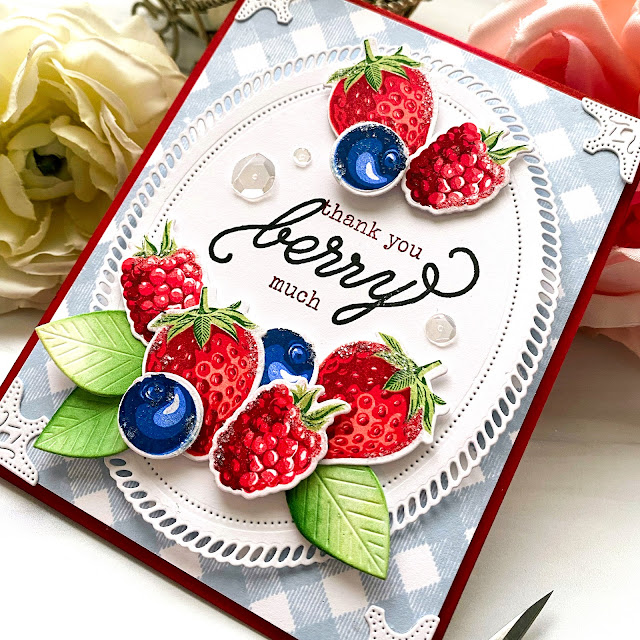
I guess I'm on a summer food-themed creative spree! ha ha! I just really enjoy soaking up all of the delights of summer and delicious-looking berries (stamped and real) are at the top of the list! There is something about gingham and berries that go so well together, don't you think? I've always been so enchanted by the multi-step stamps that have such realistic looking results! I bought the Berry Bliss stamp set and Berry Bliss dies last year and made a few tags using the cherry image, but for today, I chose to use JUST the berry images for something "berry" sweet.
I had quite a few berries already die cut from last year; I kept the dies wired together, but since I only used the cherries, I had a lot of extra pieces. I was pleased with myself that I had them all ready to stamp! I chose a hodge-podge assortment of ink pads to get the desired results I was hoping for.
I'm fairly certain I didn't ink up the last step of the raspberries correctly, but I think they look ok! Once I had all the berries inked and ready to go, I switched gears to the background.
As I mentioned earlier, there's something vintage and wonderful about gingham paired with fruit, don't you think? My favorite gingham background is the Gingham Background Stamp from Concord & 9th; I inked it up in Spring Rain ink!
I grabbed the Shape Shifter Oval 2 die to use as the focal panel for the sentiment and berries. At this point I realized that I have never clipped the wired edges as cleanly as they should and I didn't want those pesky indentations that occur without clean snips. Once I did that, I must have left a tiny shard of metal that went directly into my right thumb (I'm right handed) and it became impossible for me to remove! Can you believe that I tried to use a Misti magnet to coax it out? ha ha! It didn't work! Needless to say, I had to abandon my creative session and get to work removing the metal sliver! Have you ever tried to remove a sliver from the thumb on your dominant hand with old eyes? ha ha!
I was finally able to revisit my project a few days later, but because I'd come so far, I only needed to add the sentiment and a few extra details! I added photo corners to the edges of the gingham panel. I used the beloved Berry Patch Sentiments stamp set to stamp the "thank you berry much".
I arranged the berries here and there around the bottom of the sentiment and a trio at the top! I added a few die cut leaves to add extra texture, detail, and interest to the design. I added some glitter and sequins for sparkle and shine; the berries look like they're ready to be baked in a pie!
I had a few berries left over so I made a coordinating tag; something quick to accent the card! I'm sure I'll find something berry-themed to give as a gift and the tag will be perfect!
I added the entire gingham focal panel to a top folding A2 Pure Poppy card base using foam squares. I also added a bit of Scarlet Jewel ink around the edges to give it a little bit of depth and contrast. This was such a delightful card to create, despite my annoying injury! I hope you have a fabulous day! Thanks for fluttering by!


3 comments:
OUCH! That must have really hurt and yes, I do know how hard it is to get some way to fix a problem or injury on my dominant hand (also right handed). But for these old eyes, I now have a large magnifier/lamp over my craft desk and resort to it for soooo many things :)
Kelly, your card is just luscious looking and I do agree that gingham looks amazing with these juicy looking fruits! Have a lovely day!
So glad your thumb is better! THat is not fun! Love your gingham and berries cards. Simply gorgeous, as always!
Seriously, the snipping of dies is a PAIN! LOL I'm SO GLAD you got that sliver of metal out of your thumb! I LOOOVE your card, Kelly! Those berries are SCRUMPTIOUS! SO LIFE LIKE! AND the Gingham is WONDERFUL with all your berries! BEAUTIFULLY DONE!!!! ;)<3
Post a Comment