Tuesday, January 30, 2018

Mugs and Kisses

Love is in the air and I'm over on the SugarPea Designs Blog today sharing these fun Valentine's Day hot cocoa packets! With a sentiment like "Mugs and Kisses" you can't help but think of Valentines and cocoa! I just love how far this Mugs and Kisses stamp set has stretched for so many occasions!
I made 9 of them to hand out to all of the ladies in my book club coming up! 

I made 6 white tags and 3 pink ones. I also bought some $5 gift cards to a local sweets/drink shoppe that are in the little white sacks that are also stamped with a fun sentiment.

Each little packet holds an envelope of hot cocoa and the gift card. They are folded up and tied with ribbon and the tags! Head over to the SugarPea Designs Blog to read more about how I made these! Thanks for fluttering by!

Monday, January 29, 2018

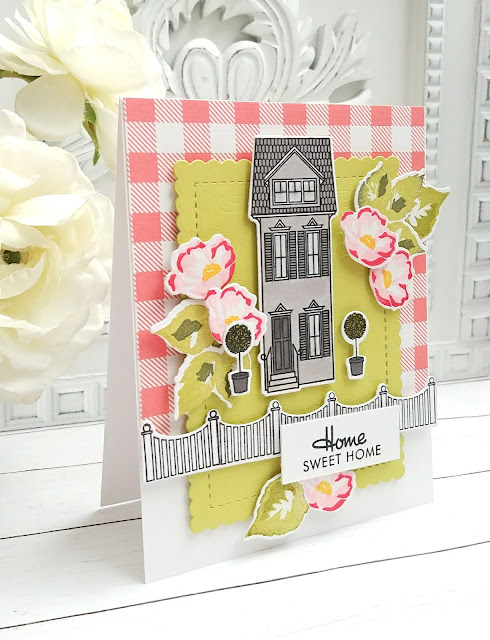
Home {Sweet} Home

A new family moved in around the corner over the weekend and I've been wanting to walk over with my family to introduce ourselves and give them a little treat! After church, I pulled the butter out of the fridge to soften for some cookies and got to work putting together a card and a tag/bag combo. Let's just say things were NOT going my way! Nothing seemed to be going right and I felt like maybe I should just walk away from the project. I took a step back and decided that I was doing a good deed and needed to keep plugging along, regardless! We had a flood on Thursday (which I will share the details of later) which meant that I had a TON of stuff crammed into my downstairs family room. Thank heavens there was a strip of fabric in a sack right where I could find it that worked perfectly to stitch up a simple bag to put the wrapped cookies in. I decided to leave the selvage edge at the top for a homespun look and I really like how the white strip looks against the plaid. It also eliminated the need to sew the top or pink the edges! 

I got the tag put together and I was really happy with how it turned out! I love the green, pink and red paired together this time of year...Valentine-y, but not! I was so excited to use the new Farmer's Market Florals for this design. When the Made With Love stamp set and the Made with Love: Tags 2 were released, I paired it with Gran's Garden, which I LOVED. You can see a few projects that I made HERE using it. Dawn is at it again with these BEAUTIFUL new florals! They complemented my project PERFECTLY!


Well, after I plugged through the tag and sewn bag, I decided to leave the project for the time being. I ended up snuggled in my bed reading " Orphan Train", which is the book I picked for Book Club that I am hosting in a week!  Needless to say, the butter went back into the fridge and the project remained halted! LOL! I got to work this morning on the card. It was easy to pull together since I used a lot of the same elements from the tag. The house, fence, topiaries, and sentiment are all from the Boards and Beams stamp set. I die cut and stamped everything and then used Copic markers for the coloring.


I adhered a piece of Chicken Scratch pattern paper to the top of an A2 White topfolding card base. The house, flowers and the rest of the design elements are added onto a die cut piece of Limeade Ice cardstock using the MIx and Mat: Scallops Die. I used the outside scalloped edge and stitched border piece first and then ran it through my Cuttlebug a second time with the lace portion with my tan embossing mat. I wanted a hint of detail that the embossing gave the piece. 

The tag is stamped in Pure Poppy Ink and the "baked" portion is stamped using Simply Chartreuse Ink. I experimented  A LOT with different shades of ink for the 4 step flowers. That is one of the reasons that things were taking so long. I wanted to find a good combination. I plan on experimenting with these a lot so hopefully I can come up with some pretty combinations.

I used the same scalloped piece for the background, but didn't do the lace embossing like I did on the card. I added some red and white striped twill ribbon and a bow of Gunne Sax lace all tied up with a Sweet Blush Button threaded with Rustic Jute Ribbon Twine. I hope this makes the new family feel welcome! Thanks for fluttering by!
P.S. I'll be up on the SugarPea Designs blog tomorrow, so stay tuned for a fun Valentine's Day project!


Merry Monday #275 {Dashing through the Snow}

A pastel colored Christmas? Yes, please! That's what Sue has cooked up for us this week over at the Merry Monday Christmas Challenge! I think I mentioned I ordered a few new Christmas stamp sets to use this year and the In the Meadow stamp set was just begging to be used for this particular challenge!
I absolutely ADORE the pinks and blues in this vintage ornament wreath, so that was my starting point. I chose one of my all-time favorite pattern papers, which unfortunately has been discontinued, as the base layer for my card. I generally use it for Easter or spring themed projects, but it was just perfect for today's card.

I die cut the Pretty Brackets layer using Stamper's Select White cardstock. I also used the In the Meadow die cut collection to die cut the tree out of the center of the bracket piece as well as the "sleigh" image 4 times. Once the tree was removed, it was easy for me to stamp the tiny snowflake images in Smokey Shadow around the negative space. I stamped the tree in pink ink on a separate scrap of cardstock and then used foam squares to mount the bracket piece over the top, using the negative tree shape as a guide for proper placement. 

The sleigh image is stacked and glued 4 times with the top piece stamped and embossed using silver embossing powder for some added shine. I particularly wanted the tree to be recessed so that it would appear as though the sleigh was in the forefront of the scene, gliding through a snowy wood (or meadow) LOL! The sentiment is heat embossed in white onto a strip of vellum and secured in the back. I was contemplating using silver because it would stand out a little bit better, but in the end decided on the white for a softer feel. I don't normally add ribbons anymore (sniff, sniff), but on this card, I just couldn't resist adding a big Sweet Blush bow, a sprig of vintage lace all tied up with Rustic Jute Button Twine and a Ocean Tides button for another splash of color! A few sparkling clear sequins finish it up! I hope you'll take the time to join us this week and I can't wait to see your creation in the gallery! Thanks for fluttering by!


Saturday, January 27, 2018

Wishing you an EPIC year!

I've got a quick, easy boy birthday card to share with you today. My cutie Rowan had his 8th birthday on the 20th and I made this for him. Part of me thinks that he could probably care less, but then I worry that if I'm not giving the ones that are closest to me special cards, they might not feel like I care about them. I always make fun cards for their friend's birthdays, so I wanted to make him something fun! When the "Boy Basics" line of mini stamp sets came out YEARS ago, I bought a few of them because I had a young boy at the time. Fast forward a few years and I have LOTS of young boys! LOL!  
For today's card, I chose to use the Boy Basics; Game On mini stamp set. They enjoy playing video games and we have both the Playstation and Wii, which are focused on in the set, so I thought it would be fun! I took all of my color cues from the wrapping paper that I wrapped his presents in. I decided to use all of the small images together to create one large focal image.

I actually really like how all of the elements and colors worked together for a nice arrangement. The background is dry embossed using a birthday Cuttlebug embossing folder that is very old. It is one of the first embossing folders that I got way back in the day! It is one of my favorites, though! I adhered that to an A2 card base. 


I stamped the red "button" images twice and then punched it out using a 3/4 inch circle punch. I popped them up using foam squares for some dimension since the card is so flat. I decided to add a few more details that you can see in the last photo.

For the inside, I die cut the number eight using the By the Number die set. I also noticed while searching for the link for these, they have the coordinating "mat" for these numbers. I think that will be a definite must have! I die cut it 4 times using Enchanted Evening carstock. I've been searching for a replacement for the old SU! color "Not Quite Navy", without luck. I was hoping this would be the solution, but it's "not quite right" LOL! Anyway, if you know of a good substitute, leave me a comment! I'd be thrilled to hear! After it was glued together, I added some wink of stella over the top and then stamped a few more of the images below the 8.


So...as you can see, I couldn't leave it well enough alone and added some Nuvo Crystal glaze over the top of the red buttons. I also added some wink of stella to the blue controllers and some glaze on those buttons as well. I think it added just the right touch! Thanks for fluttering by!

Friday, January 26, 2018

You're Tie-rific!

What do you do when you have a masculine thank you card to make and there is an amazing SFYTT? Definitely go with it! LOL! I was planning on using this fabulous Tie-rific stamp set and coordinating Confetti Cuts, so it was perfect! Our fabulous and amazing Principal at my boys' school had to take a leave of absence and since I am the secretary for PTA, they asked if I could make him a thank you card. Actually, who am I kidding...they asked me because I make cards! Ha Ha!

For my card, I chose an old SU! pattern paper that looks like a man's shirt. I like that it is double sided so I was able to get contrast, but only use on piece. It happened to be my LAST piece of this particular pattern, so I couldn't make ANY mistakes! Guess what? I did! I'll fill you in on my crafty mistake erasing fixes throughout the post. LOL! I'm certainly not too proud to say I make mistakes! 


To begin, I started assembling all of my "sketch pieces". That's what I love about sketches...you simply compile a list of things that need to go on the card and then work from there. I absolutely LOVED my time on the SFYTT team back in the day! Those are still some of my favorite cards! I created an A2 top folding card base using Kraft cardstock. I then cut the patter paper to adhere onto the base. The argyle piece was cut and then layered onto a mat of Kraft paper for some added interest and durability. It is the reverse side of the pattern paper. I also added some machine stitching for some extra tailored detail. You can see some Father's Day cards I made last year using a lot of the same elements HERE.

The pocket is die cut using the same pattern paper. Now here comes the first mistake...I didn't realize that I had some kind of blemish on the paper. I was COMPLETELY finished with the card when I noticed it and since it was the last sheet of paper, I didn't have a large enough piece left to make a new pocket. I had to die cut a strip and adhere it in the middle to hide the blemish. You can probably see the seam now, can't you? But I'm betting you most likely didn't notice it before...at least I hope you didn't! Ha ha!

The bow tie is die cut from a piece of blue cardstock using the Simple Gift Bow die cut. When I used it on THIS card, I couldn't help but think it looked like a bow tie! When I added it to the frond of the card, realized that I needed a little bit of foam tape underneath the left side. I added some, but it was hanging down so you could see it. When I tried to lift it up, I ripped the card! Ack! I had to use one of my coordinating Copic Markers to color in the paper to have it match! The sentiment is heat embossed using gold powder for some added warmth and shine. I also added some little buttons as per the sketch, but they look so perfect, I was glad for the addition!
 \

Our school theme this year is "rock and roll" and our Principal has been a rock star, both figuratively and literally! He has done so many amazing things for our kids this year; slept on the roof of the school ALL NIGHT, dyed his hair,performed a lip sync in full Heavy Metal regalia for the students! He's been so much fun! So...I couldn't resist adding something fun and unexpected to the inside! I hope he likes it! Thanks for fluttering by!

Thursday, January 25, 2018

Keeping Christmas {Something Special}


Hello and Welcome! I am so excited that you have stopped by today because I have some super fun news! For those of you who know about my Keeping Christmas  series, well, I am continuing it again this year, but it is even BIGGER AND BETTER! My wonderful friend Lesley had the fabulous idea to expand my little project from last year to create a monthly blog hop with some of my favorite ladies from the stamping community! I am beyond thrilled! Thank you, Lesley! I still want to encourage EACH of YOU to please play along if you are inspired to do so. I will be using the hashtag #keepingchrismtas2018 on Instagram. You can follow me @kellylunceford. Here is the list of the rest of the "Keeping Christmas" team! *eep* Did I really just type that? How exciting!
Kelly Lunceford ( you are here)


For my first project of the year, I chose to make some gift card holders. This was something that I meant to do all last year, and NEVER got around to it and boy was I sad when wrapping time came around! The Pillow Box Die is the perfect size and shape to hold gift cards! I just ordered Pom Pom Pals and it came yesterday, so I knew that these cute little images would be the perfect embellishment for my gift card boxes!


I had originally only planned on making 3 because there are three images in the set, but since I was able to get four boxes from the 2 pieces of cardstock I was cutting anyway, I just made four. I stamped two of the snowman image because he has less coloring to do! LOL! The boxes are die cut from Enchanted Evening cardstock and then adhered using Scor Tape. I find that is is a nice and strong bond for these boxes. I also added a strip of Kraft cardstock that is embossed using the Knitted embossing folder from Richard Garay! I thought it complemented the scarves, hats and mittens from the images nicely.


The images are colored using Copic markers and die cut using a generic Nestabilities circle die. I just made sure it was large enough to compensate for the scarves that extend beyond the striped border. Each circle is added to the box using foam squares as well as a dot of hot glue for insurance purposes. When working on things this far ahead of time, it is smart to make sure everything is secure and won't come loose in storage. One of the best things about these boxes, is that they can lay flat during the year so I won't have to worry about them getting crushed. I did adhere everything while they were popped up, but I undid the flaps and put them in the box with all of my cards that I make for the Merry Monday Christmas Challenge


I tied them up with some red and white baker's twine. I was lucky enough to find a pom pom for the penguin's hat as well as the ear muffs for the snowmen. The Rudolph image boasts a red bulbous button I was lucky enough to find in my stash. Isn't it perfect? Once they had all been assembled, I spritzed them with some Shimmer Spray for some holiday sparkle!

The sentiments are heat embossed in white onto strips of cardstock. I stamped a "to: from:" sentiment onto the back using some of the included sentiments. I did this while they were flat, obviously. It is so nice to get everything done as much as possible so there aren't any last minute additions to make during the hectic Christmas season. I am so excited to be continuing this fun series this year and I hope you will play along as well! If you create something, please leave me a comment so I can come and see it! Thanks for fluttering by!

Monday, January 22, 2018

Merry Monday #274 Bits of Holiday Magic!

Happy Monday, friends! I'm so glad you've stopped by today! I have a fun card to share with you for this week's Merry Monday Christmas Challenge! I'm starting to realize how addicted to Christmas stamps I have become! LOL! I just ordered a few more new sets so it won't feel like a broken record around here! Ha ha!

Isn't this snowy scene beautiful? Nina has challenged us to make a Christmas card with snow. I guess snowflakes count as snow, right? I was planning on making something much different for this week's challenge, until I saw some absolutely gorgeous photos that my stamping friend Dawn Lusk posted on Facebook. They were photos that she took of ACTUAL snowflakes and one of them was placed on a beautiful pink/orchid sweater or scarf! I was completely inspired and wanted to incorporate that into my design for today! Thank you, Dawn!

To begin, I needed to recreate the sweater element for my card. I started by watercoloring a piece of 140 lb cold-pressed watercolor paper from Strathmore. I used my Kuretake Gansai Tambi watercolors to create the different colors. I love using my Pearl watercolors, but the colors are limited, so I chose to use these, but add the white pearl paint over the top that is included in the 36 color set. I love that I can make any of the colors with a pearlescent quality by adding that over the top! I did have some interesting patterns on the watercolor piece before I embossed it, so I may try a design like this again, but without the embossing so you can see the "fractals" that I created with paint, but mimicked the fractals on a snowflake. I spritzed it with Frost Shimmer Spray and then dried it using my heat tool. 

I set that aside and got to work on the snowflakes for the card. I grabbed a piece of cardstock that matched the background nicely and die cut the retired "Snowflake Medley" snowflakes and then heat embossed them with some old SU! powder called Hologram Highlights. I knew it would give the snowflakes a translucent and sparkly quality that I was hoping to achieve.

Once the watercolor panel was good and dry, I embossed it using on of my favorite embossing folders called Knitted from Richard Garay. I picked mine up at Hobby Lobby quite a while ago. I heat embossed the sentiment onto a strip of vellum using silver detail powder. Once it had cooled, I added it to a strip of glitter cardstock slightly larger than the vellum strip. It helped flatten it out and I was able to tape it with scotch tape tightly to the back.

I wanted to give the snowflakes a little bit more detail, so I added some lilac Nuvo Drops here and there on each snowflake. I did this AFTER they had been adhered to the watercolor piece. I used this same technique on this non-traditional CARD I made last year. It ended up being one of my favorite Christmas cards of the year!

The watercolor piece is adhered to an A2 cardbase using foam mounting tape for some added dimension. I also added a few GEMS here and there for even more sparkle! Thanks for fluttering by!

Precious Remembrance Shop-New!!! Daily Thoughts Stickers!


Welcome to Day 3 of the Precious Remembrance Shop release! Today we are sharing the NEWS about the new Daily Thoughts Stickers! These are absolutely perfect for all of you planner addicts! I haven't joined the craze, but I'm sure I won't be able to hold out for long! LOL! These will be the perfect addition to decorate all of your planned events!


Are you  interested in winning some of these adorable stickers? Two random winners will be chosen on January 24th at midnight! All you need to do for this drawing, is leave a comment on the Precious Remembrance Shop Blog and you'll be entered! Easy peasy! As you can see, they come in both a color version or black and white for those of you who love to do your own coloring!


Thanks for joining me the last 3 days as we celebrate the new release! Thanks for fluttering by!

Sunday, January 21, 2018

WE HAVE A WINNER & Congratulations!


Thank you ALL so VERY much for your many sweet comments on my 10th Blog-iversary post! You really made me feel so happy when I read each and every one of them! It really made me feel like I could go on for 10 more years! (((((Hugs to all of you))))) So...without further adieu, I will announce the winner: Comment 42-Chris L. from Purrfect Paper Creations! You have won the $50 Papertrey Ink gift certificate! Send me an email at kellyrory1@msn.com and I will email you the redemption code for the gift certificate!

I decided to share a fun card with you today that I made a week or so ago. It all started with the background (which I ended up covering) LOL! I had so much fun making the background for THIS card that I wanted to try another one. After I had made it, I couldn't decide which stamps would complement it the best, so that is why is just got covered up. 

I did want to embrace the red and gold, though, especially since it is almost Valentine's Day. I used the always-fun-to-color Happy Day stamp! I especially love it when paired with gold embossing. I colored it with Copic Markers. I layered it onto the Mix and Mat: Pinked Edge Die

Congratulations again, Chris! Thanks for fluttering by!

PRS Daily Thoughts Bits & Pieces Blog Hop-Let the music play!

Welcome to Day 2 of the Precious Remembrance Shop release and Blog Hop! Today we are showcasing the new Daily Thoughts Bits & Pieces! I just love using these on projects because they are so fast and easy to use! They're perfect for when you are in a time crunch or want a quick embellishment! You can see what the rest of the designers have come up with as well! But, before I lose you in inspiration, I just want to let you know that you can enter to win the "Daily Thoughts" Bits and Pieces...simply leave a comment on each stop of the blog as well as the PRS blog. One winner will be randomly selected. You have until midnight of Jan 24th to enter. You can check all of the social media sites for the winner! Also, you can get a 10% discount on any order over 30 dollars using code: DTKELLY10
Kelly Lunceford (you are here)


You can see everything that the collection includes here! Aren't they great?


For my project, I decided to embrace the music theme and create a gift card holder and coordinating card to give to my son for Valentine's Day! I will go and get an Apple Music gift card, which is very fitting for this project, and very useful for a teenage boy! LOL!

I created a box that would fit the gift card nicely as well as the card. The entire project is completed using the Bits and Pieces and just one stamp from the previously showcased "Daily Thoughts" that I shared yesterday.

I had so much fun working on this project! Thanks for fluttering by!