Tuesday, June 30, 2020

Taylored Expressions Farm Fresh Kit

Hello friends! I'm so excited to be helping Taylored Expressions with the launch of the ADORABLE new Farm Fresh Kit! It is full of so many amazing, fun, and whimsical products that are sure to delight all crafters! I've created 3 cards for today's post, so make sure to scroll down to see each one!


This is the kit in its entirety and as you can see, it has 2 fabulous red rubber cling mount stamps, a red rubber gingham background stamp, a set of 3 stencils, coordinating dies for the Farm Fresh Critters stamp set, self adhesive wobblers, envelopes and 6 seals, and a fabulous mesh bag to store all of the contents! You can find the Farm Fresh Kit HERE and you can purchase additional envelop seals in quantities of 10 HERE

My first two cards are similar in design and feel. I used the Gingham background stamp to create the two panels measuring 4 by 5 1/4 inches. I love the crisp, even impression I get when using red rubber stamps! I also cut two panels slightly smaller to create the scenes for each of the cards.

I did some inkblending using the Here Comes the Sun Stencil (not included in the kit) and then added some Nuvo glitter paste to give the sun rays some sparkle and shine. I set the panels aside to dry and got to to work on the cute farm critters and barn. I decided ahead of time which sentiments I wanted to use which led to which animals I would be using.
I stamped the the barn
twice and the pieces I needed for the two animals using black ink. I colored them using Copic markers and then used the die cuts to cut them out that are included in the kit. The barn does not have a die so I did some quick fussy cutting for that. I set those aside to use the set of grass stencils to create the grass on each of the dried panels. I used a few different shades of green to create visual dimension and contrast. I also used my mini MISTI to stamp the different sentiments in black ink. 
Once that was done, I was ready to fill in the scene with the barn and critters. I used the included springy wobblers (I have no clue what the technical name is for these) to attach the head over the foam mounted body. It is such an easy and fun way to add an interactive element to your designs! The recipient will be do surprised to see this fun addition!

The seals that are included in the kit correspond with the different critters so I picked the cow seal for this card. I thought the blue envelope, which is also included in the kit, was the perfect complement. 

And of course the chicken card gets the cute "hey, Chickie" seal! These are so much fun and just add the little bit of "extra" to truly make this happy mail! Also, I added some Nuvo Crystal Glaze to the beak and red head piece of the chick for some added shine. 

This little piggy was calling my name for this 3rd and final card. I kept the background the same as the previous 2 cards, but stamped it in bright blue instead! I thought the blue was a nice contrast to the pink pig!
I chose a landscape card for this design which enable me to use the cute picket fence image that is included in the kit. I stamped the pic and fence using black ink and then colored them with Copic markers. I die cut them using the included die cuts and set them aside while I got to work on the background.
I used two of the three grass stencils for this particular card and the Set the Scene Cloud Stencils (not included in the kit) for the sky. The sentiment is stamped in black right over the clouds.

This little piggy got some glaze on her snout and ears for some fun shine! I used another wobbler for this cutie so she wiggles and shakes!

I used two foam squares on the body since the wobbler elevates the head a little more than regular foam squares. I wanted these critters to look proportionate. I added the fence as well using additional foam squares.

This kit is so much fun and these cards are perfect for this time of year! I stamped the inside of each of the 3 cards as well using the sentiment set.
Of course I had to add the pig seal to this envelope! So stinking cute! I had so much fun using this kit! It is limited quantity so make sure to grab yours today! You can purchase it HERE! Thanks for fluttering by!


Friday, June 26, 2020

Pinkfresh Studio + Altenew “Celebrate” Collaboration Blog Hop Details + Giveaway

I'm beyond thrilled to be here today for the Pinkfresh Studio + Altenew "Celebration" Collaboration Blog Hop! We're showcasing two beautiful new collaboration sets between these two amazing companies! Pinkfresh Studio will be giving the entire release to one lucky winner on their Facebook page so make sure to go there as well! Also, leave a comment here to be eligible to win a $15 dollar gift certificate to the Pinkfresh Studio shop!


You are invited to the Inlinkz link party!
Click here to enter

I've got two cards to share with you today using each of the new sets being released today! They are both so beautiful and I had so much fun creating with them! Up first is the blue floral card using a lot of my current favorite things!

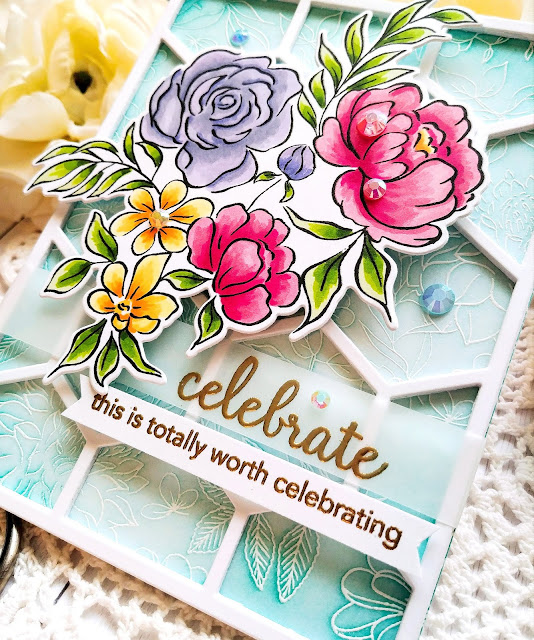
I've really been on an emboss resist kick lately, especially with the beautiful background stamps from Pinkfresh Studio! For this card, I heat embossed the Enchanted Blooms background stamp onto a 4 1/4 by 5 1/2 inch panel of white cardstock using white detail embossing powder. Once that was done, I added some Ocean Breeze and Mermaid Cove ink using a blender brush. 

I die cut the Simply Hexagons die four times out of heavyweight white cardstock and glued them together using liquid glue. I adhered it to the top of the embossed panel using additional liquid glue. I set that aside and got to work on the beautiful flowers!

I stamped the flower from the new Celebrate Today stamp set with black ink and then colored the image using an assortment of alcohol markers in bright, summery colors!

I used the coordinating Celebrate Today die to cut it out. I used stacked foam squares to adhere it to the embossed background for optimal dimension!

This gorgeous stamp set comes with some fun sentiment options! I chose to pair the "celebrate" sentiment with the "this is totally worth celebrating" sentiment. I just love it and it works for so many different occasions. It's perfect to add to your stash for either a wedding, graduation, birthday, accomplishment, or milestone!

Both sentiments are heat embossed in gold with the "celebrate" being embossed onto a strip of lightweight vellum. The other one is just embossed onto a strip of white cardstock and then popped up with foam squares underneath the strip of vellum!

I added some colorful Essentials Jewels here and there on the background and flowers. I used matching colors to give the card some extra sparkle and detail.

I like to use varying sizes of jewels here and there to give the card balance. This was such a fun card to work on and such a gorgeous floral image to color!

My second card is bursting with summer cheer! Once again, I heat embossed the Enchanted Blooms background stamp and then added two different colors of ink for a colorful background. The lemon/lime colors make me happy!

I die cut the embossed panel using the Essentials Stitched Rectangles and added the panel to a top folding A2 card base using foam squares.

I also added the beautiful Ornate Oval Frame using additional foam squares. It's the perfect frame for the gorgeous flower from the new Celebrate Us stamp set. This is a multi step stamp that is so easy to use with such beautiful results.

I stamped it in black and then added the different colors using each of the different stamps. I love multi step stamping and this one is super easy to use! I used the coordinating Celebrate Us die set to die cut the flower.

I placed it in the middle of the frame using foam squares and then got to work on the sentiments. 
I die cut the "thankful" portion of the sentiment out of black cardstock and the shadow from white cardstock for some nice contrast. I glued them together with liquid glue and popped it up on the flower with some foam squares. The "for you" portion is simply stamped onto a strip of white cardstock using black ink and then added underneath the flower.

A few jewels finish off this colorful design! I had such a fun time creating both of these cards! These are two sets that are hard to put down! Thanks for joining me today and thanks for fluttering by!

Thursday, June 25, 2020

Keeping Christmas {Shaped Tags}

It's the 25th and that means it's time for a new installment of the Keeping Christmas Blog Hop! It's always fun to add a few more projects to my stash each month as each day brings us closer to Christmas! My kids are never too happy when the Christmas music starts playing as I try to get myself in a Christmas mindset! LOL! My 6 year old asked me why I was working on Christmas projects so early and I explained that there just isn't enough time during the holidays to get everything made! He still thinks I'm weird! ha ha!  Make sure you make a stop at each blog to see what Christmas inspiration the other designers have brought us!
Kelly Lunceford (Creator)

For this month's project, I decided to make a collection of shaped tags using some of my larger die cuts and stamps! You can really expand the versatility of some of your Christmas stamps and dies by thinking of them for more than just cards!

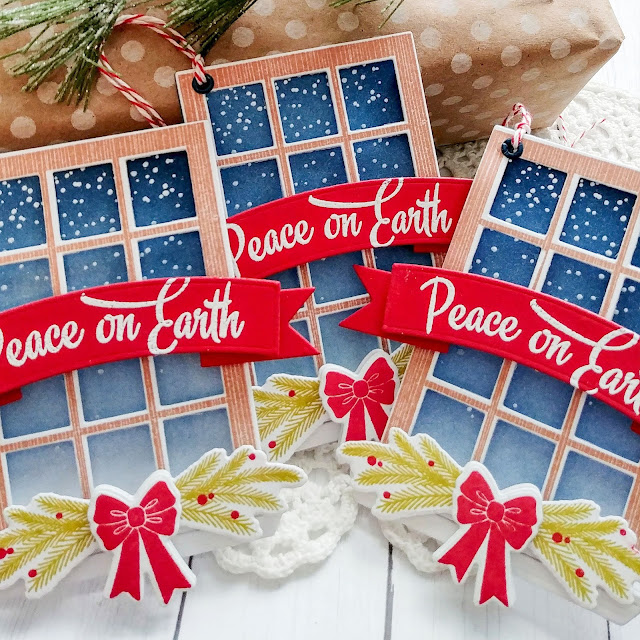
The first set of tags uses the fabulous Winter Window stamp set. The size of this is just perfect for a gift tag! To begin these tags, I die cut the back portion of the window, the window pane portion, the ledge and the foliage and bow pieces using the Winter Window Die collection

I heat embossed the snow image onto the back portion of the window using white powder. Once that was done, I added some blue ink blending leaving it darker at the top and having it fade toward the bottom. I spritzed these with Shimmer Spray and set them aside to dry.

I stamped the window frame portion using brown ink. I had every intention of backing these with acetate that had been stamped with the snowy portion, but my poor White StazOn ink was dry! Ack! Oh well....I still think they look cute! I also stamped the foliage and bows and added those using foam squares.

The sentiment barely fit onto the Banner Builder Basics which I heat embossed in white to make it pop! I added a blue eyelet to the top and some baker's twine! I was too lazy to look for a To: From: stamp (hangs head in shame) but you'll want to add that if you're so inclined!
My second tag uses the cute reindeer from the gorgeous Floral Fantasy: Christmas stamp set. The Christmas tree image from this set would also make a fabulous tag! I die cut two reindeer for each tag using the Floral Fantasy: Christmas die collection out of Kraft cardstock. I glued them together using liquid glue.

I stamped them with Pure Poppy ink using my mini MISTI for alignment. I punched a hole to the antlers of each tag and added a gold eyelet and some black baker's twine.

I heat embossed the "NOEL" sentiment using gold powder and then die cut them. I added them to the reindeer using foam squares. There is just enough room on the back to write who it is to and from!

My 3rd and final tag idea for today uses the Twinkling Trees stamp set and coordinating Twinkling Trees die collection. The large size is just perfect for this shaped tag series!

I die cut each large tree out of Kraft cardstock and then again using Simply Chartreuse cardstock. I die cut the stars portion from the green piece and popped it up onto the Kraft base. I heat embossed the Fa La La La La La sentiment using white embossing powder and then used the smaller tree die to die cut them out. These are added to the green portion using foam squares. I pulled out my ancient collection of shaped eyelets to find these silver stars! They are the perfect addition to these tags! I plan on making more shaped tags as I dig through my collection of Christmas stamps! I think they will be perfect on all of my Christmas gifts this year! Thanks for fluttering by!

Tuesday, June 23, 2020

Take a bite out of cake!

I fell in love with the super cute new Baby Shark dies and coordinating Sharky Sentiments. They arrived in my mailbox a few days ago and I couldn't wait to use them to put together a few birthday cards! I also got the Two Scoops stamp set, which I'm super excited about. Everything showed up in my mailbox at the same time, but I didn't necessarily think I would use the two together As I was putting these together, I just felt like the ice-cream cone would be super cute in the shark's fin!

To begin these two cards, I cut two panels of Aqua Mist cardstock measuring 4 by 5 1/4 inches. I rummaged around in my older and neglected stencils and decided to use the Crossing Waves stencil for something fun and a little bit different. I used Faded Jeans Distress Oxide ink and a blender brush to add the ink, leaving it lighter in the center of the panel. I spritzed it with Shimmer Spray and set them both aside to dry while I got to work die cutting the baby sharks. Super easy, super simple die cutting and assembly. I used liquid glue to put everything together. I added a white dot to each eye and then added a layer of Crystal Glaze to each of the eyes as well.

I used foam squares to pop the shark up onto the stenciled background at a jaunty angle. The sentiment is heat embossed in white onto a black strip of cardstock and added to the card front using foam squares as well. As I mentioned earlier, I didn't plan on using the ice-cream cone image, but ice-cream just goes with cake!

I die cut the pieces using theTwo Scoops dies and then used my mini MISTI to do the stamping. I just love these realistic multi step stamps!  I added the cone to the shark's fin using additional foam squares. I'm totally craving ice-cream now! LOL! I added a few dew drops using liquid glue. I always like using embellishments like this on cards like this because it really gives a sea-like quality!

I wanted to use another one of the Sharky Sentiments, so I stamped the inside of each card with the "have a killer birthday" in black ink. Just something simple to continue the shark theme to the inside. 
I have some fun things coming up in the next few days so stay tuned! Thanks for fluttering by!