Monday, April 25, 2022

Papertrey Ink Flash Sale {Happy Mother's Day}

Mother's Day is right around the corner so I chose some beautiful stamps for the Papertrey Ink Flash Sale this week to get you started on your Mother's Day projects! I love the big, bold sentiments included in the Mother & Father Stamp Set so I chose to heat emboss one of my favorites for contrast on this floral design!

The overall look and feel of this card was inspired by a printable I saw on Pinterest featuring a spring design! I love it when I can recreate the look and feel of a printable, but get my fingers inky and use my favorite supplies! I absolutely LOVE the flowers and leaves from the Wreath Box Sentiments Stamp set and knew they would be the perfect choice to accent the sentiment.

I let pattern paper do all of the work for the background; it's a 3 3/4 inch by 5 inch panel of Bitty Big: Harvest Gold pattern paper attached to a top folding A2 card base.

Once I heat embossed the sentiment, I die cut it using the Nesting Basics: Ovals and the Nesting Basics: Pierced Ovals. I added flowers and leaves here and there using foam squares for dimension.
I decided to jazz up the inside by using another one of the included sentiments in the Mother and Father stamp set and die cut it with the same oval dies. I had one lone flower to add to the bottom of the sentiment! Thanks for fluttering by!


Sunday, April 24, 2022

Papertrey Ink April Release Day 1

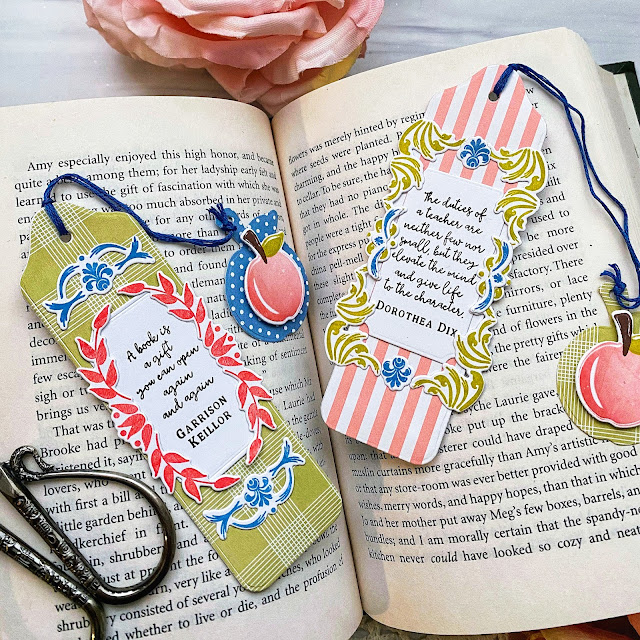
Hello and welcome to day 1 of the Papertrey Ink April release countdown! FYI: This is a quick post as I am sitting April out, but I am sharing a trio of bookmarks that I made using a few of the new products! I was always a bookmark fanatic as a child and loved getting new ones any chance I got; now I simply grab an old receipt or piece of junk mail! ha ha! The new Bookmark dies will allow me to create any type of bookmark I can imagine!

For the three bookmarks, I die cut a sturdy base using white cardstock and then die cut another bookmark using the Bitty Big: Blueberry Sky, Spring Moss, and Pale Peony pattern papers. I used ScorTape and a bit of liquid glue at the top to secure the two layers together.

I used the new Go-To Gift Card Holder: Book and Book Scrolls to decorate each of the three bookmarks. The book mark die set comes with an apple, star, and heart shape with a hole at the top so you can add them to the top of the bookmark, or use them at the end of the string like I have here.

Teacher Appreciation week is coming up quickly, so I thought it would be fun to make a bookmark for each of my little boys' teachers.


I barely scratched the surface of the beautiful possibilities of the new Book Scrolls stamp set. These are so pretty and will be perfect to accent all sorts of cards and projects!


I used DMC floss to loop around the top of the bookmark and then tied the apple piece with a knot. The apple stamp is from the new Go-To Gift Card Holder: Book stamp set. There are so many fun options with this new suite of products! I can't wait until I have some time to put them to good use! Thanks for fluttering by!
P.S. Bonus points for guessing which book this is! ha ha! If you know it, you know it! :)


Monday, April 18, 2022

Make a Wish!

I hope you all had a wonderful Easter weekend! Mine was busy and a bit of a blur, but I did have ample time to reflect on my Savior in the weeks and days leading up to Easter, which I am grateful for! His life and love help me to become a better person each day!  Our family has a set of numbered eggs with symbols and scriptures to read 12 days leading up to Easter. We also used the Immanuel Wreath this year beginning 25 days before Easter. You can use it to lead up to Christmas as well, which we will do this December. 
I'm sharing this pair of floral birthday cards for this week's Papertrey Ink Flash Sale using some of my favorite products! To begin, I die cut the main leafy bouquet and three of my favorite flowers from the Birthday Bouquet Stamp Set using the Birthday Bouquet Die. I used my MISTI to stamp everything quickly. I knew I would be making two cards so I cut enough flowers for both. I ended up with a few left over so I ended up decorating the inside of the cards as well.

I decided to make the bouquets a little bit fuller by using the Bouquet Backdrop die. I simply glued two together to make a sturdy piece and then added some ink blending using the same colors I stamped the leaves and flowers. 

I really like the contrast between the die cut leaves and the stamped leaves. The sentiments are both from the Mash-Up Birthday stamp set. I gave each one an ombre look by adding a darker shade of ink to the top and blending it to a lighter shade toward the bottom.

I chose one of my favorite sentiments from the Endearing Birthday stamp set to add to the inside of each card. I used the leftover flowers that I mentioned earlier to accent the greeting.

For the background, I die cut a Sweet Blush and Lemon Tart panel using the Border Bling: Tin Stitch Die and added a bit of ink around the edges for contrast. The Love to Layer: Notched Die is the perfect backdrop for the floral bouquet! I added the sentiments over the top and spritzed each card with shimmer spray and added a bit of glitter to the leaves and blooms. Have a fabulous day and thanks for fluttering by!


Wednesday, April 13, 2022

Pinkfresh Studio {Built on Dreams}

Hello friends! I'm popping in today to share 4 cards I made using the Built on Dreams suite of products! When I made THESE cards, I joked that I needed someone to move into the neighborhood before spring is over so that the springtime design would still be relevant. Well, that happened so here I am creating a few new designs to add to my stash! I actually made 2 "welcome" cards and then two "thank you" designs so I could use both of the bold sentiments included in the Built on Dreams stamp set.

I had so much fun stenciling each  panel using the Built on Dreams layering stencils. I used the same technique for these cards as I did on THESE; I simply switched up the last cluster of flowers to make each card unique, yet cohesive. My two favorites ended up being the blue one in the right corner and the purple one in the left corner.

I decided to make shaped cards because who doesn't love a cute little house shaped card, right? They're a sweet little size to tuck in with a welcome basket or housewarming gift! If you're not digging the shaped card idea, you can simply add the house shape to a standard A2 card base as well. Once I had the stenciling finished, I used the Built on Dreams die to cut each house.

To create the shaped card, I cut and scored 4 regular A2 cards and then placed the die over the top leaving the left edge of the die hanging off the fold line. Easy peasy! Just run it through your diecutting machine and you've got your shaped card base. I used liquid glue to adhere the stenciled/die cut houses.

Each card features the bold sentiment either reading "thank you" or "home" and then I heat embossed the smaller sentiment in white onto a strip of black cardstock. I also spritzed each card with Shimmer Spray. I normally do this AFTER I take photos, but I was too excited to see the sparkle! ha ha! The tiny flecks you can see on the black portions are the sparkles. They don't turn out looking that great in photos, so that's why I usually wait until after I photograph my projects!
I also added some Essentials: Jewels Mix (which are in stock-yay!) to each of the cards in assorted colors.
The stamp set also features this large sentiment that is perfect to add to the inside of the "Welcome to the Neighborhood" cards! 

Since I'm on an envelop kick, I decided to create some envelopes to coordinate with each card. I used a piece of typing paper to tuck underneath the flap of each of the envelopes and then stamped them using the Diamond Tiles background stamp. I think it really adds to the overall presentation of the card! Thanks for fluttering by!


Monday, April 11, 2022

Birthday Wishes and Heartfelt Sympathy

I love how one beautiful bloom can make such a big impact on a card design! I often get caught up in stamping a bunch of little elements to fill up my card front, so it was nice to do something different than usual! These two cards were created for this week's Papertrey Ink Flash Sale using the Lush Bloom stamp set. I chose to make two cards: one birthday and one sympathy.

To begin, I die cut all of the pieces I would need for the flowers using the Lush Bloom Die and then stamped them; one yellow bloom and one pink bloom. I set the stamped pieces aside and got to work on the sentiments. I die cut both the sympathy and wishes portion using the Perfect Pairs: Commodities dies and then stamped them using the Perfect Pairs: Commodities stamp set.

Just a note on this yellow bloom: I used Harvest Gold for the first and second step of the stamping, and then used Summer Sunrise for the detail. This technique works well if you don't have many ink colors, and it also works well when you don't want the different layers to be too stark in contrast. I love how this one turned out! I heat embossed the coordinating "with heartfelt" portion of the sentiment and then added it next to the sympathy word.

This bloom uses Sweet Blush, Pale Peony, and Autumn Rose ink colors. The birthday portion of the sentiment was created just like I did for the other card.

I created two A2 card bases and then added some Aqua Mist ink blending in the center with Hawaiian Shores ink splatter. I also stamped the Nifty Plaid background just near the center of each card using Aqua Mist ink. I added the Skinny Postage Frame die cut from Weathervane cardstock and then added the other elements. A bit of glitter and a trio of sparkling clear sequins finish off the design! Thanks for fluttering by!


Wednesday, April 6, 2022

The Greetery {Spring Mix Celebrations}


Hello and welcome, friends! I hope you're having a wonderful week! It's Spring Break for my elementary school kiddos, but the weather has been CHILLY; hopefully we'll get a chance to enjoy the outdoors before the week is through! Since I woke up to hail on the ground, I decided to cozy up and create a few birthday cards for my stash. I have quite a few birthday cards, but they aren't my favorites so they keep getting passed up. These will get used in a jiff, though, because I just love how they turned out!


I cut up an 8 1/2 by 11 piece of white cardstock into 4 A2 sized panels and then stenciled and stamped each of them using the Print Shop: Spring Mix Stamp + Stencil. I kept all of the colors the same on each panel for ease, but swapped out the flower colors on each panel when  I used the last stencil in the series. It's amazing how just switching that one color can really change the feel of each of the panels. Once all of the stenciling/stamping was done, I used the Print Shop: Spring Mix Die to cut each panel out.

I also die cut a few extra stand-alone blooms for each card so I could layer them for a fuller, more detailed look. I used a few flowers from the Flower Bits mix to glue to the centers of select flowers; the layered flowers and two of the pink flowers in the top right and bottom left corner. 

Each of the die cut panels is added to an A2 card base using foam squares. Before I added the panels, I blended some Aqua Mist ink around the top of each card base as well as some ink splatter. I absolutely love the sentiments that are included in the Spring Mix stamp set, but I haven't used the beautiful sentiments in the Birthday Blooms Stamp Set (which happens to be on sale), for a while and I think they're the perfect choice!

In hindsight, I should have created 5 panels since there are 5 bold sentiments in the Birthday Blooms stamp set, but I didn't, so I chose "Wish, Birthday, Happy, and Celebrate". I die cut each of the 4 outlines using the Birthday Blooms Die and then used my Mini MISTI to stamp each of the sentiments.

Each of the 4 accent sentiments are heat embossed in white onto strips of black cardstock. I used foam squares to pop both the large word and the black strip onto the stenciled panels.

I forgot to mention that I also added some ink splatter to each of the layered blooms using my old SU! Color Spritzing Tool. I used a dark purple marker on each of the flowers, which resulted in a different look for each card.


I had so much fun creating matching envelopes for my stationery set for the release, so I decided to make some for each of the four cards. I used the Flappable Stencil collection to create a gingham design for each card (simply turn the striped stencil upside down). I chose to stencil them with the same shade of ink as the layered flowers, with the exception of the robin's egg blue card.

I selectively inked a portion of one of the sentiments from the Handmade Labels Stamp Set for each of the envelope flaps. These particular sentiments were created especially for the Nouveau Notes A2 Envelopes, so they are a little larger than would fit on these envelopes. I didn't let the large size get in my way, though; I simply used a sticky note to cover up the part I didn't want to have ink and then removed it before stamping....easy peasy!


I am thrilled with how cute the stenciled envelopes look with the cards! I was worried that the fonts would clash, but I think that they look just fine!


While I chose to make these for my own stash, these would make a great gift packaged up in the Stationery Box! You could even swap out some of the sentiments by using the Blessed Blooms Stamp Set to make it more of an all-occasion stationery set.

I had so much fun creating these cards to share with you today!  I hope you get some creative time of your own; it sure does the soul some good! Thanks for fluttering by!


Monday, April 4, 2022

Thank You for Helping Me Grow!

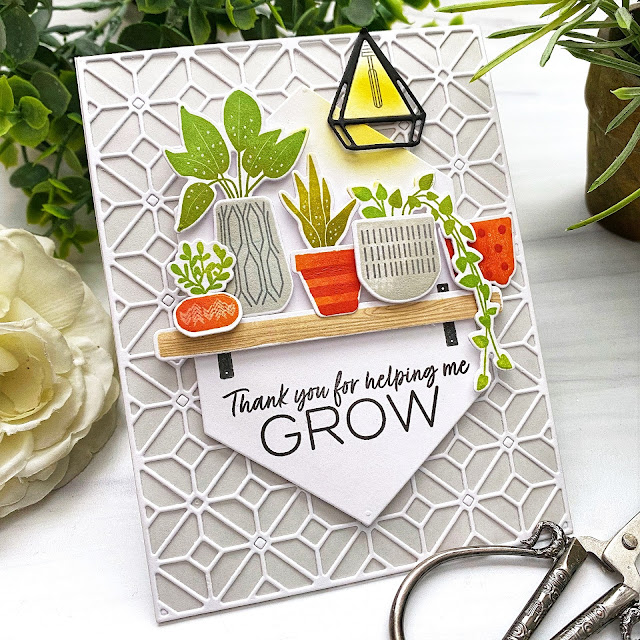
It's time for another Flash Sale for Papertrey Ink! I chose the fun Growth stamp set to feature this week; it has a couple of fun sentiments to accent the plants and lights! With the end of the school year and Teacher Appreciation Week creeping up, I will need cards like this on hand to thank all of the amazing teachers!

I had originally envisioned my card to use both the small and large shelf, but once it was time to put it together, I only had room for the large shelf. I die cut all of the pieces and got to work stamping the different pots and foliage using different shades of green for the plants, terracotta shades for a few pots and greys for the rest. I added some white gel pen accents to two of the plants for realism and extra detail.

The light was a little bit tricky to figure out since I used the Cover Plate: Trellis Die for the background. I knew I wouldn't be able to stamp the lightbulb so I used a piece of negative space from the light (cut from white) and stamped the lightbulb and added the yellow ink around it to make it look like it was on.

I had an extra pot that I was fussing with trying to get it to fit on the front. In the end, I decided to gussy up the inside by stamping the sentiment from the Inside Greetings: Gratitude mini stamp set and added the pot there.

I stamped the sentiment at the bottom of a panel cut using the Geometrix: Hexagon Die and then built the shelf scene above the sentiment. I made certain to add a bit more yellow ink blending at the top for additional glow from the light. This was a really fun card to create and I can't wait to use it as a thank you card! Thanks for fluttering by!