Saturday, February 26, 2022

Papertrey Ink February Release Countdown Day 4

It's the 4th and final day of the Papertrey Ink February release countdown! We're showcasing the new Feathered Friends 20 die today and this cute Rooster works so well with so many of the previously featured items from this release! To begin, I die cut all of the pieces and colored them using Distress Oxide inks. This particular bird is so easy to assemble; the red portions fit perfectly on top of the head feathers and then the blue wing fits right on top of the lower wing. There are die cut indentations to sh0w you exactly where everything lines up.,

I used a combination of liquid glue and foam squares to put Mr. Rooster together, depending on where I wanted a little bit of dimension to make the bird look more realistic. Between the shading and the foam squares, I think he came out pretty nice!
I set him aside to dry and then got to work on the rest of the card.

I die cut the frame from the Antique Wishes Die collection and then stamped the solid image using the Antique Wishes stamp set using Fresh Snow ink. I stamped the detail image using Dark Chocolate ink for a vintage, shabby look. I heat embossed the "farm fresh" sentiment, which is from the Farm Fresh Trees stamp set, using white detail embossing powder onto a panel of True Black cardstock. I layered it underneath the frame.

I used the Picket Fence and Grassy Edge die from white cardstock to use over the frame. I placed the rooster over the top using foam squares. I layered the entire frame piece onto a panel of Bitty Big: Pure Poppy pattern paper using foam squares. This panel is added to a top folding A2 card base using liquid glue.

My farm scene just wouldn't be complete without a few flowers so I die cut them using the Into the Blooms Die and the leaves are from the Into the Blooms II die collection. I colored them using Distress Oxide inks and glued them together with both liquid glue and foam squares.

I tucked them in the left corner to frame the Rooster scene. I couldn't resist adding a little speckled egg from the Elegant Eggs die collection. I realize that the Rooster wouldn't have an egg lying around, but it gives it that farm feeling that I was going for! This concludes day 4 of the countdown and tomorrow at 10 PM ET, all of the new products will be available for purchase! Thanks for fluttering by!


Friday, February 25, 2022

Papertrey Ink February Release Countdown Day 3

I don't like to play favorites, but today might be my favorite of the entire Papertrey Ink February release! I adore this sweet addition to the Feathered Friends family...isn't this chick just the cutest thing?? I mentioned yesterday that I wanted to tweak my carrot card and that addition would be one of these cute chicks!

I think the chick complements the new Elegant Egg dies perfectly, don't you think? I'm in love with these beautiful eggs and know I will be using them EVERY year! I was also having so much fun with this particular flower from the Into the Blooms II dies so I made a few for this card along with the two leaf options in the collection. To begin, I die cut all of the pieces from the Elegant Egg die collection using white cardstock. I colored them using ink and a blender brush, keeping the lighter color on the solid die cut and using a darker shade for the top, detail layers. Once that was done, I added some white paint splatter over the top to give them a speckled look. I also gave them a generous amount of Shimmer Spray for sparkle and shine.

The background was created by heat embossing the Weaved Background Stamp Set onto a panel of watercolor paper using white embossing powder. Once that was done, I blended some of the same inks that I used on the eggs here and there on the panel. I spritzed it with water to get a watercolor effect and then set is aside to dry.

There are two different chicks included in the Feathered Friends 20 mini stamp/die set, but I just used this one for this card. I used both of them on my second card of today's post. I ended up making 4 chicks in total, but threw one away because I did some ink blending that I didn't like. After it was all said and done, I should have made a BUNCH because now I want to go back and add a chick or two to ALL of my cards I've shown so far! ha ha!

As I mentioned yesterday, here is another cluster of grass from the Weave a Basket die set that was showcased on day 1 of the countdown. I just love it! The sentiment, which is from the new Inside Greetings: Spring Blessings, is heat embossed in white onto a strip of vellum. I strategically tucked it behind the egg with a foam square and added a tiny bit of liquid glue behind the embossing on the right side.

I love how the Weaved background gives this card a basket look, just like an Easter basket! I added a few sequins to finish off this card. The entire panel is added to a Winter Wisteria card base.

My second card for today uses those cute chicks again, but this time I used both. They are the cutest accents for this bouquet of flowers and eggs! 

For this card, I cut a panel of cardstock measuring 4 by 5 1/4 inches and used the Stencil Basics: Quatrefoil Stencil to blend in some pastel colors found in the flowers. I just added some here and there, just like I did on the embossed background on my first card. Once that was done, I arranged the flowers and leaves here and there, tucking the eggs in as well. I had some leftover flowers from one of my cards yesterday that were just begging to be used today.

I used another one of the new sentiments and stamped it on a strip of Bitty Big: Lilac Grace cardstock in black ink. I added it to the stenciled panel  just underneath the bouquet of flowers.

I had so much fun creating both of the cards I've shared today! Join me again tomorrow for the 4th and final day of the countdown! Thanks for fluttering by!


Thursday, February 24, 2022

Papertrey Ink February Release Countdown Day 2

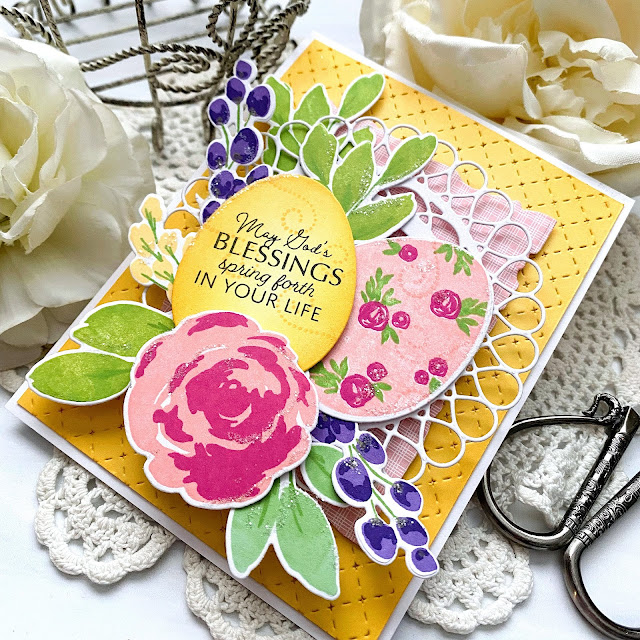
Welcome to day 2 of the Papertrey Ink February release countdown! I have A LOT to share with you today using some of my favorite new products from the release! I have three projects to share with you using the new Easter Egg-stravagance stamp/ die set and another project using the sweetest new carrot dies! Most of my cards today also use the sweeet new Just Sentiments: Easter Blessings stamp set. I think this is one of my favorites in the series!

The Easter Egg-stravance stamp/die set includes a solid egg stamp and two additional floral designs that you can use to create beautiful and unique eggs. It also includes quite a few stand-alone flowers, leaves, and this little swirl I have used on both of the eggs on this card. I stamped one of the sentiments from the Just Sentiments: Easter Blessings stamp set directly onto the yellow egg using black ink.

I used the new Delicate Circle die cut as the base to assemble my egg/flower bouquet. The flowers are from my all-time favorite floral set called Effortless Beauties. Over the years I've had different "favorites", but this is my current favorite and can see it standing the test of time! I reach for it often!

I chose traditional spring colors for this card and I feel like it captures almost everything that I love about spring!

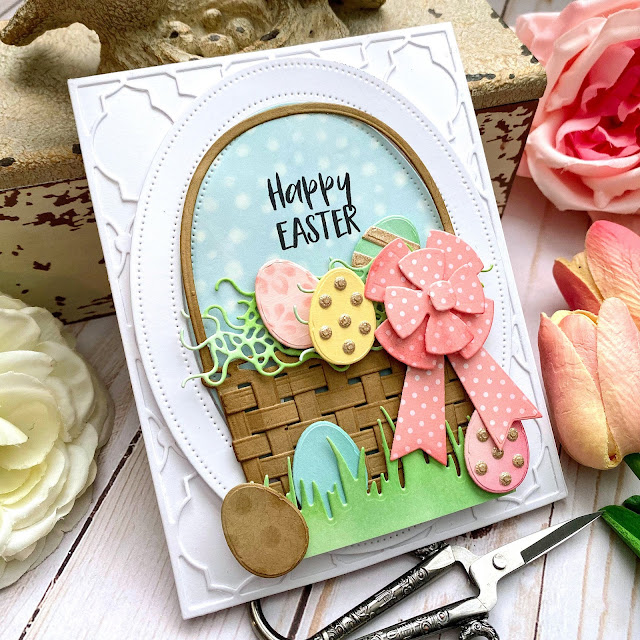
The background was created by die cutting a panel of Harvest Gold cardstock using the Border Bling: Tin Stitch Die (which is currently in stock) and then added some Summer Sunrise ink around the edges using a blender brush. I added a panel of Bitty Big: Pale Peony paper that was die cut using the Love to Layer: Torn Edges Die. I added the delicate circle over the top and built my bouquet from there. I added a generous sprinkling of glitter as well!

My second project for today uses the new Picket Fence die as well as the new Easter Egg-stravagance that I used on my previous card. I couldn't resist using it in a different way to create this basket. I have a full tutorial with pictures and directions that I posted earlier today in a separate post. I had quite a few pictures and this post is already long so you can find it HERE

When I set out to execute the idea I had in my head, I envisioned it being a little bit harder to construct that it actually turned out to be! You can whip these up in no time, especially once you've made one and know how it all goes together!

I absolutely adore this particular sentiment from the Just Sentiments: Easter Blessings stamp set. I love that so many of the sentiments fit inside these cute eggs.  I used the saying to steer the embellishments for this basket. I used a few of the single flowers and leaves from the Easter Egg-stravagance stamp set as well as my favorite flower from the Into the Blooms II dies (which are also back in stock) to decorate this basket. The little cluster of grass at the bottom of the egg is from the Weave a Basket die collection that we showcased yesterday. I have used it on almost every project for the entire release! Who knew how much I could love a little bundle of grass?!

I used Distress Oxide inks to color the blooms and leaves and added some color pencil details to the flowers.

The box measures 3 1/2 inches square along the bottom so it is a good size to fill with all kinds of Easter treats. You could also fit a potted plant or flowers. Wouldn't these be cute for May Day?  My mind is reeling with all of the possibilities! You could also add a handle if you wanted to make it look more like a basket.

I decided to show you my carrot card next to break up all of the Easter Egg-stravagance projects! ha ha! After making another card using the carrot dies, I threw it away and went for something CAS. I don't often do CAS but I really like how this turned out. I do have to admit that I will be tweaking this design just a tad. I'll let you know tomorrow which addition it will be getting as we showcase another one of my new favorites!

The Carrot dies have three different sizes and three different pattern overlays you can use. I die cut the bases of each of the carrots from Summer Sunrise cardstock and the detail pieces are cut from Orange Zest cardstock. I added ink around the edges of both the base carrots and the detail pieces using Canyon Clay ink.

There are two different carrot tops that you can use, but I decided to be crazy and use both for each carrot. These are colored using Distress Oxide ink. I also used the same ink to blend onto a panel of watercolor paper and then spritzed some water on it and allowed it to dry.

I stamped yet another sentiment from the Just Sentiments: Easter Blessings stamp set in black ink. The entire panel is adhered to a top-folding A2 card base using foam squares.

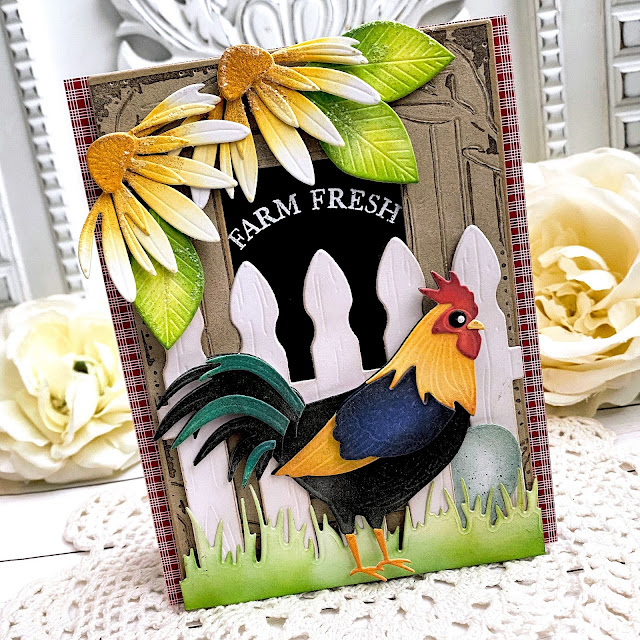
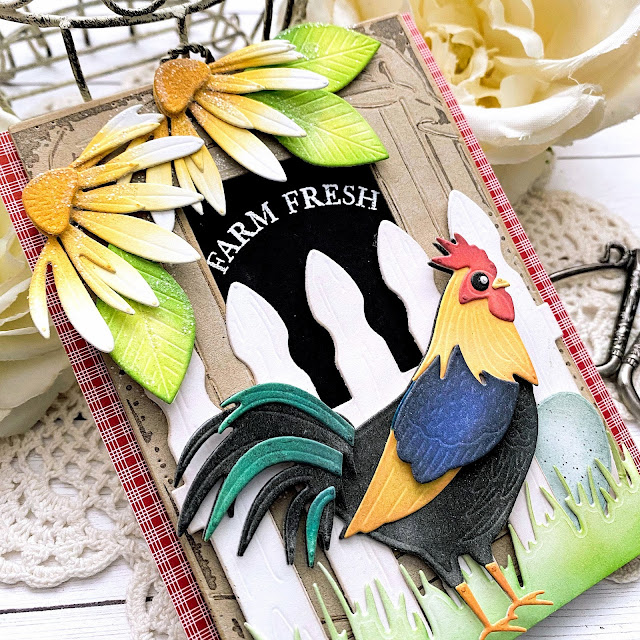
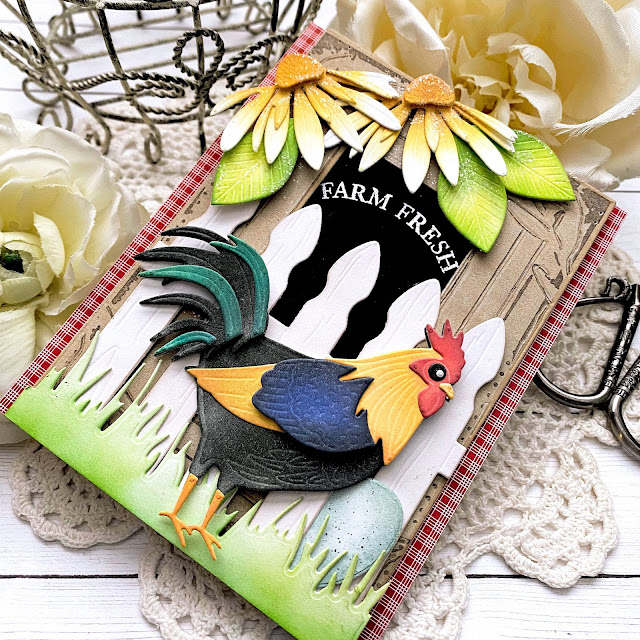
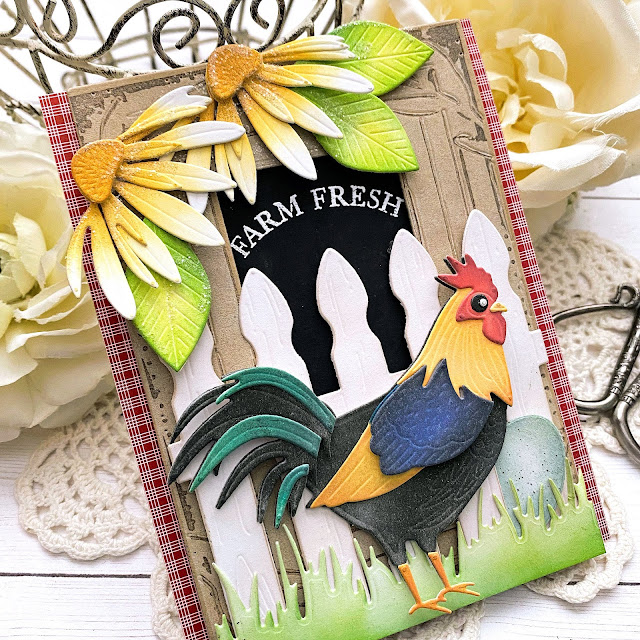
My final card for today uses the Picket Fence die and the Easter Egg-stravagance stamp set. The He is Risen sentiment is included in the Egg set. I love the beautiful calligraphy!

I die cut a solid egg from Aqua Mist cardstock and then made a custom egg using the single leaves and flowers included in the set. I really like that the sentiment has a coordinating die so you can use it in many different ways.

As you can see, I used the cluster of grass again because I love it so much!

This concludes day 2 of the countdown! Join me again tomorrow for some super adorable new products! Thanks for fluttering by!


Picket Fence Basket Tutorial

Hello and welcome! If you're looking for the Picket Fence Basket tutorial,you're in the right spot! I knew there would most likely be a lot of questions on how to create this cute little basket, so I've put a step-by-step photo tutorial to help you! It is super easy to assemble and requires very little supplies or time!


Use a bone folder to fold at each score line to make crisp edges.

I forgot to mention that these little "tabs" already have a built in score line that is included in the detail of the die so there is no need to score along the tabs, but you do need to "crack" them by placing your fingernail on the right side and bending them forward, then bend them the opposite way to get a good fold. In the end, they will need to be pointing up.
If you want to use liquid glue instead of tape, that will work as well, just look down two more photos to see how to do that. **********EDITED******** I would HIGHLY recommend using liquid glue. After time, the ScorTape is coming apart! The bull clips will make assembling it with liquid glue easy, but strong. Keep the clips on until it’s completely  dry.


If you'd like to use liquid glue, the clips work well for that, too!


It is easy to fold the box up, just make sure the bottom pieces don't get tangled. Take your time to fold them neatly.

Once it is folded, it makes a perfect 3 1/2 inch square.

This is what I did for both the top and bottom square.


Once it is done, you can decorate it to your heart's content!

Hopefully it all makes sense! Happy crafting and thanks for fluttering by!


Wednesday, February 23, 2022

Papertrey Ink February Release Countdown Day 1

I love all things Easter and spring so I absolutely LOVE this new release from Papertrey Ink and I know all of you will too! My first card for today uses the super adorable new die collection called Weave a Basket. This cute ensemble includes a solid egg die, two detail egg dies, the cutest bundle of grass, a bow, the main basket die, and the strips to weave through the basket base to create the realistic basket look.

I also used the new Grassy edge die that will be perfect all spring and summer long! The sentiment is from the new Spring Greetings stamp set. There's quite a few sentiments for both Easter and spring cards!

Growing up, my Easter basket was woven with different pastel colors that I absolutely LOVED! I was tempted to recreate that look for today's card, but chose a nice brown basket instead. I die cut it from Kraft cardstock, did all of the weaving, and then added some Cocoa Bean ink around the edges and over the top of the woven portion.

I had so much fun decorating all of my paper eggs to put in the basket and sprinkle across the grass. Dyeing Easter eggs is one of my favorite traditions, even though I'm super high-strung when my kids are splashing spoons in the dye and not being as careful as I would like! LOL! 

I absolutely LOVE the cute bow; I cut it from Sweet Blush Bitty Big paper and then added some Berry Sorbet ink around the edges for some contrast.

My second card for today uses the new Vase Collection 7 stamp/die set. I think it's my favorite so far! I think this one will be used all spring and summer long!

This card also features the new Delicate Circles die that I know will be used often. I'll be using it again on a card I'm sharing tomorrow as well. I chose to use it cut in half (not quite half) for today's card to show some different options, but it is perfect for center focal points as well.

The heat embossed/watercolored flowers are from the new Thankful Florals. It's such a sweet cluster of flowers, but also includes single blooms, leaves, and stems.

The "you make my heart smile" sentiment is also from the new Thankful Florals set.

Thanks for joining me today! I'll be back tomorrow for day 2 of the release! Thanks for fluttering by!