Friday, October 28, 2022

The Greetery {T.G.I.F.} Merry and Bright


Hello and welcome! It's my turn for this week’s TGIF feature! I’m shocked that we’re nearing the end of October and heading into the holiday season! As a card maker, I’m often inspired by store-bought and pre-printed Christmas cards! I’ll see one that catches my eye and say to myself,” I have stamps or dies that would work perfectly to recreate that look or feel”! Do you do the same thing? For today’s card, I saw a beautiful Christmas card featuring a large dove gracefully flying above a cluster of flowers and a central sentiment! I knew for certain the new Peaceul Doves die and the Winter Doves Details stamp would make an appearance and for the flowers, I chose the beautiful Pine Blossom stamp set. This is one that I haven’t used for awhile so it was fun to pull it out and give it some love!

To begin, I die cut the main bouquet using the Pine Blossom die and used the step-by-step stamps to bring the image to life. I set it aside and got to work on the background; I don’t know about you, but I can’t get enough of the arches! I used the beautiful Elegant Arches stamp and stamped it onto a panel of Aqua Mist cardstock using Speckled Egg Distress Oxide ink. I also blended a bit of the same ink around the corners for some dimension. Since I love layers so much, I decided to add even more depth by adding an Aqua Mist arch that was die cut using the A2 Arches Die with a hint of ink around the edges. I layered it on top of the background using foam squares.
The card I used as inspiration used a Peace on Earth sentiment, but I opted for the Merry and Bright sentiment from the Arched Holiday Stamp Set. I like to die cut all of the different sentiments at once and then stamp them using my MISTI so I have them on hand for other projects! I die cut the sentiment using the Arched Holiday Sentiments die and then stamped it in black. I have been saving all of the bits and pieces from my projects for quite some time now and my plan is to sit down and make a bunch of tags with the leftovers! Can you believe that I haven’t made a single Christmas tag this year? My packages will be bare if I don’t get going!

I placed the Pine Blossom bouquet at the bottom of the arch leaving enough room for the sentiment. I used foam squares for both the bouquet and the sentiment; using double thickness for the sentiment so it would rise above the bouquet. I placed the two doves that had been stamped with the details, on either side of the sentiment.

I felt like the card needed just a little something more, so I die cut the little sprigs and flowers using the Winter Medley die and colored them using finger daubers and Distress Oxide ink. These particular dies leave all of the pieces intact when they are cut, so I simply left them in place and colored them all quickly with the finger sponges. I added the tiny flowers using liquid glue and then had fun tucking them here and there until I was satisfied with the arrangement. I added some white paint splatter for a snowy look and then I added some glitter to the doves, the flowers, and the extra dies for that holiday sparkle I love so much! I layered the entire panel onto a top-folding A2 white card base using liquid glue. Once it was done, I was so happy with the depth and dimension that was certainly not on the pre-printed design!! Ha ha! I hope you get a chance to let something spark your creativity and pull out some fun combinations of products! It’s fun to get your mind working in new and different ways, especially if you’re in a rut (we’ve ALL been there}! Thanks for fluttering by!

Thursday, October 20, 2022

Papertrey Ink October Release Day

It's release day for the Papertrey Ink October collection! There's an Instagram hop happening today, so head to @kellylunceford and you can start the hop there, OR you can go to the Papertrey Ink Instagram page for the entire hop list. You an leave a comment on each stop of the hop to be eligible to win one of the gift certificates! I decided to share my hop card here as well just in case you have any questions on how I created it!

To begin, I die cut the Winter Globe twice; stamping the sentiment, which is from the Winter Globe Sentiments stamp set, onto the bottom of one of the globes using black ink. I chose this sentiment in particular because I knew I'd be using the Peace die that is included in the new Winter Globe die set and I wanted them to coordinate.

I used bits and pieces from each of the new Winter Globe die sets so I will let you know which element came from which set. The main snow globe, snow drift, aspen trees, deer, bird, and the Peace word all are included in the Winter Globe die set. The snowflakes are included in the Winter Globe: Let it Snow die set, and the house and pine trees are included in the Winter Globe: Believe die set. Hopefully that was everything....ha ha!

I colored the aspen tree background using Antique Linen and Weathered Wood Distress Oxide ink, the pine trees are colored using Twisted Citron, Mowed Lawn, and Rustic Wilderness Distress Oxide ink. The house is Antique Linen with whatever was left on my medium brown sponge dauber (haha!). The bird is colored using Festive Berries and Aged Mahogany Distress Oxide ink and the deer are colored using Antique Linen and a touch of light brown.

I die cut the Peace word and the bottom strip using silver glitter cardstock. Once all of the elements for the actual globe were complete, I got to work assembling it. I used the circle that was die cut from the main snow globe to serve as the background. I added a touch of Weathered Wood ink splatter and then layered everything on top using either liquid glue or foam squares. I added some white acrylic ink splatter over the top and then sandwiched the focal circle in between the two globes for security The bottom globe is attached using liquid glue and the one on top is secured with foam squares.

The background was created by hot foiling a 4 by 5 1/4 inch piece of Pure Poppy cardstock using the new Fanciful Snowflakes Background Hot Foil plate and Glimmer Red Glimmer Foil. I added some Scarlet Jewel ink around the edges for a little bit of added dimension.  I adhered it to a top-folding A2 card base using ScorTape for security. I then added the snow globe using foam squares. I tucked some Into the Blooms: Gardenia leaves and pinecones and pine branches here and there. The snowflakes are added in a triangle using liquid glue. I added glitter to give it that realistic snow globe look! 
The new release will be available for purchase tonight at 10 PM ET. Thanks for fluttering by!


Wednesday, October 19, 2022

Papertrey Ink October Release Countdown Day 4

The Papertrey Ink October release countdown has absolutely flown by; I can't believe it's already day 4!  I have two fun projects to share with you today and up first is a treat/gift holder using the new Wonderful Wreath stamp/die set paired with the new Larger than Life: Believe die and coordinating Larger than Life: Believe stamp set! My project is a nod to Miracle on 34th Street, complete with the Macy's star on top! I had so much fun creating this post box just ready to be filled with letters to Santa!


I absolutely LOVE making 3D projects, but they sure do prove difficult to photograph! ha ha! To begin, I die cut the two panels needed to create the mailbox using the With Love Mailbox Die. I added some Fresh Snow ink around the edges to give it a frosty look as well as a little bit of dimension.  This is the portion of the mailbox that SHOULD have the handle or mail slot, but I wanted the Wonderful Wreath to have center stage, so I added the slot on the other side; you can see it in my next photo.

This is the other side of the box; I actually added the POST die cuts to both of the sides to give it some added detail. Apparently, the die to make the larger slot has up and gone missing, so I opted to use this smaller slot and just use a glitter die cut instead of an actual slot. This side uses one of the extra panel dies, also die cut from Pure Poppy ink to give it even more dimension. I die cut the POST letters using the With Love Die Collection and set them aside. I drew a straight line with a T square and a pencil so that I could line the letters up straight. I also cut the piece of paper that the letters came out of straight so I could line it up against the line. From there,  I used a fine tip 2 way glue pen to trace the letters. I dropped the letters back into place and pressed them down using my quilling tool, you could use a paper piercer or other sharp tool. Once they were secure, I gently removed the guide and erased the pencil line. Clear as mud?


The Wonderful Wreath stamp set comes with three different wreath base images and then lots of different sprigs, leaves, berries, and flowers to enhance the wreath. I used the one that looks like a boxwood wreath and then added a few sprigs, leaves, and flowers. I also tucked a letter to above the flowers that was die cut using the With Love Die Collection. I simply die cut it from white cardstock and then added some Antique Linen Distress Oxide ink around the edges to give it definition.

I die cut the Larger than Life Believe word twice; once from "gilver" cardstock (not quite gold, not quite silver) and once from Pure Poppy cardstock.  I glued them together using liquid glue for stability. I added it over the top of the wreath with strategically placed liquid glue. The remainder of the sentiment is heat embossed using gold ink onto a strip of Pure Poppy cardstock. In hindsight, I should have heat embossed directly on the mailbox before it was assembled. 

To secure the box, I opted for a mini clothespin adorned with a glitter "Macy's" star that was die cut using the Patriot Die and secured with 1/8 inch ScorTape. I added some white paint splatter to the top of the mailbox to mimic the look of a snowy day!


I added glitter to all of the stamped pieces for added sparkle and shine!

I added some extra sprigs, leaves, flower, and envelope to gussie up this side!


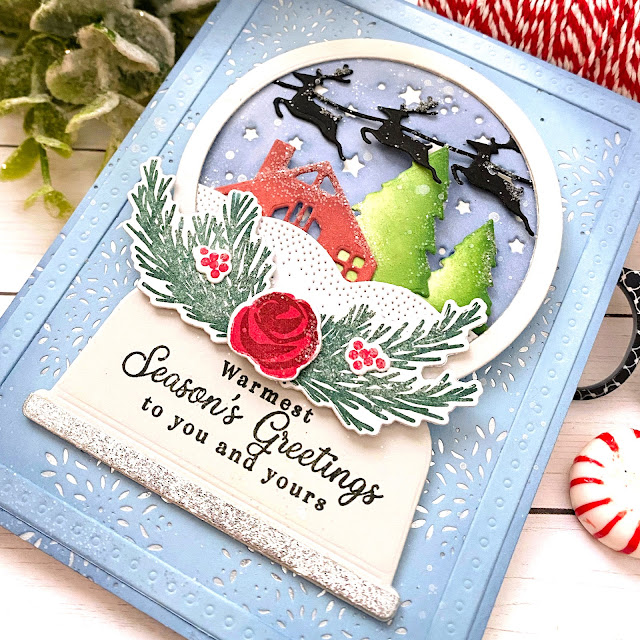
My next project uses the fabulous new Winter Snow Globes  and Winter Snow Globes: Believe dies paired with the Snow Globes sentiments stamp set. There is another Snow Globe die set called Winter Snow Globes: Peace, but I didn't end up using it today with the exception of the snow.

To begin, I created the background using the new Fanciful Snowflakes Background Hot Foil Plate (I told you I'm obsessed) using Silver Foil on an A2 sized piece of Spring Rain cardstock. I added some ink around the edges for a moody look as well as the FRAME out of the same Spring Rain cardstock with ink around the corners.

I die cut the main snow globe twice, which is from the Winter Snow Globes die collection, from Soft Stone cardstock and glued them together using liquid glue. I stamped the sentiment in black, which is one of my favorites from the release, but the entire Snow Globe sentiment set is absolutely fabulous. I also added a strip of silver glitter cardstock to the bottom that was carefully die cut from just the bottom portion of the die. I love the added detail and sparkle it adds to the card.

I die cut all of the pieces for the scene: the star background, the reindeer, trees, and house are all from the Winter Snow Globe: Believe die set, but I like the snow in the Winter Snow Globe: Peace better, so I used that instead. Everything is cut from white with the exception of the reindeer, they're die cut from black cardstock. I colored the house, trees, starry sky, and house using Distress Oxide ink and arranged them on the background using liquid glue and foam squares. I adhered the snow globe over the top using foam squares for dimension. I also added a few sprigs and flowers leftover from my first project to the globe. I added some white paint splatter over the top to give it a snow globe look and of course some glitter!

I can't wait to use the rest of the dies in the Snow Glob collection; they're so much fun! Switch up the sentiments and you can use them all winter long; can you imagine a Valentine's Day globe??? So sweet! Just a reminder, the new release will be available for purchase tomorrow night at 10 PM ET! Thanks for fluttering by!


Tuesday, October 18, 2022

Papertrey Ink October Release Countdown Day 3

Welcome to day 3 of the Papertrey Ink October release countdown! What's been your favorite so far? I think you're going to fall head-over-heels in love with the cute products being showcased today! I have quite a bit to share with you using the adorable new Gingerbread Bakery stamp/die set and another fun new die set called Trees of Cheer that I will be sharing at the end of today's post!

I've fallen in love with this cute new Gingerbread Bakery stamp set; it's one that is right up my alley and will be getting a TON of mileage year after year! I bake and deliver soft ginger cookies to friends and neighbors every Christmas season, so this set will be the perfect thing to help gussie up my cookie packaging! I promise I will share anything and everything that I make using this set.

Up first is a sweet card using many of the images included in this fun set; there is even more that I didn't show today, but some of the other designers did, so make sure to head to the Papertrey Ink blog, too! My background was created using the GORGEOUS new Fanciful Snowflakes Background Hot Foil plate that was showcased yesterday! It is so utterly amazing that I just couldn't resist using it again! I used Glimmer Silver Hot Foil on Mint Julep cardstock; it reminds me of an old-fashioned tin ceiling! I added a strip of Bitty Big: Pure Poppy pattern paper right down the middle. I also added a Mint Julep frame around the panel that was die cut using the Border Bling: Skinny Dotted Frame and secured it with liquid glue.


I had so much fun stamping all of the fun images included in the set; I die cut everything 4 times so I could use bits and pieces here and there! I'm obsessed with the cute gingerbread sign, the rolling pin, EVERYTHING!!! I die cut the medium sized oval from the Love to Layer: Oval die collection from white cardstock and built the scene over the top.

Since I had stamped everything ahead of time, I just had fun tucking things here and there until I was happy with the result! I had some leftover Pine branches from my vase collection card I shared yesterday so I used a few to tuck behind the oval for added holiday charm!

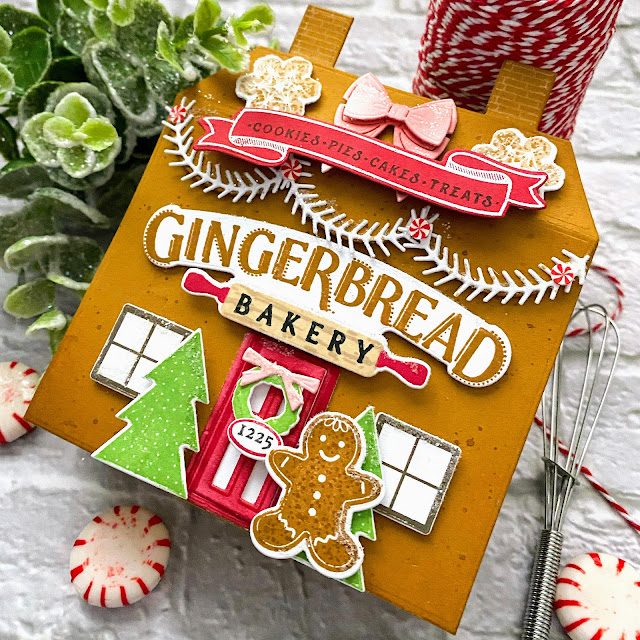
I was a little bit giddy making this gingerbread bakery treat holder; that's the kind of crafty session I love!!! I used the older Tent Style Packaging: Holiday House die for the main part of the "gingerbread bakery" and cut it from Honey Nut cardstock (this is the PERFECT cardstock/ink color to mimic gingerbread). I added some Honey Nut ink splatter over the top to make it look like a real cookie with all of the spices showing! I also added some ink around the edges of each piece to give it some added dimension. It almost looks good enough to eat!

Once the main portion of the house and the roof were done, I got to work cutting out the other house pieces using the Tent Style Packaging: Holiday House Accessories. I used the Holiday House Stamp Set for the windows, pine sprigs, door, trees, wreath, and "1225" house number. 


From there, I had so much fun adding the Gingerbread Bakery sign to the top; the rolling pin is a separate die and stamp. I simply added the "bakery" portion of the sentiment to the rolling pin and placed it below the gingerbread sentiment. You may have noticed that detail on my card as well.

I heat embossed the banner image using white ink on Pure Poppy cardstock and then cut it out using the coordinating die. I stamped the "cookies, pies, cakes, treats" sentiment using black ink. I want to point out the snowflake cookies in this picture; these cookies were stamped with Classic Kraft ink with Dark Chocolate details. I think I prefer the Honey Nut color for true gingerbread.

The bow is cut from Pale Peony cardstock using the Bows Galore die collection. I added a generous sprinkling of glitter for a sugary sweet look! The two chimneys are stamped with white ink and then glued together using liquid glue. For this particular box, you simply slide your treat inside, rather than tying it with a bow or twine.

I contemplated making a few tags for my third project using this set, but decided on another treat box so I could use the cute "holiday treats" sentiment.

To begin, I die cut the box using the Scallop Top Gift Bag die from Pure Poppy cardstock. I assembled it using Scor Tape. I heat embossed the "holiday treats" sentiment with white detail embossing powder and then added it to the top with ScorTape as well.

I used the wreath and greenery from the new Rustic Wood Star die collection to serve as a backdrop for my pedestal of goodies! I shared this tip last year on another treat box I made, but I used a velcro dot to secure the box at the top and opted for a paper bow instead of a real ribbon. This makes packaging treats up very easy and the recipient won't feel sad pulling off your pretty ribbon! ha ha! I also added the teeny tiny gingerbread boy to the center of the bow for added charm.

I love the little corner scrolls included in the set so you can frame your focal point!

My final project for today uses the new Trees of Cheer die collection; this set totally reminds me of A Charlie Brown Christmas! I can see Charlie and Linus searching everywhere for the perfect Christmas tree amongst the pastel "aluminum" Christmas trees I've featured here! ha ha!

My card also uses another fun stencil set; some kind of snowflake, but now the name has slipped my mind! It comes in a large and smaller size; this is the smaller size.

I especially love the way the tree pieces come so you can layer them for lots of dimension.

Thanks so much for joining me today...and sticking around until the end! LOL! Tomorrow will be the 4th and final day with the release being available for purchase starting Thursday at 10 PM. Thanks for fluttering by!


Monday, October 17, 2022

Papertrey Ink October Release Countdown Day 2

Welcome to day 2 of the Papertrey Ink October release countdown!  I'm thrilled to be back today to share two more projects with you using even more new products that you're sure to love! Up first is the BEAUTIFUL new Into the Blooms: Gardenias die collection; I'm officially obsessed and I know these will be used  often for sympathy cards and everyday cards! I wanted to throw a Christmas/ holiday spin on things because 'tis the season, right? ha ha!

Before I dive into the how-to, I want to point out the AMAZING new Fanciful Snowflakes Background Hot Foil plate! I'm so, so, SO in love with this and I KNOW I will be using it year-round because it could also pass as just a really cool pattern! ha ha!

I fell in love with this beautiful new sentiment, but it's not being showcased for a few more days, so shhhhh.....don't tell anyone! ha ha! I'm actually not even going to tell you the name of the stamp set because I'll give away the entire theme of the new set and I don't want to spoil it!

I heat embossed it in silver on a strip of vellum; this card is a little washed out, but it's the best way to see the detail of the embossing! ha ha!

I added a few sprigs from the Into the Blooms: Pine die for an added holiday touch! So, I feel like I've gotten ahead of myself and haven't started at the beginning! ha ha! So.....to begin, I hot foiled a panel of Weathervane cardstock using Glimmer Aluminum foil (love) and then die cut it using the Love to Layer: Notched die set. I also die cut the two largest squares from the Love to Layer: Squares from white cardstock and then layered them together using foam squares.

The Gardenias are die cut from white cardstock and then colored using Distress Oxide ink; same with the pine branches. I arranged them over the top of the squares using a combination of liquid glue and foam squares. I tucked the pine branches at the top and bottom to create visual movement.

I wrapped the heat embossed sentiment strip around the foiled panel and secured it with tape. Once that was done, I added the entire panel to a top folding A2 card base. I added a trio of sequins and some glitter to finish it off!

My second card for today uses quite a few new products: the new Elegant Edges Snowflakes, the new Vase Collection 13, Geometric Snowflake stencil, AND the new Inside Greetings: Believe! I wasn't sure I'd be able to pull off a card using that many products on one card, but it all came together in the end!

To begin, I used the new Elegant Edges Snowflake die to cut a panel of Stormy Sea cardstock. I layered it onto a panel of Soft Stone cardstock with the Geometric Snowflake stenciled softly at the bottom with Soft Stone ink. The sentiment is stamped in black offset to the right.

I die cut and stamped the new jug from the Vase Collection 13 stamp/ die set using Soft Stone and Weathervane ink. I added some pine to the jug along with the greenery from the new Rustic Wood Star die set that was showcased yesterday. The wreath is also from the set with a bow from the Bows Galore die set added to the side.

I added some white paint splatter over the top and a bit of glitter to finish it off! Thanks for fluttering by! Join me again tomorrow for day 3 of the countdown; you won't be disappointed, I promise! ha ha!