Friday, April 28, 2023

The Greetery {Something Sweet For You}


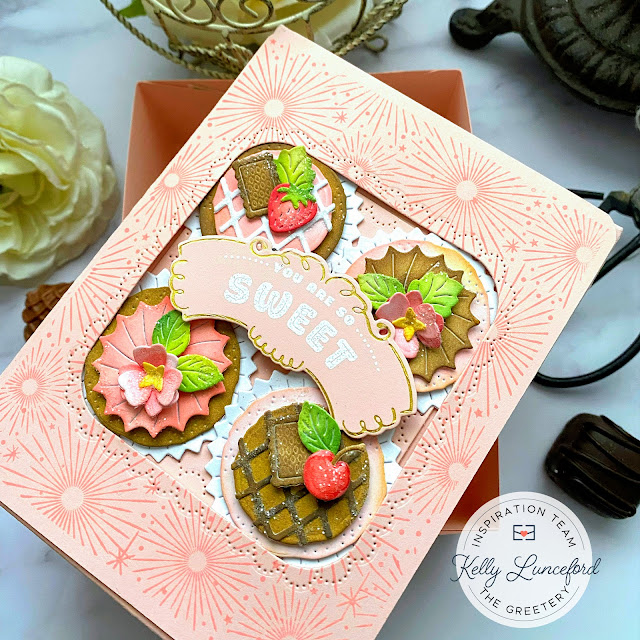
Hello friends! I’m so excited to be here today sharing a fun project with you using fabulous products from the new Hip Hip Hooray release from The Greetery! I’m particularly smitten with the Hey Cupcake Die Collection and I couldn’t wait to “bake” up a few more, so I decided to use them for today’s project! It’s no secret that I love making paper packaging of all kinds, but I always come back to this particular box because it’s so easy to make and so fun to gift! This idea works just as well for a card, too!

To begin, I cut and scored the cardstock for the box; you will need one piece measuring 7 1/8 by 8 5/8 (top) and one piece measuring 8 ½ by 10 (bottom). Score the top at 1 ¾ inches around all four sides and then cut each corner so you can make it into the box shape. Score the bottom at 2 inches on all four sides and do the same for the sides. I also made another panel for the top so I could sandwich the cupcakes between the box top and the panel with the window cut out. The window was cut using the new Window Dressing Dotted Scallop die. I also stamped it using the new Sparkler Background Stamp for some added detail.

Once that was done, it was time to make the cupcakes and the fancy foil label! I used the new Sweet and Fancy Label Hot Foil and gold foil for the label. Once it was foiled, I heat embossed the sentiment from the new Sweet & Fancy Label Stamp Set  in white. I used the coordinating die to cut it out. I set it aside with the box so that I could “bake” up some cupcakes!

I die cut all of the pieces from white cardstock and then inked them up using assorted Distress Oxide inks and finger daubers. I made two chocolate cupcakes and two strawberry cupcakes. I kept the topping style similar so that the box would have a cohesive feel to it. That being said, the sky is the limit with how you’d like to decorate your cupcakes! I did add some Nuvo Crystal Glaze over the top of the cherry for some shine, and of course, I had to had some glitter for sparkle!

I know I went on and on about patterned cupcake liners the other day, but for today’s project, I opted for plain white! Once again, I was really going for cohesive and uncluttered! I used liquid glue to adhere the cupcakes to the top of the box and then added the stamped and die cut panel over the top using foam squares.

I can’t wait to fill this box up with goodies and things to give for a special birthday! This box is also perfect for holding cards, so you could make a set of birthday/cupcake/cake cards to go inside if you wanted! I have been making this box style for over 20 years and the ways to use it are endless! I had so much fun working on this project and I hope you have just as much fun as your orders start arriving! Creating gives me such joy and I hope you find the same joy as you find time to use these gorgeous new products! Thanks for fluttering by!

Thursday, April 27, 2023

Believe In Yourself

Hello friends! I hope you're having a fabulous day! I just wanted to pop in real quick to share the card from the Papertrey Ink Blog Hop the other day just in case anyone was wanting the details! I used some of my favorites from the new release; Into the Blooms: Blossoming Beauties, Cover Plate: Exquisite, and one of the sentiments from the new Just Sentiments: In Motion.

To begin, I die cut all of the flower pieces from the Into the Blooms: Blossoming Beauties from white cardstock and then colored them with ink and blender brushes. The dies come in graduating sizes so  I made one flower with ALL of the sizes, the yellow flower is slightly smaller, and so on.

The largest flower is Raspberry Fizz ink, the yellow flower is Summer Sunrise and a touch of Orange Zest, and the purple flower is Lilac Grace ink with a hint of Winter Wisteria. The leaves use Simply Chartreuse ink and Ripe Avocado.

I die cut the background using the Cover Plate: Exquisite from Aqua Mist cardstock. I layered it over the top of an A2 white panel using liquid glue. I also added a frame that was die cut using the Border Bling: Skinny Dotted Frame. I glued it down and then added some Hawaiian Shores ink around the edges.

I also die cut an anchor for the flowers using the 
Love to Layer: Lovely Brackets. It was released last month, but since I was sick, I didn't use it! I have a goal to get to all of the products from last month; they're sitting there waiting!


I tucked in some leaves using foam squares and liquid glue, added some sequins, and glitter for sparkle and shine! The Believe in Yourself sentiment is from the new Just sentiments: In Motion and is stamped on a white strip of cardstock and then notched on the ends. Thanks for fluttering by!


Wednesday, April 26, 2023

The Greetery {Hip Hip Hooray Collection} Release Day + Anniversary SALE!

Hip Hip Hooray! It's release day for the AMAZING new collection from The Greetery Not only that, but the ANNIVERSAY SALE is starting today as well! Yay! You do NOT need any special codes, the discount will be automatically taken off at checkout, HOWEVER, rewards will not be eligible to be used at this time since only one code can be used! Also, there will be some ADDITIONAL mark-downs on a select group of products that can be found HERE

I have not put the new release away because I have still been having so much fun! I wanted to make a bonus card for today, AND, I will be sharing another fun project on the 28th, so stay tuned for that! Today's card uses a few things that were left over from my previous projects, and a few new things that I didn't get a chance to use earlier!
I just HAD to get that cute little Takes the Cake mini die out and play around with it! It makes THE cutest little cake, as you can see here! I chose to make some fun rainbow layers with flowers, and gold candles!

Once I had that cute cake all inked up, I played around with a few different options; I forgot about this panel I created earlier using the new Glow Hot Foil. I used some prismatic foil, which is hard to see in the photos, but it looks really fun in real life! I decided use that cute mini cake and a few leftover gifts from my "lift-the-flap" card from yesterday. I die cut a few more bows and tags using the Gifts Galore die to dress up the hot foiled gifts. I also loved how Betsy used the cupcake liner from the Hey Cupcake die set as pinwheels, so I gave that at try, too!

The tag was also leftover from yesterday, but looks so festive across the stack of presents! This looks just like a mini birthday party (or Barbie party! LOL!) and was so fun to make!
This release is SOOO fun!!! It will be live at 10 am ET today; that is when the sale will go live as well! Please note: it is with disappointment that the Tear Strip Tags: Birthday stamp set will not be available at this time due to an unforeseen issue! It WILL be available later, once the issue has been resolved! Thanks for your patience! Thanks for fluttering by! 


Tuesday, April 25, 2023

The Greetery {Hip-Hip Hooray Collection} Day 2

Well friends, it's day 2 of full reveals for the Hip Hip Hooray collection from The Greetery! I think you're going to be thrilled with the new products being showcased today; they are, in my opinion, squeal worthy!  I have three cards to share with you using the featured products for today. Please head to The Greetery Blog for the official "meet and greet" for all of today's products! To be eligible to wink one the 4 prize giveaways for today, make sure to leave a comment here and on each designers' blog along the hop!


My first card for today used the FABULOUS new Hey Cupcake die and the new Sweet & Fancy Labels stamp set, die, and hot foil! These are all just THE cutest and I know I will be reaching for them often! I actually can't wait to get creating even more cupcakes!
For this card, I chose to make two chocolate, one lemon, and one vanilla or spiced cupcake for a good mix!


The die collection comes with a "base", which technically is supposed to be the top of the cupcake, but since you look at these from an aerial view, the top of the cupcake it actually the bottom! ha ha! Anyway, there are also a few different icing options, flowers and leaves, a cherry and strawberry, etc; the possibilities are endless!

The die set also has the cupcake liner; I chose to die cut mine from pattern paper for some added whimsy. I'm personally obsessed with cute cupcake liners, so I obviously HAD to use pattern paper!

I hot foiled the fancy label, die cut it with the coordinating die and then stamped the sentiments using the Sweet and Fancy Labels Stamp Set. There are a bunch of options that transcend beyond birthday so you can use this collection for many different occasions. I also used the new Window Dressing Dotted Scallop die. This allows you to achieve the look of cupcakes in a box. I didn't want to hide the cute cupcakes underneath the box, so mine isn't accurate, but I just did what I liked! ha ha!


My second card uses the new Gifts Galore suite of products. I used the Gifts Galore Hot Foil plate with different colors of foil and on different colors of cardstock. Please note: there is a coordinating Gifts Galore stencil so you can simply hot foil on white cardstock and then use the stencils to make your presents any color you like. I think I jumped in head first when starting this card, and didn't even think about the stencils! I can't wait to use them on another card!

The new Gifts Galore suite of products coordinates with the previously released Curio: Divider and Details II die. I used it to die cut the presents, but then used the AMAZING new Hidden Messages die over the top of panel stamped with the Sparkler Background that was showcased yesterday, to cut out the different windows. If you love Lift-the-Flap books, you're going to love these dies!

Here you can see that I die cut three windows using the three different sized dies. Once they were cut, I added the die cut presents over the top using foam squares.

I used different sentiments that are included in the Sentiment Suite: Birthday sentiments set. You could also tuck cash, different images, etc. underneath the flaps, but I just chose to use sentiments on this card.

I gussied up the hot-foiled presents using the bows and tags that are included in the Gifts Galore die set. The bows just make the presents so darn cute! I heat embossed a sentiment from the new Tear Strip Tags: Birthday stamp set onto Raspberry Fizz cardstock using white detail powder. I die cut it using the Tear Strip Tags Die and then used the cute new Tear Strip Tags Toppers die for the cute detail on the end.

This card was a lot of fun to make, but I also can't wait to try using the stencils!

Last, but CERTAINLY not least, is the GORGEOUS new Takes the Cake stamp + stencil, Banner die, Stand die, Floral Details die! I'm obsessed and I barely even scratched the surface of possibilities with this one! I had so much fun bringing this floral cake to life!

To begin, I used the stencil set to create the cake portion; I knew I was going to die cut the cake stand so I didn't do any of the stenciling for that. Once it was all stenciled, I used the coordinating Takes the Cake stamp set to add the remaining leaf detail.

I layered it onto a white cake base that was also cut using the die set using foam squares. In hindsight, I would have die cut it first and THEN stenciled. I will have to try it that way and give you my opinion on what works best!

There's a couple different options for the banner; I simply die cut it from white cardstock, added the ink blending and then stamped the sentiment. There is, however, a coordinating banner stamp in the Takes The Cake stamp set that you can add color that way as well!

I die cut the cake stand using the Takes the Cake Stand die from specialty gold paper and then glued it to white cardstock for stability. I absolutely love how it looks and wish that I had a real one to use for celebrations! I know that many of the other designers used more of the details like candles, and the different layers, so you'll fortunately be able to see lots of options today! I kept mine simple and sophisticated, but I can't wait to go crazy with the different choices! Thanks for fluttering by!




Monday, April 24, 2023

The Greetery {Hip-Hip Hooray Collection} Day 1

Hello and WELCOME!! I truly am BEYOND thrilled to be here celebrating The Greetery's FOURTH birthday!!! How exciting! You'll be happy to find that by leaving a comment here, you will be eligible to win one of FOUR $50 gift certificates! Simply leave a comment here, and on each of the designers' blogs along the way! Don't forget to head to The Greetery Blog for the official meet-and-greet to read all about the details of each of the individual products being showcased today.


My first card for today uses the fabulous new All Aglow die/stencil set paired with the new Sparkler Background. You'll also notice the new addition to the Tear Strip tags family: Tear Strip Tags: Birthday, AND the fabulous new Tear Strip Tags Banners! You're going to love to have this new option in your supply arsenal for versatile ways to use these cute sentiments.

I envisioned these beautiful candles atop a delicious buttercream cake adorned with fresh daisies, so that is the direction I headed. To begin, I die cut the candles using the All Aglow die and then used the numbered stencils to add the color and patterns.

Once the candles werre done, I added the "glow" using the last steps in the stencil set, but this time I stenciled them on a panel that was already stamped with the Sparkler Background stamp. Also, please note: the stencil collection comes with a stencil to add the black portion for the wicks, but I opted to just add the black using a marker. You will definitely want to use the stencil if you are just doing a panel and no die cutting!

The "buttercream" frosting was created using the Frosted Frames Die. I simply did some creative cutting and piecing until I was happy with the look. I used the BotaniCuts Sunflower Die to create the daisies to accent the cake! I added glitter to the candles, flames, daisies, and frosting! I stamped the sentiment in grey ink and then die cut it using the new Tear Strip Tags Banners die. This card is a little bit bigger than an A2 sized card; I layered it onto a panel of pink glitter cardstock for that birthday feel!
My second card for today uses the All Aglow dies and stencil again, but for this card I paired it with the new Make a Wish stamp and die set! I also used the new Sparkler hot foil plates for the cute sparkles in the background.

I got a little bit more adventurous with my candles this time; rather than alternating the same two colors like I did on the first card, I decided to switch up the color scheme. The candles are far enough apart on the stencils so you can easily change colors without running the risk of colors touching.

The Sparkler hot foil plates are individual in two different sizes, so I was able to place them where i wanted, but it will require several heating sessions depending on how many "sparkles" you want. I was nervous I was going to mess it up, so I just did 4! Now I feel a little more confident, so I'll have to try a few more on another card.

I die cut the large "Make a Wish" from gold glitter cardstock and the shadow is die cut using vellum. I worked so hard on the candles, I didn't want them to get covered up, so I chose vellum for its translucent quality.

The Make a Wish stamp set comes with a bunch of accent sentiments to go with the large Make a Wish; I chose the "it's your day to shine" since I used the sparkles at the top! I heat embossed it in gold to keep with the gold theme of the foiling and glitter cardstock. I added glitter to the candles for even more birthday sparkle!

I'm obsessed with the new options with the Tear Strip Tags; I chose to make some birthday treat packaging using the Tear Strip Tags: Birthday stamp set and the new Tear Strip Tags Banners dies!

I did some All Aglow stenciling directly to an A2 panel; I did NOT use the die this time. I used the "sparkle" image from the Make a Wish stamp set for the flame on some of the candles. I also added a few flowers that I thought enhance the flame look! ha ha! They are from the BotaniCuts Wildflower Mix dies; I think I use these flowers for EVERY release! LOL!

I put the cup of Cake Bites into a treat cup I found at the Dollar Tree; it was the perfect color combination and I loved the gold foil around the top and bottom edges. I tied it up with ribbon and attached the candle tag.

I dressed up a clear box of gumballs using the previously released Ribbon Maker: Pinked Stars Die and the Robin's Egg Paper Ribbon Roll. I simply measured enough of the roll to wrap around and then used the die until I had it all die cut. I secured it in the back using a bit of tape.

I like the "Birthday Treats wrapped up inside" sentiment, so I chose that one for the gumball package.

I stamped the Sparkler Background onto pink cardstock and then die cut is using the crimped circles.

I had so much fun working on all of these projects! I hope you'll hop around to the other designers' blogs and leave some comments so you'll be eligible to win one of the 4 prizes today! Thanks for fluttering by! P.S. Join me again for day 2 of full reveals!


Kelly (you are here)