Tuesday, May 29, 2018

You Sparkle & Shine!

I fell head over heels in LOVE with the new Shine On stamp set from Honey Bee Stamps! I quickly ordered the stamp set and coordinating Shine On Dies and couldn't wait for them to arrive! Because Honey Bee stamps has amazing shipping times, I had them in my hot little hands in no time! I realized after they came that I didn't order the Nail Polish Bottle Die, which is what I thought I was getting! So....I quickly put in a second order and got my dies lickety split! Unfortunately, by the time everything arrived, I was knee deep in DT commitments and I had to set them aside! I keep seeing so many cute projects made with these supplies, I just couldn't resist them any longer. I didn't have a lot of time, but I wanted to get a feel for the dies and how everything worked together, so this is a bit of an experimental project, but I still thought it turned out cute! It speaks to my Barbie lovin' heart! That pink paired with the embossed "sparkle" reminds me so much of my youth! 


To begin, I die cut the bottle, which is actually a shaped card! So, so cute! I die cut the pink portion and the black portion and adhered them to the card. I spritzed it heavily with Shimmer Spray for some realistic polish shine! I love how it looks on this project! I've seen quite a few projects that used glitter paper, which is amazing, but I wanted to see if I could get something I liked just as well. I did use glitter paper for the bow and the bottom of the bottle because I love how it looks. I have made lots of glitter paper bows in the past, so I knew I would like it!


I heat embossed the sentiments using silver powder and embossed them in the same pink as the bottle. I didn't want to make the bottle too busy by adding in a white background or another color. I added the "& Shine" sentiment to the inside of the card. I decided to add a few sequins, which I debated back and forth on. I thought it looked fine without it, but when you have the word "sparkle" on the card, it seems like a natural addition! LOL! I can't wait to experiment with these products more, so stay tuned! Thanks for fluttering by!

Monday, May 28, 2018

Merry Monday #292 {There's SNOW one like you}


I hope you are all having a wonderful Memorial Day! I just realized that my photos are red, white, and blue...just fitting for today! LOL! Today I am sharing my card for this week's Merry Monday Christmas Challenge!

This week's challenge is all about penguins and I had a ball adding all sorts to my card this week! We've done a few penguin challenges, but I think this is my favorite card so far!


This is one of those cards with quite a few steps and I really had to think things through before I got to work. To begin, I created masks out of post it notes for each of the letters that would spell SNOW. They are from the Simon Says Stamp Stitched Alphabet, which I have used on another Christmas design similar to this! I just love how these letters look colored with copics, covered with crystal glaze, and sprinkled with red chunky giltter! After I had stamped and cut out the masks, I positioned them onto a  piece of Bristol paper that had been die cut using the Postage Stamp sugarcut. I thought it gave it an extra special detail, like it is a postcard from the North Pole! LOL!


Once the masks were in place, I blended some Peacock Feathers distress ink onto the paper. I also stamped a few of the snowflakes from the Eskimo Kisses stamp set at full strength.   I spritzed it with water and Frost Shimmer spray and set it aside to dry!
All of the penguins are from the Eskimo kisses stamp set as well. They are just so darn cute and I was happy to be able to implement ALL  of the images  onto one card! I normally wouldn't do that, but I thought that they worked nicely for this design!

I stamped all of the images using black ink, colored them with Copic markers, and then die cut them using the coordinating Eskimo Kisses Sugarcuts. The iceberg is stamped onto vellum and embossed using silver powder. I also added some wink of stella to all of the images, including the iceberg. I set these aside and got to work on the letters. I used my MISTI to stamp them in black. There was a faint outline around the "S" and the "W" from the masking I did on the first step. I was able to easily place them where they needed to go. I colored them with a red Copic marker, added some Nuvo Crystal Glaze and sprinkled some red chunky glitter. I added the penguins using foam squares. The "There's SNOW one like you" sentiment is also from the Eskimo Kisses set and is heat embossed using WOW Powder White Puff powder. I just love how it looks like snow!

I was going to add this little guy to the center of the "O" on the front, but it covered it a little too much and made the design even busier than it already is! LOL! So....I quickly stamped the "Happy Holidays" sentiment in black and added this little cutie using a foam square! Even though this card was time/step intensive, I really enjoyed creating it! I hope you'll join us this week! Thanks for fluttering by!
Friday, May 25, 2018

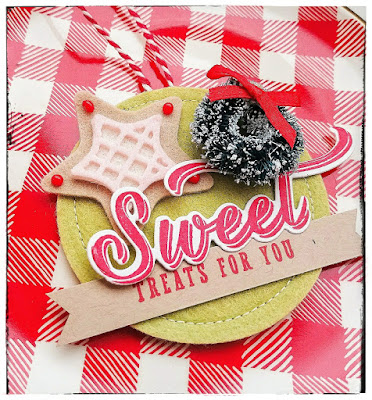
Keeping Christmas {Sweet Treats for You}


Welcome to this month's installment of the "Keeping Christmas Inspiration Blog Hop"! I was doubting my ability to get something made during this busy month of May, but look at me! Here I am! LOL! I actually finished these sooner than many  most of my projects! You'll want to head to each designer's blog for more inspiration!

(off this month)

Nina Forsyth

(Off this month)
(off this month)


For this month's project I whipped up 8 tags that can, if the recipient so desires, to double as ornaments. Honestly, I am contemplating never gifting them and just using them as ornaments for my Kitchen Christmas tree. shhhhhhh....don't tell anyone! They would be such a great addition! I was actually inspired to make these because of the current Merry Monday Christmas Challenge, which I am the host of this week! After I finished my card, I was ready to make cookies!

The inspiration photo that I used had a felt garland of sweets and treats, so I decided to work with felt for my tags and the cookies.  To begin, I die cut 8 circles from Kraft cardstock and 2 each of  Sweet Blush FeltLimeade Ice FeltSimply Chartreuse Felt, and Pure Poppy Felt.  This particular felt is the best I have ever worked with!  On this pink one, I added a Holly Berry accent that I bought at Hobby Lobby and have used on other projects like this one HERE.  I've been able to find them two years in a row and they are part of their "Make it Christmas" line. They usually put these items quite early, so if you're interested, you could probably get them as early as August!


The "sweet treats for you" sentiments are from the Sweet Holiday Wishes stamp set. I used the coordinating Sweet Holiday Wishes Die set for the "sweet" portion as well as all of the cookies. The wreath in this particular tag is also from the "Make it Christmas" line at Hobby Lobby.

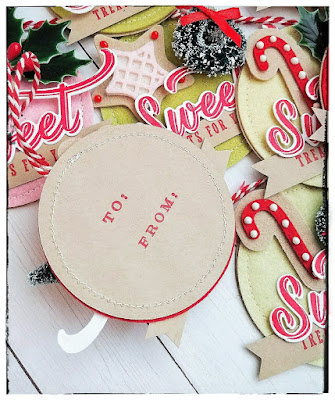
I used my sewing machine to sew around each of the tags/ornaments using white thread. I used red baker's twine as the "hanger" and made sure to tuck the ends in and secure with scotch tape before I  sewed around the edges. I considered using felt for both sides, but in the end chose paper for two reasons; I didn't want to use a ton of felt and the other reason being that I needed a place to stamp to/from and be able to write on it...that is, if I don't keep them all to myself! LOL!

Each felt cookie is adorned with Nuvo drops for added dimension. I just love the extra realistic detail that it adds to each cookie. I stamped "sweet" and "treats for you" using Pure Poppy Ink.

Once I had sewn around each tag, and created each embellishment, I used a hot glue gun to stick everything down. I wouldn't want to risk having things fall off, and hot glue is the perfect adhesive for this type of a project. 

 You can see the entire collection here. These were so fun to work on! I always find that when things are turning out better than I envisioned, I just want to keep going! That was definitely the case with these tags!
You can see the back side of the tags in this photo.  The to/from images are from the Painted Poinsettia stamp set .  I have quite a few stamp sets that include these, so you might have a few in your stash as well. Thanks for fluttering by! 
P.S. If you decide to play along with us, please use the hashtag #keepingchristmas2018 on Instagram so we can find your creations, or leave a comment with your blog address!


Thursday, May 24, 2018

MIM #322 {With Heartfelt Sympathy}

This is one of those sympathy cards that was extremely difficult to make because of the sweet family who is going to be receiving it. My heart is aching for them and I can only imagine the pain they are feeling. I have been needing to make this for a while now, and when I saw this week's Papertrey Ink Make it Monday, it was perfect for this card! It is already what I had in mind when I was visually creating it in my head, so I decided to play along!
Before I begin, I just wanted to remind everyone of the awesome sale that is going on over at Papertrey Ink until the 26th. You can shop HERE

To begin, I cut a piece of Plum Pudding cardstock to 4 by 5 1/4 inches. I used the Round Off Edgers Die to create the scalloped edge on both the top and the bottom. I used a quatrefoil embossing folder and ran it through my cuttlebug. Once that was done, I cut out the portion where I wanted my sentiment to go. I used my old Stamp-a-majig and the "With Heartfelt Sympathy" sentiment to line it up properly. This is an old wood mount stamp that I have that is from SU!'s "Close as a Memory" stamp set. I heat embossed it in gold for some shine.


At this point, I was able to adhere the purple embossed portions onto a piece of Stamper's Select White Cardstock measuring 4 by 5 1/4 inches using foam squares. I thought it would be a nice touch to recess the sentiment rather than have it stand out. I like how the flowers look like they are cradling the sentiment. All of the flowers are die cut using the Rosie Posie Die collection and I cut quite a few of each one so that I could build my arrangements as I wanted. It looks like the Rosie Posie and Rosie Posie II sets have been retired! I am SO sad! This is one of my favorites of all time! 

I chose purple, because it was her favorite color, and added in a few other colors for a fresh and happy feeling!  After everything was stamped, I began arranging the flowers, adding in leaves here and there. The entire piece received a generous amount of Shimmer Spray.

I used foam squares and stacked them two high if needed to get the depth and dimension I was aiming for. 


I added a few sparkling clear sequins for some extra detail.. Thanks for fluttering by!


Papertrey Ink SALE!!!!

Did you see this??!!?? It's the BIGGEST sale EVER!!! Run, don't walk, and get everything on your wishlist!!! Start shopping HERE !!!!


Tuesday, May 22, 2018

Precious Remembrance Shop new release {the little things}


Hello! I'm happy to be here today sharing some fun projects using the new "Little Things" set from the Precious Remembrance Shop! It has a lot of fun and unique sentiments that are useful for so many types of cards! I've already got a few more ideas I can't wait to share with you during my "Tuesday Ideas" installments!
Isn't this new set so fun? You'll want to head to the rest of the designers blogs for more inspiration as well as a chance to win the Giveaway!

Kelly Lunceford (you are here)


Giveaway Details:

- Hop along and leave comments on each blog. 
- Show us some love!:) Like & Follow us on Facebook & Instagram 
Precious Remembrance Shop: Facebook , Instagram
- Giveaway is open until May 25,2018. Winner will be chosen randomly. 
- Have fun & Goodluck!


This new set comes with an awesome swiss dot image, which you can see I put to good use. It looks like ribbon or washi tape and the sky is the limit with the ways you can implement it! It was begging to be stamped in a diagonal rainbow, so that it where I began my design!

I used the awesome Memento inks that I received for the Imagine Crafts collaboration blog hop last week. I love how crisp they stamp and the shades of pigment. I used my MISTI and MISTI corners to get the diagonal stripes the way I wanted them. It was so easy to stamp this background quickly!

The triangle image is stamped in the middle in black for some added interest. I spaced the stripes just enough so that I could stamp a few of the included sentiments in the spaces here and there! I really like the contrast it gives!

The circle images are heat embossed using gold powder (also from Imagine) and then punched using a 1 inch circle punch. I popped them up using foam squares. I also created a little tag to accent the Flat Kraft paper bag. It uses all of the same images as the card, but I also added a sweet little button!

The tag is attached with a striped orange clip that gives just the right amount of juxtaposition from the dots. I also added a few gold sequins to the card for some shine and added interest. Don't forget to head to the other designers blogs for their projects! Thanks for fluttering by!

Cheers, mate!

I'm up on the SugarPea Designs Blog today sharing this unexpected graduation card! My oldest son is graduating from High School and the graduation announcements have been rolling in. I knew that the London Scape SugarCut paired with the Chic Wishes stamp set could make something fun and a little different.

To begin, I sponged some Peacock Feathers Distress Oxide Ink onto a panel that had been die cut using the smaller Postage Stamp SugarCut. Once it was blended, I spritzed it with water as well as some shimmer spray for some shine. I also stamped a few of the stars included in the Chic Wishes stamp set at full strength above the skyline. While that was drying, I got to work on the skyline.

I die cut it twice out of black paper and then adhered it together using foam squares. I love creating dimension with these skyline sugarcuts. I showed some other ways during the release that are so fun, too! They are so versatile.

I love how the postage stamp SugarCut looks paired with the Diagonal Striped Coverplate. It really helps add to the postage vibe, I think! The "cheers, mate" sentiment is stamped in black onto the bottom of the blended piece.

You can really see the sparkle and shine from the shimmer spray in this photo. I also added a few sequins for some detail and added shine. Thanks for fluttering by!

Monday, May 21, 2018

Merry Monday #291 {Sweet Holiday Wishes}

Welcome to this week's Merry Monday Christmas Challenge! I am hosting this week and I'm so excited! I hope you will join us! My challenge this week evokes many special memories from Christmases growing up!

I fell in love with this adorable felt garland and knew that it could spark some creativity and some awesome Christmas designs! 

One of my favorite Christmas traditions is making frosted sugar cookies with my daughter. My younger sons are deciding they want in on the action as well, so next year will most likely be a full-on circus! LOL! I knew that Sweet Holiday Wishes would be the perfect set for this challenge! I quickly got to work making a whole army of cookies!

I stamped and die cut the images using the Sweet Holiday Wishes die cuts! Growing up we would make red, green and white icing...that being said...the McCormick food colors would make them pink and light green! That is Christmas tradition for me, so even though I have a whole collection of gel food coloring, I go for pink and light green! It holds so many memories of magical Christmases spent with my family! My aunt would always bring trays of fabulous cookies adorned with silver balls, cinnamon imperials, and sugar sprinkles! Now that is how I decorate mine with my daughter and so that is how I decorated my "paper cookies" today!

I thought that the Shape Shifters Oval Die looked like a cookie platter so I die cut a piece of Pure Poppy cardstock. I also used the Round Off Edger Dies on the white piece..I love the pinked, rounded edge, just like a cookie cutter! The sentiment is stamped onto a 4 by 5 1/4 inch piece of Kraft Cardstock and then heat embossed using white powder. That entire panel is attached to an A2 Kraft cardbase. 


The candycane cookies have a coating of Crystal Glaze over the top for a realistic candy look. The star cookies have some chunky glitter "sprinkles", and the Christmas trees have red Nuvo drop "cinnamon imperials". I added a silver nuvo drop to the center of the snowflake cookies to represent the silver decorating sprinkles/balls we use! I had so much fun creating all of these cookies! I hope you'll join us this week! Thanks for fluttering by!
Saturday, May 19, 2018

And they lived happily ever after!

Did you watch the royal wedding? I thought today would be a fitting time to share this wedding card! My cute and amazing nephew got married last weekend and I snuck a little bit of time to make them a wedding card! I decided to pull out some underutilized sets and one that I bought specifically to have for weddings, since previously I didn't own a single one. To begin, I die cut a piece of Strathmore 140 lb cold-pressed  watercolor paper using the Card Front Element Builder. I also cut the Ocean Tides piece as well using another one of the die cuts from that collection! I really love the extra detail that they give my designs.

The flowers are heat embossed using Gold embossing powder and are from the Clearly Besotted Floral Fancy stamp set. I also heat embossed the "and they lived happily ever after" and "Mr & Mrs" sentiment in gold and they are from the Clearly Besotted Happily Ever After stamp set. I used the floral image from this set for the bridal shower card and so I want to use the smaller version that is included in the Floral Fancy set for their wedding card. I watercolored the flowers and leaves using reinkers and an aquapainter.


The "happily ever after"sentiment is embossed onto a piece of Linen Vellum cardstock. I really like this particular variety because it is a little bit heavier and I am able to add adhesive behind it without it being too visible. I only added foam squares behind the gold embossing, so you can see the loose edge on the left side. 

I also used some gold paint and splattered some across the card front before adding the vellum. I also added a few gems from the "Recollections" collection from Michael's. Thanks for fluttering by!