Tuesday, July 31, 2018

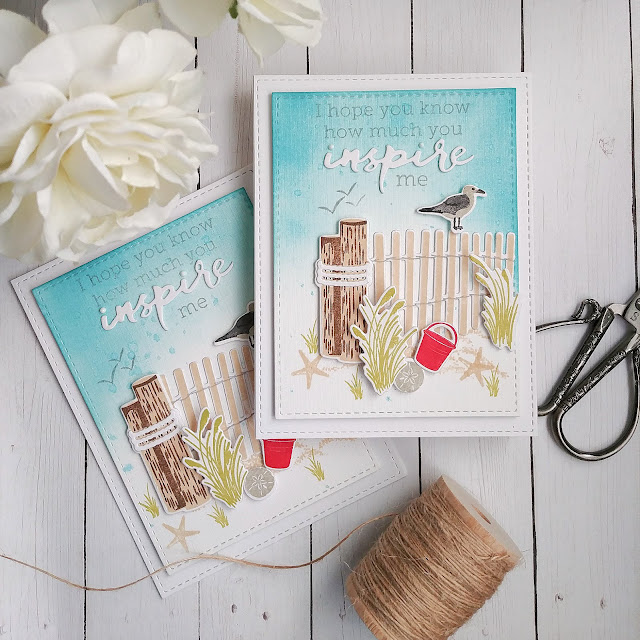
I hope you know how much you inspire me!

 Yesterday was "Mail it Monday" and I sent out quite a stack. I've been trying hard to send out the cards that I make on a more regular basis. That being said....after a few new stamp releases my stash can get quite large again! I like to check Facebook regularly for upcoming birthdays to help get those sent out as well. However, there were a few cards that I WANTED to send out, but my selection wasn't quite right. I fell head over heels in love with the new Words to Live By: Inspire and coordinating Words to Live By: Inspire die because of the uniqueness of the sentiments. 

 I've been dying to get both of these sets inky so it was the perfect excuse! I can feel Summer slipping through my fingers like sand, so I thought I'd better use this set before it's over! I made two {almost} identical cards for two deserving recipients.
To begin this design, I used the Noted: Simply Stitched A2 vertical die cuts using Fresh Snow Linen Cardstock. I blended some Peacock Feathers Distress Ink onto the top using an ink blending tool. I also mixed some of the ink up with water and tapped it onto the panel as well for some added interest. And...you probably could have guessed, but I also spritzed it with some Sparkle Shimmer Spray.
 While those were drying, I got to work stamping and die cutting all of the images from the Fence Line: Summer stamp set. I used my MISTI so that I could easily stamp two of each image since I was making two cards. Once they were all stamped, I die cut them using the Fence Line: Summer die cuts and set them aside.

 I stamped the sand image and then lined the fence up for placement and then got to work stamping the grey portion of the sentiment using my MISTI. I die cut 4 of the Words to Live By: Inspire die cut. I glued two together for each card and then glued it onto the panel. I used white Nuvo drops for the dots for the i's because they are SO small! LOL! I wasn't feeling that patient today! Ha Ha!
 After that was done it was easy to get the rest of the pieces in place. I also stamped some extra tufts of grass, seagulls, and starfish here and there. I want to step inside this little scene and be whisked away for a beach day!
I ended up by double layering the focal panel onto another die cut piece. I also used the larger stitched die for the card front as well so that it would have a double stitched edge! I had so much fun putting these two cards together and will get these popped in the mail as well! Thanks for fluttering by!
Monday, July 30, 2018

Just {fur} you!

 I'm sharing a simple card using the adorable Kit 'N Caboodle stamp set! I needed a quick card for a cat lover and this was the PERFECT choice!  I also paired it with the new Pierced Feature Frame die cuts. I just love the extra detail that these can give the simplest of designs!
To begin, I used the coordinating Kit 'N Caboodle Die cuts to die cut three of the cat piece. I then used a small bit of adhesive tape to secure the die cut shape onto a rectangle scrap to place into my MISTI.  I wanted everything aligned properly and I also wanted to get good saturation on the image. For this particular image, it is best to die cut first so that you can align the whiskers properly. If you stamp it and then die cut it, you run the risk of the whiskers not lining up. I hope that makes sense. I layered the stamped piece onto another blank die cut for stability. I made a mistake on the 3rd one so that one ended up in the garbage.

I die cut the frame twice, once out of pink paper and once out of white. I wanted the extra detail inside the frame as well. I stamped the "Just fur You" sentiment in black as well as the cute coordinating hearts. I took a gamble by adding the little paw prints onto the frame as well. I almost covered them up with an additional frame, but I think the recipient will appreciate those little paws.


I wanted a little extra detail to jazz up the simple design so I used a tiny jingle bell and hot glued it to the cat's neck. I layered everything up onto the fabulous Scallop Stackers: Large Die for some added detail. Thanks for fluttering by!

Saturday, July 28, 2018

Color Throwdown #503 {Birthday Greetings}

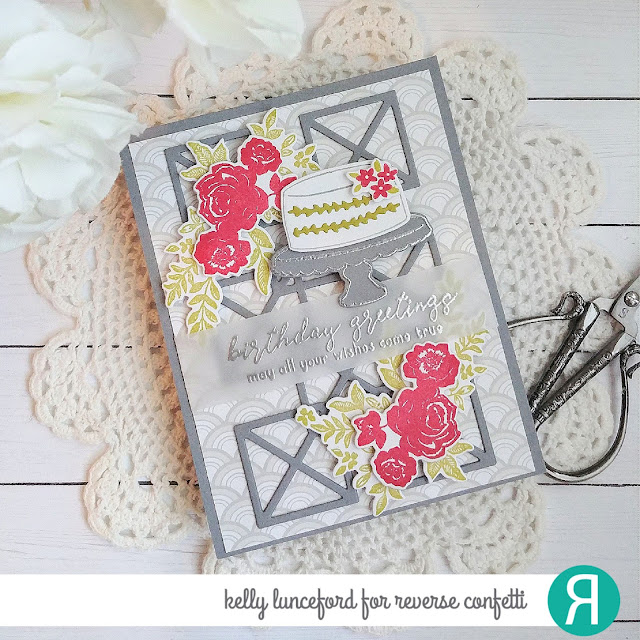
Hello friends! I've been dying to use this week's colors from the Color Throwdown Challenge!! I snuck some time to make this floral birthday card using some of my favorite Reverse Confetti products! I thought everything worked so well with this week's colors!
Image may contain: text
And....to make things even better, Reverse Confetti is having a sale until the 31st! You definitely won't want to miss out if you have things on your wish list!

Aren't this week's colors so fun and versatile? I just love how fresh the inspiration picture looks, too!

If you haven't noticed, I'm kindof obsessed with this Geo Panel Confetti Cut. I've used it on quite a few cards lately! I die cut it twice and then glued it together using liquid glue. The flower clusters are from the new Elegant Florals stamp set. I stamped the leaves twice and then the red flower clusters and then used the coordinating Elegant Florals Confetti Cuts


 The background pattern paper is from the Pattern Play 6 by 6 paper pad and is becoming one of my favorites!
I'm currently obsessed with this cake from the Candles 'N Confetti stamp set as well as the coordinating Candles N' Confetti confetti cuts. I've used it a few times on a project that I will be sharing later next month. I've had this set for a while but I've never taken the time to get results I like until now. In the past I've tried coloring in the outline images with Copic markers, but I've decided that I like it MUCH better with just using outline on cardstock. 


In this case, I just used silver embossing with the cake stand and then grey ink on the actual cake. The flowers are die cut out of white and then stamped using coordinating ink. I wanted to add a lot of blooms to the cake, but they were competing with the large floral clusters so I resisted and only added one! LOL! I die cut the green leaf trim using green cardstock.


The sentiment is heat embossed in silver and is from the Tall Blooms stamp set, which is another one of my favorites! I heat embossed it onto a strip of vellum and then wrapped it around the pattern paper and secured it with scotch tape. The entire front panel is adhered to a grey A2 card base. I had a lot of fun creating this birthday card! Thanks for fluttering by!

Wednesday, July 25, 2018

Keeping Christmas {Just for you: Homemade sweets}


 It's the 25th and that means it is time for this month's Keeping Christmas Blog Hop! I always love this time of the month and I had so much fun creating my projects that I am sharing with you today! Before I dive into the details, don't forget to stop by the rest of the ladies' blogs to see what fabulous inspiration they have for you!
Kelly Lunceford (you are here)


 Like I mentioned earlier, I had so much fun creating everything for this month! It's amazing how different it is when you're not doing it last minute! LOL! Even though I'm happy when the project is DONE, it is much more rewarding when you're enjoying the process and not stressed! I had so much fun making THIS project so I decided to make some Christmas ones as well. I host a Christmas brunch every year for a few ladies in my neighborhood and thought these would be cute to put at each place setting....OR, they may also be used for other little gifts depending on my needs when the holiday rolls around!  I'm just grateful to have them done!  I used the Favor It: Box 1 die for the boxes and die cut them using Pure Poppy and New Leaf cardstock. 

I used Mat Stack 1 die which coordinates with this treat set that is sadly discontinued.  I just love it and have used it for so many projects. In fact, I specifically bought this particular favor box because it coordinates with this set. However, there are other great sets that still work with it, too, which you can see HERE

 I just love how easy it is to layer everything up for a professional look! I stamped the base of the Mat stack in red, then I stamped the circle portion in white and used a punch to punch them out. Then, I stamped the "sweets" portion in black onto a white strip and used foam squares to pop everything up!
 I've used this cute little holly berry embellishments on a few projects and I had just enough to add to these boxes. I've been able to find them at Hobby Lobby the last 2 years, so I am hoping they have them again this year. They are the perfect addition to so many projects!


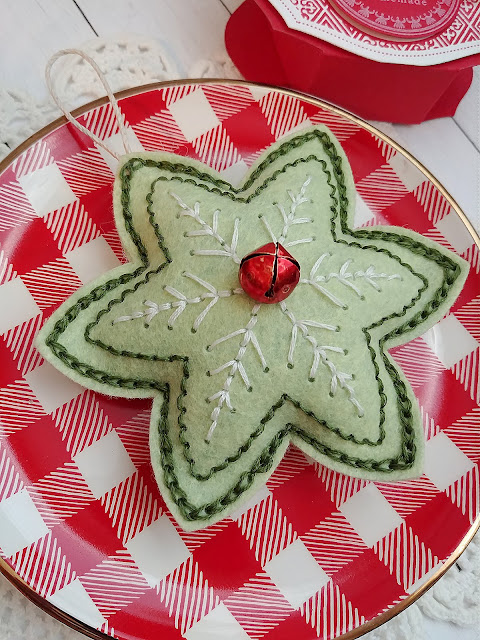
I was so thrilled when I opened my Papertrey Ink design team package to find these incredible new stitching dies. They are called Heirloom Ornaments 1 die and I am in love! I decided to whip up a few for this month's project as well. These two are both "experiments" in a sense because I am getting a feel for which stitches I want to use, etc. For this first one, I used green felt and green and white floss. I forgot that I wanted to do the chain stitch around the inside edge, so I did it around the perimeter instead. I actually love how it turned out, BUT I still want to try the chain stitch on the inside on my next one.

I'm hoping to stitch up quite a few to use as package adornments or to just tuck inside of a gift. I also think they would make cute gifts on their own with some candy or something. I added a red jingle bell to the center of this one using glue for some extra detail.


 This blue one was actually my first attempt and I had so much fun adding all of the beads to the snowflake. This particular one also uses the ombre type floss which is always so much fun to use. Once they were all stitched up, I stuffed them with batting and finished sewing them closed. I also added a twine loop for hanging on the tree. It's been fun to sneak out to a shady place in my yard and stitch away! It is very relaxing and I like doing something crafty that I can do outside! I hope you had fun on the hop today! Thanks for fluttering by!


Friday, July 20, 2018

Color Throwdown Challenge #502 {Let's Shell-ebrate!}

My one and only daughter's birthday is on Sunday and I wanted to make her a card that she hasn't already seen, so I created this for her using this week's Color Throwdown Challenge. I just love the cool blue tones and knew it would make a fantastic sea life card.  I have been dying to ink up these turtles from the Salt Air: Fauna stamp set, but I didn't think I'd be making them grey and blue! LOL! I think they look adorable in these colors, though!
 
I didn't have that bright cobalt blue, so I used the closest thing I had, which is Enchanted Evening. I absolutely LOVE  this inspiration photo and almost used the new Fence Line: Summer because of it!

To begin, I stamped the Text and Texture: Ocean stamps set onto Fresh Snow Linen Cardstock in Hawaiian Shores Ink. I used my MISTI so that I could get it nicely saturated, because of the texture of the linen cardstock. I just love the look! I also used an ink blending tool and added in additional Hawaiian Shores ink over the top. I layered that onto an A2 Linen Cardstock base using foam squares.


I can't get enough of the new Pierced Feature Frames and used them to frame this underwater scene. Everything has been spritzed with Shimmer Spray so you can see the glittery flecks in this close up photo.

The turtles are stamped in grey and blue as I mentioned before. I think they look quite cute like this! They are die cut using the Salt Air: Fauna die cuts . The sentiment is from the super cute Salt Air sentiments. I also decided to add some real sea shells onto the bottom to enhance the sentiment. 

The plant life is from the Reef Builder die set. The thing I love about this particular set is that I can die cut everything in white and then use ink to create the color combinations that I want. I left one stark white because I liked the stark contrast it added to this card! I also added a few sparkling clear sequins and some Nuvo drop bubbles to enhance the underwater feel. Thanks for fluttering by!

Wednesday, July 18, 2018

Inspired by....Campfire S'mores!

I've been needing to make some thank you gifts for 8 ladies who graciously baked 24 cakes for Girls Camp that my daughter and I attended! The ovens weren't working properly so we needed to get them made quickly by these 8 awesome women. I was heading back to get my daughter to dance, so it worked out that I could pick them up on my way back up! I wanted to do something "campy" and this new Greatest Adventure stamp set was the perfect choice!

It also worked perfectly for the current Inspired By Challenge. I actually used these same containers to package up my S'mores gifts. They've been hanging around for years and this was the perfect time to use them all up!

I found these cute soaps at Bath and Body Works and decided to add those in with the gift as well. 

To begin, I stamped all of the images that I needed to create each tag. I colored them using Copic markers and then die cut them using the Greatest Adventure Confetti Cuts. Once that was done, I got to work die cutting the backdrop which is the Blocked Out Square Confetti Cut. I haven't used this yet, and it was perfect to use for this project. I layered it onto some Kraft cardstock.


 The sentiment is stamped onto Kraft cardstock using black ink. I also die cut 8 of the Dashed Line Tag to set the scene for these cute little campers. I just added them all using foam squares and a dab of liquid glue for the s'mores sticks.
I added some hemp twine to the hole on the tag and tied it in a bow. I punched an additional hole on the side of the tag so that I could attach it with ribbon to my bundle of S'mores. I had so much fun with this project! Thanks for fluttering by!


SugarPea Designs Mix it Up Challenge #45

I have two cards to share with you today using this month's SugarPea Designs Mix It Up Challenge!I've included the rules for the challenge below,  but you can read all about it HERE
 I had so much fun creating this card and the second one is a quick and easy design! I LOVE the inspiration photo for this month's challenge and it lends itself perfectly for a fun red, white, and blue card!
 
I love the Lantern SugarCut and thought it would be a fun starting point for this card. Usually I have some sort of an idea in mind before I begin a design, but for this card, I just decided to sit down and have fun seeing where it took me. I die cut the lantern four times from red paper and glued it together using liquid glue. I like how sturdy it makes the piece and gives it extra dimension. The grey pieces are only die cut once and just glued to the top layer. 

The "so happy for you" sentiment is stamped in the middle of the white rectangle using both black and grey ink. I love the Sweet Sentiments: You stamp set because of all of the versatile sentiments. The stars are also included and I stamped each of the three sizes in either red or blue.

I also added in a few sparkling clear sequins for some added sparkle and shine. I layered this entire piece onto a grey piece of cardstock that has been cut using the Postage Stamp SugarCut

I used this awesome striped paper from the Sugar and Spice paper pad. It actually had a row of men's neckties in the center, but the lantern piece covered that up nicely and left me with the perfect backdrop for my card. I also added some machine stitching around the edge of the card for some extra detail.
This second card is simple and fun using just a few supplies.
As usual, I like to use both sides of the challenge, but I think you could say I took a liberal approach this month. I actually didn't even try using the sketch for the first card...I just had fun seeing where it took me. I really love the colors in the inspiration photo, as well as many of the little details such as the bowl and the sprinkles. I thought that by using the Large Striped Coverplate I could mimic the look of the bowl. I die cut it using red cardstock and layered it onto a Rustic White cardstock base using liquid glue.

The sentiment, which is from the Parisian Holiday stamp set, is heat embossed in white onto a black sentiment strip.  I just adore this little croissant and have used him quite a bit. His trio of balloons were beckoning me because I knew that I could make them red, white, and blue, just like the french flag. This little guy is from the Ooh La La stamp set and is colored using Copic Markers. It is die cut using the coordinating Ooh La La sugarcuts. The balloons have a coating of crystal glaze and just a few sprinkles of iridescent chunky glitter, because I just can't  help myself!

As I mentioned earlier, this card is VERY simple, but adding in all of the rainbow sparkle gems really makes is sparkle and shine and adds in some of those fun sprinkle colors. Thanks for fluttering by!