Saturday, July 27, 2019

Saturday Showcase {Hello Sunshine}

I'm one of those people that really likes to "celebrate the season", no matter which one it happens to be!  Honestly, even though Summer can be uncomfortably hot, it seem to just whiz by quicker than any other season and I end up feeling sad as the summer days slip into Autumn. For today's Ink to Paper Saturday Showcase, a few of us are creating some fresh designs using the new Beachy Keen stamp set which is just perfect for July! I really like to send out seasonal birthday cards, thank you cards, etc. so these two cards will be heading out ASAP! I'm also getting excited to use these palm trees for some Hawaiian themed Christmas cards as well!

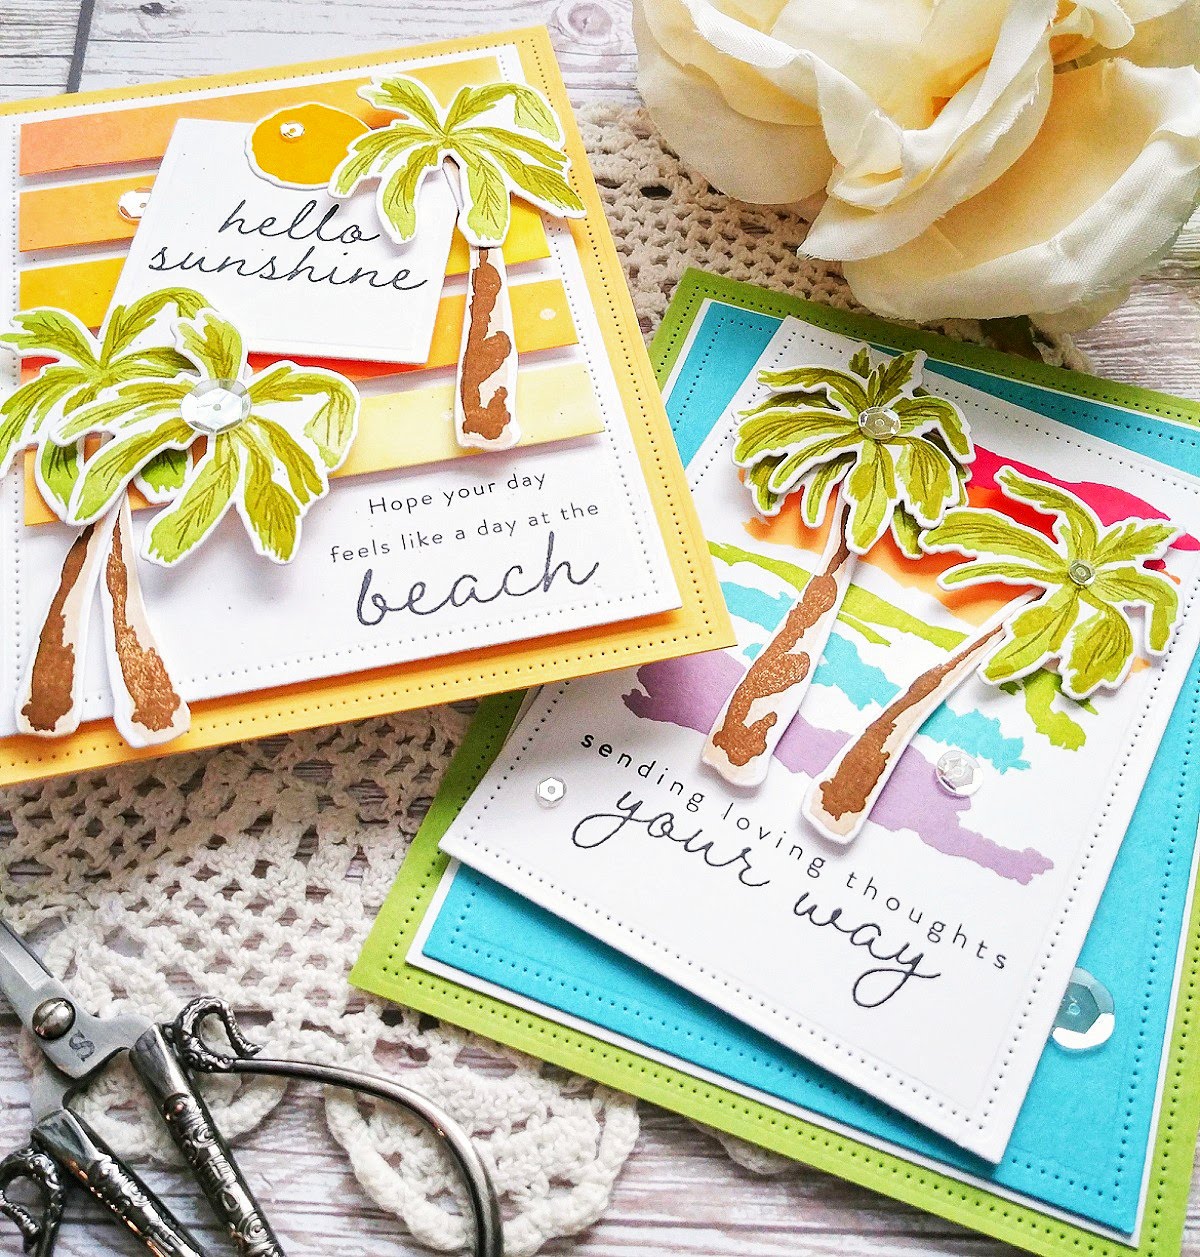
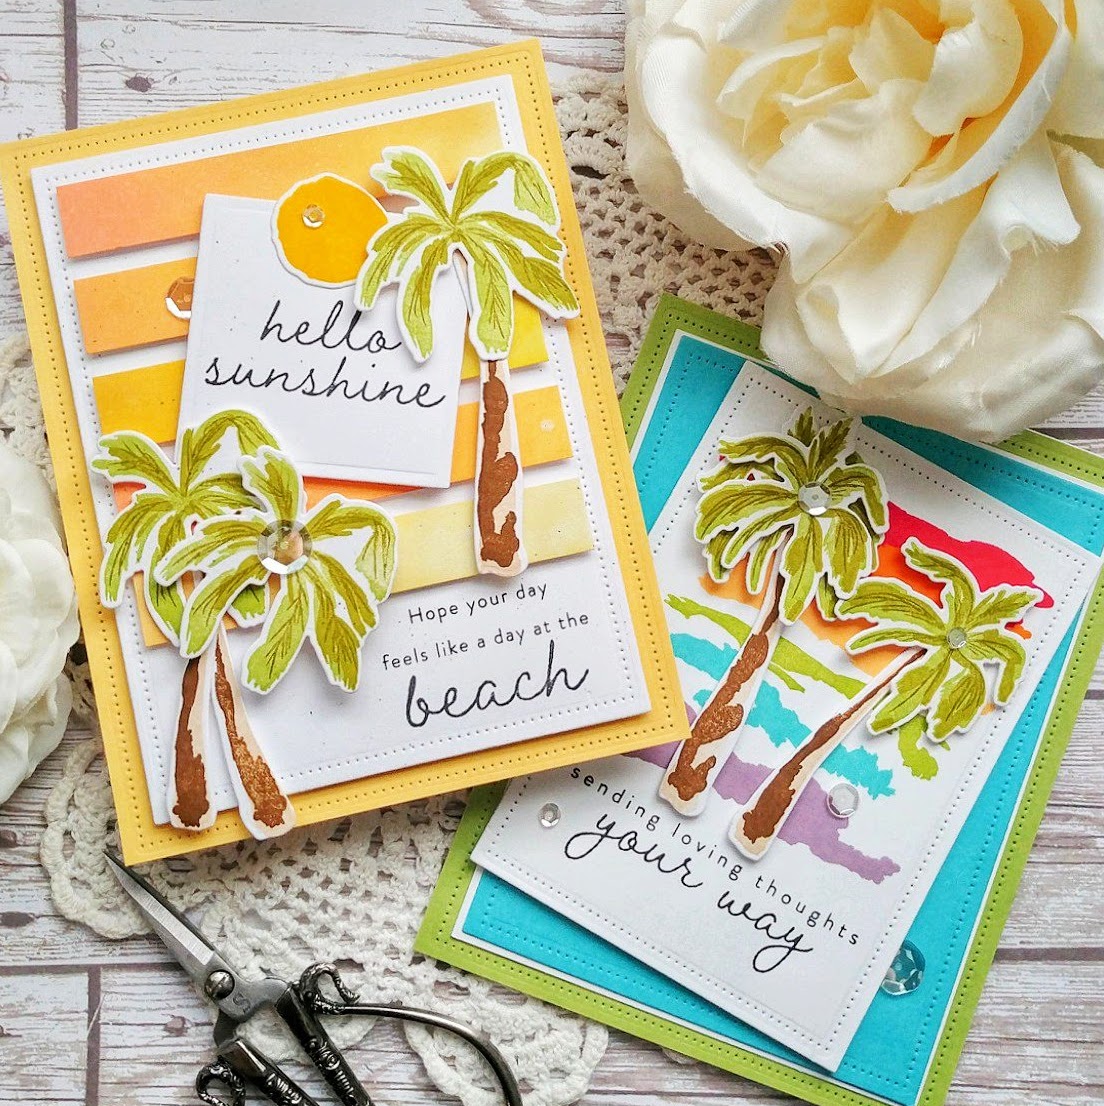
I ended up by making two cards {surprise, surprise} but it wasn't planned. I just happened to have some extra palm trees all cut and stamped and they were just begging to be used! I originally only planned on making the "hello sunshine" design, so I will start off with the details of that one first! To begin, I got to work doing some ink blending on 5 strips of white cardstock. I used an assortment of Distress Oxide inks and my Blender Brushes to get the ombre effect blend I was going for. I wanted it heavy on one end and have it fade out. Once those were done, I spritzed them with water and some Shimmer Spray and set them aside to dry.
The next step was to stamp the palm tree tops and the trunks using the Beachy Keen stamp set. I used my mini MISTI and just got them all stamped quickly. I used the coordinating Beachy Keen die set to die cut everything. I set those aside with the strips and got to work on the rest of the card details.

I really love all of the sentiments that are included in this set, so I used 2 of them on the front of this design. The "hello sunshine" portion is stamped in black onto a die cut square. The other sentiment is stamped directly onto a white panel that was die cut using the Nesting Basic die set and the Nesting Basics Pierced Rectangles die . I also used that die set for the yellow panel as well.  Once all of that was done, I was ready to assemble the card. I added some black ink flecks here and there and some sequins for some detail and shine!

This is my second card which uses the extra trees that I had ready to go! I figured I'd put them to good use and make another card,which allowed me to use yet another sentiment! I die cut a white panel using the Nesting Basics Rectangle dies and the Nesting Basics Pierced Rectangles dies and then added the different rainbow colors using the different abstract shape images that are included in the set.
I stamped the sentiment in black and then added the palm trees over the rainbow portion. I used an extra top to the tree and double layered the one on the left. I think it helps make the tree look more full and realistic. I added the focal panel onto some additional die cut layers for some extra pops of color. A few sequins finish off this colorful design! Thanks for fluttering by!


Thursday, July 25, 2019

Keeping Christmas {Handmade Just For You}


It's the 25th and that means it's time for this month's Keeping Christmas Blog Hop! It's been fun to see all kinds of Christmas projects popping up on Instagram for "Christmas in July" so maybe today's projects won't seem so out of place! My daughter turned "Sweet 16" on Monday (as well as a few of her friends), so they got together for lunch on their special day. She wanted to take a small gift for each girl so I suggested some earrings. Once I had everything out, I thought how perfect it would be to get some made for Christmas gifts as well. I decided to share the ones I made for her friends at the bottom of this post if you are interested. Before I dive into the details of today's project, don't forget to hop along to the other designers' blogs to see what holiday inspiration they have to share!
Kelly Lunceford (you are here)
Anita Madden (off this month)
Vicki Finger 
Nancy Guse (Off this month}

It's no secret how much I love making these earrings. They are so fast and so easy, you'll have a jewelry box full in no time! I used the Designer Dangles-The Bigger The Better dies for today's projects, but I've used ALL  of the Designer Dangles Kits in the past to make lots of earrings!
My goal for today's earrings was to create holiday inspired earrings, but I didn't want "Christmas" earrings, if that make sense. I want the recipient to be able to wear them all Winter long, if not longer with some of the designs! 

These dies are Mixed Media dies and they are stronger and thicker than regular dies so they cut through the Faux Leather like butter! I have all of the Taylored Expression Leather but I also like to buy sheets of the faux leather HERE

This is one of those pairs that I would wear all year long! Each pair of earrings are on a die cut cardstock piece. This particular shape is from an old Nestabilities set that I've had for a million years. I'm sure we ALL have it! LOL!

I used the retired Vintage Labels stamp set from PTI to stamp the border around the cardstock. I used another old set to stamp the "handmade just for you" sentiment at the top. Once that was done, I just used my tiny hole punch to punch the holes to thread the earrings through. I purchased the clear earring backs from Hobby Lobby so that they won't fall off of the card.

For all of these earrings I used the largest sized die and then the next size down.I have used three at a time that you can see HERE.

I love this fun plaid; I have a shirt with this same plaid that gets a lot of use in the winter, so I think I may need to make myself a pair!

I'm super in love with this basket weave print paired with the Buffalo Plaid! These will be perfect to tuck into lots of the 3D projects I've already made this year!

These are the earrings that I made for my daughter's friends. I had so much fun working on these and matching them to the mini lotions.

These cute little gift bags were purchased at Hobby Lobby and were the perfect size to fit the earrings and the lotion. You could even add a treat in there as well.


I think this pair looks so cute with the gingham lotion.


This was probably my favorite pair in the end; I love the gold flecked cork paired with the light floral leather.


I'm planning on making more pairs like these last ones I have shared, to give as Christmas gifts as well. I have to get using up the large quantity of leather I just bought! LOL! Thanks for fluttering by and don't forget to hop to the other designers' blogs! 


Inspired By...centerpiece {You are special}

This week there's a fabulous new Inspired By Challenge that's just  bursting with detail and beauty that is sure to get your creative juices flowing! I've been so excited for this week's challenge; so excited that I ended up making two different cards. The first one, shown here, is stampy and the second one is more scrappy!

I was inpired by the subtle embossed floral image on the pots; it is very hard to see, but I promise it is there! The colors and scattering of the flowers, as well as the background color. I also really liked the shine of the water and the wine.

I used Soft Stone cardstock for both cards and dry embossed both panels using an old Cuttlebug embossing folder that fit well with what I could make out on the pots in the photo. I attached a strip of Spring Rain cardstock on top of the dry embossed panel. I stamped the "you are special" sentiment, which is from the Pinkfresh Studio Blooming Bouquet stamp set in black ink onto the blue strip.


I had so much fun using the Pinkfresh Studios Floral Elements stamp set on THESE cards, and they worked so nicely with today's challenge, that I used them again! I stamped them in black and then colored them using Copic markers and die cut them with the coordinating Floral Elements die set. The cute circular scallop piece is die cut using the Essentials: Inverted stitched scallop die set. I used the smaller size on my second card shown later in this post. I added it to the embossed panel using foam squares and then got to work arranging the colored flowers.
I absolutely LOVE all of the unique and special sentiments that Pinkfresh Studios stamp sets have to offer. I plan on using this as a birthday card, so I chose an additional sentiment from the Folk Hummingbird stamp set that I heat embossed in white onto a black strip of cardstock. I added it to the bottom of the circle piece using foam squares. I also added a sprinkling of black ink for some added detail. Once that was dry, I added the Essentials Jewels here and there for some shine. I used the champagne looking ones because they looked like the wine in the photo.

My second card uses some of the same elements as the first card; the dry embossing, the circular die cut and the flowers as well as the blue strip of cardstock. I decided to give the blue strip a little something more and sewed a portion of white carstock that is die cut using the Essentials: Classic Edgers die set. I just taped the portion that I wanted and then sewed along the edge using my sewing machine. This piece is attached to the dry embossed panel using foam squares.
From there, I just started adding in bits and pieces to create this scrappy/stampy design. The scrappy bits are all from the Just a Little Lovely Embellishment bundle. I had so much fun picking out the things that would work well with the inspiration photo.


The "one awesome day" and "this brings me real joy" sentiments are puffy stickers from the embellishment bundle. I used my embossing buddy to take off the adhesive so that I could keep them elevated on the different levels of the cards without them sticking down where they shouldn't. I just used foam squares and liquid glue just like I would a stamped piece.

You can see the smaller scalloped circle on this card. It was the perfect spot to add some of the stamped flowers.

Something that I like to pay special attention to is the placement of vertical words on my designs. I always make sure that the bottom of the letters are facing toward the inside of my card; or towards the middle, if that makes sense. When I see a word that is facing the other direction,it feels like it is looking away, or not part of the design. So, I made sure that the word "happiness" which is also a sticker, faced "into" my design. This one will be used as a birthday card as well. I had so much fun on both of these similar, yet different designs. I hope to see your cards in the gallery. It's always fun when I am scrolling on Instagram and see a card that is headed to the challenge! Thanks for fluttering by!

Tuesday, July 23, 2019

Ink to Paper Transformation Tuesday {Scatter Kindness}


Hello and welcome to this week's Ink to Paper Transformation Tuesday! I'm sharing two cards with you today with a twist on the original design! I always love the Transformation Tuesday post because it gives me a chance to revisit a past project; in this case, my card from the latest release using Dandelion Wishes stamp set. While I liked my original card "okay", I found it very hard to photograph and it felt washed out. I also used a heavy hand with the Nuvo drops (ha ha), which were super fun to add, but in the end I felt I'd gone overboard. 

Here is my original card. I was really hoping to achieve a soft, airy feeling like a real dandelion with the emboss resist technique. I also wanted to keep the sentiment airy as well, but in the end, I feel like it got a little lost and didn't "ground" the card. I really wanted the Nuvo drops to mimic the dandelion seeds floating away, but I think I got a little "carried away" instead! LOL!
The effect from the  emboss resist technique on the dandelions was what I was hoping for, so I kept that element and detail the same, but I added some crystal rhinestones to the centers rather than sequins so as to not overwhelm the look. I did add some Nuvo drops, but just used some restraint this time! LOL!


To begin both designs, I chose some Bitty Big: Green Parakeet pattern paper to use as the background. I had used the Harvest Gold in my original design and it just felt too yellow. I really like the bright, happy, retro feel that this paper gives the cards. Each panel is die cut using the Nesting Basics Pierced Rectangles die to give it some added detail.


For this card, I used the Geometrix Hexagon die for the middle portion.I stamped the word "wish" at the bottom using black ink. The "make a" portion is heat embossed in white onto a black strip of cardstock. I attached it directly above the "wish" with foam squares. From there, I got to work adding the dandelions and stems. The stems are attached using a 2 way glue pen. This adhesive works well for these narrow die cuts. I also spritzed some turquoise ink across the white panel for contrast and detail.

This one is very close to the original, but I swapped the sentiment which is from the Dandelion Wishes sentiments stamp set and is heat embossed onto one of the banners from the Banner Builder: Basic Die. These are going to be well loved,I can tell!  I used the Geometrix oval die just as I did in the original and sponged some blue ink around the edges for the soft feel I was hoping for. I only added a few Nuvo drops as I mentioned earlier, which looks so much better! I had so much fun reworking my original card! Thanks for fluttering by!

Monday, July 22, 2019

Pinkfresh Studios (Notes of Encouragement)

Hello and welcome! I'm so excited because today I am sharing my first two cards as a Pinkfresh Studio Design Team Member! I'm sharing these over on the Pinkfresh Studio Blog as well! I've created two different cards using the same Floral Elements stamp set to create these notes of encouragement!

The inspiration for both of these cards came from the BEAUTIFUL Just a little lovely: 6 by 6 paper pad. I just loved the colors; cheerful yet soothing all at the same time! That is just what I am looking for when creating uplifting cards!


I stamped the images in black ink and then used the coordinating Floral Elements die set to die cut them. I set them aside while I got to work on the other elements of the cards. 

I used the Fancy Label Frames for both sentiments. This "bloom" sentiment is from the lovely Blooming Bouquet stamp set and is stamped in black. I also added some grey ink splatter to continue with the flecks from the pattern paper.

The black label has a sentiment from the Oval Foliage stamp set heat embossed in white. I was a little hesitant to add black to a sympathy card, but it really adds the contrast that this card needed. 

Each card has a frame that is die cut using the Pretty Frames die set. I added that over the pattern paper using foam squares. Once that was done, I added the floral elements and sentiments. Of course, the finishing touch is a sprinkling of the beautiful Essentials Jewel Mix ! These add such pretty and sparkly detail to any design! I had so much fun working on these two cards and I hope they bring some comfort and cheer to the recipients! Thanks for fluttering by!

Thursday, July 18, 2019

Inspired By...Let's have S'more! {Hugs...everything will be okay}

There's a fun new Inspired By Challenge starting today that is sure to get your creative juices flowing! I really like this challenge because I usually end up by making a card that I never would have otherwise, like today's card! 
I was inspired by the buffalo check napkins, the perforations in the graham crackers, the silver holders and the chocolate bars, of course! 
As I stared at the inspiration photo, like I usually do each week to really let the details soak in, I was wondering what pattern paper I would use. Thank heavens a light bulb went off and I realized that I had the PERFECT stamp to make my own paper! I love the Taylored Expressions Buffalo Check Background stamp so much and have used it for quite a few projects, but it was absolutely an exact match for today's card! 
I stamped it using an old SU! pad called Riding Hood Red and then added some PTI Pure Poppy over the top to get the right color!


I knew that I would be using some type of die that included some perforations that looked like those found on graham crackers, but the whole direction of the card took a turn when I chose to use the Classic Edgers Die set . I love these so much! I used them on one of my favorite card sets that you can see HERE. Anyway, I just love the amazing detail they provide. Since these had a feminine twist, I decided to bring in some flowers as well. I die cut the  "chocolate" letters to spell "HUGS" using the Adore Alphabet dies and popped them up onto the scalloped Kraft piece. Once that was done, I was able to add the cute flower bouquet that I stamped and colored from the Floral Elements stamp set

The "everything will be okay" sentiment, which is from the Blooming Bouquet stamp set,is embossed in silver to bring in the silver from the holders that the s'more fixings were in. I added a few Pinkfresh Studios Essentials Jewel Mix gems here and there. They look like a marshmallow color in real life, but of course they pick up a lot of colors while I am trying to photograph! Once everything was done, I added some chocolate ink splatter at the top for some extra graham-y detail! I hope you'll join us this week! Thanks for fluttering by!


Wednesday, July 17, 2019

SugarPea Designs Mix It Up #57 {Hello There}

I took last month off from the SugarPea Designs Mix It Up Challenge, so I'm super excited to be back this month with this fun inspiration photo and sketch! I've been itching to use this bear paired with these florals since the release, so I had a lot of fun creating this design!


I wanted to use both sides of the challenge, so I used blue tones and kept to the sketch pretty close! LOL! Sometimes you have to tweak things here and there to create balance, which I did today!


To begin, I cut a panel of white cardstock so that it would fit onto the scalloped piece from the Card Front Element Builder. I taped the Spirograph Mandal Stencil over the top of the panel and blended on some Peacock Feathers Distress ink. Once that was done, I kept the stencil in place and then added some Moonstone Glimmer Paste over the top. I removed the stencil carefully and set the panel aside to dry while I got to work on the stamped elements of the card.

I stamped the largest flower cluster from the Meadow Motifs stamp set in black and then colored it using an assortment of alcohol markers. Once I was done with the coloring, I die cut it using the Meadow Motifs SugarCuts

I stamped one of the bears from the Hey Summer stamp set and colored him with some brown Copic markers and some pink for the nose, of course! He is die cut using the Hey Summer SugarCuts and set aside. I added some Crystal Glaze over the top of his nose for some fun shine!

I stamped the "hello there" sentiment, which is from the Everyday Sentiments stamp set and die cut it with the Sentiment Strips SugarCuts. Once all of that was done, I was ready to assemble the card. I layered the stenciled panel onto the scallop portion using foam squares. That piece was added to a die cut white base, which also uses the Card Front Element Builder {linked above}, using foam squares as well. I added the flowers, the bear and the sentiment and a trio of sparkling clear sequins. I had a lot of fun using this month's Mix It Up Challenge photo! I hope you get a chance to join us! Thanks for fluttering by!