Wednesday, September 19, 2012

Non-traditional *sweet baby*

 Emma's dance teacher is having her first Grandbaby so some of the "dance moms" put together a baby shower at the studio.  I couldn't go, but I wanted to take a gift.  The expectant parents aren't super traditional, so I thought I would go non-traditional, but still cute and frilly. It coordinates with all of the baby gifts that you can check out here. The fabric that I used was originally patterns from basic grey's paper line, but they also printed it for fabric. I couldn't find the paper, so I went with some I picked up from Hobby Lobby a year or so ago. They still have it and I really enjoy using it. I never thought I would be using it for a baby card, though.
I rummaged through some of my old SU! stamp sets to find "Buggies and Booties" which worked well with theme.  I have always loved using this set.  I stamped it onto cream cardstock with black ink and then added a little bit of wheat Prismacolor marker to antique it a bit.
I folded doilies  and layered them for a more dramatic effect.  I aged all of the edges using Vintage Photo distress ink by Ranger. It is one of my go-to supplies.  Once I had the medallion done, I added an accordion medallion with a tiny bit of antique linen stickles.  Of course I had to add some rhinestones to keep up with the theme. In the end, it looked a little bridal, but I like it. I like working out of the box sometimes. It really stretches yourself.  I was bummed that I couldn't go to the shower, but I hope she liked everything.
Here are some photographs of the sweet little shoes that I made. I am seriously addicted. They are so fun to make!
Thanks for fluttering by! P.S. My mom and I are putting together a tea party for Emma on Saturday. I will share photos next week. I also need to share photos of Rhys's first birthday party. If you are friends with me on facebook, I am sure you have already seen them.

Monday, September 10, 2012

Happy Birthday, Dad!

Hello and welcome! I hope you all had a beautiful weekend! We celebrated my Father-in-law's birthday yesterday so I needed to make a card.  We also missed Father's Day with him since he was out of town, so I kind of combined a Father's day card and a birthday card.  I don't have a lot of masculine sets, so I chose to use this tree set from PTI. I can't think of the name off the top of my head.  I have always liked using it. I chose to use the outline of the tree and the trunk so that I could color in the leaves. I also added some glossy accents to the larger leaves for some texture and dimension.  Everything was distressed using Ranger's Vintage Photo distress ink. I love that stuff!

 I used some of my newer "Authentique" paper that I got from Ellen's store. You can check it out with the link on my sidebar. She always has fun stuff.  For those of you who know me, I like to mix a lot of prints and this card is no exception. I kept all of the embellishments as masculine as possible, from the jute twine to the felt stitched ribbon. No bow in sight!
Now for the exciting part....on Labor Day, my husband, kids and I moved me into my new stamping space. You would die if you could see it, especially compared to what I used to have, but it is functional and it is out of the way. In honor of this blessed event, I will be posting some blog candy in the next few days, so stay tuned! I am so happy! Thanks for fluttering by!

Monday, September 3, 2012

Thinking of You


I needed a thinking of you card so instead of only making one, I decided to make two. It is so easy just to cut enough for two rather than sitting down to make another card entirely.  I am trying to talk my husband into moving all of my stamping stuff today, but we will see. He already told me he doesn't "really" want to do that, but I think we could be quick. Especially since Rhys is taking his morning nap and the older kids can watch Rowan.
  With summer on its way out and fall on its way in, I decided to use some early autumn colors.  I really love light blue and orange paired together.  I used this "Trendy Trees" set from PTI for my focal image. I have only used it once, but I really like using it.  I also used Jen's August SFYTT. Isn't it great? She always does such a good job. One of the things I miss the most is being part of her sketch team. Maybe someday.........
I had a package of cork that was handy and I thought it would work well with the theme of the card. I liked it as the background for the tree. I used a sentiment from the PTI set "Autumn Abundance" which is another one of my favorites.
I have actually been quite busy the last month or so working on some fun sewing projects. They have been for baby showers, but I didn't have enough time to get everything photographed. That is always such a bummer when you work so hard on something but then don't get a chance to get a good picture of it. I didn't really think the mother's to be would be keen on me asking if i could come over and take pictures of their stuff! LOL! Anyway, I had fun and I have been trying to be creative. Thanks for fluttering by!

Sunday, July 1, 2012

Baby's First Year mini album

 I have always wanted to make a "Baby's First Year" mini-album and I finally did! I am so proud of myself!  I posted the card I made for the shower I went to in my previous post and now you can see where all of the inspiration came from.If you want to see all of the other baby things I made you can check them out here Once I picked out my papers it all came together nicely.  I have been making these little albums for years and they are so much fun.
 Of course you all know how obsessed I am with banners, so I made a little one for the cover. I also added some die-cut letters to spell baby.  I picked up the tiny tiles that I used throughout the book (you can see it in the left hand corner) at Hobby Lobby and they are the perfect addition and some of them had sweet little baby quotes on them.  I love it when I find the perfect embellishment.  I uses doilies and an accordion medallion for the focal piece.  The "sweet pea" image is just a sticker and I added some glossy accents to all of the little hearts for some added interest.
 For the "meat" of the album, I let my computer do the work. I simply printed out all of the little tabs that indicate which month is being highlighted, the monthly milestone pieces as well as the the "sweet things I do..." pieces.  The album wasn't the only gift I was making so I felt pressed for time.  I figured that the new mommy would have lots of fun little things to add to each page to make it her own, anyway.
 I kept all of the pages similar in design. Each has a little bit of change whether it be in tiny details or layout, but for continuity reasons, everything is pretty much the same.  Well....my little ones are up from their naps, so I better go, but thanks for fluttering by!

Tuesday, June 26, 2012

Sweet Baby

 I was busy last week making lots of fun stuff for a baby shower I went to on Thursday! I almost didn't have time to make a card, but I quickly whipped this one up with scraps of things I used to make the gift. I will share all of those goodies with you next time.  
 Like I mentioned in my last post....there are a ton of babies being born in the neighborhood. It is so much fun! It is the year of the girls, too.  I had so much fun making lots of fun, girly baby things that I haven't been able to do for myself in a while.  I quickly made a little fabric rosette and some little felt leaves.  I placed the whole focal piece onto a little doily.
I will share the rest of the things that I made soon. I really had a lot of fun! Thanks for fluttering by!

Wednesday, June 13, 2012

A new little someone


There are a ton of babies due around here, so I went and got stocked up on baby gifts. Of course that means that I need some cards, too.  I made 3 girl cards and one boy card. I couldn't get the boy one to photograph nicely, so I only am showing you the girl ones.  I used Jen's June SFYTT. I always check it out when I am short on time, but need to get a lot done. It really does minimize the guess work and I get on with the fun part....stamping and embellishing!
   I went to my "go-to" baby set and got to work.  I always love to paper piece the cupcake liner. I am sure those with mad coloring skills would prefer to color it, but not me. I think it makes it look like a cute patterned liner.  My favorite part of the whole card is the little die-cut letters to spell baby. You can't tell in the photo, but they are all glossy. I die cut each one out of pattern paper and then also out of cardstock.  Once they were glued together, I mounted them onto the card using cut up foam squares.  I am having way too much fun with that glossy accent stuff. I think you can tell a little bit better in my previous post. I used the same letters and stuff.  The flowers are made from one of my Martha Stewart punches, layered.  I used a dimensional in between each layer to really give it some depth.  The center is just a circle punch out of pattern paper and then some glossy accent...surprise, surprise!
It really is straightforward. I don't have many tricks up my sleeve lately, but I had fun. I was literally going "stir (craft) crazy" if you know what I mean.  I am really, really, really, really (there aren't enough really's to explain) how much I miss my craft space. Creating is part of who I am and I don't feel like me lately! Making these cards was helpful, but not enough.  Anyway, thanks for fluttering by!

P.S. Emma is going to see the new Disney Pixar film "Brave" tonight with her Grandma and Grandpa. It is the Utah premier and she is so excited.  We went to the Utah Highland Games and Scottish Festival on Saturday, so she probably still has bagpipe music ringing in her ears! LOL!  Rowan was helping his Grandpa hold the flag! Such a good helper. He is currently obsessed with flags and balloons.

Sunday, May 27, 2012

Be Prepared

My darling little nephew just turned 8 and has started Cub Scouts.  One of my son's friends makes these great survival bracelets out of rope, so I thought I would give him one for his birthday. I asked my son's friend to make it yellow and gold, since those are the two cub scout colors.  Once I had the bracelet, I thought that I would make some "scout" type packaging. I decided to use the PTI set "Father know best". It has a compass and it worked well with the theme. I also used some PTI alphabet dies.

  I couldn't fit the word "prepared" onto the box if I used the die cut letters, so I just created a computer generated strip and printed it out.  I added some glossy glaze onto the letters and the center of the compass. I am really loving that stuff and I like how it dries. I have used "Crystal Effects" from SU! for years, but this stuff is way better. It really makes the letters look like store bought alphabet stickers rather than quick and easy die-cuts. I added a strip of cork for some extra texture. I simply stapled it into place on either side of the box.

I stamped the outside of the box with the compass image to carry out the theme and to dress it up a bit. Not that 8 year old boys really care about "dressed up" boxes!   I hope he enjoys wearing his manly survival bracelet and that he never has to really use it to survive!  Thanks for fluttering by!

Tuesday, April 3, 2012

Special Delivery: Baby Boy


Ever since I saw the film "Red Tails" I have been wanting to use this little airplane set. I didn't really have a reason, so I kept putting it aside. Since I have gotten back into blogging, I have been visiting some of my favorite stampers. I have sadly realized that while I have been away, so have others. In fact, some of them are just gone. But, I did visit Julee Tilman's blog to discover that she recently had twin boys! How exciting! So...I decided to make a card to send to her darling little twins. She had hoped for some to decorate their NICU walls. I decided that while I was making one, I may as well make two so that I could have one on hand. I think this is a practice that I will keep up on!
Of course that meant that I could use this darling little airplane from PTI. In fact, all of the stamps I used are from PTI. I used quite a few sets to assemble these two cards. Some of them are sets that I have hardly inked, so that felt good. I also used quite a few dies as well. All of them are from PTI except for the circle piece; it is a nestibilities die.


To begin with, I chose my papers which are Authentique and I picked them up at Ellen Hutson's online store. You can see the link on my sidebar under "Places I love to shop". She ships things super fast and she has a great selection of popular items. I love these papers and thought they worked nicely for a baby boy, or two! LOL! Oh....I almost forgot....the sketch is one of the Verve sketches. I saw it while I was on Julee's blog reading about the twins and thought it would be perfect with the set I wanted to use. Now....if you know me, you know that I seem to have a slight problem sticking to sketches, but I think I did pretty good considering.
After I picked my papers, I got to work die-cutting the circle pieces. I stamped onto the Kraft cardstock using Palette Noir ink. I paper pieced the body of the plane using some of the coordinating papers. Once I had it glued in place, I colored in the rest of the plane using copic markers. Once that was all done, I added glossy accents to the body of the plane, the circle on the tail and the nose. I wish that you could see how cute it all looks from the photos.


I set those pieces aside so that they could dry and got to work cutting out the banner pieces. I realize that the alphabet I used was a little large, but I think it looks okay. I also took the time to die-cut a few buttons since I knew that they would need some time to dry as well. Once that was all done, I got to work on the ticket pieces. I used quite a few stamps on these, but I think they turned out quite nicely. I actually hadn't intended to use this stamp set, but while I was rummaging for the ticket set, I stumbled across this neglected set. I thought it would be perfect since I was using the airplane image.


Once every last detail was dry or stamped, I got to work assembling the cards. I needed to machine stitch the felt rick rack border to the left panel. There is something really gratifying about machine stitching on felt, but I think I have already mentioned that. If you haven't tried it, I suggest you do. I also wanted the linen twine "ties" for the banner to actually be tied to the card, so I used a needle and thread to get it through the cardstock. I don't think it should be going anywhere now. Once I got everything done, I thought that the right side looked a little light since the left side was so heavy with detail. I added a quick piece of dark coordinating pattern paper to fold over the edge and added a quick line of zig-zag stitching. I thought it did it's job nicely to balance things out. Thanks for fluttering by!

Sunday, April 1, 2012

Celebrate Today and Everyday

My friend celebrated her birthday at the beginning of March, but I didn't get her gift to her until last week! Shame on me! I did, however, have a lot of fun getting her gift together. I was going for a "sewing" theme, so I had to use this cute button stamp set from PTI. I haven't really had a chance to sit and fiddle with all of the button die-cuts and stamps until now.

I decided on all of my papers first and then worked on the cute buttons. The tiny circle ones were die-cut and then stamped using the stamps that come in the set. The larger scalloped buttons were die-cut out of pattern paper. I added some glossy accent stuff to all of them and then let them dry.

While I was letting them dry, I got to work on the fun felt flower. I die-cut four flowers out of felt and then four flowers out of tulle. I am sure most of you know how to make these flowers; they are super easy and super cute. I hot glued it all together and added it to the card. I also die-cut some felt ric-rac which I then layered onto some lace and stitched to the card. This is one of my favorite parts of the card. I really like the way sewing looks on felt. The sentiment stitched to the top left corner is from an Autumn set from PTI, but it is one of my favorites. I also stamped the "superior quality" image onto a piece of pattern paper and paper pieced it onto the button card for some extra color and detail.

The reason why I was going for a "sewing" theme is because I sewed a cute little coin purse for her gift to which I added a gift card to one of our favorite quilting/fabric shops, some gum, hand sanitizer and some yummy lip gloss. I will post the coin purse on my "Thimbles and Thread" blog soon, but you can see it photographed here with the card. ETA: You can check it out here It isn't a perfect match, but I thought it went pretty well. As far as "matching" goes, I found some fabulous fabric today that is the same print as some of my favorite papers. I will be sewing and card making soon to show you a "perfectly matching" pair!

Friday, March 30, 2012

Easter Blessings

I have gone a little bit crazy this year decorating for spring and Easter. I actually have gotten out almost every single Easter decoration that I own. I can't find a few, which is bugging me, but I am sure they will turn up; maybe around Halloween or Christmas! LOL! Even with all of the bunnies, chicks and Easter eggs, I haven't forgotten what Easter is really all about!
I needed a couple of cards to send out this week, so I made 3 so I could have an extra on hand. I was talking to a friend while I was getting them made and she mentioned that she was in need of a card so I gave her the extra. I used all of the same supplies that I had used on my Easter banner which you can see below so it made it easy. As you can tell, I am still using my old slab of My Mind's Eye paper. I promise the next project will not be using that! LOL!

The stamp set that I used for both of these projects is "Tags for Spring" from PTI. It is one of my favorites, but really only gets used once a year. Everything is pretty straightforward, but I did use some of my yummy new bakers twine that I picked up at the cooking store last month.
I realize that these photos are a little hard to see, but I made them as big as I could. I had someone comment on my St. Patty's banner that the photos are hard to see, but this (photo above) is the largest that I can make them; to my knowledge. If anyone has a suggestion, please let me know.
This is the first banner that I made that isn't a word or a phrase, if that makes sense. Each panel is just a little bit of Spring or Easter.

You will notice on the Easter cards that I used distress ink on all of the edges, but for my banner, I kept it all clean. Sometimes it is hard for me just to leave well enough alone, but I resisted for this project!


I have a few more projects that I have made but haven't posted. I will share them soon! Thanks for fluttering by!

Friday, March 23, 2012

Three cards, three ways, one day!


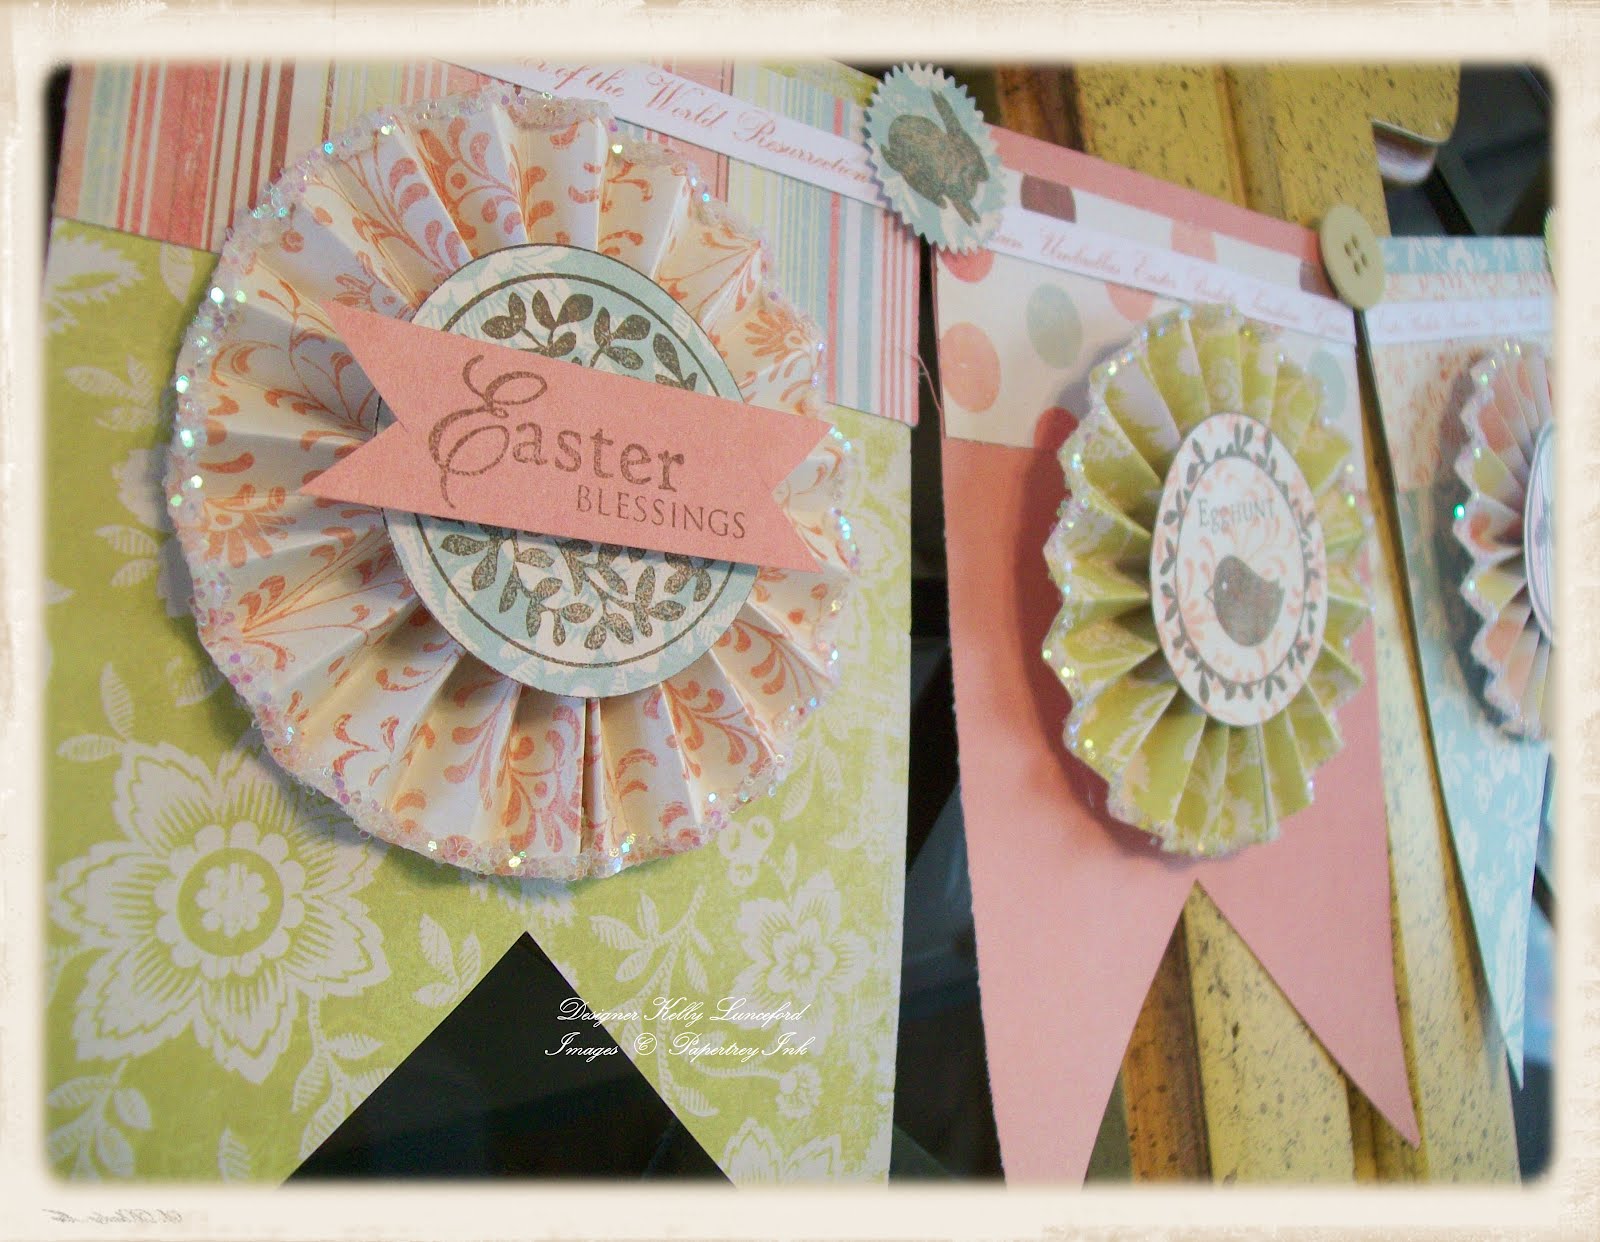
Yesterday I sat down and got to work on three cards that I needed. I pulled out an older slab of "My Mind's Eye" paper and got started. I needed to make a card for a 3 year old, a 12 year old and a brand-new baby!

For card #1, I kept it simple since it was for the 3 year old (pictured to the right). I knew that I would be using "Just the Ticket" from PTI because the invitation that my son got for the 12 year old's party, was in the shape of a ticket. Of course you all know how much I love to follow a theme. So...I decided to use the same supplies on all three cards. I'm a little bit obsessed with the ticket stamp set lately anyway, if you haven't noticed. I also paired it with the PTI star set as well.

When I first bought "Just the Ticket" I couldn't figure out why I didn't like what I was making and how things were turning out until I realized that I was trying to stamp it all onto white paper. If you look at any kind of ticket like this, they are all printed onto colored paper; usually pink, blue or brown. Since I have been doing it like this, I have really liked the results. The finishing touch is a die-cut ric-rac border and a bit of baker's twine.


Card #2 is very similar to card #1 so I won't go into much detail. In fact, it is very similar to the St. Patrick's day card I made a few posts down.

I did stamp a few black stars at the bottom and then added a bit of glossy crackle accent glue to each of the three circles.


Card #3 is just a tiny little card. I needed something simple and quick to tuck into a baby gift. I was kindof "done" making cards at this point, especially since I was trying to do it off the kitchen table which meant making it in my bedroom so I had stuff strewn all over my bed. All I really wanted to do was go to bed, which wasn't an option at that point.
Again, pretty straightforward, but it is kind of fun to see how easy it is to change the look and still use the same stamp set. Of course, this particular card uses all of the same elements as the others, but they really do make it feel different. I still have some other projects that I have made but haven't share yet, so stay tuned. Thanks for fluttering by!

P.S. I hope you are all enjoying the arrival of spring. I know I am.