Wednesday, September 28, 2022

Papertrey Ink September Release Countdown Day 4

Well friends, it's the 4th and final day of the Papertrey Ink September release countdown! Everything will be available for purchase tomorrow night at 10 pm ET! My first card for today uses the new Larger than Life: Peace die and the coordinating Larger than Life: Peace stamp set. I've also used the new Layered Snowflakes as well as a few other new favorites and some tried-and-true staples!

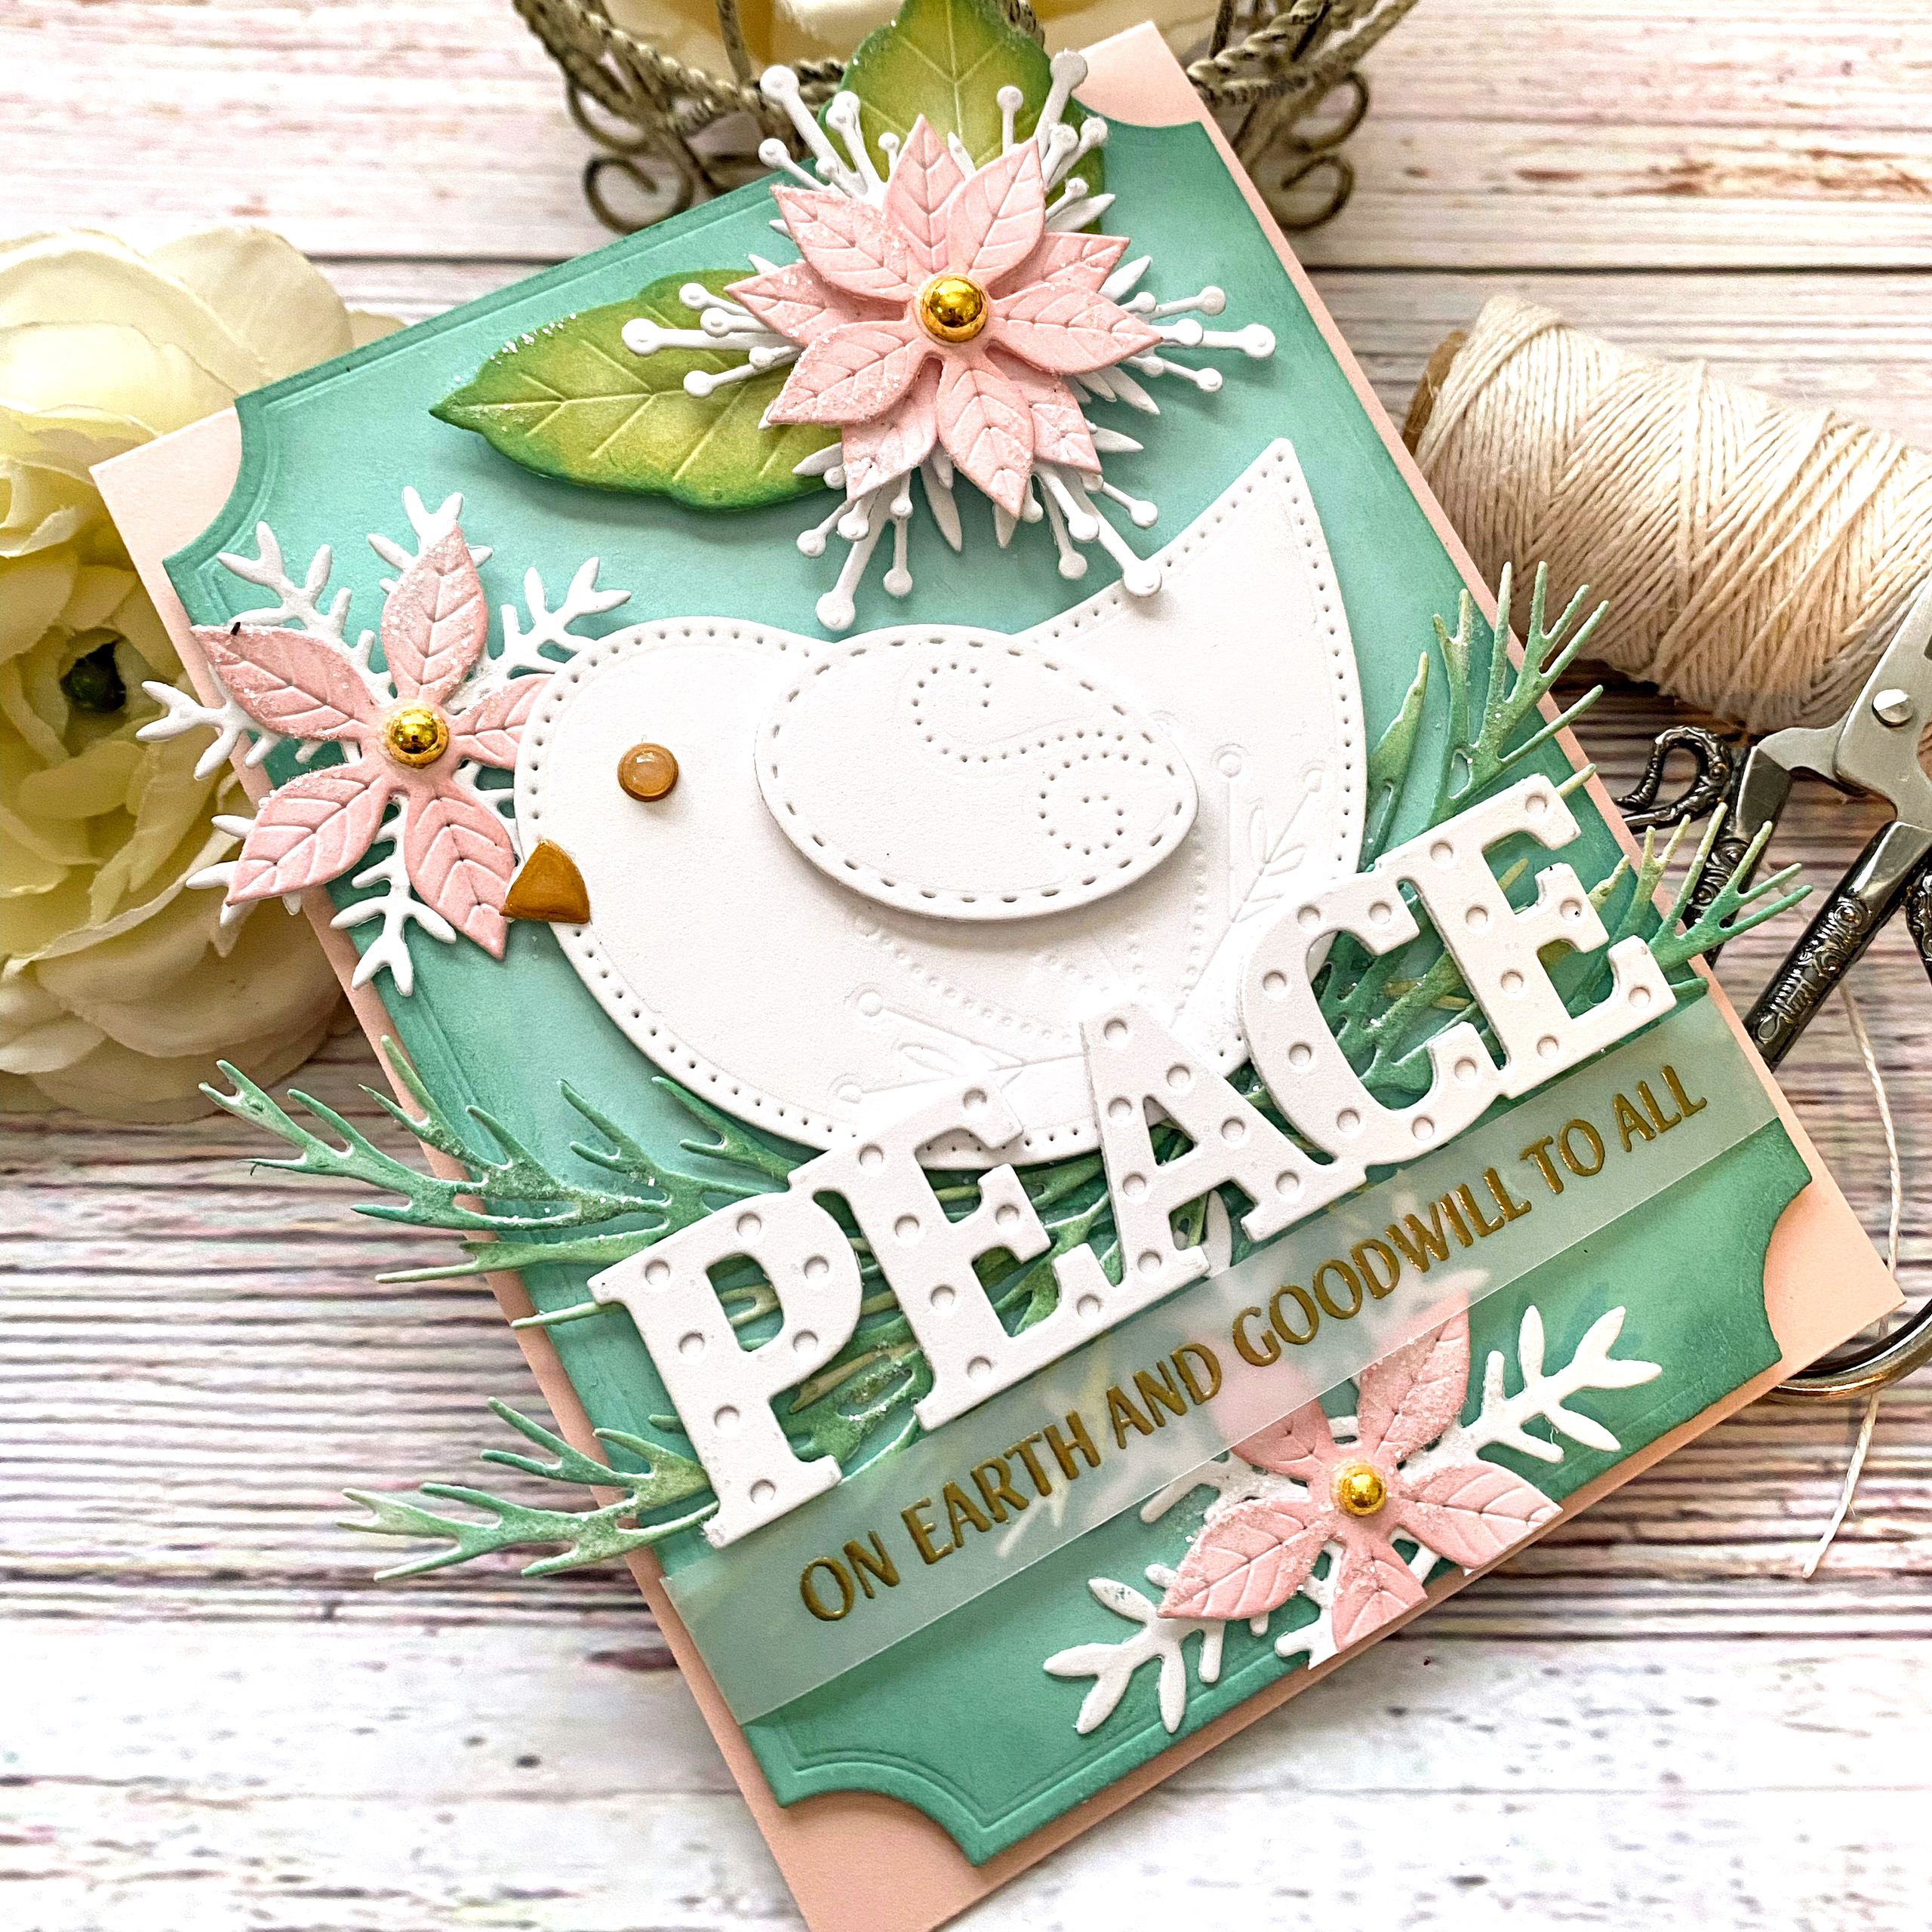
I think it's natural for use to a dove and peace together, so that's what the inspiration point was for this card. I already had all of the bird pieces ready and waiting from day 1. To begin, I die cut the PEACE word; there are two dies that layer over the top of each other to create this look. You could also use either one separately for a different look. I chose to keep them stark white and glue them together using liquid glue. I heat embossed the "on earth and goodwill to all" portion of the sentiment using gold powder on a strip of vellum.

The new Layered Snowflakes come in three different styles, but I opted to use just two. I die cut them from white cardstock as well and a few of the smallest Into the Blooms: Poinsettia die to layer over the top of each snowflake.

I used the two leaves from the Poinsettia die collection and the pine boughs from the new Into the Blooms: Pine dies. I used Distress Oxide ink to color the leaves and the pine boughs .

This was probably my favorite card to make from the entire release! I just love pink and aqua for Christmas cards! 

My final card for today uses the FABULOUS new Snowy Truck Accessories stamp/die set paired with the new Bring Home the Holidays die collection! I have to say, I'm completely IN LOVE with these cute little houses! I've been using some from MFT for my Welcome to the Neighborhood cards, but these are my  new favorites!

I die cut EVERYTHING for this card from white cardstock and either stamped it, blended it, or kept it white to bring this scene together! Confession: I stamped the sentiment at the top of the main panel crooked, but a quick fix with an oval die and a stamped sentiment fixed it up just right! In the end, I actually like the oval detail at the top much better than how I had it! ha ha!

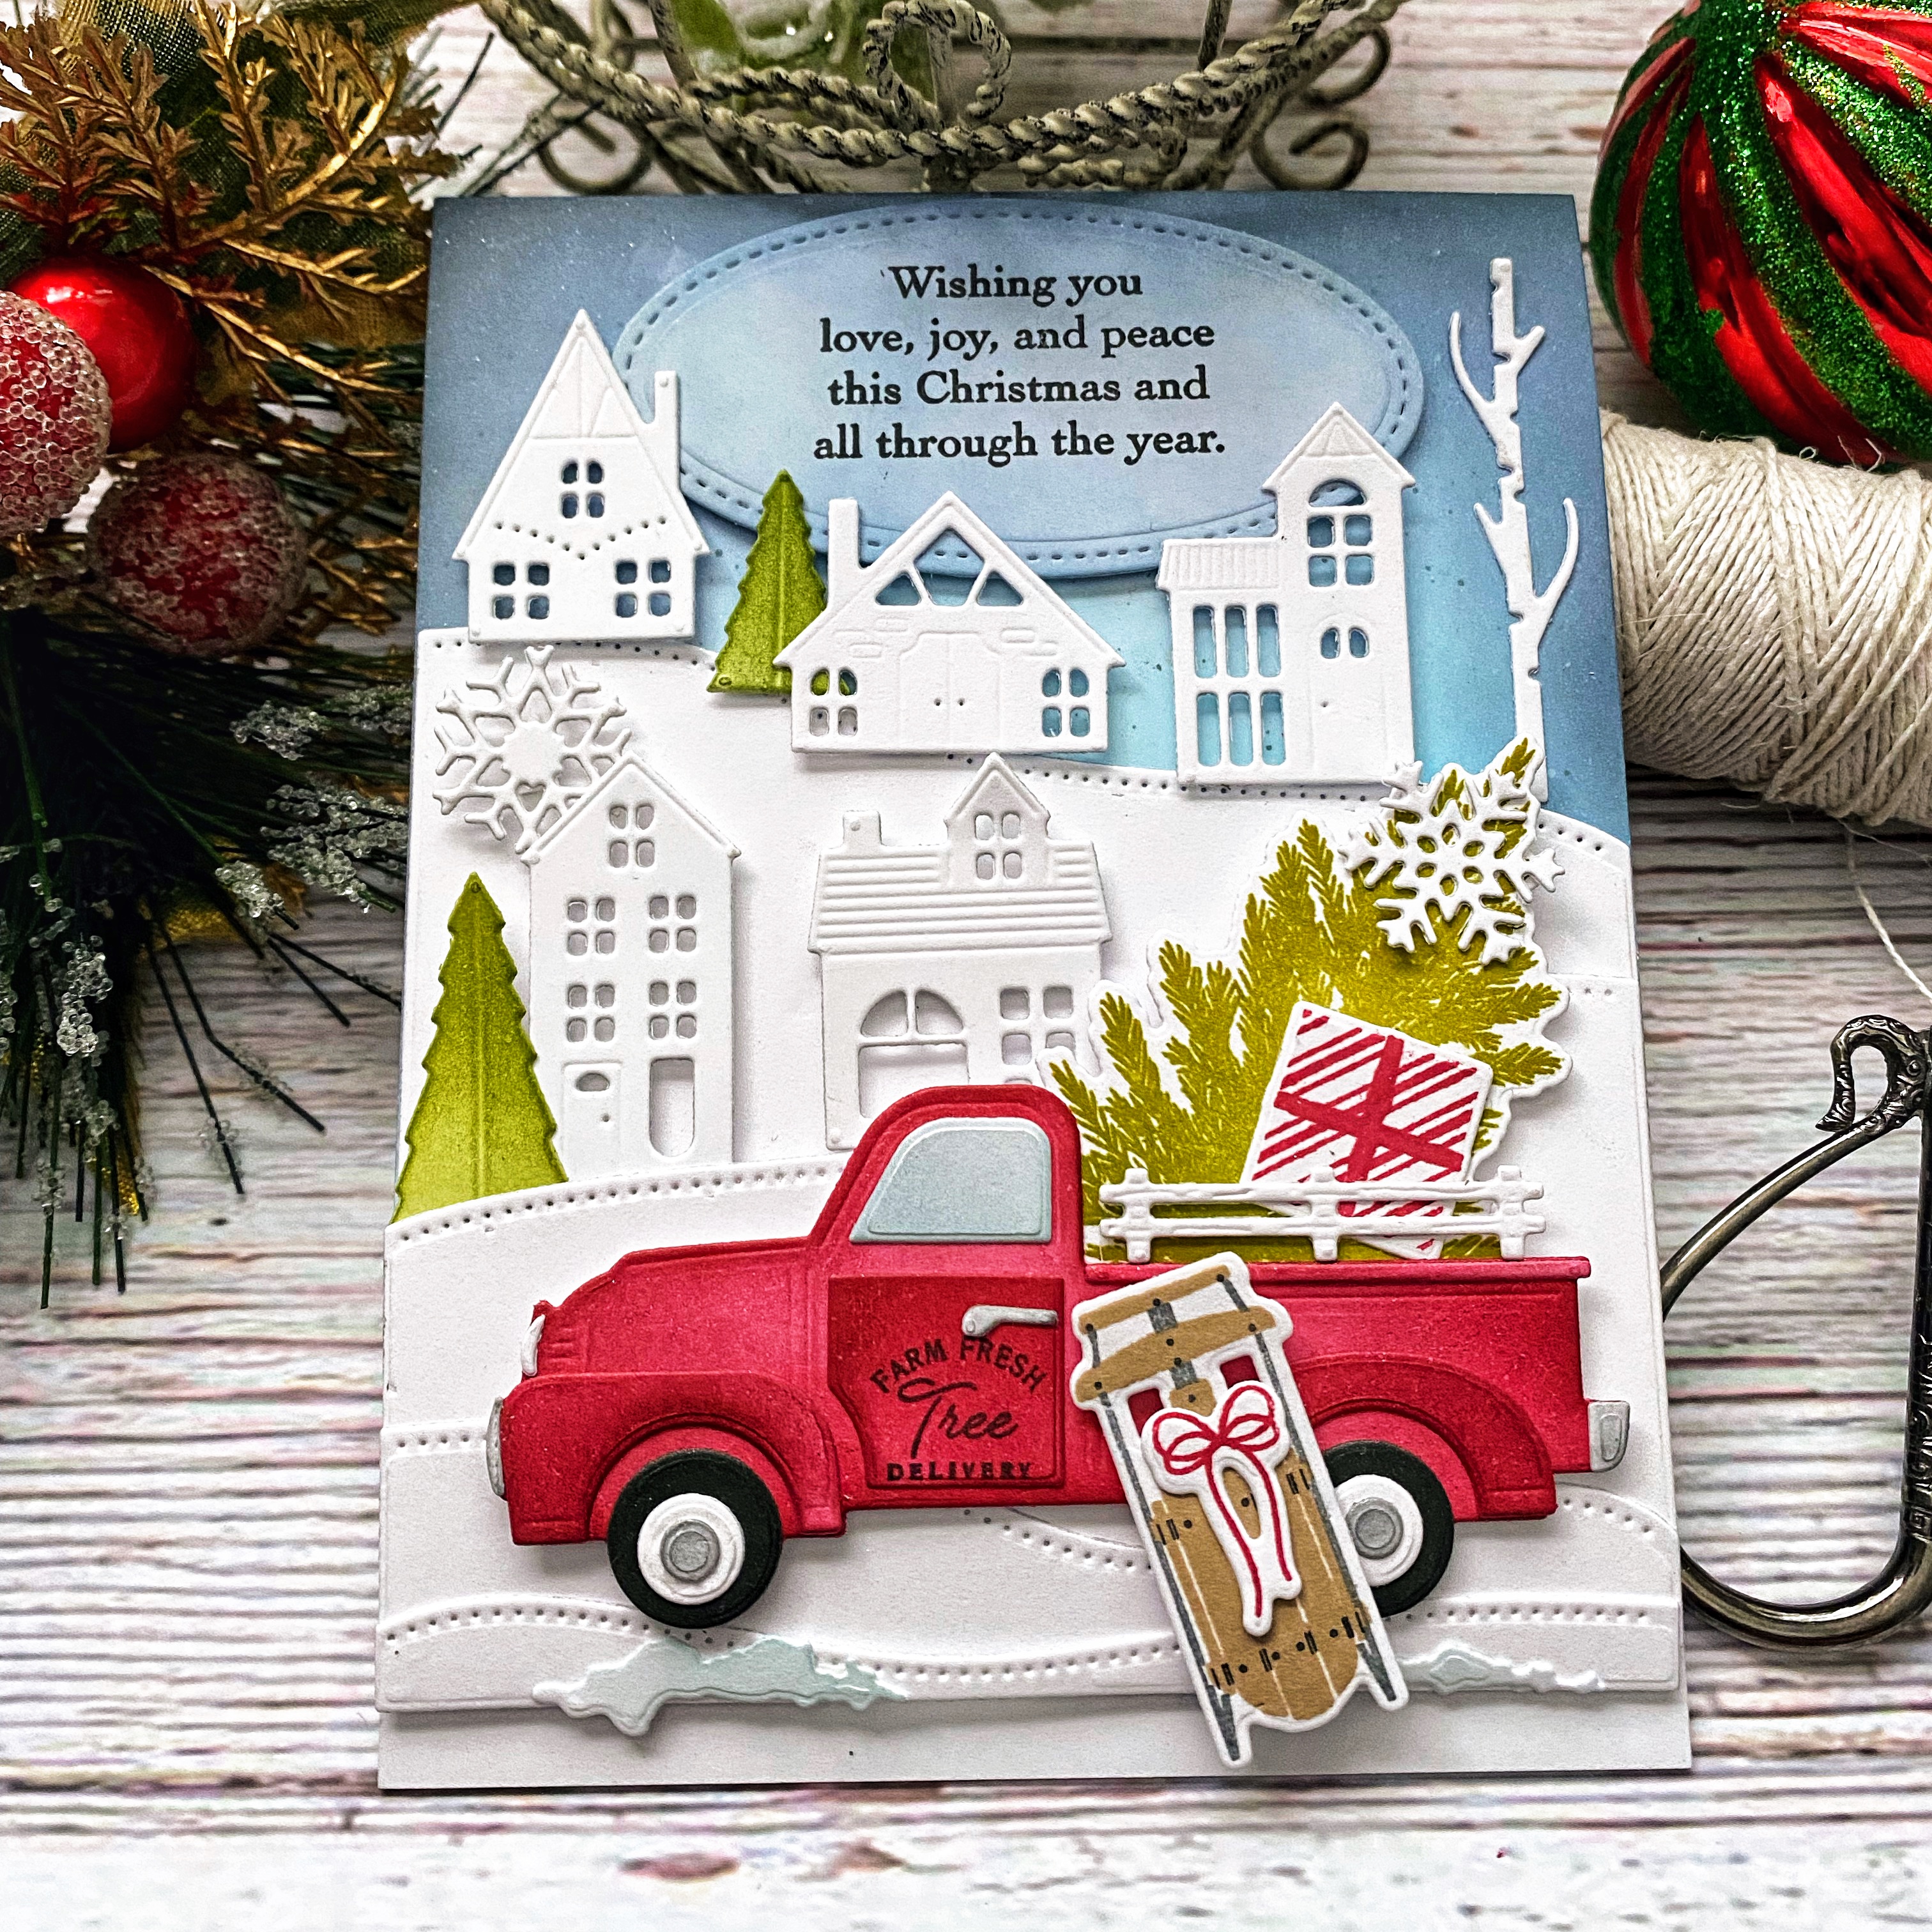
The Snowy Truck Accessories stamp set comes with quite the fun assortment of things to dress up the truck; I used the sled, the bow, the fence on the bed of the truck to hold the tree in, the gift, and a tree....AND the cute sentiment on the side of the truck. There is also a really cute snowman, more gifts...etc.

This was such a fun card to make! I hope you've enjoyed the countdown! Thanks for fluttering by!


Tuesday, September 27, 2022

Papertrey Ink September Release Countdown Day 3

Welcome to day three of the Papertrey Ink September release countdown! I'm sharing two cards today and up first is a Christmas card made using the adorable new Tiers of Cheer stamp/die set! I've had so much fun over the years decorating my own tiered trays, so it was a joy to create this paper version!

This stamp set allows you to create the three tiered tray like I've done here, but the dies include the single or double version that you can use as you'd like. I stamped my tray in Pure Poppy for a festive look. I die cut all of the pieces and then had fun stamping them in Christmas colors. In the end, I didn't use all of the pieces, but opted to keep my vignette a little bit spare so you could really see each piece. There are quite a few different options to mix and match to really customize your tiered tray.

The largest oval in the Love to Layer: Oval die collection is the perfect size as a background for the triple tiered tray. The little "feet" on the bottom are separate pieces and are simply glued to the edges of the oval using liquid glue. I die cut a 4 by 5 1/4 inch piece of Aqua Mist cardstock using the Border Bling: Tin Stitch Die. I added some Vintage Patina Distress Oxide ink around the edges using a blender brush. I layered this panel onto a Pure Poppy top-folding A2 card base using liquid glue. I added some photo corners from the retired Fairytale Christmas die collection die cut from Weathervane cardstock. I a touch of glitter finishes off this fun card!

My second card for today uses the new Vase Collection 12 stamp/die set! I also used the new Just Sentiments: Peace stamp set for the sentiment. The Vase Collection 12 stamp set comes with a really cute sentiment that says "farm fresh" for the metal jug. I did stamp it, but in the end, it got covered up with the embossed sentiment! ha ha!

I'm blanking out on the name of the die cut for the corners; something about Holly Berry corners! (hangs head in shame) I also used a corner rounder punch to round the corners of the olive twist focal panel. I used the new Love to Layer: squares to ground the jug. One of the things I like about this vase collection is that it also comes with the coordinating foliage and berries.

This photo shows the gold embossed sentiment that I just love! What a reassuring statement! I added some white paint splatter for a snowy look.

Tomorrow is the 4th and final day of the countdown so make sure to stop back by! Thanks for fluttering by!


Monday, September 26, 2022

Papertrey Ink September Release Countdown Day 2

Welcome to day 2 of the Papertrey Ink September Release Countdown! Thank you so much for the sweet comments on yesterday's post! I'm back again today with two cards using some beautiful new products! Up first is a rustic card (I can't seem to put away the Bitty Big: Kraft paper) using the new Merry Berry Wreath. This is such a simple, easy to use stamp/die set that would be perfect to use for mass-produced Christmas projects.

I accented the berry wreath with a cute new bow from the Bows Galore die set! This is one of those sets that feels like it was made "just for me"! ha ha! I know I'm going to be putting these little bows on EVERYTHING....YEAR ROUND!!! I used one on my Mistletoe card yesterday!

This card features the new Love to Layer: Square die collection; this is another one I will be using a lot! I die cut the largest and medium size squares from Pure Poppy cardstock and added some Scarlet Jewel ink around the edges.

The Berry Wreath set comes with two sentiments; I chose to use the 'joy' sentiment. I also added a little bird I had in my stash just waiting for it's day to shine! Its the Feathered Friends Mini 16, I believe (the PTI website is currently down so I can't check)  I added some machine stitching; my sewing machine was luckily threaded with red thread! Some white paint splatter and sequins finish off this rustic design!

My second card for today is a little bit out of the norm for me; I usually like a lot of layers, but sometimes it's nice to do something a little more Clean and Simple. I always love cards that use paper strips, but I hardly ever use them myself. 
I don't know if I've mentioned it or not, but my three youngest boys are all playing football this year so my evenings and weekends are CRAZY BUSY!

This is one of those cards that is perfect for when you want to be creative, but you're in a time crunch! This card features the new Merry Christmas Tree stamp/die set. This is a fun set that uses a multi-step series of stamps to create the final tree image.

I didn't follow the suggested steps to stamp the tree; I found it was easiest to stamp the images that are on the edges first and work my way in. Of course, you can do whatever is easiest for you. I used a MISTI, so this one of those stamp sets that would be perfect for mass-producing as well; just die cut the main tree outline and use a MISTI and stamp a bunch at each step.

The die collection also comes with the cute little pieces to create the gifts under the tree. I used the smallest oval in the Love to Layer: Oval die collection to look like a tree skirt. I added the presents under the tree. The stamp set comes with a star for the top of the tree, but I opted for another bow from the Bows Galore die collection.

I added a few gold half back embellishments here and there to look like ornaments glimmering in the tree. 
This concludes day 2 and I'll be back again for day 3! Thanks for fluttering by!


Sunday, September 25, 2022

Papertrey Ink September Release Countdown Day 1

Hello and welcome to day 1 of the Papertrey Ink September release countdown! I honestly can't believe we've made it to Christmas products already!!! Where has the year gone? That being said, I think for those of you who are yearning for the holidays, this release is definitely for you! ha ha! I normally listen to Christmas music while I do my holiday crafting, but I resisted this year and I'm going to wait just a little bit longer! 

My first card for today uses the beautiful new Very Berry Mistletoe stamp/die set paired with the new Into the Blooms: Pine dies AND the new Elegant Edges: Holly Berry! I die cut two of EVERYTHING included with the Very Merry Mistletoe die set and inked them up using Green Parakeet and Pinefeather ink.

I really love the variety of pinecones included in the Into the Blooms: Pine die collection; I used two different ones on this card, and I've used all of the other varieties on different projects I'm sharing today!

I did some simple watercoloring to create the background, allowed it to dry and then stamped the sentiment, which is from the Very Berry Mistletoe stamp set, as well as the snowflakes from the new Let it Snow stamp set.

I arranged the greenery on the smallest oval included in the Love to Layer: Ovals die collection. I also used a cute little bow from the new Bows Galore die set (it's not being showcased until day 3....shhhhhhh) to tie it all together! I layered the entire watercolor panel onto a top folding A2 card base using foam squares. I added glitter and white paint splatter for some holiday touches!

Up next is another Christmas card using the new Festive Birds die collection paired with the Very Merry Mistletoe stamp/die set along with even more pinecones and a trio of snowflakes from the Let it Snow stamp set.

To begin, I die cut the pieces I would need for the two birds from white cardstock and then colored them using ink and blender brushes. I added the wings to the body of the birds using foam squares for dimension. The beaks and eyes got a quick coating of Nuvo Crystal Glaze; once they dried I added a small white dot to the center of each eye with a gel pen.

I had quite a few sprigs of Mistletoe just waiting to be used, a few pinecones, and snowflakes as well! The background was created by stenciling a 4 by 5 1/4 inch piece of white cardstock using the Dotted Hexagon Stencils and pure poppy ink. I added a Pure Poppy FRAME over the top and then had fun adding the birds and accents!

I heat embossed the sentiment using white detail powder for a crispy look and tucked it behind the pink bird and over the larger bird's wing.

The entire focal panel is added to a top folding A2 card base using foam squares.

Up next is a rustic, masculine Christmas card using the new Into the Blooms: Pine dies. I'm a sucker for ALL of the Into the Blooms dies, and these are no exception.

I die cut all of the pine pieces using white cardstock and then colored them using Distress Oxide ink. This is my favorite way to bring these beautiful dies to life!

I wasn't quite ready to stop using the Fallen Leaves Hot Foil Plate; I added gold foil to a panel of Vintage Cream cardstock for a soft look!

This is one of those cards where I used the three design elements of pattern, texture, and shine to pull it all together!


This card also has a rustic, folky feeling; these two birds are dressed up using ALL of the included bits and pieces! Once again, I die cut everything from white cardstock and then colored them with Distress oxide inks.

As you can see, I used two additional types of pinecones included in the Into the Blooms: Pine die collection!

I also used more of the Let it Snow snowflakes to accent this card just like I did on my bird/mistletoe card! 

This concludes my day 1 post, but please join me again tomorrow for day 2! Thanks for fluttering by!


Wednesday, September 14, 2022

The Greetery End of Summer Sale

Hello friends! I'm popping in with some exciting news: The Greetery is having an End-of-Summer sale and you can find everything included in the sale HERE!
I quickly perused the sale and it is FULL of so many of my favorites! Thanks for fluttering by!

Thursday, September 8, 2022

The Greetery Calico Fields Release Day

Hello and welcome! It's release day for the Calico Fields collection from The Greetery! I'm sharing one more bonus card with you today for even more inspiration! I joked with my mom the other day that I'm always excited to see what Betsy does with the collection so I know how it is 'supposed' to be used! ha ha! I was absolutely smitten with one of her Rolling Hills cards she created yesterday; it was the one with an arch cut into the scene and flowers spilling from the arch! I had already planned on making a field of lavender, but her darling card really made me want to try an arched scene!


To begin, I die cut a panel using the Rolling Hills die and then stenciled it using the coordinating Rolling Hills stencil collection. As I mentioned earlier, I knew I wanted lavender fields, so I chose an assortment of purple inks and a field or two of green for some contrast with the purples. I layered it onto a piece of typing paper that I had traced and cut the shape from and then die cut it using the A2 Arches Die.  I die cut another arch from white cardstock and added some ink to look like a beautiful sunrise, or sunset. I added some Ground Espresso ink splatter to both the sky arch and the stenciled arch. I layered them together using foam squares.

I'm sure it doesn't come as any surprise that I chose to use the Sketched Wildflower Frame stamp for the background! ha ha! I stamped it using Dusty Concord ink and then added some ink blending around the perimeter using whatever purple ink happened to be left over! I ended up trimming the panel to 4 by 5 1/4 inches so some of the deeper purple ink was cut off!

I used the new Grateful Heart stamp/die set for the sentiment. I didn't realize until I was making this card that there are stencils included with the stamp set so you can add the shading to the middle portions of the letters! ha ha! I'm so glad I noticed those tucked in the packaging!
I added the arched panel on to the background using liquid glue. Because the stenciled panel is popped up, it gives the card dimension and I didn't feel the need to pop up the entire arched panel. I created the bouquet of lavender with the BotaniCuts Lavender die; I simply die cut them from white cardstock and colored them with finger sponge daubers and Distress Oxide inks. I glued them to the left side of the arch using liquid glue and then added a stamped and die cut bow from the previously released Wildflower Bouquet stamp set and added it to the bouquet.

I added a few houses and trees from the new Countryside die collection! I added glitter here and there; not too much on the houses! I didn't want it to look like snow! ha ha! I layered the entire focal panel onto a white A2 card base using liquid glue! Thanks for fluttering by!
P.S. the collection will be available for purchase at 10 am ET!