Friday, August 19, 2022

Wildflower Sympathies

****UPDATED with embossing folder information******Thank you so much for all of your sweet comments on my August release projects! I'm popping in today to share a pair of sympathy cards using a few new-to-me goodies that I recently purchased! I can't seem to keep my sympathy card stash stocked, and here I am again needing another one! I decided to make two cards so that at least I could add one to my stash and send the other out the door. I think I need to set aside one day every couple of weeks to just work on sympathy cards. 

I can't seem to stop with my same old formula for sympathy designs, so I apologize if you've grown weary of these; this is another one of those posts that is probably more for me! ha ha! I did, however, want to share with you the beautiful Lovely Layers: Wildflowers Honey Cuts! I think by now you know how much I love a good flower/leaf die collection! This particular set really spoke to me and I couldn't wait for them to arrive in my mailbox!

I also ordered the Vintage Garden stamp set specifically for the fabulous sentiments! I'm very particular with which sentiments I like and which ones I don't!  I knew that I would use the ones in this stamp set often, so I wanted to add it to my collection!

As you can see, this particular card got one of my older favorites; this one is included in the Feathered Friends 4 mini stamp set and is my usual go-to. 

I die cut all of the flowers from white cardstock and then colored them with assorted Distress Oxide inks and then glued them together using liquid glue and foam squares for the poppy flower. The two Ballet Blue background panels measure 3 3/4 by 5 and are dry embossed using the Regency Swirls embossing folder that was included with my Gemini Jr.

I arranged the three flowers as the focal point on the Love to Layer: Oval using foam squares.

I heat embossed the sentiment onto a strip of vellum and wrapped it around the focal panel and secured it on the back using scotch tape.

For this card, I really wanted to use the beautiful, large sentiment as the focal point and then arrange the flowers around the oval.

I spritzed both cards with shimmer spray for a hint of sparkle and then added glitter to this card; I usually don't use glitter on sympathy cards, but I felt like this one needed it! Thanks for fluttering by!


Wednesday, August 17, 2022

Papertrey Ink August Release Countdown Day 4

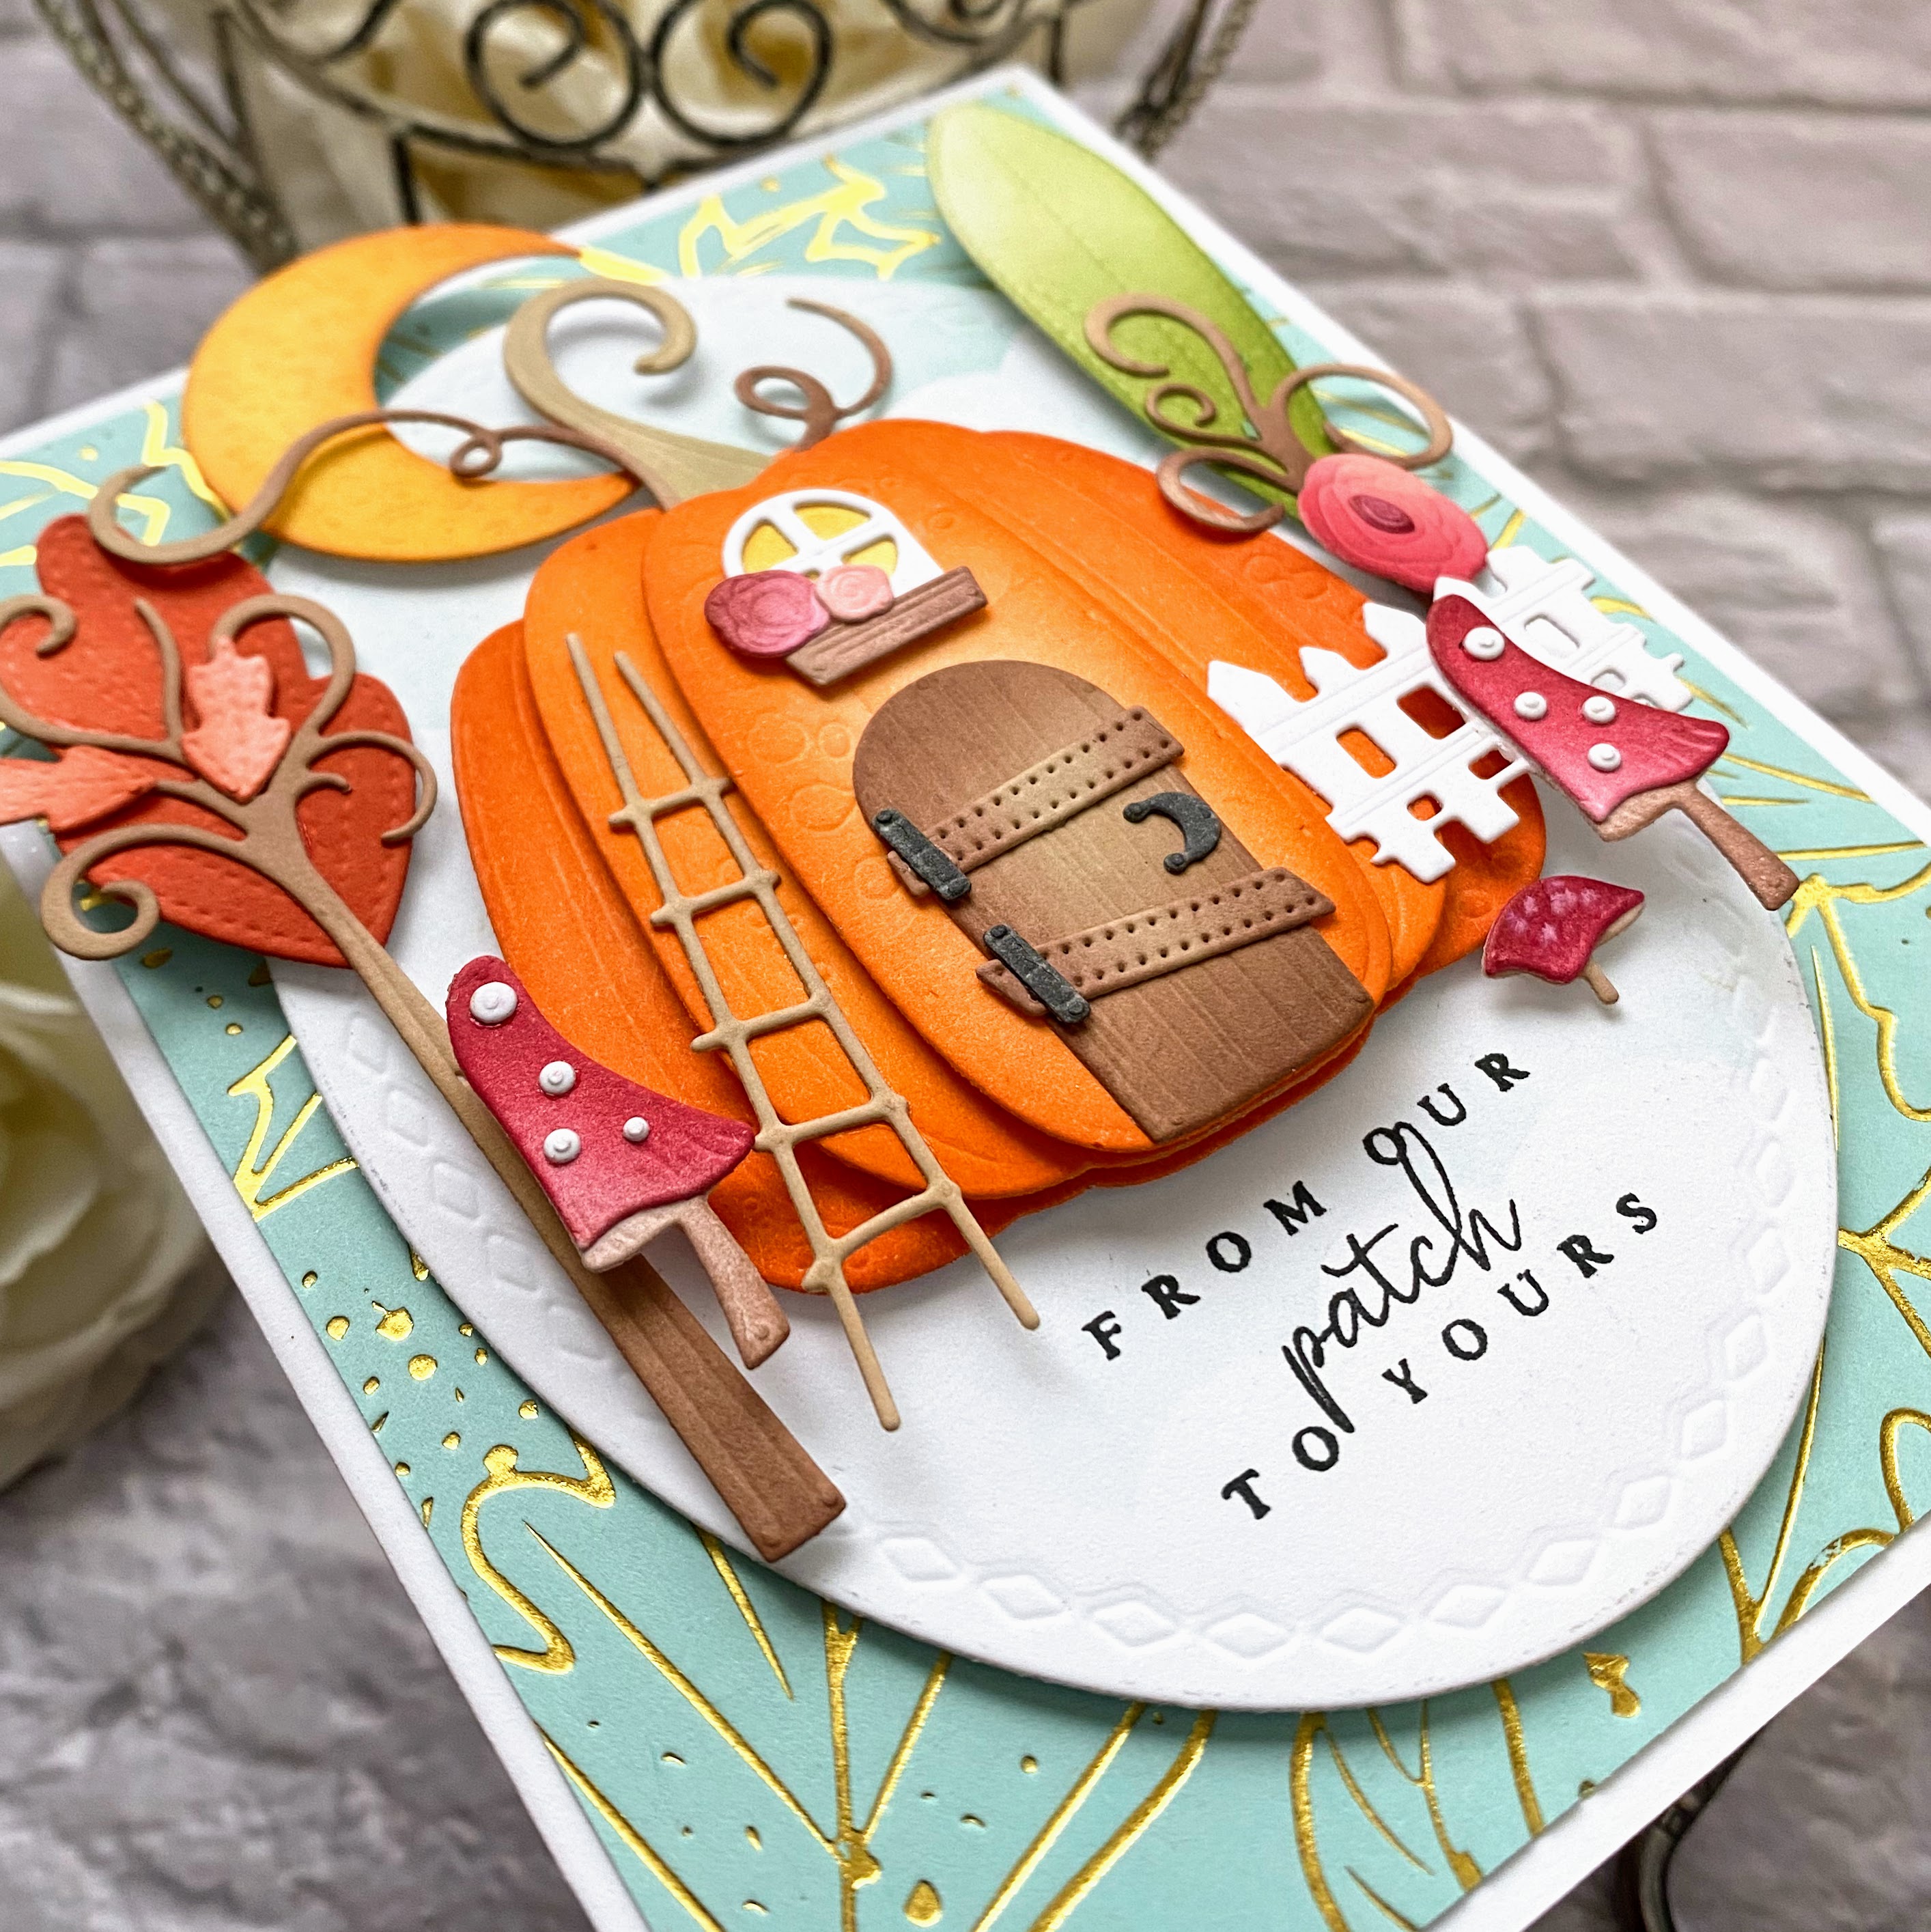
Eeep!! I think today might be my favorite of all the Papertrey Ink  August countdown days because of the cute new Pumpkin House die collection! Is this not the cutest thing ever? I'm especially smitten with the cute sentiment that is from the Just Sentiments: Spooky stamp set paired with this cute house!


As promised, here is a better look at the new Fallen Leaves hot foil; I'm loving the gold on the Aqua Mist cardstock!

I die cut all of the pieces from white cardstock using the Pumpkin House dies and then colored them using an assortment of inks! I love all of the sweet details that make this such a fun collection of dies!

Once everything was cut and colored, I die cut the largest oval from the Love to Layer: oval die collection. I used a cloud stencil to create the background, which I admit is hard to see in the photos. I stamped the sentiment in black and then I layered all of the little pieces here and there to create this fun scene!

I already know I will use this particular sentiment quite a bit to send autumn treats and greetings to friends and family!

This photo really shows the beautiful shine that the Fallen Leaves Hot Foil plate creates!


Up next is a SPOOKY version of the cute pumpkin house! I couldn't resist creating something a little bit more on the Halloween side, but I still think it's cute as can be!!!

Once again, I die cut all of the pieces from white cardstock and then inked them up using blender brushes and ink pads. I chose to create a purple pumpkin, toxic toadstools, and spooky trees to bring this cute scene to life!

I opted for coordinating purple clouds in the background and layered a black frame over the top to frame the scene.

The die set comes with little dots for the toadstools, but I chose to just use a fine-tip Sharpie marker to add the black spots!

The sentiment is from the new Just Sentiments: Spooky and I stamped it in black, punched it with a circle punch and then cut it straight below the witches portion.

This is one of those die sets that you just sit down and have a grand time inking and gluing to your heart's content!

My next card features the cute pumpkin from the Pumpkin House die collection, but this time just as a beautiful focal point for this autumn design! I paired the pumpkin with the GORGEOUS new leaves from the Fantastic Foliage stamp/die set; this is one that I was supposed to use the other day, but just couldn't work it into my design! I was sure happy that they work so well with this card!

I had originally stamped these leaves as possible accents to the spooky pumpkin house, but in the end, there just wasn't any room for them! I certainly didn't want them to go to waste, so I was thrilled to see how wonderfully they accent this creamy pumpkin!

One of the things that I like most about the new Fantastic Foliage stamp set is the fun speckled images that you can add to each of the different leaves; it really gives them an organic and realistic look!

The sentiment is from the new Thankful for Fall Sentiments and is heat embossed in gold onto a strip of vellum. 

For the background, I cut a panel of Royal Velvet cardstock measuring 4 by 5 1/4 inches and then foiled it in gold using the new Fallen Leaves hot foil plate. I absolutely LOVE the dramatic look of the gold and purple together!

I layered the pumpkin onto an oval of Lilac Grace cardstock that is cut using the Love to Layer: Oval die set. I also die cut the largest oval from Vintage Cream cardstock and then added some Fine Linen ink around the edges. 

I tucked the leaves behind the pumpkin here and there until I was satisfied with the arrangement! I layered the foiled panel onto a top-folding A2 card base using liquid glue.

My  next project uses the cute new Happy Owl-o-Ween stamp/die set! I chose Lilac Grace and Summer Sunrise cardstock to create the two treat/gift holders!


I may have mentioned that I will only have two kiddos in elementary school this upcoming school year so  I will only be making two of everything! ha ha! Well....guess what??????? I just found out that my 6th grader has a male teacher!!!! In the 22 years that I have been a mother, none of my kids have ever had a male teacher so I'm entering into an entirely new world of masculine teacher treats/gifts! LOL! Do they even want cutesy treats and gifts? What's a crafty girl to do??? I guess this is where my creativity will be challenged in new and exciting ways, right? 


Needless to say, the man-teacher will NOT be getting an owl gift with purple eyes and belly! ha ha!

The eyes, however, are my favorite part of this cute new Owl set; stars in the eyes!!!

Well friends, this wraps up day 4 of the countdown! Tomorrow is release day...yippee! Thanks for fluttering by!


Tuesday, August 16, 2022

Papertrey Ink August Release Countdown Day 3

Welcome to day 3 of the Papertrey Ink August release countdown! My daughter wanted to watch the last bit of Anne of Green Gables yesterday so we both sat and cried and it was giving me my favorite autumn vibes! I guess maybe I am getting ready for fall! Today's new featured products will also help get you in the fall frame of mind!

My first card uses the fabulous new Famer's Market Fall stamp set and dies! This is one of those sets that I know I will reach for often! I paired it with the Falling Leaves Hot Foil plate, but you can only see a little bit of it....boo! I'm sharing a card tomorrow that shows it off a bit more! We don't get to pick which products to show together, so I did my best! ha ha!

That being said; this is one of my FAVORITE hot foil plates I've ever used, especially with the results! It foiled so beautifully!!!!! I used the Gemini Jr hot foil machine and set it to low and timed it for 15 seconds. I used Spellbinders gold foil and then ran it through my Gemini Jur. machine for incredible results!

I found a cute Farmer's Market sign on Pinterest that I used as inspiration; apples, pumpkins, and leaves!

My next card features the AMAZING new Into the Blooms: Pumpkin dies! These are going to be used quite a bit this season! I had an extra Into the Blooms: Sunflower leftover from day 1 so I used that with my pumpkins for a genuine harvest feeling!

The background was created using the new Falling Leaves Stencil collection. I believe this pairs with the hot foil plate as well so you can add beautiful color to your hot foil panels.

I dusted my pumpkins with some glitter for some sparkle and shine!

Thanks for joining me today; head back tomorrow for the 4th and final day of the countdown! Thanks for fluttering by!


Monday, August 15, 2022

Papertrey Ink August Release Countdown Day 2


Welcome to day 2 of the Papertrey Ink August release countdown! If it's August in the paper crafting world, that means it's time for HALLOWEEN! I usually have an internal struggle when I start using autumn/Halloween things in August, but this year, I rallied and enjoyed looking ahead to October! I think it helped that my daughter and I were talking about Halloween during a football practice this week and reminiscing over different costumes the kids have worn over the years and looking at cute, old pictures on my phone! Let me just say, my poor son did not get my attention during that practice! LOL!

This spooky trio uses the darling new Witches Brew stamp set and the new Brew to Go gift card holder! 

The Witches Brew stamp set features this large tea cup and saucer, a smaller size that I used on the tag, a bunch of fun and punny sentiments, lots of steam and swirls, and two different stir sticks, just to get started!

The sentiments work perfectly with the new Brew To Go gift card holder, too! I'm in love with these dies and I can't wait to use them for Christmastime as well!

the gift card slides perfectly down inside the cup cozy, which I just love!

My last project for today uses the new Bright Night stamp/die set that is just too cute! This particular card lights up using some new lights that will be offered for this release! I have a photo at the bottom that I took in the dark so you can see it lit up! I also made a video, but I can't seem to get it to load! Ugh!

This particular set is very fun and comes with a lot of accessories to create all sorts of different types of Halloween cards! 

The sentiment is from the stamp set as well and of course, it's just perfect!

It's hard to see in the photo, but I spritzed the entire card with shimmer spray for lots of sparkle and shine!

I took this photo in the day, but turned off the lights and shut the blinds to show you a little bit of how it looks all lit up! I learned that the light doesn't show through the solid lantern as well as the cut out one. Anyway, my kids love interactive cards so I'll bet all of your little ghouls and goblins will love receiving one of these light-up cards! Thanks for fluttering by!