Showing posts with label Merry Monday Challenge. Show all posts

Monday, June 25, 2018

Merry Monday #296 {Let it Snow}

Happy  Monday! I'm here today with this week's Merry Monday Christmas Challenge !! And...It is with sadness that it will be our LAST challenge as well! I'm so sad to be saying goodbye! I have thoroughly enjoyed my time on the team, albeit a short time!  I will still be posting my monthly Keeping Christmas posts, so there will still be some Christmas around here!  Ha Ha!

For our final challenge, Nina has asked us to create a rustic Christmas card! This is such a fun one because anything rustic is so popular right now! Nina always uses pattern paper so well, so I thought I would use some today as well!

I knew that one of my favorite stamp sets, Two Feet Deep, would be the perfect choice to create my rustic design. I stamped the skis using Vintage Photo Distress Ink onto Kraft cardstock. I used the coordinating Two Feet Deep dies to cut them out. I heat embossed the silver portion for some added detail and realism. 

The background is created by layering a potpourri of pattern papers. I just love the wood background and it is a piece of pattern paper from Hobby Lobby. I also layered up a piece of snowflake paper that is also from  Hobby Lobby with a strip of paper from the Warm Hearts 6 by 6 paper pad.  I did some zig zag machine stitching along the seam for some interest.

The sentiment is heat embossed in silver onto a strip of vellum and wrapped around the back of the pattern papers. It was easy for me to tuck the skis  down behind the vellum.


The finishing touches are a few plastic snowflake embellishments I've had in my stash for a while. I added some sequins to the middle of each one as well as a few others scattered here and there for some added shine. I hope you get a chance to join us for this last and final Merry Monday Christmas challenge! Thanks for fluttering by!

Monday, June 18, 2018

Merry Monday #295 {The Sweetest Chrismtas}

It's so good to be back with a card for the Merry Monday Christmas Challenge. I took two weeks off and it feels like it's been forever!  

This week Marcia has challenged us to use the inspiration photo for our cards! I love the green and red peppermints. I usually do a lot with red and white peppermint stripes for Christmas, but I love the addition of the green! 
I'm loving how bright and summery my Instagram feed is getting, so I decided to keep with something "Merry and Bright"! Ha ha! I chose to use the fabulous pattern paper from the Shakers and Sprinkles Kit for my starting point, so I took all of my color cues from there. So...I made Raspberry Fizz and Simply Chartreuse peppermints. Aren't they cute? 


All of the images are from the Candy Cane Christmas stamp set. It is one of my favorites! To begin, I die cut the sequin print paper using the Shape Shifters: Oval 1 die. It was the perfect backdrop for the trio of circles. The sentiment circle is stamped in Hawaiian Shores ink and then the sentiment is stamped in black. I used a circle punch to punch them out. They are adhered to the card using foam squares for dimension.


I added some clear sequins here and there and was about to call the card done, but it seemed like it was missing something. I decided to stamp a pair of candy canes from the same set in Raspberry Fizz and Hawaiian Shores ink. I used the Candy Cane Christmas Die set to cut them out. I tied them up with some Pure Poppy Baker's Twine. I was hesitant to use this color since there isn't any other red on the card, but I think it looks just fine since the red stripe is so thin. The oval piece is adhered to an A2 cardbase with another piece of the pattern paper from the Shakers and Sprinkles kit. The whole things is spritzed with Frost Shimmer spray for some fun detail.  I had so much fun making this card! I hope you'll join us this week! It's always so fun to see your creations in the gallery. Thanks for fluttering by!


Monday, May 28, 2018

Merry Monday #292 {There's SNOW one like you}


I hope you are all having a wonderful Memorial Day! I just realized that my photos are red, white, and blue...just fitting for today! LOL! Today I am sharing my card for this week's Merry Monday Christmas Challenge!

This week's challenge is all about penguins and I had a ball adding all sorts to my card this week! We've done a few penguin challenges, but I think this is my favorite card so far!


This is one of those cards with quite a few steps and I really had to think things through before I got to work. To begin, I created masks out of post it notes for each of the letters that would spell SNOW. They are from the Simon Says Stamp Stitched Alphabet, which I have used on another Christmas design similar to this! I just love how these letters look colored with copics, covered with crystal glaze, and sprinkled with red chunky giltter! After I had stamped and cut out the masks, I positioned them onto a  piece of Bristol paper that had been die cut using the Postage Stamp sugarcut. I thought it gave it an extra special detail, like it is a postcard from the North Pole! LOL!


Once the masks were in place, I blended some Peacock Feathers distress ink onto the paper. I also stamped a few of the snowflakes from the Eskimo Kisses stamp set at full strength.   I spritzed it with water and Frost Shimmer spray and set it aside to dry!
All of the penguins are from the Eskimo kisses stamp set as well. They are just so darn cute and I was happy to be able to implement ALL  of the images  onto one card! I normally wouldn't do that, but I thought that they worked nicely for this design!

I stamped all of the images using black ink, colored them with Copic markers, and then die cut them using the coordinating Eskimo Kisses Sugarcuts. The iceberg is stamped onto vellum and embossed using silver powder. I also added some wink of stella to all of the images, including the iceberg. I set these aside and got to work on the letters. I used my MISTI to stamp them in black. There was a faint outline around the "S" and the "W" from the masking I did on the first step. I was able to easily place them where they needed to go. I colored them with a red Copic marker, added some Nuvo Crystal Glaze and sprinkled some red chunky glitter. I added the penguins using foam squares. The "There's SNOW one like you" sentiment is also from the Eskimo Kisses set and is heat embossed using WOW Powder White Puff powder. I just love how it looks like snow!

I was going to add this little guy to the center of the "O" on the front, but it covered it a little too much and made the design even busier than it already is! LOL! So....I quickly stamped the "Happy Holidays" sentiment in black and added this little cutie using a foam square! Even though this card was time/step intensive, I really enjoyed creating it! I hope you'll join us this week! Thanks for fluttering by!

Monday, May 21, 2018

Merry Monday #291 {Sweet Holiday Wishes}

Welcome to this week's Merry Monday Christmas Challenge! I am hosting this week and I'm so excited! I hope you will join us! My challenge this week evokes many special memories from Christmases growing up!

I fell in love with this adorable felt garland and knew that it could spark some creativity and some awesome Christmas designs! 

One of my favorite Christmas traditions is making frosted sugar cookies with my daughter. My younger sons are deciding they want in on the action as well, so next year will most likely be a full-on circus! LOL! I knew that Sweet Holiday Wishes would be the perfect set for this challenge! I quickly got to work making a whole army of cookies!

I stamped and die cut the images using the Sweet Holiday Wishes die cuts! Growing up we would make red, green and white icing...that being said...the McCormick food colors would make them pink and light green! That is Christmas tradition for me, so even though I have a whole collection of gel food coloring, I go for pink and light green! It holds so many memories of magical Christmases spent with my family! My aunt would always bring trays of fabulous cookies adorned with silver balls, cinnamon imperials, and sugar sprinkles! Now that is how I decorate mine with my daughter and so that is how I decorated my "paper cookies" today!

I thought that the Shape Shifters Oval Die looked like a cookie platter so I die cut a piece of Pure Poppy cardstock. I also used the Round Off Edger Dies on the white piece..I love the pinked, rounded edge, just like a cookie cutter! The sentiment is stamped onto a 4 by 5 1/4 inch piece of Kraft Cardstock and then heat embossed using white powder. That entire panel is attached to an A2 Kraft cardbase. 


The candycane cookies have a coating of Crystal Glaze over the top for a realistic candy look. The star cookies have some chunky glitter "sprinkles", and the Christmas trees have red Nuvo drop "cinnamon imperials". I added a silver nuvo drop to the center of the snowflake cookies to represent the silver decorating sprinkles/balls we use! I had so much fun creating all of these cookies! I hope you'll join us this week! Thanks for fluttering by!

Monday, May 14, 2018

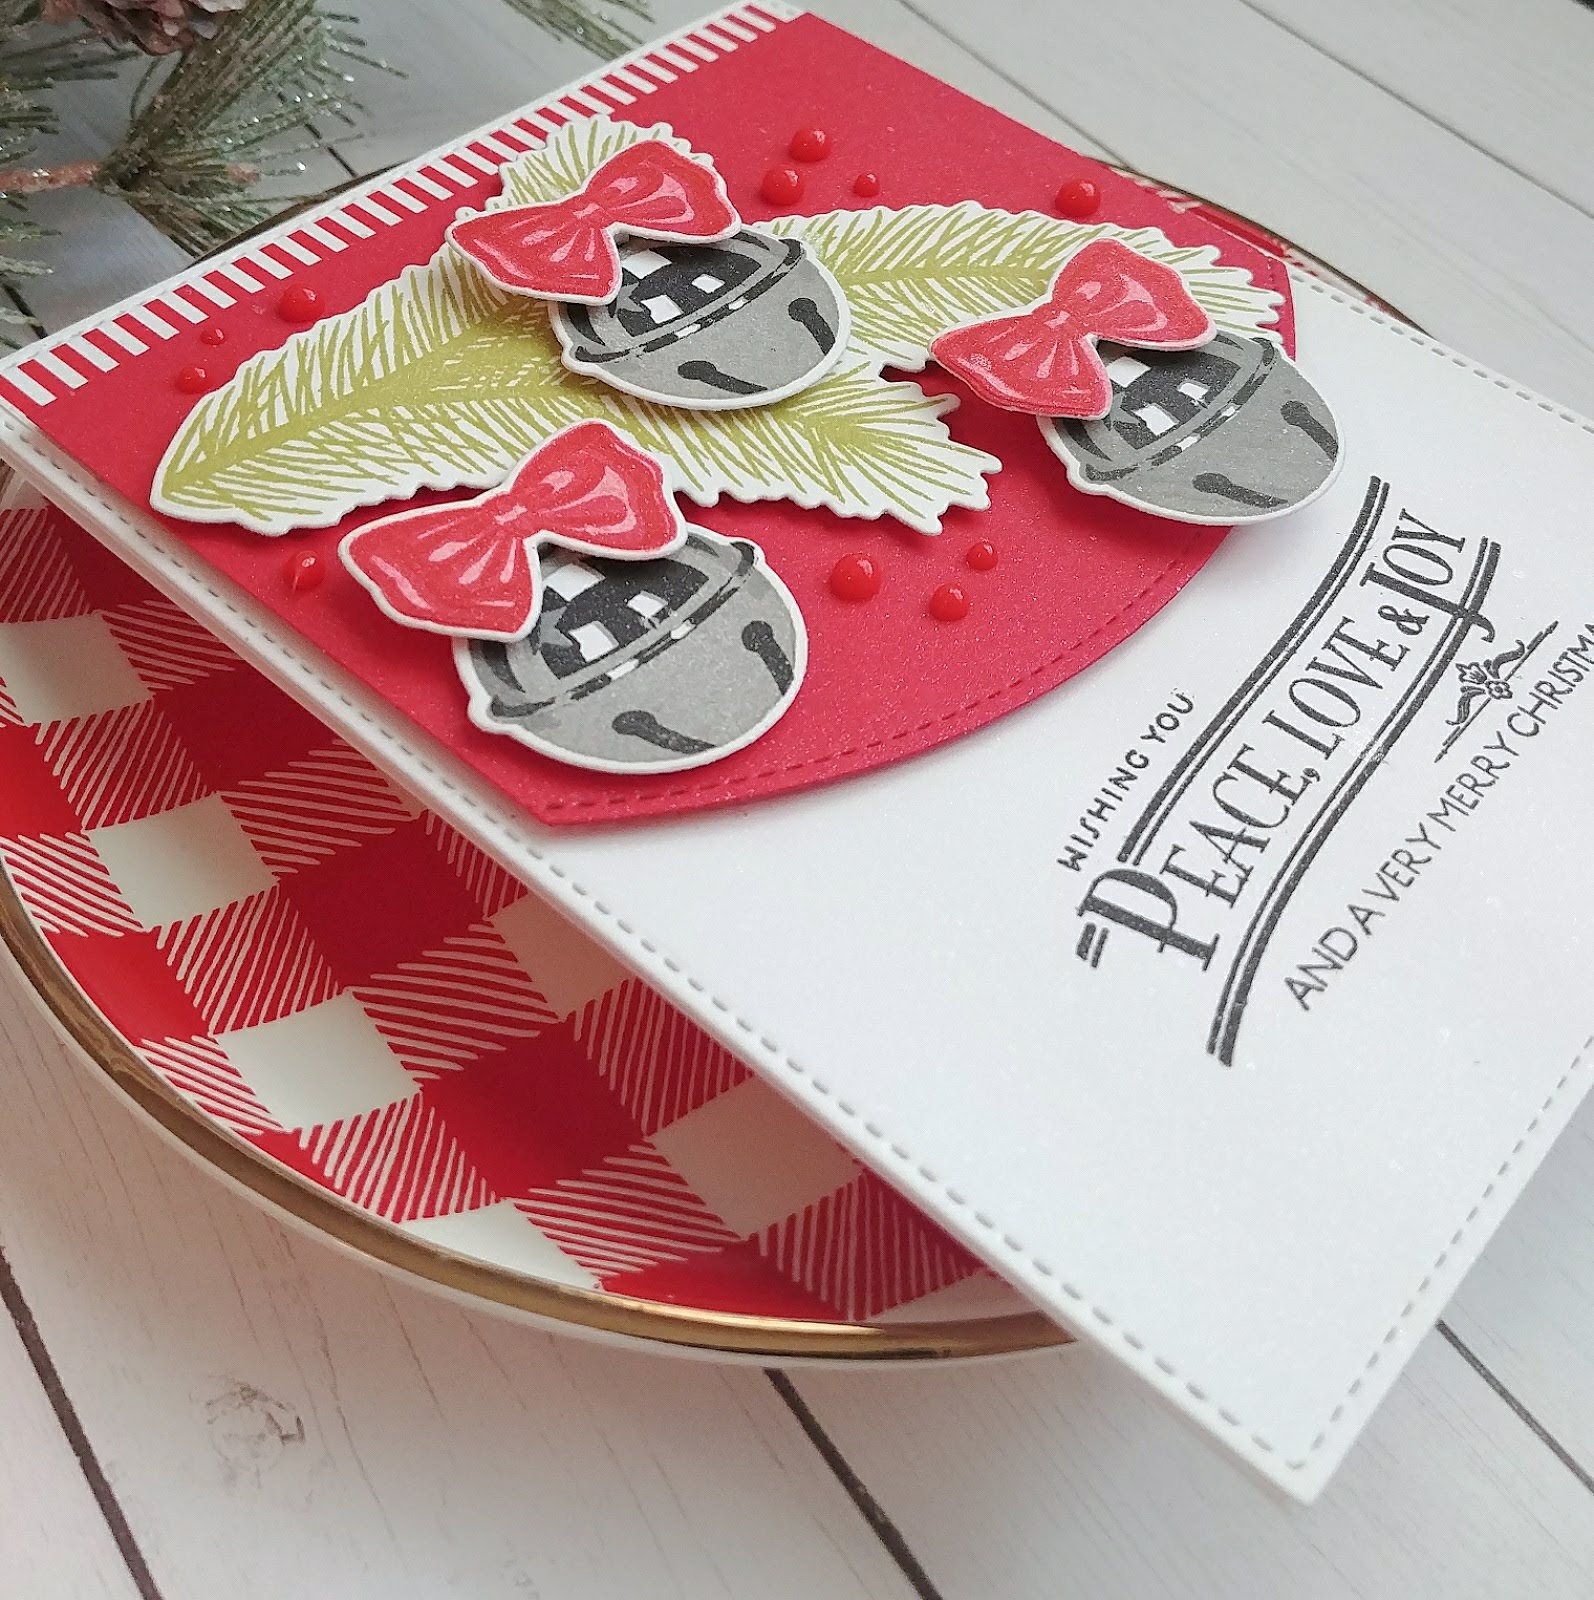
Merry Monday #290 {Peace, Love, and Joy}

Welcome to a brand new week and a new Merry Monday Christmas Challenge! No matter how busy life gets, I absolutely love the time I get to spend working on my cards for Merry  Monday! It will be even more fun when I get to bring them all out in December to give them to family and friends!
This week JoAnn has asked us to add bells to our cards! Confession: I was SO HAPPY to see that bells were required for the challenge! I ordered the Holiday Style stamp set and it came a few weeks ago! I was so excited to use them on a challenge, but guess what? It was the "no stamping" challenge! LOL! I used them on  THIS project, though, but I still couldn't wait to use them again! 

To begin, I die cut a panel of white and a panel of red using the Card Front Element Builders SugarCuts. I really liked the detail on the challenge photo, so I thought it would be fun to include that onto today's design. I stamped the white bottom portion using the Happiest of Holidays stamp set using black ink. I really like this particular sentiment because it was long and horizontal and I knew it wouldn't take up too much room that I was planning for the bells. 

The bells are stamped using Going Gray, Smokey Shadow and Black inks to create this realistic looking bell. I am seriously in love with them. I didn't use my MISTI when I made the project I linked above, but decided to for the bells today. The bows were stamped off once using Pure Poppy, then at full strength and then the last piece was stamped using Rose Red SU! ink. 


All of the images, including the branch are die cut using the coordinating Holiday Style Dies. I can't wait to use the Christmas ball ornament images included in this set as well! I added a strip of red and white striped pattern paper from the Spots and Stripes Pattern Paper pad from SugarPea Designs. I added some red Nuvo drops here and there for some added detail. A good spritzing of Shimmer spray finishes this design off! Thanks for fluttering by!

Monday, May 7, 2018

Merry Monday #289 (Deck the Halls!)

***If you're here for my Countdown to Confetti post, please scroll down!***
It's been a busy few weeks and I'm feeling it! I'm counting down the days until school is out for summer! I got some much needed time out in the yard on Saturday and it made me yearn for lazy days with nothing to do but whatever we want!  
Well, enough rambling....Debbie has asked us to add a star to our cards for this week's Merry Monday Christmas Challenge! Stars and Christmas go hand in hand, but I really don't have that many stars. I knew that the "Star Prints" stamp set from Papertrey Ink could work and the patterns actually match the ones from some of the stockings from the "Stocking Prints"set. Unfortunately, they have both been retired, but they sure came in handy for today's design!

To begin, I die cut two windows using the Window Works Die set on a piece of 4 1/8 by 5 3/8 inch Pure Poppy cardstock.  I chose two windows that would work nicely together AND that the stockings would fit inside of. I thought that they looked a little bit like ornaments hanging from a tree, so I added some silver metallic cord at the top of each window using some liquid glue.

I used the stocking pieces that have stars on them to fit into the theme. I used a combination of Pure Poppy Ink and Vintage Jadeite. I love how these look together for a vintage feel! I popped them up inside the windows using foam squares. The star is stamped in Pure Poppy as well as punched out using an old SU! star punch that fits perfectly.

I added some red Nuvo drops around the silver heat embossed sentiment, which is from the "Stocking Prints sentiment. I like how well the silver of the cord matches so perfectly with the silver sentiment. I also added a few Sparkling Clear sequins for some shine. It is always fun to see your cards in the gallery, so I hope you get a chance to play along! Thanks for fluttering by!

Monday, April 30, 2018

Merry Monday #288 {NOEL}

Welcome to this week's Merry Monday Christmas Challenge! I'm so happy with my  collection of cards that is growing week by week! 
Deanne has asked us to create cards without stamps! What??? LOL! I thought of making a scrappy card, but in the end, decided to take a more artistic approach and pull out my watercolors that haven't been used in a while.

My design was inspired by my cosmetic bag. It has a Navy background with words spelled out in Red, Fuschia, and Mauve. I just love the bold, graphic quality  and I thought it would be fun to try and translate the idea onto paper. I had to make a few adjustments because of the size of the letters, but I really like how it turned out. I like doing things a little more artistically from time to time and this was the perfect excuse.

To begin, I cut a piece of Strathmore cold-pressed 140 lb. watercolor paper to 4 1/8 by 5 3/8. I used my Kuretake Gansai Tambi watercolors to do a wash of blues across the paper. I also mixed up some gold really well with water and splattered it over the top. I set it aside to dry while I got to work on the letters.


As I mentioned earlier, I was limited in my design because of the alphabet die cuts I chose to use. They are the Bookprint Alphabet Upper Die set. In the end, I really like that I was only able to get one word onto the design. I just chose to incorporate the 3 different colors by using a different color for each letter. The "N" and the "L" are both red, however! I die cut each letter four times and then glued them together using Tombow Mono Multi glue. I also added some Wink of Stella to each letter as well as a good coating of Tonic Crystal Glaze.

Once the watercolor panel was dry, I ran it though my cuttlebug using one of the "Next Generation" embossing folders from We R Memory Keepers. I also spritzed it heavily with shimmer spray. I glued the letters onto the card using liquid glue as well. I made sure to place something heavy on top for a bit so that they would stick nicely. With all of the grooves from the embossing, it makes it a little more difficult to glue them down.


At that point, I was ready to call the design done. It had a boutique chic feel that I just love, but my daughter disagreed. She DID NOT  like it! Her new favorite word is "terrifying" which is how she described this card! LOL! So...at that point I thought what more I could add {that wasn't a stamp} that wouldn't detract from the original vision I had for the card. I decided to pull out some ancient SU! rub-on transfers. They were just the thing! The texture from the embossing folder made the application a little tricky, but I finally got it done! I added a few Sparkling Clear sequins to the centers of three of the snowflakes for some shine!

I really enjoyed making this card! It was so fun to think a little out of the box and not use stamps! Thanks, Deanne, for the fun challenge! I hope you will join us as well! It's so fun to see your creations in the gallery! Thanks for fluttering by!

Monday, April 23, 2018

Merry Monday #287 Sweet Holiday Wishes

Happy Monday, friends! I hope you all had a nice weekend and were able to enjoy some time with your loved ones! It's so gorgeous here, I just want to soak it all in! Spring is just heavenly, don't you think? 


Colleen has asked us to use this inspiration photo for our cards this week. I was inspired by the houses/buildings and snowflakes, as well as the colors. 


To begin, I die cut 3 of the sweet shoppes, signs and awnings using the Petite Places Sweet Shoppe Die. I stamped each of the die cut shoppes using Aqua MistPale Peony, and Pure Poppy. I alternated the colors on the awnings and doors as well to give it a good mix of colors. Once all of the pieces were ready, I cut a piece of Stamper's Select White cardstock to 5 by 3 3/4 inches. I added some score lines to separate the three sections of buildings. Once that was done, I was able to place the die cut shoppes.

It was easy to fill in other buildings to create the scene. Once the buildings were all in place, I got to work on the sentiment. I used the Sweet Holiday Wishes stamp set to stamp "Holiday Wishes" directly to the white piece using Smokey Shadow ink. I also added a few snowflake images from the same set to enhance the Christmas feeling, since this card is definitely not traditional!

I die cut the "sweet" portion using the coordinating Sweet Holiday Wishes Die Collection out of Pure Poppy Cardstock. I heat embossed the sentiment using some Nuvo embossing powder to give it a candy/sugary look. 

I added a few sequins as well. I love how cute the awnings look popping up on this card! I hope you get a chance to join us this week! Thanks for fluttering by!

Monday, April 16, 2018

Merry Monday #286 Joy to the World!

****If you're here for either my Reverse Confetti SFYTT post or my SugarPea Designs release post, please scroll down! It's a busy day around here! LOL!****
Welcome to this week's Merry Monday Christmas Challenge! I debated on whether I should participate this week since I have two other posts today and I didn't want to bombard anyone! I'm glad I decided to make a card, because I had so much fun with today's design!

Sue has asked us to create a card with our favorite Christmas verse. Mine isn't exactly a verse, but rather a statement. "Joy to the World...the Lord has come!"...I just love this and it is what Christmas is all about! I'm grateful for the birth of my Savior and He brings me JOY!!!

I played around with this set quite a bit last year and I feel like  I have just touched the tip of the iceberg with all of the possibilities. You can see a few of my projects I made with it HERE and HERE. As I did some brainstorming trying to decide which direction to head, I remembered these fabulous pine pipe cleaners from Hobby Lobby. I haven't used them since I made THESE tags and I just love them! Working on those Christmas projects was really the push that I needed to get back into blogging on a regular basis. 

To begin, I got out my Jpy Bundle and got to work die cutting the "JOY" word 5 times out of Kraft cardsstock and glued them together using liquid glue. Once that was done, I placed the stacked pieces BACK into the die and stuck a piece of washi tape to hold them in place as I removed them. I did this so the thin "JOY" stamp would line up properly since it is all connected, rather than individual letters. I stamped it in Versamark ink and then heat embossed them using Antique Gold embossing powder. I also heat embossed the "to the world" portion onto a strip of Kraft cardstock.

For the background, I heat embossed the snowflake image onto a piece of Stamper's Select White Cardstock. I also added some Bright Gold Nuvo Drops to the centers of the snowflakes. I wrapped the pine pipe cleaner around a bottle of Nuvo drops for a nice, small circle that would fit nicely around the "O". I used hot glue to adhere the ends together. I shaped it around the "O", which is more of an oval and then hot glued it to the card. The "to the world" sentiment strip is added using foam squares. I toyed around with the idea of adding a splash of red here and there, but in the end I really liked the neutral palette. Thanks for fluttering by!