Wednesday, October 27, 2021

Papertrey Ink {The Great Cover-Up} Happy Halloween

Hello friends! I hope you're having a fabulous Halloween week! I've been busy getting Halloween goodies and packages put together to give to teachers, family, and friends (not to mention finding costumes for my kiddos)! I love Halloween, but for some reason, I'm always scrambling at the last minute! ha ha!
My card was created for The Great Cover-Up feature on the Papertrey Ink Blog today, but wanted to share it here as well. Since I took the summer off, I ended up not getting a chance to make any Halloween cards when everything was released! I decided to pull out the fun Spook-tacular Halloween Kit and a few other favorites to create this card!

I came across a DARLING Halloween print on the Kohl's website that featured a jar just like this with some sprigs coming out the top and two primitive Halloween figures. I knew it would be so fun to translate the same idea into a card! Once again, I had JUST THE RIGHT stamps and dies to recreate the look and feel!
 To begin, I die cut two particular floral branches using the Sprigs and Sprays die collection and then stamped them in autumn tones using the Sprigs and Sprays stamp set

The two pumpkins are die cut using the Pumpkin Party dies and then stamped using the coordinating Pumpkin Party stamp set. I wanted to create the look of the Jack-o-lantern glowing, so I die cut the larger one twice, added some yellow ink where the face is, and then popped the stamped pumpkin over the top using foam squares. The smaller, dotted pumpkin is attached to a toothpick and tucked inside the jar.

I die cut the jar using the Spook-tacular Mason Jars Die (these are included in the kit, but are now sold separately using the link I just provided). I added some Spring Rain ink around the edges to give it some color and depth. Once that was done, I got to work creating the sentiment and the backgrounds.
The black background was die cut from True Black cardstock using the Twinkle Die and layered onto a top folding Vintage Cream cardbase using liquid glue. I also added two different strips of Bitty Big: Canyon Clay pattern paper.

 I heat embossed the "Happy Halloween" sentiment, which is in the kit, and then die cut it using the cute label die included in the Take Your Place Kit. It is just the right size to fit on the jar and looks just like the one in the original print. I added a cute little spider that is part of the Spooktacular kit as well! I added some glitter and black paint splatter for added detail and a few Moonshine Sequins for some shine! Thanks for fluttering by!


Monday, October 25, 2021

Papertrey Ink Release Night PLUS Flash Sale {Season's Greetings}

Hello friends! It's the night you've all been waiting for! The Papertrey Ink October release will be available for purchase TONIGHT at 10 PM ET! My Flash Sale is going on NOW! I chose quite a few fun stamps, dies, and ink colors for this week's sale!

Here's a look back at the projects I made for the October release countdown!

I've had an image pinned on my Christmas Pinterest board that I've been dying to turn into a card! You know when you have JUST the right supplies and you can't wait to give it a try? I love how this turned out; clean and simple, but with details to make it special.
To begin, I die cut 4 ornaments using the Ornament Greetings Die set out of white cardstock. I also used just the top of the die and gold specialty cardstock to cut out the top portion. I simply placed the ornament die directly onto the straight edge of the paper so only the top portion would cut. 

I stamped the 4 ornaments using the Ornament Greetings stamp set. The Spring Rain one also has the cute snowflake/flower embellishment over the top. The Enchanted Evening ornament has white paint splatter and a few sparkly stars that are die cut from the Twinkle Die. I glued them here and there with liquid glue. The Stormy Sea ornament has Ocean Tides stripes using the included stamp. The top ornament is stamped in both Aqua Mist and Hawaiian Shores with Hawaiian Shores detail.

I glued the top gold pieces on using liquid glue and then got to work placing them on the card front. I used a pencil to create small dots so that I could draw the "strings". I moved the ornaments off of the panel and then used a T square ruler and a metallic pen to draw straight lines. I also stamped the "Season's Greetings" sentiment, which is from the Peaceful Forest stamp set, directly onto the focal panel using Enchanted Evening ink. From there, I adhered the ornaments back in place using foam squares.

The foliage was all die cut from white cardstock and then colored using ink. The sprigs and berries are from the Tag Creations: Modern Gift. The bow is also from that set, but is die cut from Tropical Teal cardstock with Tropical Teal ink blended over the top where shadows fall.


AS you can see, I rounded the corners on both the focal panel and the Enchanted Evening card base for a professional, boutique look. I added glitter here and there  and Nuvo Crystal Glaze over the top of the berries. The finishing touch is a few of the twinkle images stamped in Spring Rain and additional die cut stars glued here and there. Thanks for fluttering by!


Sunday, October 24, 2021

Papertrey Ink October Release Countdown Day 4


I can't believe it's the 4th and final day of the Papertrey Ink October release countdown! I've had a ball creating with all of these fabulous new products! The best part  is I still have so many ideas that I'm dying to try (now I just need to find the time) ha ha!


My first project(s) for today uses the amazing new O' Holy Night stamp/die set! This set consists of a trio of TALL trees that are just perfect for slimline cards, scrapbook pages, and regular cards, of course! I really wanted to maximize the benefit of the large size, so I decided to make a snow themed brown paper sack that would be perfect for either treats or gift giving!

I die cut quite a few trees so I had a few left over which I decided to use to create a coordinating card! To begin, I used white acrylic craft paint to brush over a plain, brown paper lunch bag. I actually grabbed 5 from my cupboard and ended up painting the entire stack. It was very therapeutic brushing the pain on both the front and back. I didn't end up by using all 5, but now they are all painted and ready to be decorated for another project!

I love the new Grand Christmas Sentiments and the "Let it Snow" sentiment worked perfectly to place over the trees! I used Distress Oxide ink to color the trees and then I added some water droplets and white paint splatters to enhance the snowy feeling!

I added them directly to the paper sack using foam squares, which hold really well on the paint! I needed to move a snowflake and found it very hard to remove! ha ha! Speaking of snowflakes, I die cut them using the two intricate dies in the Splendid Snowflakes die  collection and added them using foam squares right in the middle. I added some Moonshine sequins to the center to cover up the mini foam squares. I tied it up with Baker's Twine looped through the snowflake.

The card uses the same trio of trees, but this time I cut them smaller to fit on the card. Just a note: these trees are the PERFECT size to go along with the Build-a-Santa set that was showcased on day 1! I can't wait to try turning one of these trees into a Christmas tree and gussied up with ornaments, etc!

I die cut a frame using the Bold Borders: Flurries out of Kraft cardstock to mimic the look of the brown paper sack. I added it to a top folding A2 card base using liquid glue. I added the trees and the sentiment, just like I did on the sack. I also added a heat embossed "snow" sentiment, which is from the Inside greetings: Snow Mini stamp set. I added quite a dusting of tinsel glitter to all of the card elements for a true frosty look!

My last card for today, and for the release, uses the new Greatest Gift stamp/die set that I absolutely love! As much fun as I've had creating with Santa and presents, etc., it's always nice to create something that sends the message of the true meaning of Christmas! I absolutely LOVE all of the large, bold sentiments that are included in the set!

I found a canvas print online that had this same sentiment on dark blue and a lighter blue sky, so that is what inspired this card! To begin, I die cut the bottom panel using the To the Point Edgers dies to create the point. I added some black in around the bottom and side edges using a blender brush.I heat embossed the sentiment onto a scrap piece of Enchanted Evening cardstock and then cut it using the Nesting Basics Pierced Ovals. I layered on top of the panel using foam squares.

I set that aside and cut a piece of white cardstock and then added some lighter blue ink blending around the edges leaving the center white. I used the new Seeing Stars Stencil Collection to add the two different sizes of start using the same inks as the background.

I used the On the Border: Sunburst Border Die to cut the "shine" out of glitter cardstock! I added it to the white panel using liquid glue. It gave the card just the right amount of detail I was hoping for! I added the sentiment panel to the bottom using foam squares.

I die cut the stable, trees, and baby Jesus from white cardstock and stamped them in black ink (gold around baby Jesus) and added them over the "shine". The star is die cut from specialty gold cardstock and added over the top of the stable. There is a fun flourish image and die included in the set, so I added it over the top of the stable and star for added detail! I added the entire panel on a top folding A2 card base. I stamped another one of the large sentiments on the inside!
 Thanks for joining me today! Everything will be available for purchase tomorrow night at 10 PM ET! Thanks for fluttering by!


Saturday, October 23, 2021

Papertrey Ink October Release Day 3

We've reached that halfway point for the Papertrey Ink October release countdown! What's been your favorite so far? I'm not sure I could say because I'm loving it all this month! My Christmas card stash is growing nicely! I have two projects to share with you today, and up first is this AMAZING new sentiment set called Grand Christmas Sentiments! I absolutely adore these new large sentiments and can't wait to try them all! I chose to use the JOY sentiment for this peppermint inspired card!

I used the leaves, candy canes, and berries from the new Go-To Gift Card Holder: Cozy Mitten stamp/die set that is also being showcased today! To begin this card, I die cut the candy canes, berries, holly leaves, bow, and pine wisps. I stamped the berries and candy canes using Pure Poppy ink. I used a blender brush to add Mint Julep, Vintage Jadeite, and Pine Feather ink to  the holly leaves. The pine wisps just have Pine Feather ink on them for contrast.

 I used the Border Bling: Twinkle Die to create the star background. It is cut from Vintage Cream cardstock with a Skinny Embossed frame around the edge. The entire panel is adhered to a top folding A2 Kraft card base.

Once that was done, I was able to start adding all of the leaves, candy canes, pine sprigs, and berries to the card. I die cut the JOY piece twice and then stamped it using black ink. I glued the two pieces together to create a more sturdy word. I layered it over the top of the candycanes using foam squares. 

The bow and pine wisps are from the Tag Creations: Modern Gift die collection. The bow is die cut from Pure Poppy ink with some Scarlet Jewel ink blended to create a realistic shadow.

I added some glitter to the candy canes, foliage and berries and used Christmas Red Stickles to add to the candy canes. This card was so much fun to make! I can't wait to use these dies on more projects!

My second project for today uses the Go-To Gift Card Holder: Cozy Mitten stamp/die set! It is seriously so much fun and I know I will be using elements from both the stamp and die collection often, just like I did for my first card! This is definitely one that transcends WAY beyond its intended design!

The candy canes, flowers, and foliage make this a must-have in my opinion! I guess I may as well apologize now for how often you will see pieces from this set on EVERYTHING! ha ha!

I die cut the main mitten portion twice using the Pretty Pastels pattern paper and the pink portion using the Happy Spots pattern paper. I placed the die on the wrong side of the paper for the back piece so that it would have pattern on both sides. I glued the thumb pieces together and the pink portion and then added some  machine stitching around the entire perimeter using a small seam allowance so the gift card slider would still fit inside.

Pardon my washed out photo here...light has been tricky this week! Ugh! You can see how the Go-To Gift Card Slider is stamped using some of the included sentiments in the Cozy Mitten stamp set.

I had so much fun decorating this mitten gift card holder using all of the bits and pieces included in the set, and I didn't even use ALL of them! There are snowflakes and cuff trim to really enhance the snowy vibe! I added some pom poms using hot glue for even more detail! Thanks for fluttering by!
P.S. Don't forget to join me again tomorrow for the 4th and final day of the countdown!


Friday, October 22, 2021

Papertrey Ink October Release Countdown Day 2


Welcome back for day 2 of the Papertrey Ink October release countdown! Thanks for your sweet comments on yesterday's post! I have two cards to share with you today using products I'm really excited about! Up first is a floral card using the AMAZING new Into the Blooms: Dahlia dies! If it's anything "Into the Blooms", you know I'm going to love it and these Dahlias are no exception! The foliage that is included in the collection is FABULOUS and I know I will be reaching for them often to tuck here and there on all kinds of cards!

This card also features the new To Die For Sentiments: All Is Bright. I die cut it from gold glitter cardstock and layered it on top of two other die cuts from Kraft. This particular sentiment is a little bit delicate, so I actually glued it together in reverse. I put the gold cardstock back into the die so that it would be in the correct position and then layered the 2 Kraft pieces on top. I simply pushed it out of the die using my piercing tool and it was ready to use.


I also added the cute ornament, which is from the new Vase Collection. It is meant to be used with sprigs and things coming out of the top for a fun look, but I chose to use it as a regular ornament. I'm sure you'll find more examples using it as a vase, and I know I will be using it again as it was intended! ha ha!

I  layered all of the flowers and foliage onto a panel of Scarlet Jewel cardstock with white paint splatters using liquid glue and foam squares. From there, I added a bit of glue to the bits of the sentiment that would be touching the highest points on the card and let it dry.

The ornament is stamped using Sweet Blush ink and gold polka dots. The flowers were inked using assorted Distress Oxide inks. I layered the entire focal panel (it has rounded corners) onto a top folding A2 Scarlet Jewel card base.

My second card for today is a little bit more traditional and playful using the CUTE new wagon set! I think it's just the cutest thing ever and I had so much fun putting this card together!

To begin, I die cut all of the pieces and then had fun stamping away until they were all done! I used liquid glue and foam squares to assemble the wagon.

There are a bunch of fun sentiment that you can add to the tiny sign hanging from the wagon, and I opted to use the one that says "special delivery". I used the Santa Claus is coming to town sentiment to enhance the delivery theme!

I had so much fun with theCorner It: Holly stamp set for THIS card, and I thought a few holly leaves and berries would be cute in the corners.

I had so much fun creating both of the cards for today! Join me again for day 3 of the countdown! There's so much to love! Thanks for fluttering by!


Thursday, October 21, 2021

Papertrey Ink October Release Countdown Day 1


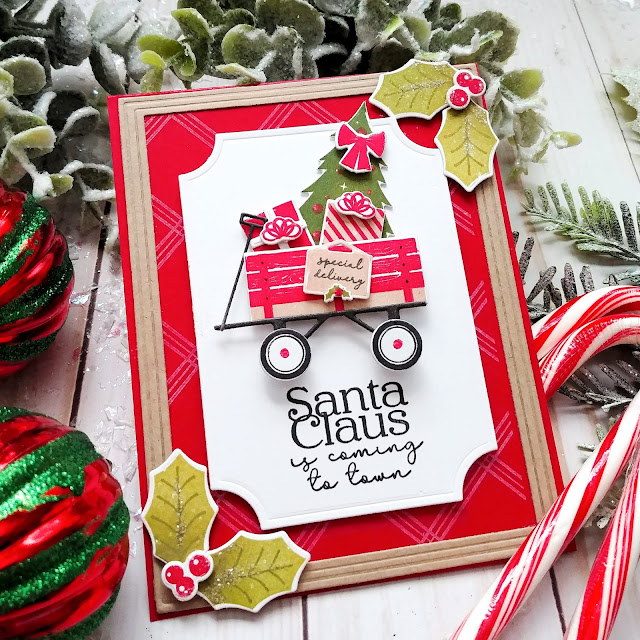
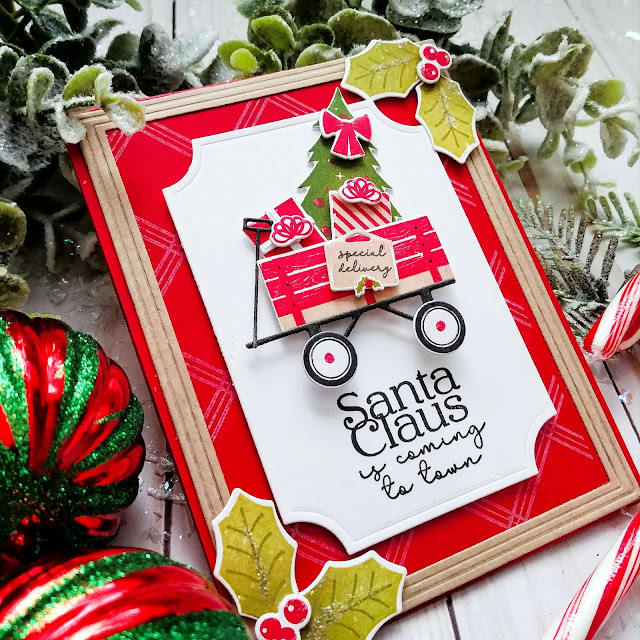
Welcome to day 1 of the Papertrey Ink October release countdown! I've been having loads of fun putting together all kinds of  holiday projects to share with you over the next 4 days! Up first is a super fun new set called Build A Santa paired with the new Just Sentiments: Santa! He's just the cutest thing ever and I've created 3 projects using this darling Santa!  My first project is a sweet treat that you could make for anyone on your gift-giving list!

To begin these gifts, I die cut all of the pieces I would need to create three in total. I'm not sure exactly who will be getting these, but my 3 littles could give them to their teachers at school, so I started with 3! ha ha!

Once the Santas were all assembled, I got to work on the actual box presentation. I ordered the plastic tubes that I used for the hot cocoa on Amazon, but depending on what you want to put inside, you could use the Trendy Tubes as well. I used bulk hot cocoa powder, crushed peppermint candy, and dehydrated marshmallows (also bought on Amazon). I made myself a cup of this the other day and I have to say, it was delicious! 


The presentation box is just a combination of simple scoring and die cutting the hole for the tube. I found a circle die that was just the right size, so depending on what size tube you use, you would need to either find a punch or die to fit. Once the hot cocoa tube was safely inside (it has a few glue dots on the bottom for security) I was able to add the Santa to the front using foam squares.

I used the smallest die from the Love to Layer: Notched die collection to create a place to stamp the cute Santa sentiments from the new Just Sentiments: Santa stamp set. I used three different sentiments from the set for variety. I also added some snowflakes from the Splendid Snowflakes stamp set to both the packaging and the sentiment piece. Santa's suit and the candy cane both got a touch of some Christmas Red Stickles and Star Dust Stickles

My second project using the Build A Santa stamp set is another packaging idea (you can't have enough) I die cut the box portion using the fabulous Scallop Top Gift Bag Die that was released last year (and is back in stock) using some Mint Julep + White Basics Pattern Paper ( on sale for $2) and assembled the box. Now, I totally forgot to keep the bottom open; I usually do this so that everything is tied up and ready to go long before the holiday hits, and all I have to do is fill it from the bottom and add adhesive! ha ha!

I chose to use the "sitting Santa" for this box because it made him the perfect size to fit on the front! I tied up the box with ribbon, a jingle bell, and a perfect sentiment from the Just Sentiments: Santa heat embossed in white!

The bow is tied through the pre-cut holes in the bag, and then I tied the tag and Jingle bell up with twine!

You have two different option for eyes with this cute set, and for this project I chose to use the open eyes (my first project used the "smiling eyes"). I added a few dots of white gel pen to really let his eyes glimmer with holiday delight!

As much as I love a traditional Santa, I had a lot of fun decking him out in a Raspberry Fizz suit with Sweet Blush trim! His Hawaiian Shores mittens and buttons are just the perfect finishing touch!

Since I was already going for an unconventional look, I decided to use the fun Border Bling: Flower Frame Die paired with the Poinsettias from the Tag Creations: Modern Gift Die (which is also back in stock) and a few of the included pine wisps.

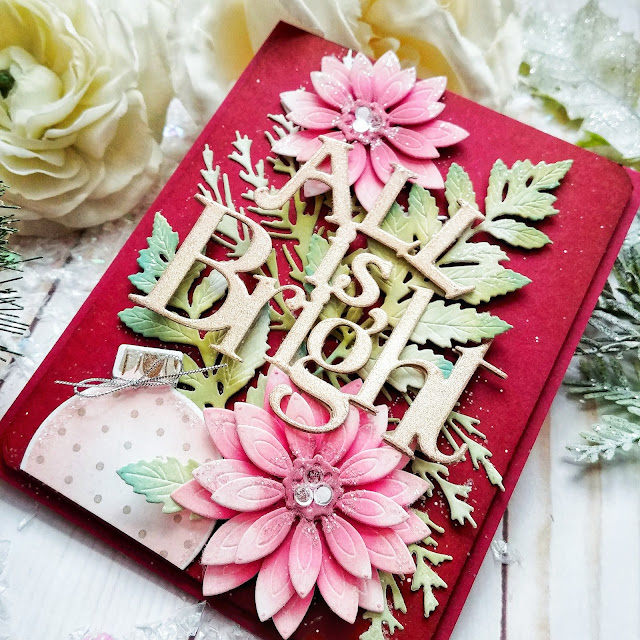
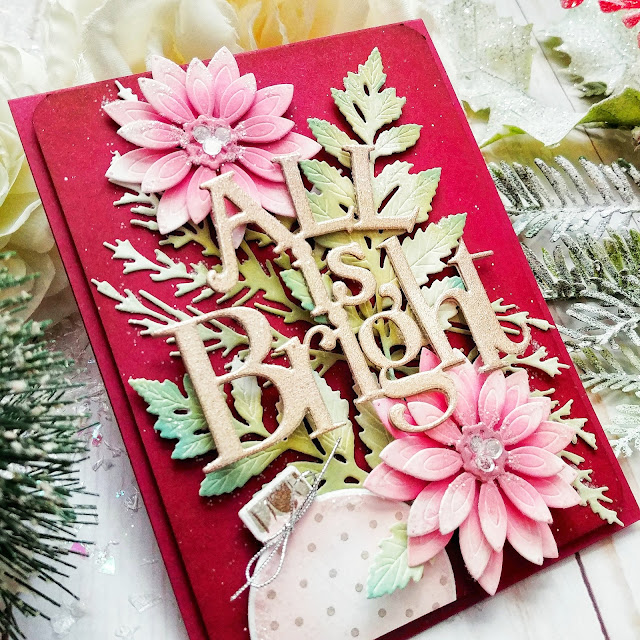
I used Pale Peony and Raspberry Fizz ink for the Poinsettias and Mint Julep and Hawaiian Shores ink for the pine wisps. I Love how they turned out and they worked perfectly to place over the flowers in the frame. 

Since Santa is quite large, especially with the boot/leg option, I chose to use the "Believe" word from the To Die For Sentiments: Christmas cut from silver glitter cardstock. I also die cut it in white so that I could stack them for a more sturdy piece. I simply glued it over the top of Santa leaving the end of the word free of glue.

Of course I had to add more Stickles to the pink candy cane and hat. I added glitter to the foliage and flowers with a few Moonshine Sequins in the center of each poinsettia!

Now I'm switching gears entirely and showing you something less on the cutesy side and more on the elegant side. My 4th and final project for today pairs the latest installment in the Feathered Friends Die collection with the new Ornate Evergreen die set! These trees reminded me of intricate gingerbread cookies, so that is the direction that I headed in, hence the Honey Nut color! ha ha!

I had originally planned on having a card with cookies and oranges from the Sweet Orange Holiday stamp set, but forgot we were also showcasing the bird! duh! I couldn't really have oranges and birds, I didn't think! ha ha!

I did use the greenery sprigs from the orange set to tuck here and there in this shadow box type card. To create the base, I die cut two panels using the Love to Layer: Torn Edges Die opting for the largest and second to largest dies. I layered them together using foam squares on a Cocoa Bean card base. I added the trees and then gave the card some white paint splatter to mimic snow.

The bird was die cut using white paper and then colored using an assortment of Distress Oxide inks in colors suggested on the stamping guide. They ended up being perfect for this warm card. I added the bird so it looks like he's flying high above the trees! A few snowflakes and a heat embossed sentiment added even more holiday details. The finishing touches are a few more Moonshine sequins and a dusting of glitter, especially around the torn edges for a frosty look. While this card didn't turn out how I originally envisioned, I have to say, I really like how it turned out! It's definitely something different for me! Thanks for fluttering by!