Monday, March 29, 2021

Pinkfresh Studio March 2021 Cling Stamp, Stencil, Die, and Hot Foil Release


Hello and welcome to the Pinkfresh Studio March 2021 Cling Stamp, Stencil, Die, and Hot Foil Release Blog Hop! There's so much to love about this release and I know you're all going to fall in love! I've made two cards for today's hop, but I can't wait to use more of the fabulous new products! Some of you may know that my sweet Father-In-Law passed away and we laid him to rest on Saturday so my mind and emotions have been elsewhere! Maybe that's why I picked this particular sentiment for my first card! Isn't it true? Anyway, before I dive into the particulars on the two cards I made, I wanted to make you aware that the ENTIRE release will be given away to two lucky winners from the Pinkfresh Studio Facebook page and one from the You Tube channel. 

Don't forget to comment here for a chance to win one of 10 $25 dollar gift certificates being given away from the hop designers! All the winners will be posted on the Giveaway Page on April 5th and you must claim your prize within two weeks! Don't forget to check out the Free Shipping information on the graphic below!


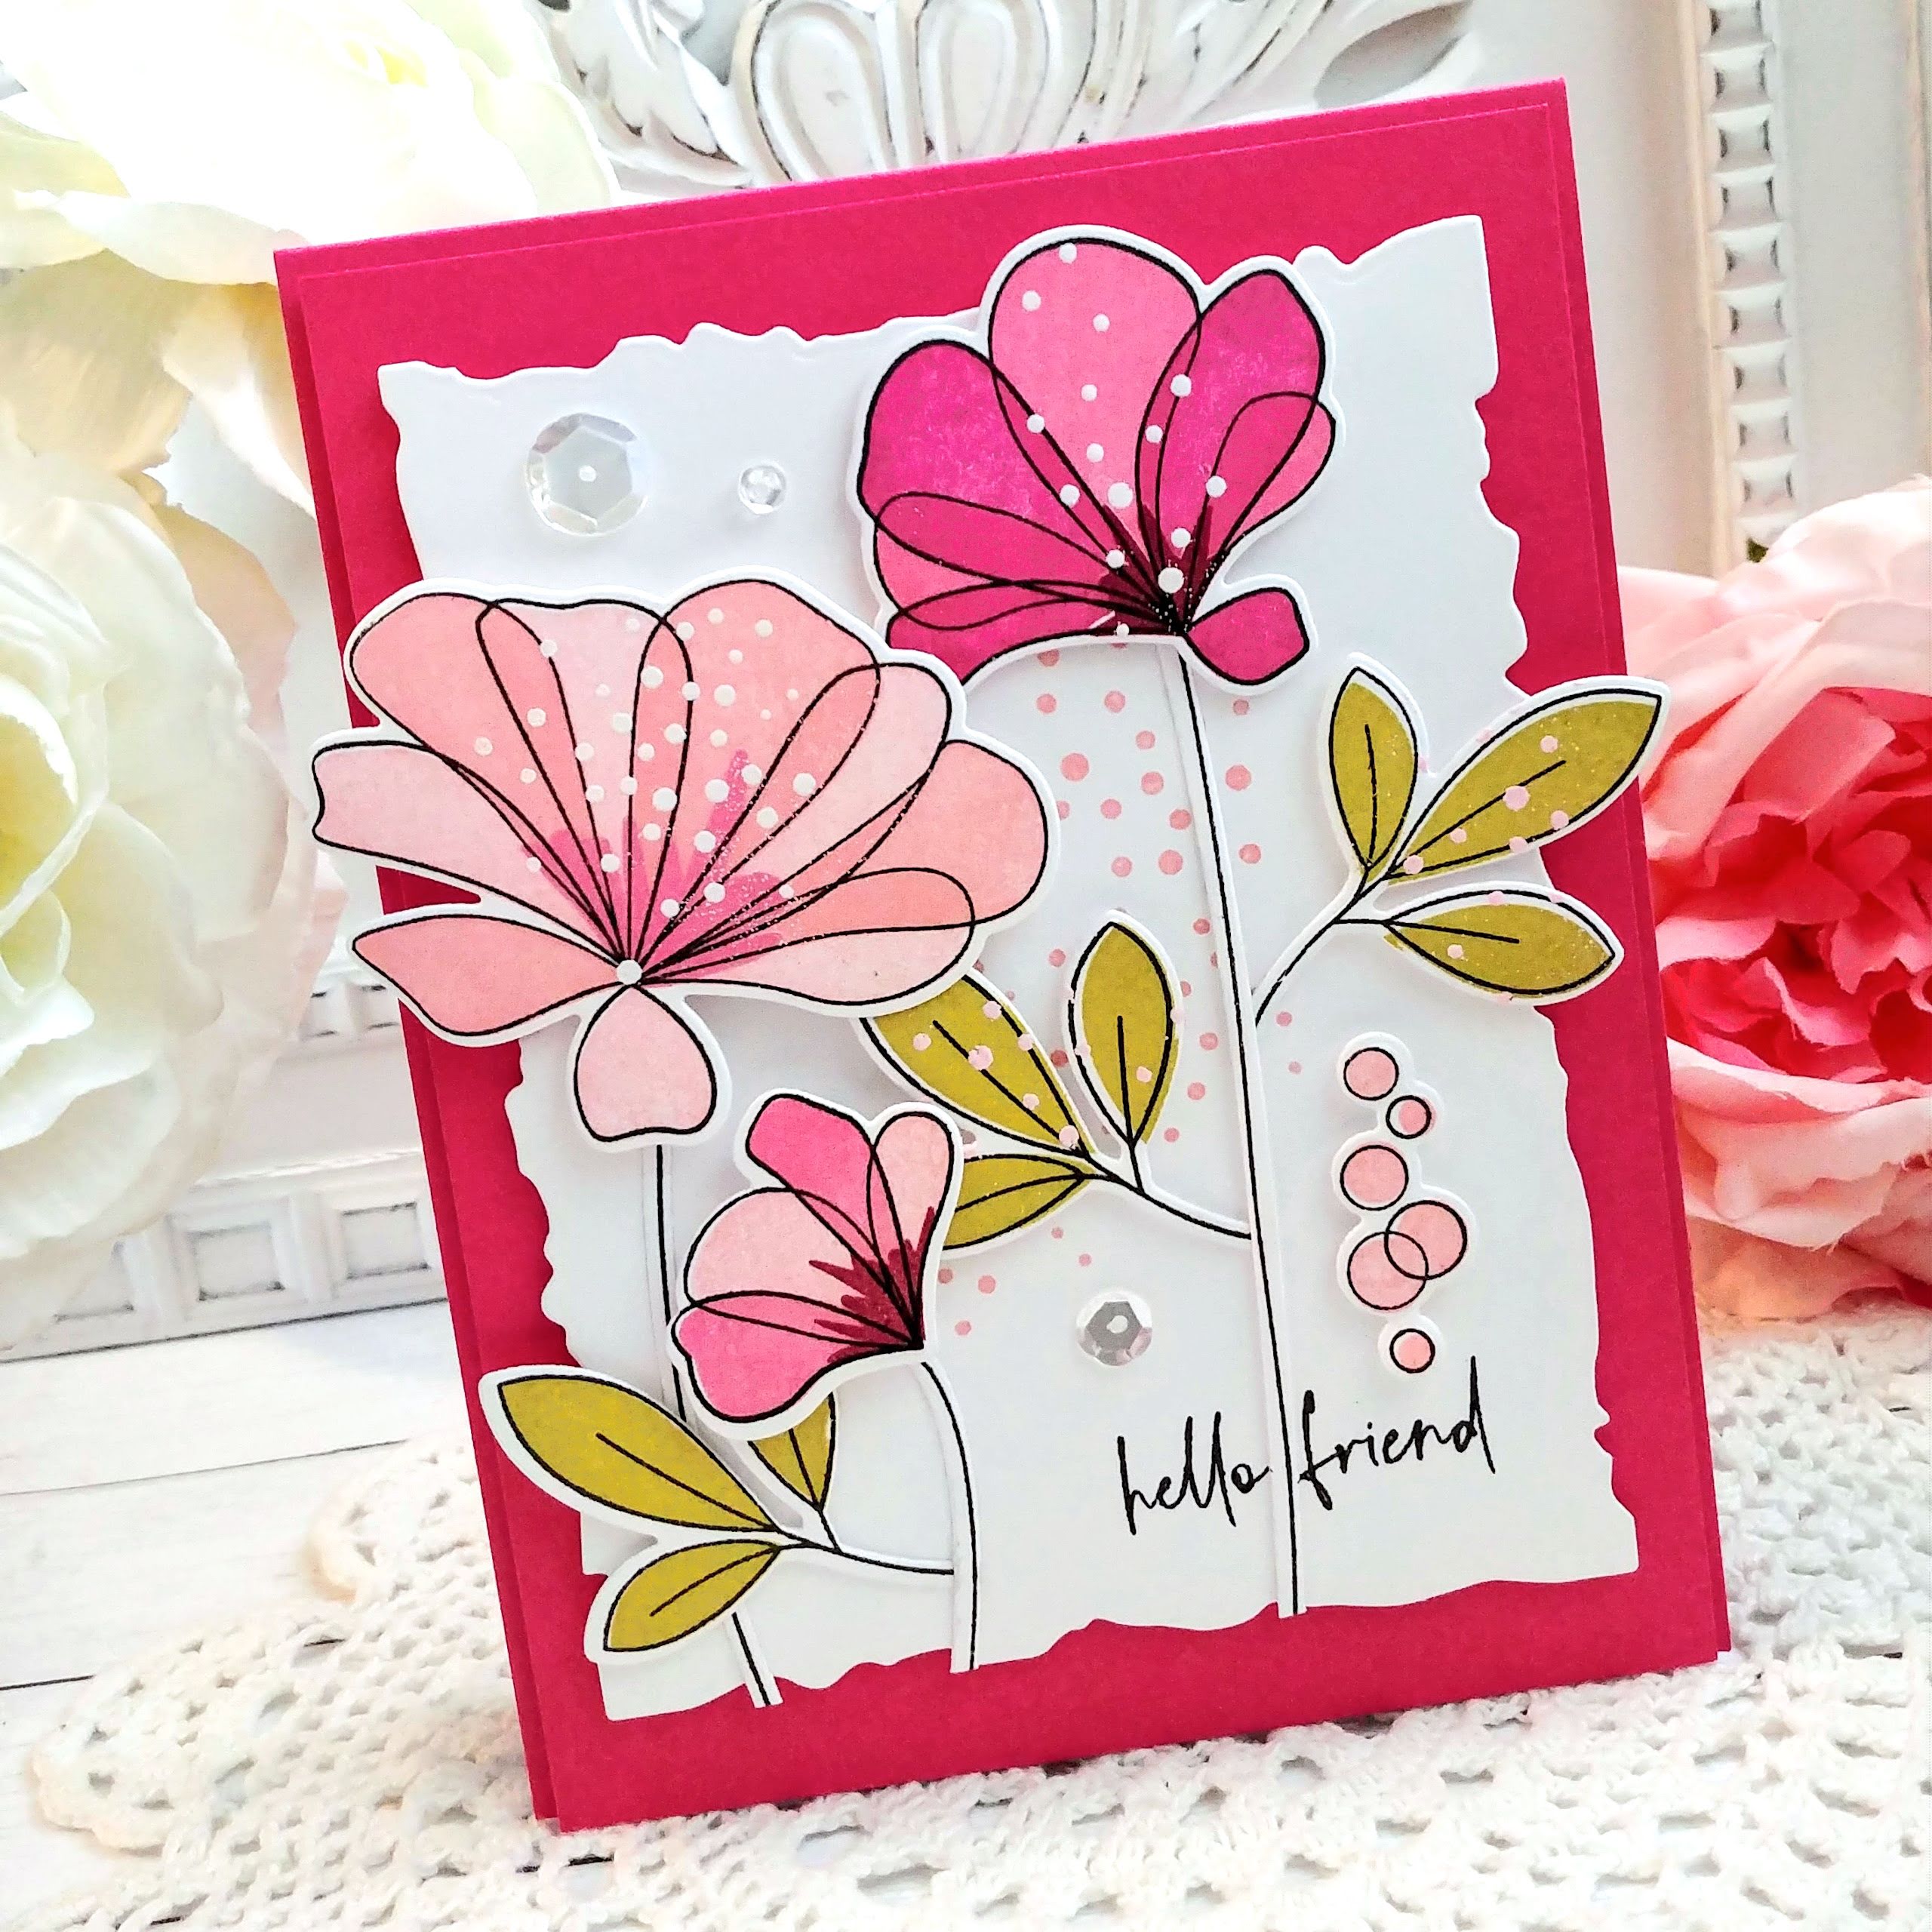
For those of you who don't own a hot foil machine, my post today is for you! ha ha! I am showing the new Folk Garden Cling Stamp paired with the coordinating Folk Garden Layering Stencils and the new Folk Garden Die. Now, I do have to mention that it DOES have a coordinating Folk Garden Hot Foil Plate, so if you DO hot foil, it provides beautiful results! I decided to do some gold embossing to give it a luxe feel without doing any hot foiling. My second card is similar in feel, but I didn't do the gold embossing and I die cut all the pieces for a different look.
To use this particular suite of products, you will want to BEGIN with the stamp. I found I got the best results by "floating" the large background stamp in the middle of my MISTI door so that I could get a nice impression on each side without having it get caught up in the corners. If you've played with background stamps enough, I think you'll know what I'm talking about. ha ha! For BOTH cards I stamped the large image using Coral ink onto a piece of blush cardstock. I left the background stamp inside my MISTI so I could go back over the top with Versamark ink to do the embossing AFTER I did the stenciling.

Once I had both backgrounds stamped out, I removed them from my MISTI and used the layering stencils to add the color. I was going for a mono-chromatic look so I chose to use Coral Reef, Passion Fruit, Berrylicious, and Candy Apple ink to do all of the stenciling. Note: you could also just use the background stamp by itself and color the outline images using the medium of your choice. 

For this card, I didn't do the gold embossing but opted to just use the coordinating dies to cut out the pieces. Once that was done, I used the negative space of the die as a guide to lay them back together onto another piece of blush cardstock using foam squares for dimension!
For this card, I put it back inside the MISTI to add the Versamark ink over the top and then used gold powder to do the heat embossing. The possibilities are endless with these new products and you can completely change the look the colors that you choose! I had toyed around with doing something traditional and folksy by having a black background and bright colorful flowers, which would be so much fun! I'll have to give that a try, too! Don't forget to head to the other designers' blogs to see what they've come up with!


You are invited to the Inlinkz link party!

Click here to enter

Thursday, March 25, 2021

Pinkfresh Studio {Keeping It Real}

Hello friends! I've been MIA for a while and I feel like I can talk about it now! My sweet Father-In-Law passed away last week and I've needed a minute. I just didn't feel like I could post on here and pretend like everything is okay when it's not! That being said, when creating is your therapy, it's something that you come back to, no matter what! I've been wanting to play along in the Pinkfresh Studio March challenge and the month has completely slipped away! You can read all about the challenge HERE. I haven't made a "scrappy" card for quite a while, so it was fun to use supplies from the Keeping It Real Collection for today's card.

I used to use pattern paper ALL THE TIME, but not so much anymore. For today's card, I've used the Keeping It Real: l by 6 paper pack. A tip I like to use when creating with pattern paper is to use a large print in the background and then mix in medium and small prints for the smaller accents. I actually used a large and two small prints, but with the complementary colors of the two small ones, I feel like it works.

I embellished the pattern paper background using pieces from the Keeping It Real: chipboard stickers, such as the "Live, Laugh...lower your expectations" and the "I'll Make Better Mistakes Tomorrow" pieces. The flowers are from the Keeping It Real: Floral ephemra pack and I tucked them here and there to accent the other design elements. You can see I added a bit of zig-zag stitching in the upper left corner; a staple for scrappy cards in my opinion!


I did cut out the "no on has it all figured out" piece from the pattern paper because it really helped find the balance I needed for this design.

Creating this quick and simple card was exactly what  I needed! I'm "Keeping It Real" over here! ha ha! That's why I love these paper collections so much because you can create all kinds of projects quickly! I've got some paper crafting projects that I'd love to use this collection for as well! We've got the funeral coming up in a few days but I'll try to pop in as much as I can! Thanks for fluttering by!


Friday, March 19, 2021

Pinkfresh Studio {A Great Big Wish}


 Hello friends! I'm over on the Pinkfresh Studio blog today with a birthday card using the new Joyful Bouquet washi tape! I've been having so much fun creating with all of the different styles! I decided to go with something bold and pulled the darkest purple shade from the tape to begin my card!

I used the Simply Diamonds Die to die cut a panel of this deep purple cardstock. I used the negative pieces to adhere to an A2 panel of white cardstock that was die cut using the Essentials: Stitches Die using foam squares. I love how the stitched detail in the background is just peeking out from the bold, purple pieces. I adhered the entire panel of the washi tape onto white cardstock and then used the Joyful Bouquet Die to die cut all of the floral elements.

I added a pink Fancy Oval Frame using foam squares and then added some metallic gold watercolor splatter to the top of the panel. I set that aside to dry while I got to work on the sentiment, which is from the Happy Birthday Sentiments stamp set, and the bow.

I added the sentiment and wrapped it around the panel and secured it with adhesive on the back. Then came the fun part....I added all of the floral die cut embellishments to my card! The bow is also added using liquid glue. I found that hot glue, which I use to assemble my bows, doesn't like to stick to the washi tape!


I added some jewels as well for a little bit more sparkle and shine! I had a lot of fun creating this card! Thanks for fluttering by!

Ink to Paper March Release Countdown Day 4

Well friends, it's the 4th and final day of the Ink to Paper March Release countdown! Today we're showcasing the latest in the Feathered Friends series! This first card features the Feathered Friends 9 die set. I love creating with the Feathered Friends dies because it is so fun to use ink and a sponge dauber to color them and bring them to life. This bird is very simple and easy to create! Those are always my favorite! ha ha!


I paired the bird with the Enchanting Roses set that was showcased yesterday. I chose to use some brighter, tropical colors to allow this bird to shine!

I also used the new Inside Greetings: Appreciation stamp set for this card. 

I chose to do another tone-on-tone background, but this time with just different design elements rather than a Cover Plate.

I added some white paint splatter here and there to add some extra detail.

Of course I couldn't resist adding some glitter and sequins to finish it off!

My second and final card for today and the release uses the Feathered Friends 9 mini stamp set and coordinating die. I stamped the bird in the exact colors as the stamping guide since I felt it was pretty accurate as to what it probably really looks like. Sometimes I like to go crazy and just do whatever, but this particular bird seemed like it is very specific! ha ha!

I added some blue watercolor to a panel of watercolor paper and set it aside to dry. I got to work on the bird and layered it twice for a more sturdy piece.

I used the Numbers dies that were released a few months ago paired with the woodgrain dies for a nature-esque feeling!

Once the wate rcolored panel was dry I stamped the "Cheers to" and "years" sentiments, which are from the new Just Sentiments: Milestones II stamp set, directly onto the panel using my mini MISTI.

Simple and easy, just perfect for a masculine card! All of the products will go on sale on the 20th at 10 PM ET! Thanks for fluttering by!


Thursday, March 18, 2021

Ink to Paper March Release Countdown Day 3

Welcome to day 3 of the Ink to Paper March release countdown! You're going to love the products that are being showcased today, I guarantee it! I'm loving this new rose set because it is a fabulous cluster of 3 sizes of roses with two different sizes of leaves. It's so fast and easy to put together and you can add different colors to the petals for a custom look! I don't have any roses at my current house, but in my old yard, I had some beautiful roses with hints of yellow that are the inspiration for these!


I stamped the "with gratitude" sentiment direclty onto the roses for a subtle look. I stamped another sentiment on the inside but forgot to take a picture! ha ha!

It's no secret that I love a tone on tone background so for this card I die cut the Cover Plate: Ornate Die out of Aqua Mist cardstock and then glued it onto another panel of Aqua Mist cardstock. I added an oval frame that was die cut using the Pierced Feature Frames Ovals and attached it using foam squares.

I placed the flowers and leaves a little bit off center and then added a few sparkling clear sequins here and there.

The leaves are tucked here and there using the two different sizes. I didn't notice it until now, but one of the leaves is tucked upside down! LOL! I better fix that before it gets mailed off!

Up next is a fun card for Mom using the previously released Into the Blooms dies paired with the new Berry Best Mom set!

I added ink to both the stems and berries, flowers and leaves using a blender brush. The berries got a few white Nuvo Drops to mimic the seeds for a fun touch!

There's also a bee sentiment and bee image to do a bee theme, but I chose to just add it to the berry card for an additional design element.

There's a coordinating die with the sentiment which I always love! Thanks for fluttering by!

Wednesday, March 17, 2021

Ink to Paper March Release Countdown Day 2

Happy St. Patrick's Day! Welcome to day 2 of the Ink to Paper March release countdown! Today I'm sharing some graduation/teacher projects. Up first is the fabulous new Go-To Gift Card Holder: Graduation! It is just the cutest thing ever and is giving me some serious Deja Vu about some large/wide paper dolls I had when I was a kid. I can't put a finger on the memory, but this graduation gown really reminded me of them! ha ha!

My cute daughter is graduating this spring, so this is for her! Of course I had to make it in her school colors for maximum impact! I die cut two of the gown from Pinefeather cardstock and adhered them together using foam squares, making sure not to put any where the gift card slider portion goes.

The cap is actually the portion that you slide with the gift card holder below. I have a picture showing it a little further down the post. I die cut the 2021 numbers using the recently released Numbers Die out of silver glitter cardstock and added them to the front of the gown using foam squares.

All of the sentiments are from the new Just Sentiments: Graduation stamp set. I stamped the "To: From" portion onto the gift card slider. You can see how the cap is at the top and then it slides down into the gown. The "congrats Grad! Class of:" sentiment is heat embossed in silver to accent the glitter numbers.

I also added the diploma scroll and tassel for additional charm and detail! You could also just use the gown portion to use as a shaped card or to add to a regular card front if you don't want to make a gift card holder! The possibilities are endless!

My next card uses the new Storybook: Teacher stamp set paired with the new To Die For Sentiments: Grow! I was trying to make a chalkboard type card, but the white sentiment was getting lost on the wreath so I added a red layer to the top. After that, it was giving me some serious "Mary Engelbreit" vibes! ha ha!

I used the ruler image to stamp along the four sides of the frame to help accentuate the "grow" theme, even though growth is not always visible! ha ha!

I added the book, apple and eyeglasses to the bottom for additional teacher detailing!

I layered it all onto a red card base to accentuate the red letters and apple.

I can't wait to try using the books even more!


T


Tuesday, March 16, 2021

Ink to Paper March Release Countdown Day 1

Hello and welcome to day 1 of the Ink to Paper March release countdown! I have a lot to share today using quite a few of the new release products! To begin, I have three cards using a fun new floral set called Prominent Petals! I've also paired these flowers with the new Dainty Deliveries Frame die!

To begin this card, I die cut the Dainty Deliveries Frame out of Lemon Tart cardstock and then layered it onto a panel of the same cardstock using liquid glue. I added the largest Love to Layer: Scalloped Circle die cut in the center and then the medium doily die cut from the Delicate Doilies to use as an anchor for the different colored blooms and leaves!


The two sentiments are from the previously released Lush Bloom stamp set and they are stamped in black and then added to the center of the floral cluster using foam squares.

Each of the flowers has an outline image and then different "filler" stamps for the petals, thus the name "Prominent Petals"!

There's also some of these fun circle clusters for you to add either background details or detail directly to the flower. I will showcase how to use them in a background on my third card today!

My second card for today uses the Dainty Deliveries Frame in a different way. I turned it horizontally onto the vertical panel using liquid glue.

 I chose to create some poppy type flowers for this design using red and black inks for a dramatic look!

The "sent with love" sentiment is also from the Prominent Petals set and I stamped it directly to the white panel underneath the flowers.

I added some black paint splatter over the top of the main panel using a paint brush.

You could also stamp the outline image using something different than black ink for a softer look.

I used the Nesting Basics: Pierced Rectangles dies around the perimeter of the white panel to add even additional detail to this simple design!

The idea for my third card using the Prominent Petals was actually from the "assembled examples" graphic for the stamp set. I really liked the layout and that it showcased all of the different images together!

I used white and pink embossing powder on the flowers and leaves to give the speckled portions more drama. You can also see how I added the pink portion to the background.

The flowers are all layered onto a panel that was die cut using the new Love to Layer: Torn Edges dies.

It really helps add some visual detail to the edges to keep the design moving!

This "hello friend" sentiment is also from the Prominent Petals stamp set and is stamped strategically between the stem! ha ha!

My 4th and final card for today uses the new "Flying By" stamp set paired with the Dainty Deliveries Frame. I chose to do some emboss resist with the butterfly for a whimsical feeling!

I added the color using blender brushes and then spritzed some water over the top using a spray bottle. I set it aside to dry and got to work on the background.

I added the same colors of ink that I used on the butterfly around the edges of a white piece of cardstock. I then layered the Dainty Deliveries frame over the top using liquid glue and a frame that has some blended purple ink.

I added the butterfly die cut to another one of the Love to Layer: Torn Edges die cuts with foam squares. I added some Hawaiian Shores ink splatter to the card front using a paint brush!

The sentiments are from the "Flying By" stamp set and are added using foam squares.  A few sparkling clear sequins finish off this design! I might need to add some shimmer spray before it heads to its new home! ha ha! Join me tomorrow for day 2 of the release! Thanks for fluttering by!