Sunday, January 30, 2022

The Greetery {You Nailed It}

Every once in awhile, I tend to need some cards that I haven't taken care of during a new release or design team assignment! ha ha! This is one of those times! At the beginning of the month, our church congregation changed buildings and the building we moved to hasn’t  had a children's group in it for over ten years. The place needed a little bit of TLC, including some stairs for a pulpit so the children could speak into the microphone. One of the awesome men noticed the need and offered to build some much-needed stairs!

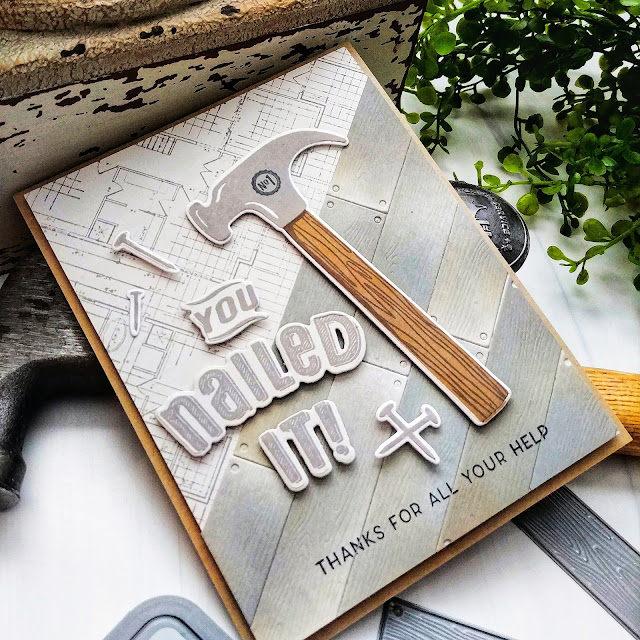
I bought a few of his favorite treats and wanted to include a card. I mentally perused my stamp/die stash and remembered the fabulous Dad Jokes: Nailed It Stamp Set from The Greetery! When this set was released, the design team signed up for which set we wanted to use; this one or the punn-y Dad Jokes: High Steaks stamp set. I chose the latter, which meant this was my first time using this fun set! It is the PERFECT choice for this thank you card!

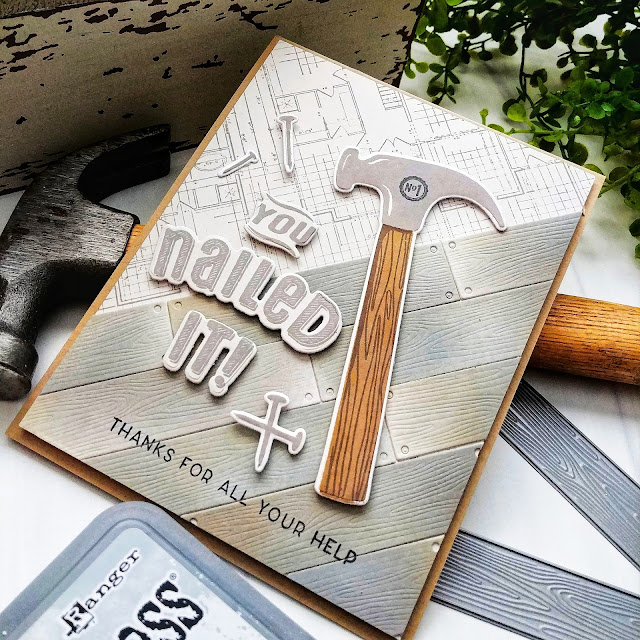
To begin, I created a panel of blended ink using Weathered Wood, Frayed Burlap, and Hickory Smoke Distress Oxide inks. Once that was done, I die cut the panel using the Shiplap Builder Die. I set them aside and got to work on rest of the background. I cut a panel of Soft Stone cardstock and then stamped the Big Plans Background Stamp using Hickory Smoke ink. From there, I used one of the diagonal lines found in the background to line up the shiplap pieces. I glued them in place using liquid glue and then used my paper trimmer to cut the pieces that were hanging over the edge. I used those extra pieces to fill in the corners, and small sides.

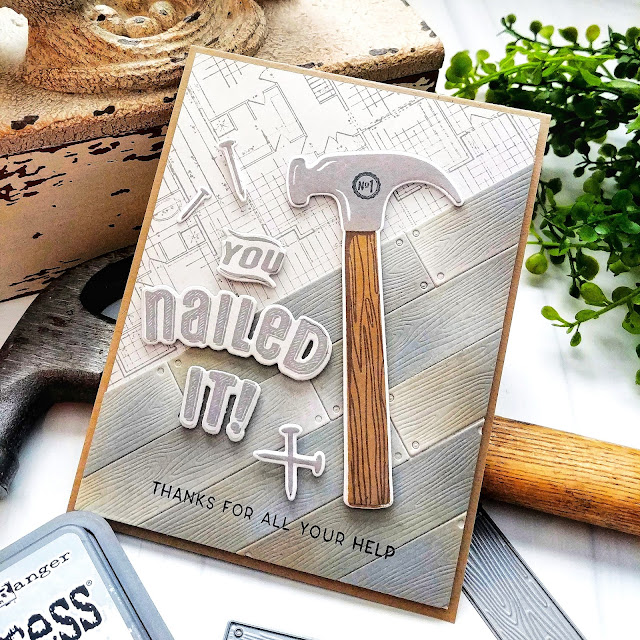
Once that was done, I die cut the hammer, "nailed it" sentiment pieces, and the nails. I used my mini MISTI to stamp all the pieces using the same ink as the shiplap background with the exception of the detail image for the handle; that was stamped using Walnut Stain Distress Oxide ink. The "no.1" and "thanks for all your help" are stamped using Black Soot ink. I used foam squares to pop everything up on the background. I layered it onto a top folding A2 Kraft card base using foam squares. Thanks for fluttering by!


Saturday, January 29, 2022

Wintertime Welcome

The cutest new couple moved into the neighborhood along with their super-precious twin baby girls! I couldn't wait to deliver a "welcome to the neighborhood" gift basket and card! I don't know if I've mentioned it or not, but I have a tendency of buying all of the stamps/dies/stencils/etc. that I fall in love with and they get sent to a specific "new product" basket that I have next to my desk. Unfortunately, this basket is bursting at the seams since I rarely get a chance to do "just for fun" creating! I decided to put a dent in the basket with today's card. I don't want to put the items away in their designated bins until I've actually USED them, otherwise they will be forgotten. Once I've created, photographed, and posted the project, the chances of me forgetting about a product are greatly reduced! Does this sound familiar to anyone? ha ha!

To begin, I used a beautiful embossing folder from Simon Says Stamp, which appears to be discontinued or out of stock. It was part of their holiday release; I snagged two others in addition to this one, so hopefully I'll get a chance to use those as well! ha ha! I used Stormy Sea cardstock which looks absolutely beautiful with this deep embossing! I added some white paint splatter for a snowy look.

I die cut the houses from Soft Stone cardstock using the My Neighborhood Dienamics. I glued the corresponding roofs to each house using liquid glue and then added them to the embossed panel using foam squares. I probably should have waited until I added the sentiment strip, because after I edited these photos, I noticed they were wonky! oh well! ha ha! I gave the rooftops some glittery snow for some added detail and sparkle.

Speaking of the sentiment, I heat embossed the "welcome" sentiment from the Right at Home  stamp set onto a strip of Smokey Shadow cardstock using silver powder. I adhered it to the embossed panel using foam squares.  I almost left the card just like that; clean and simple, but then I remembered that I had an extra pine bough and pinecone left over from THIS card, so I added it to the top!

I'm really glad I remembered it because it enhanced the images from the embossed background so nicely!

Since I had so many die cut houses left over, I decided to gussy up the inside by adding another sentiment and a cute little house! Thanks for fluttering by!


Thursday, January 27, 2022

The Greetery {Sending Hugs and Kisses}

I've got Valentine's Day on my mind today and wanted to create a few cards using some of the cutest new products from the latest release from The Greetery! I absolutely adore the new BotaniCuts Strawberries Die and the Curio: Confections Die so I decided to bring the two together for these sweet and delicious looking Valentine's Day cards! Have your orders arrived? Hopefully so, and here is some fresh  inspiration for you! 
I wanted to keep the layout very simple to highlight these sweet confections; almost like a countertop with these chocolate delights laying out, ready to be eaten.

To begin, I die cut the chocolate "liners" from vellum and set them aside. Next, I die cut all of the chocolates and swirls from white cardstock. After that, I die cut all of the strawberry pieces twice; one for each card. I started coloring the foliage for the strawberries first, starting with Mowed Lawn Distress Oxide ink and then adding the darker Rustic Wilderness ink for contrast. The berries are colored using Festive Berries and Aged Mahogany. I also added some of the Mowed Lawn ink to the highlighted portion with a touch of Abandoned Coral over the top to dilute the intensity of the green. I only used the amount of green ink that was left over on the finger dauber rather than adding any additional ink.

The flowers were simply left white with yellow colored pencil detail added to the centers. Finally, it was time to ink up the chocolate confections. I kept some on the milk chocolate spectrum and others made their way to the dark chocolate side of things. I really like the contrast in browns to keep it interesting and realistic looking. I used the Strawberry Bits on the majority of the chocolates, but a few have Heart Bits as well. It's fun to create these one-of-a-kind confections!


The background was created by cutting a panel of white cardstock measuring 5 1/2 by 4 1/4 inches. It's hard to see in the photos, but I stamped the panels using the Fond of Foliage Background and Sweet Blush ink. I kept it very light because I didn't want it to compete with the business of the chocolates and strawberries, ESPECIALLY because I didn't plan on using any additional layers.

I added the border detail by die cutting the stamped panels using the Nordic Frames die. I stamped the "Happy Valentine's Day" sentiment directly on the background panel using Ground Espresso Distress Oxide ink.

I also stamped the "Sending Hugs and Kisses" sentiment, which is from the Sentiment Suite: Love Stamp Set, in the same brown ink onto Sweet Blush cardstock and die cut it using the Sentiment Suite Love Stamp Set. I forgot to mention that on one set of foliage, I added colored pencil detail, which you can really see in this photo. There is a definite difference between the two sets of leaves! I think I need to go back and add the detail to the other card now! ha ha! I added a sprinkling of glitter to each of the cards and mounted the panels onto top-folding A2 Pure Poppy card bases. Thanks for fluttering by!


Wednesday, January 26, 2022

Papertrey Ink January Release Day {Loving Wishes}


I hope you've enjoyed the last 4 days of the Papertrey Ink January countdown! I wanted to share one more card with you today before everything is released at 10 PM ET tonight. I absolutely love the new Into the Blooms: Roses dies, which I used for three cards during the countdown, but I wanted to create some paler, tone-on-tone roses. The roses I created for my previous cards are bright, and colorful, but I also love white and cream roses so that is where my card began.

Here's a little peek at the cards I made using all of the different products being released tonight. 

I die cut all of the pieces I would need for these two roses and the leaves using Vintage Cream cardstock. I felt that the cream cardstock would start these roses off with a lovely hue and I was right. I colored the petals and leaves using assorted Distress Oxide inks. I assembled them using both liquid glue and foam squares on the third layer to give them some added dimension.
I love how Melissa used gold leaves on one of her cards, so I thought I'd give that a try today and I love how they look with the regular leaves and roses. I also die cut the beautiful Love to Layer: Floral Fusion die from Vintage Cream cardstock as well. I layered it onto the largest circle in the Love to Layer: Scalloped Circles Die collection using foam squares. I also made certain to pop up the petals and leaves on the Floral Fusion die to give the card even more detail.

I arranged the roses and leaves around the circle using both foam squares and liquid glue. The background was created by layering both the Ornate Cover Plate and the Border Bling: Skinny Dotted Frame onto an A2 sized panel of Limeade Ice cardstock. I glued the panel to a top folding A2 Vintage Cream card base and then added the focal circle using foam squares.


I added some glitter and sequins and the "Loving Wishes" sentiment, which is part of the Just Sentiments: Belated Birthday stamp set, to finish off the card. Thanks for fluttering by!
P.S. The entire new release will be available tonight at 10 PM ET.


Tuesday, January 25, 2022

Papertrey Ink Flash Sale {Sending Sunshine}

I'm popping in quickly this evening to share my card for this week's Papertrey Ink Flash Sale! I chose to use the beautiful and easy-t0-use Brighter Days stamp set as the focal point of my card with the Vintage Postage stamp set and Vintage Postage Sentiments stamp set to accent the flowers! I think I must be subconsciously yearning for springtime colors because my card I'm sharing tomorrow uses some of these same hues! ha ha!


To begin, I die cut all of the pieces that I would need for the flowers and bow using the Brighter Days dies. I stamped the flowers using a combination of Lemon Tart, Summer Sunrise, and Canyon Clay ink using a small blending brush to "tap" out the harsh lines from the ink pad. The foliage portion is stamped using Spring Moss and Simply Chartreuse ink. I used liquid glue to adhere the flowers to the stems. The bow is stamped in Canyon Clay ink for contrast. 

I absolutely adore the Vintage Postage stamp set and chose to stamp it in a slighter darker shade than the foliage. I thought that Ripe Avocado would be a good choice and it was! It ended up being the perfect contrast between the flower clusters. 

I stamped the "Sending Sunshine" sentiment in black and then added the accent images next to each word using Summer Sunrise ink. I had to use my MISTI to get them saturated....I see a "reinker" party in my future...all of my inkpads are bone dry! I don't think Utah's dry winter air helps out AT ALL! ha ha!

I die cut the postage image using the Nesting Basics Rectangle die along with the Nesting Basics Pierced Rectangles die to give it that extra detail that I just love. I thought this step was important because the size of the rectangle was too large to allow the pierced detail from the Border Bling: Postage Frames Die to show, so I added it this way. I die cut the Postage Frame from Lemon Tart cardstock and then layered the stamped panel using foam squares. I adhered it to a top folding A2 Spring Moss card base using additional foam squares. I added some glitter to the flowers and bow to finish it off! Thanks for fluttering by!


Papertrey Ink January Release Countdown Day 4

Well friends, it's the fourth and final day of the Papertrey Ink January release countdown! Everything will be available for purchase beginning tomorrow night at 10 PM ET. There's a really fun new set called Scene Everywhere: Windowsill that we're featuring today before the release goes live tomorrow! I haven't done many simple cards for this release, but I wanted to keep these two cards on the simple side to really let these sweet details shine.


I couldn't decide if I wanted an "inside" or "outside" window scene, so I made it easy and just made one of each! I love the drapery rod and panels so really wanted to give that a try and I also couldn't resist the window box with the pie cooling in the window!

A few simple sentiments finish off these easy cards! I had such fun choosing which colors I wanted to use to bring these scenes to life.

I really enjoyed this release, so I'm hoping to get a few more cards made with my favorites, but life has been crazy lately, so we'll see! I hope you've all enjoyed the last four days of the countdown! Thanks for fluttering by!


Monday, January 24, 2022

Papertrey Ink January Release Countdown Day 3

Hello and welcome to day 3 of the Papertrey Ink January release countdown! As promised, I'm sharing two more cards today using so many fun new products from the new release AND those dahlias I can't seem to put down! Up first is the cutest new set called Pattern Play! Who knew a set of patterned circles and dies could be so much fun? I'm having so much fun with them and know I will be reaching for them often! 

When I set out stamping my circles, I envisioned something on the Valentine's Day end of things, but when I saw how cute the blue dahlias from yesterday's bird card looked with the patterned circles, I decided to make a few more!

To begin, I stamped the largest pattern in Pure Poppy, the next pattern in Simply Chartreuse, and the smaller circle using Pure Poppy. There is a super cute small gingham pattern that I'm itching to use, but that will have to wait until the end of the countdown!

I created my dahlias and leaves by die cutting everything from white cardstock and then colored them using an assortment of Distress Oxide inks. I glued them together using foam squares and liquid glue and set them aside to dry while I got to work on the background elements.

I used the same elements for this card as I did for my first rose card from day 1 but switched up the colors and size of the scallop stacker for a completely different look. I love how it turned out; it complements the patterns and flowers so well.

I arranged the patterned circles and flowers here and there and then added a quick "thinking of you" sentiment from the newer Jar Accessories stamp set.

My next card uses both the new Pattern Play stamp set  and the cutest new set called Band-aid Wishes. I am obsessed with the older band-aid set that was released YEARS ago...I think it was called Healing Wishes, but I can't remember. Anyway, this one has stolen my heart, too! I love that you can create all sorts of different patterns for the band-aids!
I die cut the band-aid box from Lemon Tart cardstock and then added the die cut "get well" sentiment using the included die. Some Summer Sunrise ink around the edges really gives the box some contrast. I die cut the "red cross" symbol using Berry Sorbet cardstock and added it to the box using foam squares and then a coat of Nuvo Crystal Glaze.
Once the box was done, I set it aside to let the glaze dry while I worked on the band-aids. I die cut them from white, Lemon Tart, Berry Sorbet, and Sweet Blush to fulfill my bright and sunshine-y feeling I wanted for this get well design.


I stamped the largest circle from the Pattern Party stamp set using Berry Sorbet ink and die cut it using the die. I layered the box stuffed full of cute patterned band-aids on top of the circle using foam squares and liquid glue to adhere the stack of band-aids.

I've surprisingly only used the new Border Bling: Blooming Hearts die for one card, so I thought it would be super cute for this card. I die cut it from Sweet Blush cardstock and glued it to a top folding A2 card base. I also added one of the Border Bling: Skinny Stitched Frames in the center using foam squares. 

I added the circle with the box directly in the center and then clustered the flowers and leaves around the box. Thanks for fluttering by!


Sunday, January 23, 2022

Papertrey Ink January Release Day 2

Welcome to day 2 of the Papertrey Ink January release countdown! I'm sharing a handful of cards with you today; one using the latest Feathered Friends cutie and a trio of cards using beautiful new set called Frame Decor. I had so much fun stamping the frames and accessories that I couldn't stop at just one!

I was a little intimidated by this little bird at first because he has quite a few steps, but in the end, it was so fun to see him come to life as each step was stamped! My tip is to begin with the tail on wing portion, then the head, side and bottom image and then build from there. 

I chose teals and blues to bring this little guy to life and I love how he turned out. Once he was done, I chose one of the sentiments from the new Inside Greetings: Sympathy stamp set. I heat embossed it in silver onto a strip of vellum and set it aside. I purposely picked this particular sentiment because I wanted to use the On the Border: From the Heart Frame die. I die cut it from Aqua Mist cardstock and then glued it to an A2 panel of Aqua Mist cardstock. If you haven't noticed, I adore tone-on-tone backgrounds!

I wrapped the heat embossed sentiment around the panel and secured it to the back using tape. I've been on a floral creating frenzy so I decided to make a few more dahlias to accent the bird using the Into the Blooms: Dahlia dies. I think I mentioned yesterday that I've used these leaves on just about every card for the release and that isn’t an understatement! I used them again today on another card I’ll be sharing tomorrow! ha ha! I guess I just need to keep them  permanently on my desk!

I nestled the sweet little bird among the leaves and blooms using foam squares. I added a generous sprinkling of glitter to the blooms, leaves, and even the bird. I also added some additional shading around the perimeter of the panel before adhering it to a top folding A2 card base using liquid glue.

There are so many fun options and sentiments included in the new Frame Decor stamp set that I decided to just  make three cards! I kept the layouts simple since I was doing three at once. Sometimes you need simple in your life!

To begin, I die cut all of the pieces I wanted to use and then stamped them using the Frame Decor stamp set. 

Once everything was stamped, I got to work assembling each of the elements for each frame. This particular sentiment fits perfectly inside the frame.

Next, I decided on three simple backgrounds that I could easily put together and then stamped the additional two sentiments on the background panels.

The background panels are attached to card bases using liquid glue or foam squares, depending on what I wanted. I added some glitter here and there on each of the cards for some sparkle and shine. Thanks for fluttering by!