Sunday, February 28, 2021

Pinkfresh Studio {Forever True Forever Friends}

I can't believe we're already saying goodbye to February! I realize that it DOES have the shortest amount of days, but still it seems like the month has whizzed by! I have a really busy March ahead, so I was happy that I snuck some time to get my St. Patrick's Day decorating done in the house and do a bit of a refresh in the main living areas! I knew if I didn't get it done then, it most likely wouldn't happen!

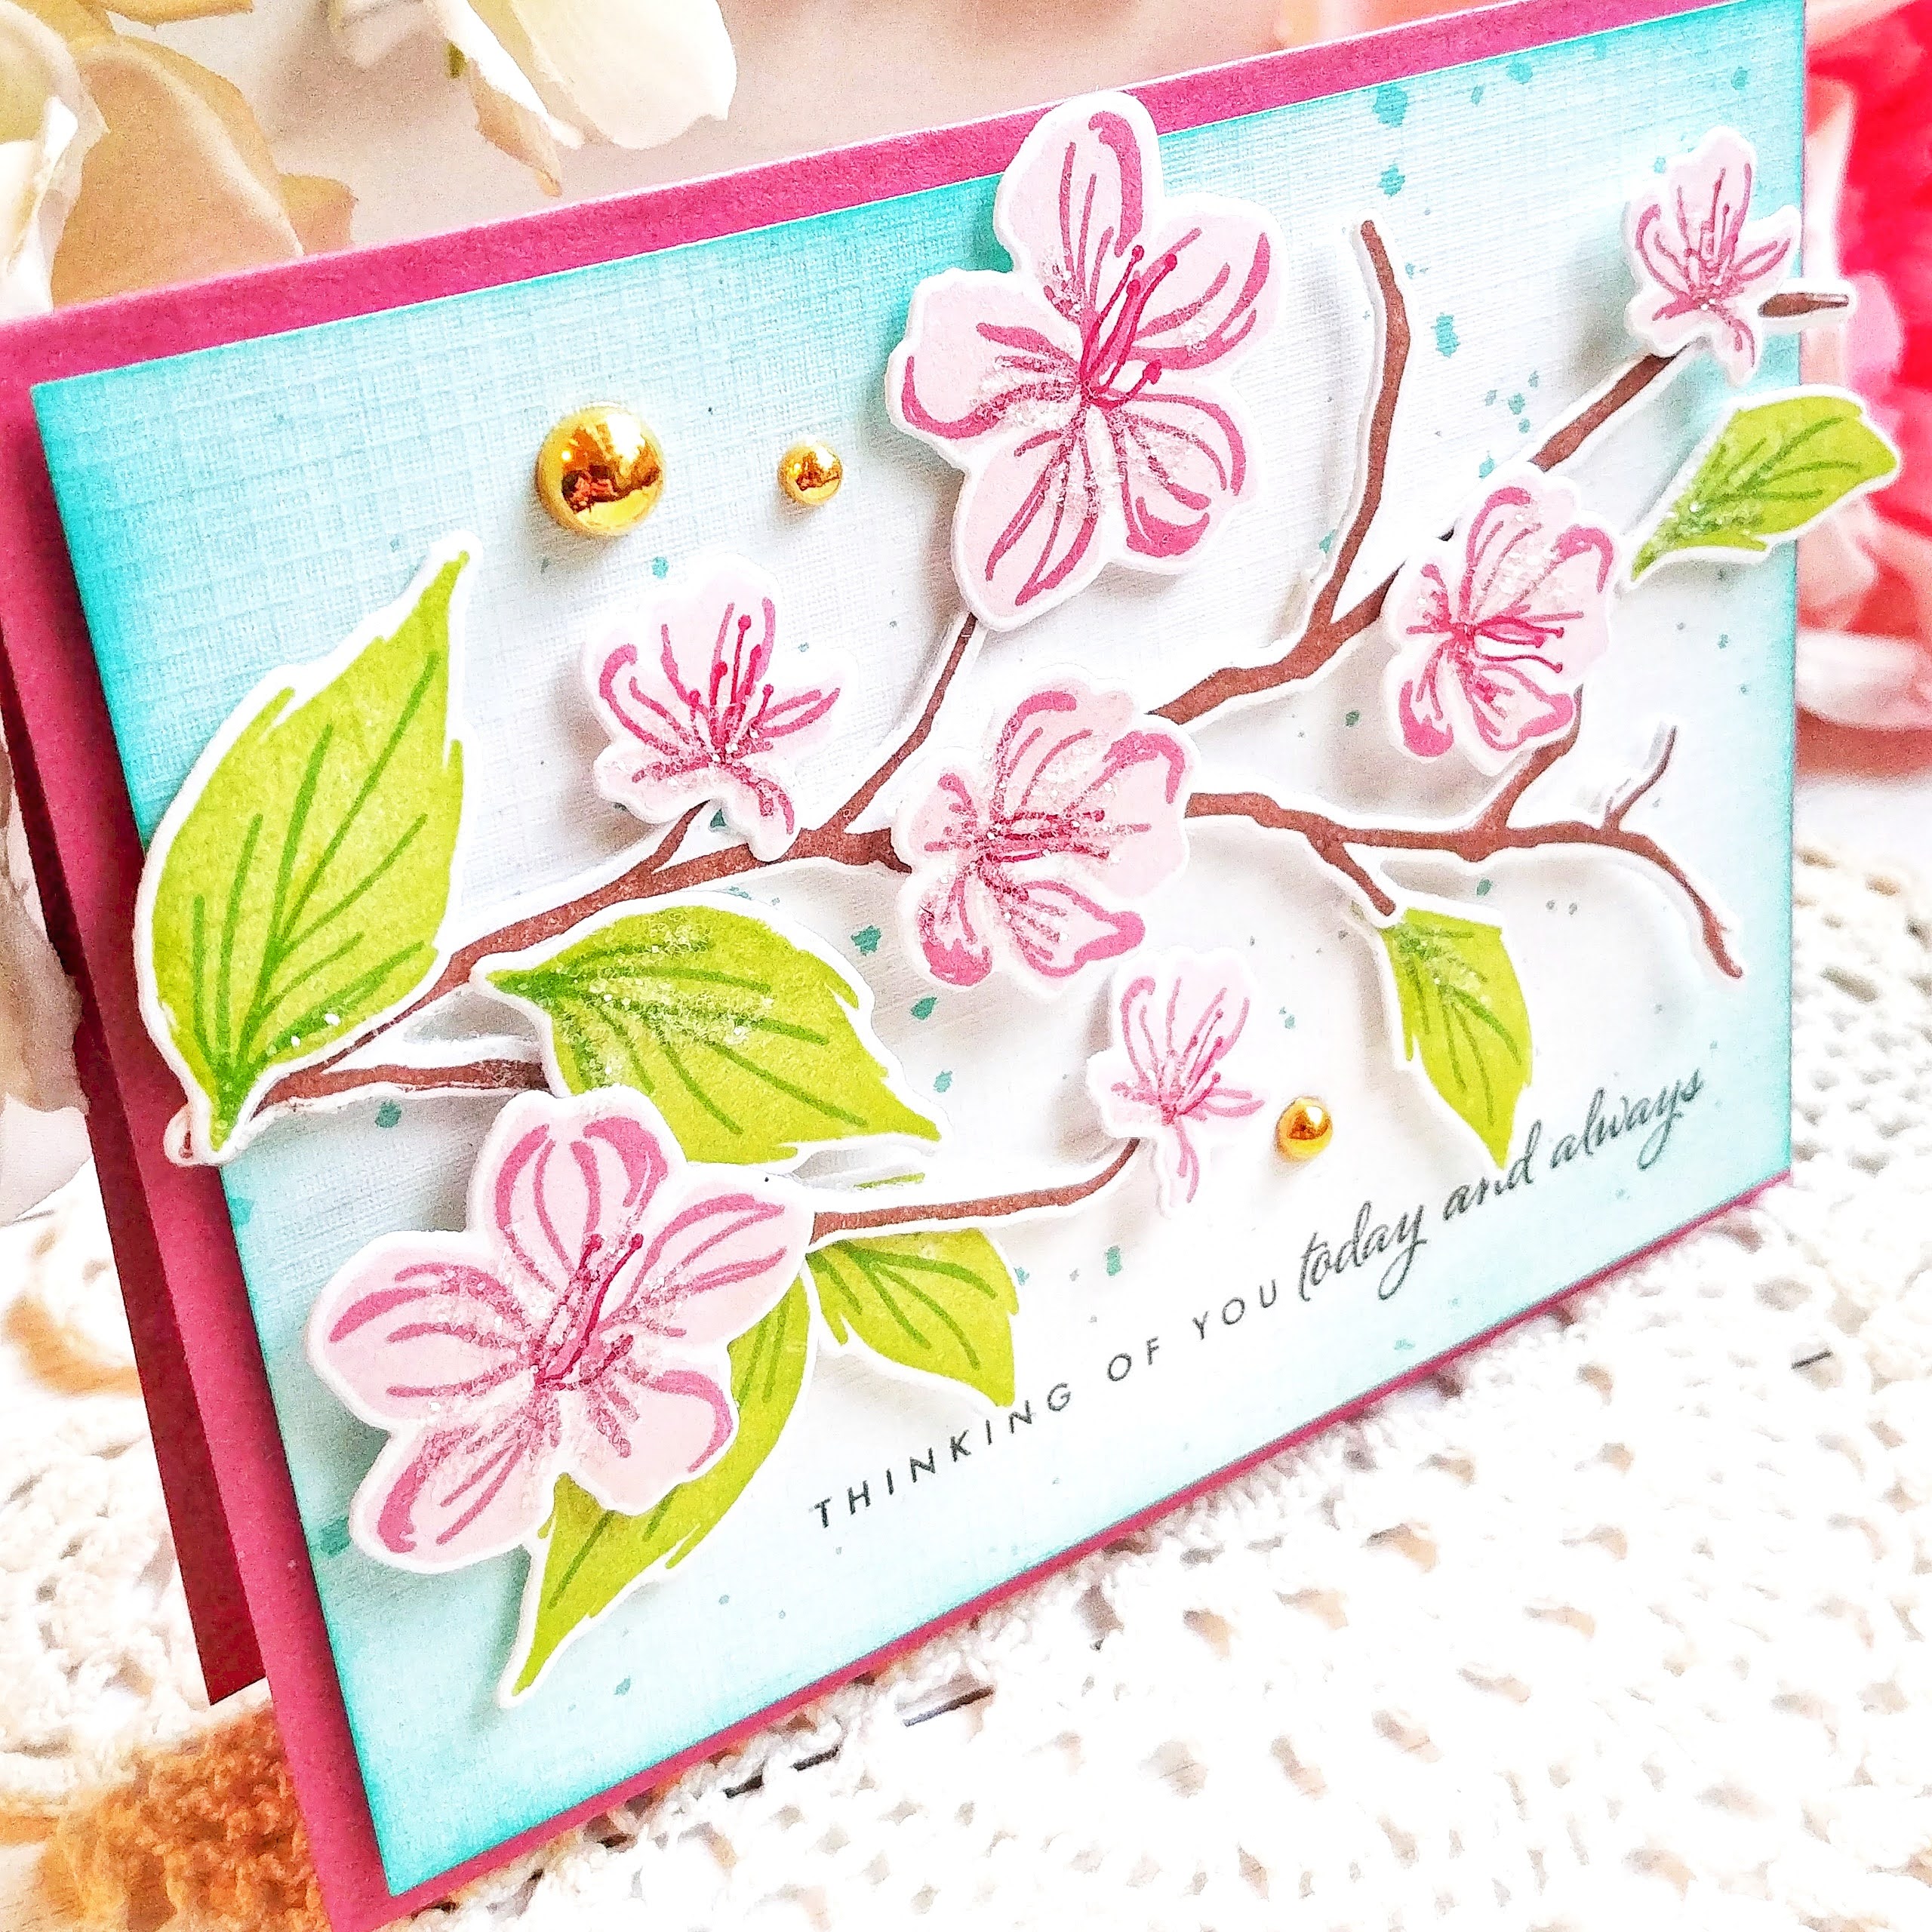
For today's card, I chose to use the new Friendship Blooms Layering Stencils, but this time with the coordinating Friendship Blooms stamp set to add the gold embossed  outline around the flowers.  When I made THIS card, I only used the stencils so I was excited to try this today! 

Something I learned from the first time I used this set, is that all the flowers and leaves can be stenciled at one time onto a panel measuring 4 1/4 inches by 5 1/2. They have the guides in the corner just like the background stencils which makes lining it up a breeze!

Once the stenciled panel was complete I was able to do all of the outline heat embossing quickly and easily. I used the coordinating Friendship Blooms dies to get everything cut out. I set those aside and got to work on the background. I really liked how the Sunburst background looked on the slimline card, so I decided to try the A2 version using the Layered Sunburst Stencil set

I chose to use another complimentary color combination because they're just easy and I don't have to think too much! ha ha! These colors also remind me of Pansies that I usually begin planting in my porch pots this time of year!

I heat embossed the sentiment in gold to accent the gold details of the flowers.

I wrapped the vellum around the background panel and secured it in the back using tape. 

I added some jewels to finish it off! Thanks for fluttering by!


Friday, February 26, 2021

Hello, Fabulous Friend

Hello to ALL of my fabulous crafty friends! It's nearing the end of the month which means I have a little time to do some "just because" creating! I decided to spend that time creating  something for this month's SugarPea Designs Mix It Up Challenge! I don't think I have participated in one of these challenges since I stepped down from the Design Team, so it was super fun to create this card! 

I just HAD to have the Open Book SugarCuts when they were first released, but I haven't used them until now! That's why I wanted to play along with this challenge so much because these are just perfect! To begin this card, I die cut the scallop portion using the Card Front Element Builder SugarCuts as well as a panel to fit just inside. I knew I would be using the English Bond Brick Wall Stencil and I didn't want it to go onto the scalloped portion. I simply cut a panel slightly smaller and then used the stencil with some texture paste. I set it aside to dry and got to work on the other design elements.

I searched my stash of pattern paper to find a print that would work well for the book pages. I was thrilled when I found this particular pattern from a VERY old pad. I selectively die cut this particular portion of the paper since it talks about summer vacation starting up! I thought that seemed like a fun book to read, especially since this card will be going to the school librarian, who also happens to be one of my fabulous friends! ha ha! I die cut the cover portion of the book out of Kraft cardstock to fit the color parameters of the challenge. I did some quick stitching down the pages of the book and then secured them to the cover using foam squares.

The eyeglasses are probably my favorite part...I die cut them three times from black cardstock and then added Nuvo Crystal Glaze over the top and let them dry before I glued them together. The Open Book SugarCuts also come with some fabulous flower and leaf dies. I die cut them all out of white cardstock and then colored them with finger daubers and ink. 

I die cut the Hello word  twice out of white cardstock and then glued them together using liquid glue. I heat embossed the "Fabulous Friend" sentiment, which is from the Everyday Sentiments stamp set, onto a black piece of cardstock and then die cut it with the Sentiment Strips SugarCuts. Once I had all of the elements created, I put the card together using foam squares and liquid glue onto the dried brick panel. I added sequins to the centers of the flowers for a fun detail and some sparkle! I had a lot of fun creating this card! Thanks for fluttering by!


Thursday, February 25, 2021

Pinkfresh Studio {Reset.Refocus.Readjust.Restart.}

Welcome friends! I'm over on the Pinkfresh Studio Blog today sharing this springy card and wanted to share it here as well! There are still quite a few stamps/dies/stencils from the latest release that I haven't had a chance to use!

I chose to use the unique Reset Stamp Set for today's card! I thought it would be fun to create in a pastel rainbow color palette, which is always fun! To begin, I die cut the words and flowers and then stamped them using my mini MISTI. 

The flowers are colored using Copic markers in coordinating colors to the letters for a cohesive look! Next, I got to work on the background which was created using the Diamond Plaid Stencil set

I layered everything up using foam squares to create a lot of dimension! The banner is  stamped with the "as many times as you need to." sentiment and then added over the top of the bold words.

I added some coordinating jewels to a few of the letters and flowers for some sparkle and shine!

Such a super simple card to put together, but I think it would really bring some peace and reassurance to someone who needs this type of encouragment.

Thanks for fluttering by!


Monday, February 22, 2021

Papertrey Ink/Ink to Paper Flash Sale {Thinking of You Today and Always}

Hello and happy Monday! If you've been around a while then you know that Monday means a new Papertrey Ink/Ink to Paper Flash Sale! I decided to use one of my favorite stamp sets from last spring: Blossoming Branches with the coordinating Blossoming Branches Dies. The sale will run from the time the Papertrey Ink newsletter hits your inbox and will end Wednesday at 4 pm! This week's sale will include:


INK: Sweet Blush, Autumn Rose, Scarlet Jewel, Green Parakeet, New Leaf, Hawaiian Shores

PAPER: Autumn Rose


I chose a very simply design, if you can even call it that! LOL! I just really wanted to showcase how easy it is to create a striking card with very little supplies and this beautiful stamp set. It really does all the work, doesn't it? If you want to see a few cards I made when it was first released, you can check them out HERE. I used this set in quite a few different ways if you're looking for some additional ideas!

One of my favorite things about this set in particular is the fabulous sentiments. It comes with three and I love the mix of fonts on each of them. I've used them over and over paired with different sets over the last year! I chose to use the "thinking of you today and always" sentiment which works so well for many different occasions!

I die cut the branch twice and glued it together for a sturdy piece and then added it to the card using foam squares for dimension.


I used foam squares to add the flowers and leaves in varying heights for a more interesting design. I added some glitter and gold drops to finish it off! Thanks for fluttering by!


Saturday, February 20, 2021

Just Because You Make Me Smile!

Hello and welcome! I'm so glad you're joining me today! Tonight is THE night for the February Ink to Paper release! We're also celebrating the 14th anniversary, so you'll enjoy a 15% discount on your purchases!
 This is a fun bonus card that I'm sharing and is the card I created on the Zoom call with Lori Craig! Were any of you there? I'd love to hear from you? It's kind of weird typing this out BEFORE I have the meeting and hoping everything will go well! ha ha! Anyway...I wanted to show pictures of the completed card and give you some step by step directions that maybe won't get covered on Zoom! By the way...if you would have told me a year ago that I would be demoing cards on Zoom, my first question would be, "What in the world is Zoom?" LOL!

This card uses the beautiful new Lush Blooms stamp set that will be released tonight at 10 PM ET. It is such a beautiful floral set with a few different sentiments to create fabulous cards quickly and easily!

To begin, I die cut the Ornate Cover Plate portion of the background AND the Border Bling: Skinny Diagonals Frames out of Aqua Mist cardstock. I glued both of them to a 4 1/4 by 5 1/2 inch piece of Aqua Mist cardstock for a tone on tone look. Once that was done, I was able to add the smallest panel from the Love to Layer: Notched Die over the top using foam squares. I did, however, stamp the "you make me smile" portion of the sentiment BEFORE I added it to the background panel. Once that was done, I was ready to start adding the flowers and leaves.

I chose to use two different colored blooms; Lilac Grace, Winter Wisteria, and Plum Pudding for one, and Sweet Blush, Pale Peony, and Berry Sorbet for the other. The leaves are stamped in Spring Moss, Simply Chartreuse, and Ripe Avocado ink.

I love that this stamp set has a die for the "just because" portion of the sentiment to allow for creative placement. I love how it looks hovering above the flowers! I finished off this floral design with some glitter and some sparkling clear sequins! Thanks for fluttering by!


Pinkfresh Studio {Your Potential to Succeed is Infinite}

Hello friends! I have a fun floral card to share with you today using the new Infinite Blooms stamp set! I created this for the February Pinkfresh Studio Facebook challenge. You can see the inspiration photo below and I chose to use Dilay's fabulous card as the springboard for mine. I love how she die cut the floral panel to create a camouflage look. I chose to do a simpler version of this on the plaid panel.


To begin, I die cut the floral piece using the Infinite Blooms die and then stamped it using the infinite Blooms stamp set. Once that was done, I used an assortment of alcohol markers to color the flowers and foliage. 

I set the colored bouquet aside and got to work creating the background panel. I couldn't decided between a purple background (to keep with the inspiration card) or blue. As you can see, the blue ended up winning! I used the Simple Plaid Stencil Set paired withOcean Breeze and Aquamarine ink. 

Once that was done, I carefully chose where I wanted to do my "camouflage" cutting. I used the bouquet for placement and then used Washi tape to secure the smaller of the two Essentials: Stitched Scallop Rectangles. Once it was cut, I layered the bigger portion to a top folding A2 cardbase and then added the scallop portion using foam squares to give it dimension. I threw the center portion away so that I could stamp the sentiment onto the white portion. 

I used my mini MISTI to get it lined up just right and to get a good impression.  I also added some Aquamarine ink splatter for added detail.

At this point I was able to add the bouquet using additional foam squares. I also added glitter and jewels for some sparkle and shine! I hope you get a chance to join us this month! Thanks for fluttering by!


Friday, February 19, 2021

Ink to Paper February Release Countdown Day 4

Well friends, it's the 4th and final day of the Ink to Paper February release countdown! Up first is a gorgeous new floral set called "Effortless Beauties"! This is my new favorite floral set and I know I will be reaching for it often!

There's also a new cutie in the Feathered Friends series....just like the cutie that was shared yesterday, but this is JUST a die so you can add color and shading to your heart's content!

This particular bird is VERY easy to to put together and is one of my favorites! It is the Feathered Friends 8 die set.

I used the "With Heartfelt Sympathy" sentiment, which is from a previously released Feathered Friends set! It is one of my favorite sentiments, but I wish I wasn't needing it so much lately!

I had a lot of fun putting this card together and might create another one with a different sentiment!

 My second and final card for the release is a beautiful and different set called "She Blooms". I don't normally stamp people so this was a fun change of pace! 

I really like the sentiments included in this set and was torn between which one to use. In the end, this particular one looked like it was meant to nestle into the arch of the heart, so it won its place on the front, but my favorite sentiment in the set is on the inside and I'll share a photo of that later in the post.

The dress/girl/hair are all created by multi-step stamps to create the finished product. I chose to make her dress blue since my daughter always loved Cinderella so much as a little girl, although she called her "Cinderlala"! ha ha! Oh, I miss those days!

The stamp set has two single flowers as well so you can use those to accent your project how you like. I chose to add two to her dress and a few others here and there.

I added a few gold drops to the centers of three flowers.

I just love this sentiment so I added it to the inside along with two more flowers! This concludes the February release countdown! Everything will be available for purchase starting at 10 PM ET on February 20th! Thanks for fluttering by!


Thursday, February 18, 2021

Pinkfresh Studio {Hugs from Afar}

I'm still having so much fun using all of the amazing products from the latest Pinkfresh Studio release! I know that no matter what I reach for, I'm going to be having fun! For today's card, I chose to use the new Rustic Floral Wreath Layering Stencil set for an elegant, yet country feel, if that's even a thing! ha ha! 

I added a lot of white layers, but each one is packed with texture and detail to give this card some visual interest. To begin, I die cut the Rustic Floral Wreath using the Rustic Floral Wreath die and then added the different colors using the stencils. If you read my Pinkfresh Studio post from Monday, I used the same steps, except this particular set doesn't have a coordinating stamp, so I obviously didn't do any stamping for the wreath.

I did, however, stamp the sentiment, which is from the new My Favorite Things to Say 2 stamp set, directly onto the flowers at the bottom. I love hanging wreaths on my windows, so I thought it would be fun to use this same idea by using the dies from the Essentials: Shaker tags

I also layered the cute little Leafy Circle underneath the Rustic Floral Wreath for additional depth and detail.


Of course I couldn't resist adding a bow but I didn't add any jewels, which is shocking! Believe me, I tried! They just didn't fit the mood of the card, but I DID add some glitter for a bit of sparkle! I had a lot of fun creating this card! Thanks for fluttering by!