
Welcome to this week's Papertrey Ink Design Team Tips! Thanks for joining me today! I think that no matter how many cards we create, we've all had times when occasions sneak up on us and catch us unprepared! I've been needing to make quite a few thank you cards recently and I had thought about sharing my process with you. One of my sweet blog readers asked me in one of my last posts if I ever mass produced cards, so my decision was made! LOL! I hope you'll find today's information informative and helpful!

I made 8 cards in total and I do suggest that you make an even amount of cards since you get 2 card bases from one 8 1/2 by 11 piece of cardstock. If you don't need an even amount, just make it anyway, because it will definitely come in handy later! The first thing you will want to do is decide on the design you'll be making. You don't need to reinvent the wheel if you are struggling to come up with something; maybe tweak an old design or use one of your favorite standbys. If you use someone else's design and are planning on sharing it on your blog or social media, remember to give proper credit. Tip #1- Start with a clean and tidy work space and gather all supplies that you will need. Make sure you have enough of everything before you begin. There's nothing worse than finding out in the middle of a big project that you don't have everything you need. I also like listening to music while I create. Make sure all of your ink pads are juicy so that you can stamp quickly and get good impressions.

Tip #2-Once you are all set, score and cut all of your card bases. Use a bone folder to get a smooth crease. I like to add a "handmade" type image to the back. This only adds a minute to the total time, but it really gives your cards that extra special touch.

I also like to add a greeting or sentiment to the inside of my cards as well. After you have stamped the back, quickly stamp your sentiment on the inside. Once again, this doesn't take up much time and really makes your card seem put together. The "handmade" sentiment and this greeting on the inside are both from the Better Together stamp set. Another thing I'd like to mention is that I put everything away as I go. I knew that I wouldn't need this stamp set any more, so I put it away. This really helps keep your work space tidy and uncluttered.
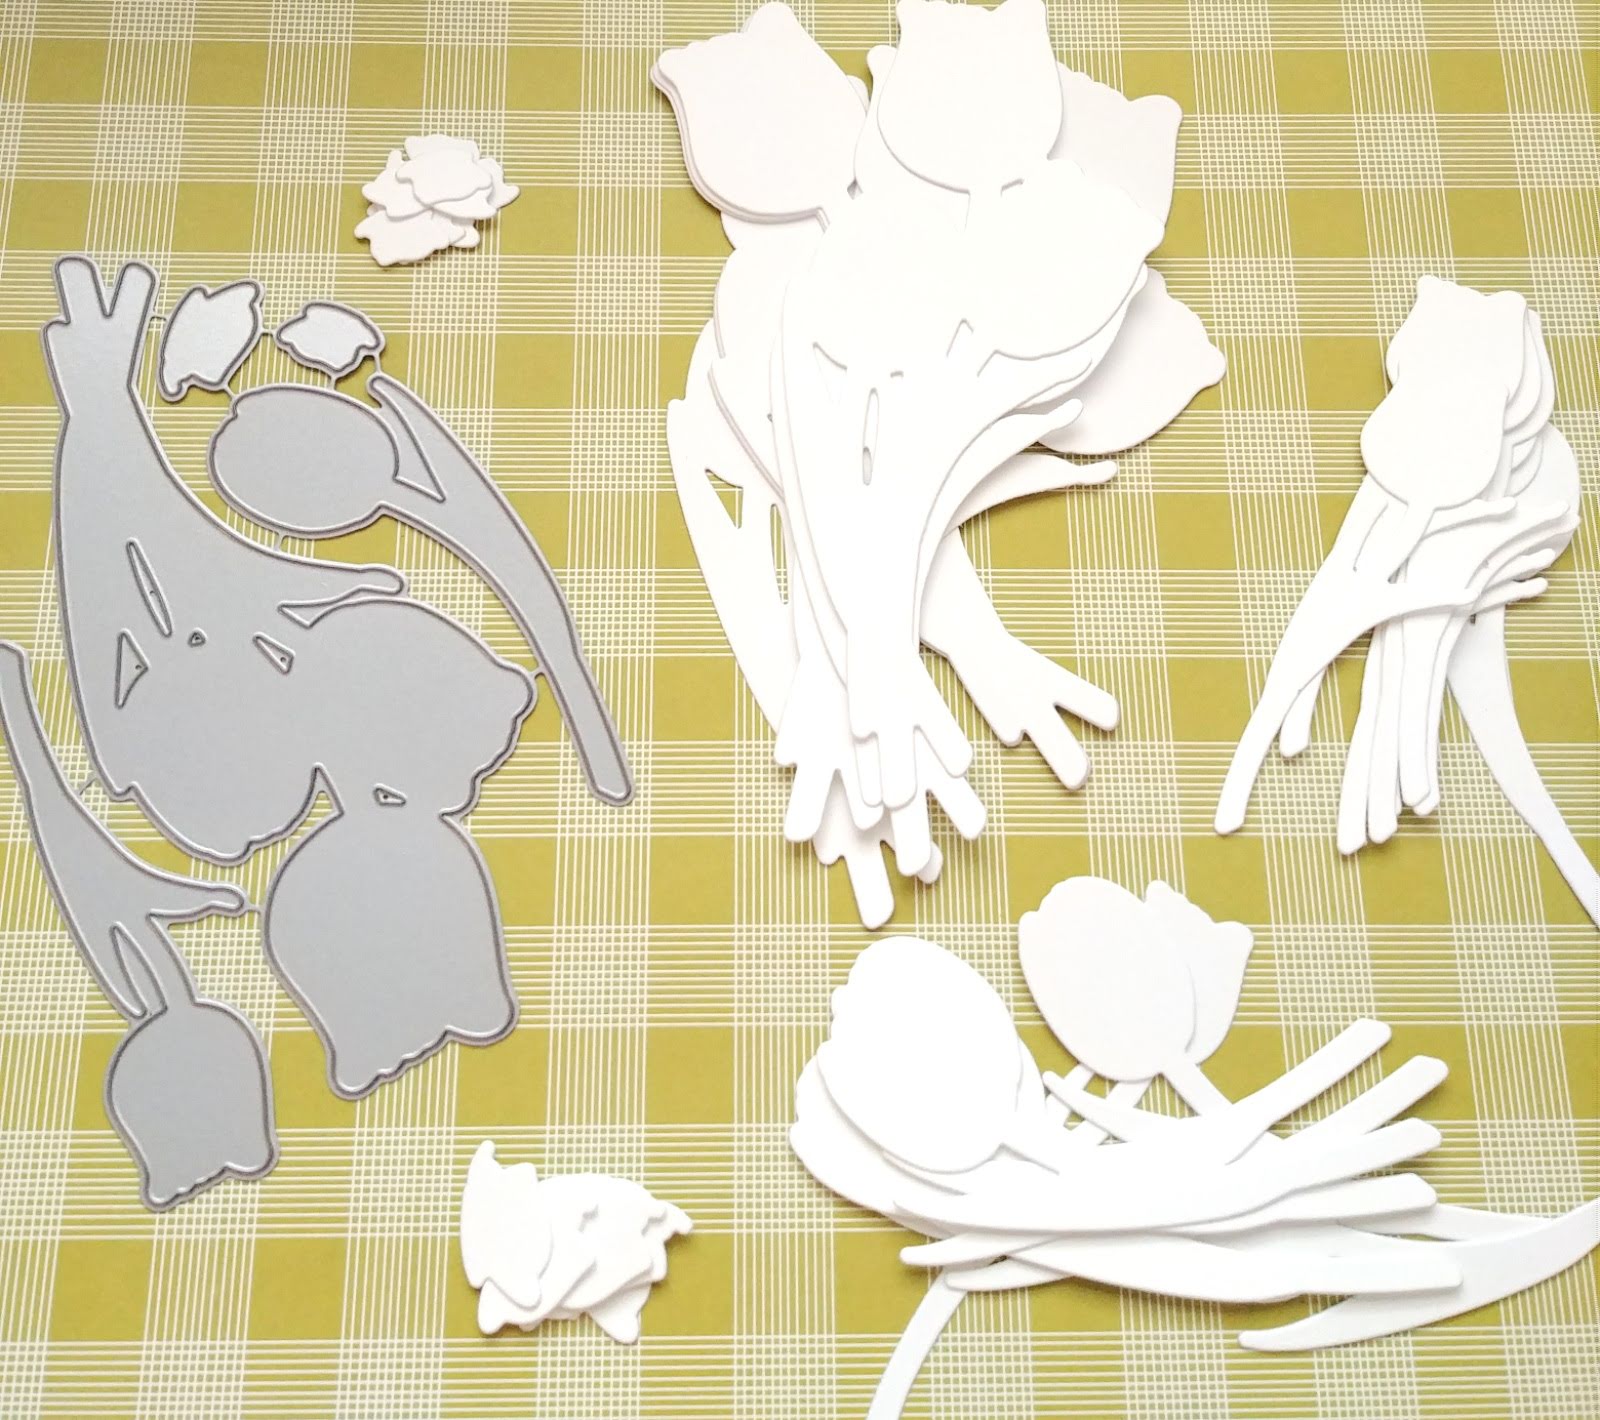
Set the card bases aside and begin working on the elements for the front of your card. Tip #3- pick images with a wow factor or that give you some bang for your buck. When you are mass producing, you definitely don't want a design with a million steps. By picking a beautiful flower, it really helps make my design stand out without a ton of work. I die cut enough of everything for 8 cards at one time. As you can see, I've left these dies connected. I can't imagine a time when I will need one without the other and it makes placing it inside of my die cutting machine so much quicker. I like to arrange each type of diecut in a stack or pile so that I can grab them easily during the stamping session.

A MISTI or other type of stamp positioner is such a time saver, but not mandatory for these cards. Make sure to take the time to align your stamps properly. It really doesn't take much time at all and in the end, you will have nice results. Also, I had originally planned on making all of the flowers the same color but as I went along, I realized that it would be fun to make some other colored tulips as well. It didn't take any extra time, except to clean the stamp and grab a new ink pad. I'm glad I decided to this as it really gives a fun variety. Tip #4-Don't hesitate to mix up your color combinations if they will work together as a whole on the final result. I used quite a few ink colors for the flowers: Harvest Gold, Lilac Grace, Winter Wisteria, Bright Buttercup, Simply Chartreuse, Ripe Avocado, Pale Peony, Sweet Blush, Berry Sorbet, Americana, Aqua Mist, Ocean Tides, and Weathervane.

And the results are beautiful and so worth it! Like I mentioned earlier, these tulips are just breathtaking and are a show stopper all on their own. The stamping portion took me about 2 hours total, but the rest of the design elements only took and hour or so. I find the stamping to be therapeutic and enjoyable. It is always fun to see the flowers come to life as each layer is added. If you can't commit to that much time in one sitting, break up the stamping on one day and then come back on another day to finish up the rest of the elements.

I chose to use the Tag Sale: Quilted die as the backdrop for the tulips. Tip #5- Pick a second element with some texture or special detailing that will make your design interesting without having to do any additional work. I love the scallops and stitched detail that this tag provides. I also used the MISTI to stamp the sentiments on the tags. They are all from the Never Enough: Thanks stamp set. I love all of the different fonts so I couldn't pick just one! LOL! I stamped them in Weathervane ink for a soft look.


Tip #6- Cut your papers in dimensions that will get you the most from one sheet of paper. If I use a 6 by 6 paper pad, I like to cut squares that are 3 by 3, or 2 by 3 so that I can maximize one sheet. Just try to keep in mind ways to getbas many cuts from one piece of paper. For today's cards, I cut the Bitty Big: Simply Chartreuse pattern paper in panels that measured 4 by 5 1/4. This is a standard size panel, but it gives me 4 card fronts from one piece of paper. The Bitty Big:Pink Posey paper is cut 2 by 4 inches which maximizes one sheet as well. Hopefully that makes sense.

Once I had the pattern papers cut, I did some zig zag machine stitching at the bottom for an additional design detail. This really adds in some extra detail and texture and doesn't take up much time. For me, I try and think of little details like this that I am willing to do that don't make me feel overwhelmed.

Tip #7-Add in some shine if you can. I decided to do some heat embossing on the banner piece that is included in the tag die. I added this detail to 4 of the cards and added a bow of Jute Button Twine to the other 4. All of the cards will be spritzed with Shimmer Spray as well. I do this after I photograph them for aesthetics since the tiny specks can show up as a distraction, but in real life the results are wonderful!

You can see the two different card designs that I ended up with. I hadn't intended on them being different, with the exception of the sentiments, but I really like the two varieties. They both have such a different feel just by changing up the colors. Also, since I didn't end up by using all of the butterflies, I took that opportunity to add them on the inside at the end of the sentiment. That particular sentiment isn't centered, so the addition of the butterfly really feels intended. I also added some Nuvo drops to mimic the look of raindrops or dew on the tulips. This is another one of those easy-to-do additions that can really make the design feel more special.

Tip #8-Keep your mailing needs in mind when adding a lot of bulk or weight. These cards will all be mailed and I don't generally skimp on dimension, but these will still be able to be sent through regular mail without needing any extra postage. The lady at the post office always slides my cards through her little "mail slot" sample to see if they will need any extra postage. I decided to make one of my own so I can check it before I go to the post office! Well friends, I think that about covers it! I hope you've found today's tips for mass producing cards helpful. Thanks for fluttering by!
49 comments:
Kelly, may I first say your set of cards are gorgeous. Thank you so much for your step by step "tips". I just put together a set of four cards last night and will definitely incorporate your tips in the future. I tend to forget the inside greeting and then am fumbling to complete when I need the card or am giving the set as a gift. Also love the reminder of the little stamped detail on the "backside" of the card. OK so I could go on and on about everything I love about this post but let me simply say I loved it all!! Have a wonderful weekend.
Love the “springy” colors! Thanks for sharing your tips. These would make a great little hostess or neighbor gift. Happy Spring!
My favorite season is Spring because of the tulips, flowers in general & all the lovely colors. Your card set has brought me there today on this cold snowy day in NYC! Thank you for taking me to my happy place. These are lovely cards & I'm sure will utilize this idea as well. TFS & the inspiration!
I love your tulips. This set is one of my favorite and your color combos really bring it to life. I haven't stitched on cards in ages. Thank you for reminding me of this one simple tip to add that extra wow factor. Great cards with a very spring time feel.
Hi again, Kelly. I had to finish up my comment earlier but wanted to ask a question now that I am back. My lady at the post office also uses the little mail slot sample. I likewise have thought of creating my own. Can you describe yours, dimensions, size of slot, etc. Thanks so much for always being helpful with our questions and requests.
Love your beautiful cards! Thank you so much for sharing all those tips, too. I haven't used my tulip stamps in a long time. It's time to get them out and stamp! :)
As a practiced multiple card maker, you did a fabulous job with the details here! And your cards are delightful! Hoping your spring mantra brings some relief of the frigid temps, and yes more snow tonight.....LOL!
Your cards were like a breath of spring! what a lovely way to greet the day. I love the mass production of cards, especially switching up colors a bit, as you did. Lovely, Kelly!
Kelly, what a beautiful and fabulous post! I love everything about these cards and even looked up the stamp sets you used. How did I miss buying them? I just made my card for Laurie's Favorites last week using Tulip Time. TFS all the details as I don’t mass produce often enough.
Love the beautiful cards with all the tulips in different shades of color. You did a great job putting them together and sharing all your tips, Thanks
Hi Kelly ! A MILLION thanks for your generous post. I have a tips & technique’s notebook that I’m adding “ Kelly’s tips “ to. I never copy a card but I am definitely inspired by talented artists, like you. I think there were 2 tips that stood out. Not inventing the wheel and keeping things tidy as you go. Too many times I’ve picked a design for mass producing that is too intricate. Therefore, it’s taken me a longgg time to finish. And when I’m crafting, I tend to pull everything out and THEN clean up when I’m finished. Then my very small craft room looks like it was hit by a storm. Lol, but not funny sometimes. I love that you’ve kept your design on the less fussy side, yet added extra detail here and there to make it special. I too have Tulip Time, it’s a beautiful set. What’s not to like?, as my hubby says. Your photography paints a perfect picture of mass production and as always, I LOVE YOUR WORK ! I’m very grateful for your help, thank you again. AND YOUR CARDS ARE BEAUTIFUL!! Double like button. :)
These are all so GORGEOUS, Kelly!! Thank you for including all your tips and tricks! Someone like me NEEDS them. Ha!
So lovely, and I appreciate all of your tips. am wondering - what is this stamp and die set. I didn't see it mentioned in your post. Thanks!
This comment is for Debbie who is asking about the "mail slot". I have a small, old, cheap paper cutter that has a side flip-up plastic bar (that holds the paper down when you cut...) The slot in that plastic bar is 1/4 inch -- just the right size of the mail slot. Just slip your card through there, and if it gets stuck, you need additional postage. Sometimes the PO lady says I need more postage when I've already checked and I don't. Then she puts it through her "mail slot" and sheepishly says, I guess you don't need extra postage.
Oh wow! These are beautiful.
Love the colour and detail.
Thanks for sharing your process. I usually stamp, then die-cut, but I can see now how well it works the other way round.
xxx
These are lovely. If you ask very nicely, your local post office may give you one of their "mail slot" cards. Mine did and it has been a lifesaver. It also has dimensions on it for larger envelopes, etc.
Your cards are lovely, Lovely, LOVELY! They are so bright and cheerful.
I really like your tips for mass-producing. I think Tip #1- Start with a clean and tidy work space, is the hardest for me, lol! Maybe if I were better about put everything away as I go it would be so hard!
Thanks for sharing all these tips. Lovely cards for any occasion!
What a wonderful post -- so chock-full of information! Your cards are stunning, and I really appreciate your "why I did it this way" explanations throughout your process. There's always something to learn!
This is one of my favorite flower sets and your cards are simply stunning. Thanks for all of the great tips.
Beautiful cards, love these tulips. Thanks for all the tips
Thank you Blaze for the mail slot tip using a paper cutter. Who would have guessed? I love that fellow blog readers jump in with advice and suggestions.
Awwww...thanks so much Debbie! I'm glad you found these tips helpful! I know people have their own way of doing things, but I enjoy learning new things from each other! Thank you for all of your kindness and encouragement! It really means a lot!
Thank you, Cindy! I'm definitely ready for some spring color! Thanks for your sweet comment!
Awww...you're certainly welcome! I love spring flowers as well! Thank you for stopping by and for your comment! They really mean a lot!
Thank you, Mary! This was my first time using it and it has already made it near the top of my favorites list! Thank you for stopping by and for your comment. I really appreciate it!
Hi Debbie! I'm glad you popped back with your question. I noticed that blaze replied. Did you get your question answered? I will share a picture of mine in an upcoming post or go ask for one from the post office, like another reader suggested!😂
Thank you, Cindy! You're welcome! I appreciate you stopping by and for your kindness!
Thanks, Jan! I appreciate you stopping by and for your comment! I hope you get some relief, too! Stay warm!❤❤❤
Awwww...thank you so much!Thank you for stopping by and your sweet comment!
Thank you so much, Kathy! I'm glad my post was useful! You're so sweet!
Thank you so much, Cynde! I appreciate you stopping by and your sweet comment!
Awww...thank you, Stephanie! You, my friend, we're the inspiration for this post. I had already toyed around with the idea of doing a post like this, but when you asked your question, it made up my mind!😂 I'm glad you found these tips helpful! You're so sweet!
Awww...thank you so much! I'm sure glad you stopped by and thank you for your kind comments!
Thank you so much, Maureen! It's called Tulip Time. I probably didn't mention it in my normal order, but it's in there somewhere! LOL! Let me know if you can't find it in the post and I can leave a link.
Thank you so much for this tip! That is perfect! I always check once it's already in the envelope since it slides better that way! That's funny about the postal worker!😂
Thank you so much! I'm glad you like them! I usually do it this way when mass producing. If I have wire shapes, then doing it after can work too. Since these dies are solid, I did it first. Hopefully that makes sense!
That's awesome! Thanks for sharing! I'll have to see what my post office is willing to do!😜
LOL! Right? Thank you so much for your sweet comment! I appreciate you stopping by!
Thank you so much, Donna!
Thank you so much, Merry! You're so sweet! I appreciate you stopping by and I'm glad my post was useful!
Thank you so much, Mary! I'm glad you stopped by and found these tips helpful!
Thank you, Colleen! Have a great weekend!
Such a great idea! I appreciate that tip as well!
These cards are absolutely BEAUTIFUL Kelly and make me want to go get my tulip set out and play, even though it is snowing quite heavily outside right now...grrrrr!! Thank you so much for the lovely, lovely inspiration and all the great mass producing tips!! :0)
Hi Again! I just wanted to say, I've never known an artist who takes the time to reply. I can't imagine with your busy, busy life how you find the time. But as my mom used to say, "you didn't have to, but I'm so glad you did". :) You're very special & I hope you have a very HAPPY day. :)
Awwww...thank you, Marcia! You are so sweet! Thank you for stopping by and leaving such a sweet comment! Big hugs!💓💓💓
Hi! Thank you for popping back in! You know, I haven't always taken the time to reply, but I'm always so thrilled for each and every comment. There were a few years after I had my 3 youngest when I posted so hit and miss and there were hardly any people visiting, that I'm just so happy to be back in the papercrafting community!❤❤❤ thank you so much for ALL of your kind comments! It's people like you and your genuine interaction that make me WANT to reply! Thank you again! You're a dear!
Hi Kelly. I love your tips and cards. I’m enjoying reading the comments and your replies too. They make me smile to think how warm and friendly the crafting community is. Thanks for sharing in such detail!
Post a Comment