Sunday, March 31, 2019

Feeling a little Blue!

 Happy Sunday! I'm just popping in today to share a fun little gift ensemble that I made yesterday to give as a hostess gift. It really wasn't necessary since it was just a Girls' Night, but I was in the mood to create just for fun, using a hodgepodge of products to put it all together! It's all  blue, hence the title of my post, and since I photographed it so late, my photos even look blue! LOL!


 The starting point for the entire ensemble was the earrings that I made for her. This is really all I was planning on making, but things just evolved from there, which they have a tendency of doing with me. I used the new Taylored Expressions Designer Dangles-The Bigger The Better  mixed media dies and some printed leather I bought from Etsy. I have been having a ball making all kinds of earrings and giving them as gifts! I had promised a post showing how I package the earrings up, so I will share everything here. 
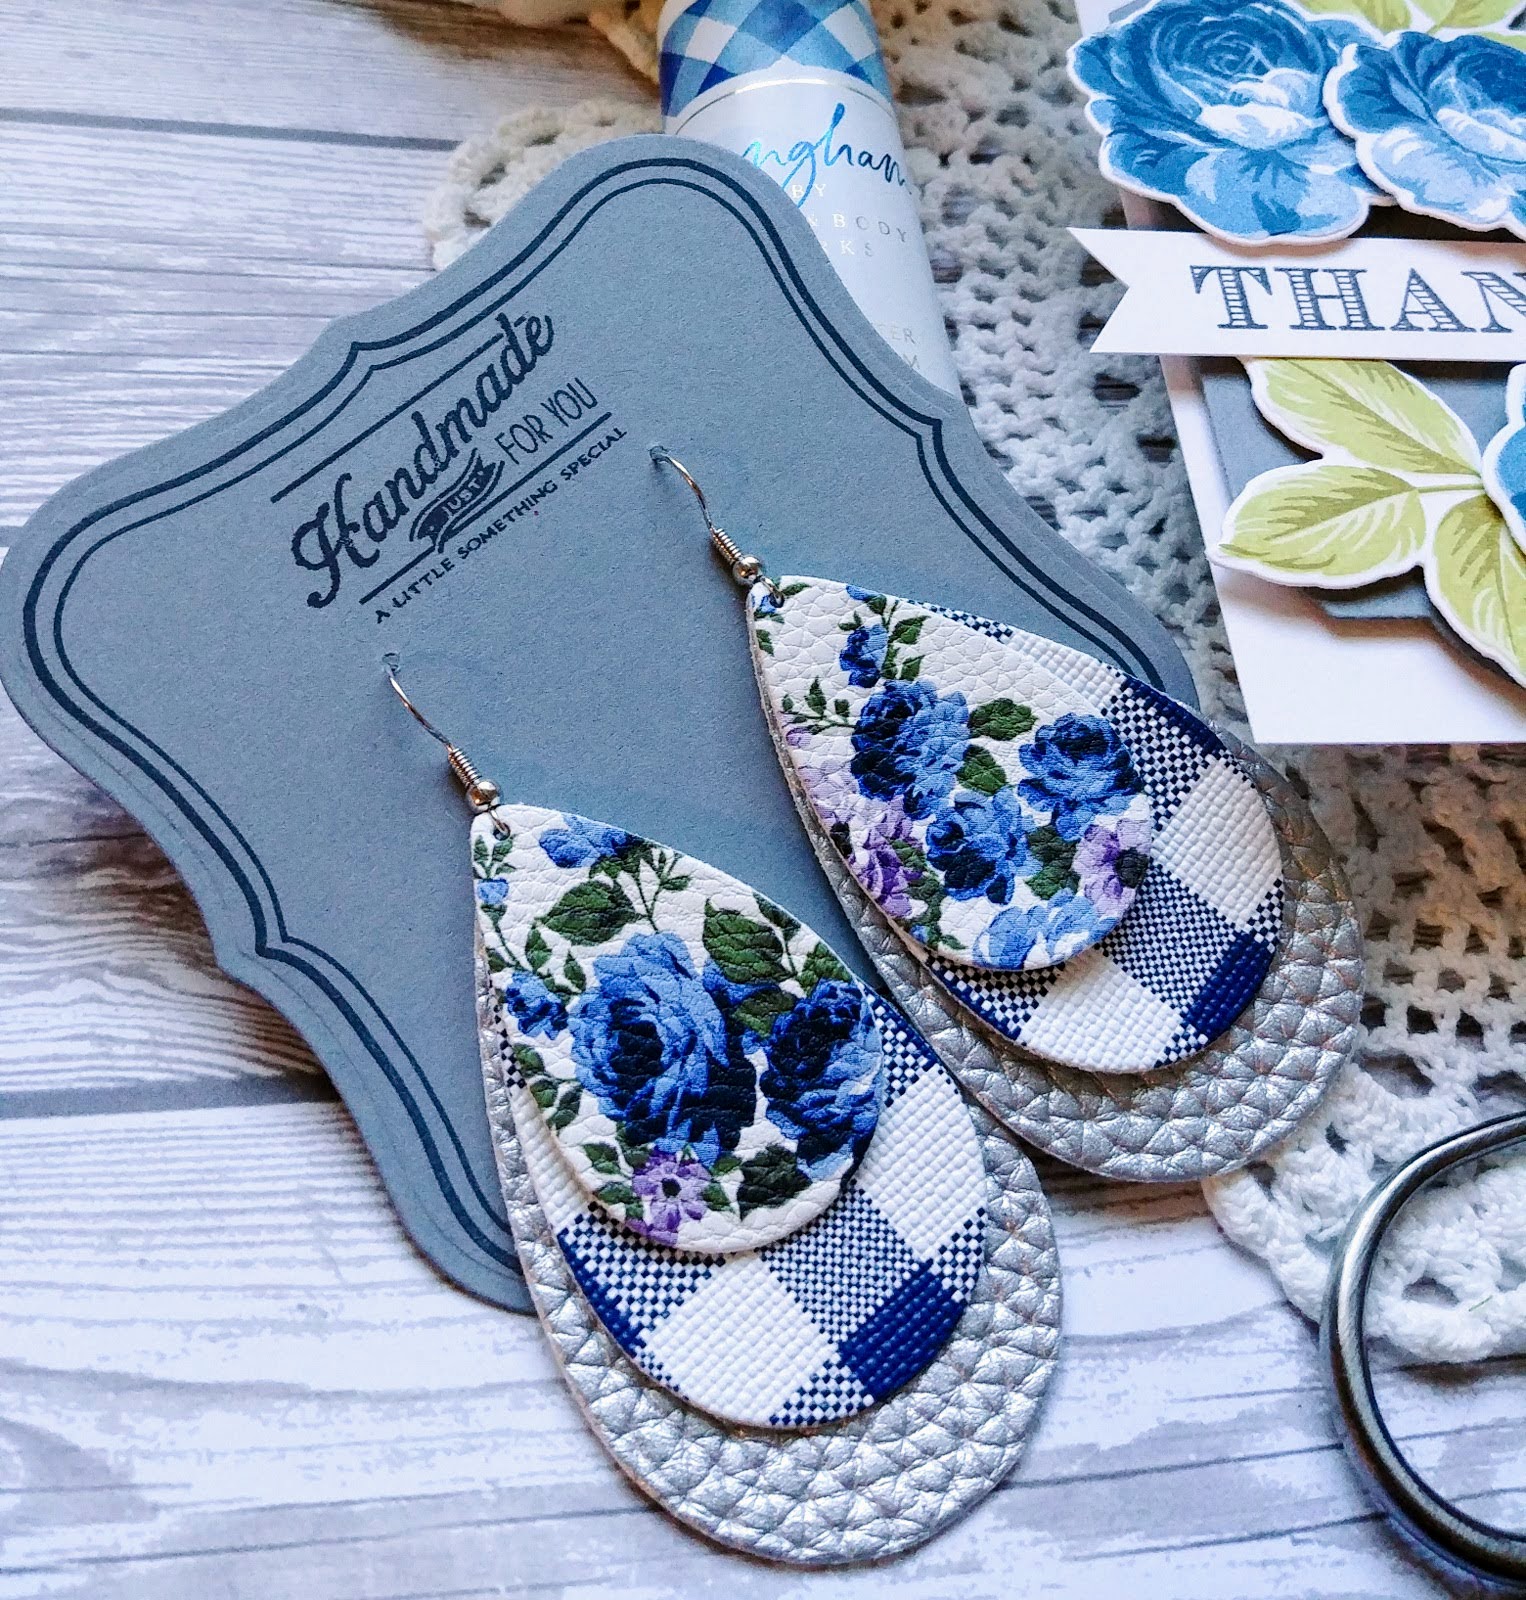
The earring card is die cut using an old Nestabilites die, but you could use any shaped tag or plain shape to get the same look. I used a really old PTI set for the border around the die cut. It just gives it a polished and professional look that I am always looking for. The "handmade" stamp is from the retired "Handmade Hodgepodge" stamp set, but any "handmade" type stamp would work. Once the stamping is done, I just use a small hole punch to make tiny holes so that the earring wire will slide through easily. I bought the clear earring backs from Hobby Lobby to stabilize them on the card.

I recently purchased the Everything's Rosy stamp set and have been dying to use it. The flowers on the earring leather reminded me of these flowers so I used them to create this quick and elegant tag.  The gray tag base is die cut using the Tag Sale #6 die

The "thanks" sentiment is from the Never Enough Thanks stamp set and is just the style I was looking for. I adhered it to the grey tag using foam squares and then arranged the flowers and leaves around the sentiment. Once that was all done, I matted the entire tag onto a white rectangle to give it some extra dimension.

The key wristlet is a quick sewn project that I love to make to tuck into gifts. I used some Moda fabric cut into a 4 inch by 1/4 yard and then pressed in half and then each half folded in again. I place a 3/4 inch piece of cheap felt in the middle and then run some straight stitches in intervals along the piece. The hardware is from Amazon and I purchase it in bulk so that I have them on hand for times like this. I had some left over flowers from the tag, so I made a quick little tag to thread through the key ring. The sentiment is from a REALLY old SU! set, but it is one of my favorites. I bought 15 of these cute little hand creams from Bath and Body Works when they had their sale last week and the Gingham is just perfect to match the earrings.

I packaged everything up in a cellophane bag tied up with some black and white gingham ribbon. I also added some sparkling clear rhinestones after I took the other pictures and I don't know if I like it, but oh well!

Saturday, March 30, 2019

Saturday Showcase {Lilies of the Field}


Hello and welcome to this week's Papertrey Ink Saturday Showcase! Today a few of us are sharing some projects using the wonderful Lilies of the Field stamp set! I've never used this set before so it was a lot of fun getting all of these beautiful spring blossoms inky! I don't think there is any occasion or time when flowers aren't appropriate, which makes them perfect for all types of cards! I did a large quantity of stamping to create quite a few projects that I've been needing to make.

 I actually had to go buy a sympathy card the other day because I didn't have one on hand. I needed a Get Well card this week as well, too, but ended up sending flowers since I didn't have time to make one! So....that is the fuel for today's post; my sincere need for a few types of cards.
To begin, I got to work die cutting all of the pieces using the Lilies of the Field die collection. I used my mini MISTI to stamp all of the images. At this point, I didn't have an end game in mind except to get some cards and tags made. I chose to make half of everything pink and half yellow for some variation.


The final result is 4 cards and 6 tags (one didn't get photographed) which are desperately needed in my stash! For the cards, I used 4 of the amazing sentiments from the Expressions of Empathy stamp set. The thing that I like about these sentiments is that they "fit" for so many different reasons; sympathy, a rough time, sickness, etc. I like that they stretch far beyond "get well soon" and "with sympathy".

The sentiments are all heat embossed on vellum using gold powder for a warm feeling. I picked a color scheme and theme and used that for all of the projects. It is so much easier to get a lot of cards done at one time when you don't have to stress about different colors.

I decided to keep the backgrounds easy and use  Bitty Big: Harvest Gold and the Bitty Big: Pale Peony . If you can't tell, I REALLY like using these papers on my projects! LOL! I used the Shape Shifters: Oval 1 as the backdrop to add the flowers and sentiments.

Each card is unique, but cohesive. I didn't make any two cards alike and just had fun putting things together!


The Ink Colors that I used for the flowers are: Harvest Gold, Summer Sunrise, Green Parakeet, New Leaf, Sweet Blush, Raspberry Fizz. I had googled images of lilies and these were two of my favorite combinations.


Once I had made the 4 cards, I had quite a few flowers remaining so I made a set of tags. I always love to have tags on hand as well to package up a quick thinking of you gift or some goodies.

I used the Tag Sale #6 die to create the tags. I also added some decorative detail using the Round Off Edgers . I ended up by using both the positive and negative portions of each tag so that I could maximize the paper. I didn't originally intend on doing that so I ended up having some full tags die cut from the pattern paper.


The sentiments for these tags are from Friendly Flowers as well as Bitty Bouquets

Both the cards and tags are finished off with some sparkling clear sequins for shine. I'm so happy to have these projects made for those times when I need a quick card. It is times of grieving and sadness that you need to act in a timely manner and I like having these on hand! Thanks for fluttering by!

Friday, March 29, 2019

Papertrey Ink Design Team Tips {Store Front Window Cards}

Hello and welcome to this week's Papertrey Ink Design Team Tips! I've got a trio of fun cards to share with you which I am calling "Store Front Window Cards". I had so much fun creating these and I certainly hope you enjoy them as well! My inspiration for today's cards and today's tips came from the new Inspired By Challenge for this week! I unfortunately got my dates mixed up and thought these were both posting the same day, so...you are getting a two for one today! I hope you'll join us for the challenge this week!
As you can see from the awesome inspiration photo that the theme this week is windows. I decided to use some fun elements to create today's cards!


I absolutely love charming stores lining Main Street in any quaint town and especially the fabulous lettering that can be found on the windows! The fonts and layout of the scriptures from the New Every Morning stamp set reminded me of such windows. I took a risk doing some white heat embossing on Clear Cardstock but I was successful. I DO have heat resistent acetate, but wanted to see if this would work. It did warp a little bit, but since I was adhering it to the Pierced Feature Frame, it worked out perfectly.

Oftentimes you will find window boxes bursting with flowers as well, so I thought that the flowers from the Seasonal Borders: Spring would look nicely below the frames to give it just the right touch. I used this same stamp set recently on THESE cards and I just love how the borders turn out.

Of course, the border is a little too long for a vertical card, but I just simply trimmed it to fit. As I mentioned earlier, I adhered the heat embossed acetate to the back of the frame that is die cut out of Weathervane cardstock. I used 1/8 inch scor tape for a secure application.

Once that was done, I adhered the frames to a piece of 4 by 5 1/4 inch Bitty Big: Pale Peony pattern paper using foam squares to give dimension. I really wanted them to look like windows. The flowers are adhered with even more foam squares to give the illusion of them growing right under the window.

The addition of the awning is just so fun! When I was originally thinking of how I would execute these cards, I didn't think of the awning right away, but when the light bulb went off, I was hoping I could pull it off. I knew there was an awning die included in the Make It Market: Market Street and I was thrilled to see that it worked perfectly! It is meant to be used in conjunction with the included stencil, but I found that the Bitty Big: Green Parakeet striped pattern paper was perfect! No, the lines don't match up perfectly, but I think it still looks awesome!  

I used a combination of different stripes for the awnings and a few different pattern for the backgrounds as well to really give these cards a fun feel! The awnings will fold flat for mailing, but since they are scored, the recipient can do some quick fluffing and have them pop up in no time! Or...you could hand deliver them as well! It's totally up to you!


I finished off the cards with a trio of sparkling clear sequins nestled in the flower borders form some shine! I have all kinds of new ideas to add to these cards so stay tuned for a future post! Thanks for fluttering by!


Monday, March 25, 2019

Keeping Christmas {Have Yourself a Merry Little Christmas}

Hello and welcome to the March installment of the Keeping Christmas Blog Hop! I'm so glad you've stopped by today! I've got a fun project to share with you today, but before I get started, don't forget to head to the other designer's blogs that are on the hop for even more Christmas inspiration! Honestly, I don't know what I would do at Christmas time if I didn't give myself this head start! 
Kelly Lunceford (you are here)

Today I'm sharing 3 gift box/ bags that were inspired by some wrapping paper that I bought last year. It ended up by being one of my favorites to use and I was really inspired by it. I should have taken a picture {maybe I will add it here later}. It has a black backround with red cardinals and lots of holiday foliage. It is just very woodsy, yet striking and elegant. Anyway, as I was getting things prepped and wrapped for Christmas last year, I made a list of projects I really wanted to do but didn't get a chance to, and this is one of them.

 When I made THIS project, I promised a tutorial, so here it is! LOL! I didn't realize it would take me this long!  These bag/ boxes are created by using the Stitched Gift Bag Die but die cut out of paper rather than felt and I just use the front and back pieces and the handle portion. They are so cute and are perfect little packages for all kinds of gifts!


This photo gives you a little bit better view of the size and shape of the finished piece. Since I don't own any cardinal Christmas sets that I wanted to use, I chose to use the Songbirds Stamp set which gave my project the look I was going for.
To begin my project, I cut a front and back from 3 different colors of cardstock: True Black, Pure Poppy, and Simply Chartreuse. I also die cut the handle portion as well, but didn't show it in the photos. This really gives the handles some stability since they are made from paper. Also, there is a bottom and a top to the handles, so make sure you line up the holes before you glue it in place. {Ask me how I know this} 
I made the boxes that are sandwiched between the front and back pieces out of the same cardstock. Start with a piece of 6 1/2 by 11 inch cardstock. The sides and bottom measure 1 1/2 and the front and back measure 3 3/4 inches. This will leave you with just enough of a tab to secure it, which you can see on the left hand side. I use Scor Tape to secure my boxes like this.
I die cut all of the pieces that I would need to decorate the boxes using the Songbirds Dies . The red and black boxes have Simply Chartreuse foliage and the Simply Chartreuse box has Spring Moss foliage. I added some ink blending to the tips of each leaf for some contrast. It really helps make the images pop a bit more!

The green and red boxes have red birds and the red box has black birds for contrast and cohesiveness.

I just love how folksy these turned out!

Once I had them all decorated, I glued the front and back panels onto the box portion. Make sure you don't put the glue near the holes so that it seeps out or that you can see it! {Ask me how I know this} I had three birds left over so I ended up making a trio of tags that I can either use with these or add to my gifts when it is wrapping time.

I added some gold nuvo drops on the red box here and there to mimic berries.

I added red Nuvo drops on the green and black boxes.

These were so much fun to make and now I'm kicking myself that I only made 3. Since the songbirds set has so many different sentiments and song images, I might make a few more of these that aren't Christmas themed as well! Thanks for fluttering by!


Saturday, March 23, 2019

Saturday Showcase {Inflate & Celebrate}

I hope you've all had an enjoyable week! We've had some great weather and some rainy weather, but it's definitely feeling like spring! I'm hoping to get outside and start on the spring yard work! There's something so invigorating about clearing out the flower beds and seeing what surprises are beginning to grow! 
Today a few of us are sharing some projects using the Inflate and Celebrate mini stamp set. I've never used this set before, but it is one that has been on my wish list, so it was fun to get a chance to use it! You can head to the Papertrey Ink Blog to see what the other designers have come up with!


One of the reasons why I fell in love with it, is because of the ability to pair it with the Tasting Tag die and attach a balloon. I love this idea for birthday invitations, birthday cards, and more! The sentiments are just so fun and versatile. Once I decided on making a birthday tag with a balloon attached, the idea to put together a "birthday in a bag" was born! I'll take you step by step along the way to explain all of the details on how to create today's project! 
As I mentioned earlier, this tag was the starting point for the entire project. I die cut the Tasting Tag  and then used the Corner Adorner: January mini stamp set to give it the confetti pattern in the two corners using black ink. the "Celebrate" portion is also from that stamp set, but the "Inflate and Celebrate" stamp set also has a "Celebrate" sentiment. Once the stamping was done, I attached the pink polka dot balloon using True Black Baker's Twine tied in a bow. 

I also added a few sparkling clear sequins for sparkle and shine! Once the tag was done, I set it aside to get started on the rest of the projects for the "birthday in a bag".


 The main ingredients for a successful birthday celebration consist of balloons, candles, cake, and of course ice cream! Since the balloons are taken care of, next on the list is cake! I created a very simple pouch to hold a packet of "Confetti Cake" mug cake. When I saw these at the store a few months ago, I've been trying to find a reason to use them! Well...today is the day!
They have all kinds of different flavors, but I chose to get this kind since it seemed the most "birthday" to me! The packet was created from a piece of pattern paper from the Make It Market Kit: Shakers and Sprinkles and then scored at the bottom in two places to create an easy packet. I punched a hole at the top so that I could attach the tag, which is actually a gift card holder for ice cream!
 I used the Folded Pocket Tag Die to create the gift card holder. I was thrilled that the card itself had a fun picture on the front so it looks great peeking through the window. The sentiment pairs perfectly since I wanted to add a candle to this part of the packaging. It is from the Stylish Sentiments: Birthday. I simply added the candle using a mini glue dot. So...at this point, we've got the cake, candles, AND ice cream!


I had some extra balloons left over, so I decided to make a card to go along with the rest of the festivities! I die cut the tasting tag again, but this time out of Hibiscus Burst cardstock. I used another one of the sentiments from the Stylish Sentiments set along the side.

I tied up a pair of balloons the same way that I did for the tag.

And, of course a few more sequins! The entire tag is layered onto a panel of pattern paper that is from the Shakers and Sprinkles paper pad as well. It is mounted onto a top folding A2 card base.


 I placed the packet inside of a Large Frosted Tin tie Bag and tied it up using some Hawaiian Shores Saddle Stitch Ribbon with the tag attached. I like that you get a hint of what is inside the bag! These would be a lot of fun to give to teachers, friends, and more on their special day! I hope you've enjoyed today's project! Thanks for fluttering by!