Tuesday, November 30, 2021

Papertrey Ink Flash Sale {All is Calm, All is Bright}

Happy Tuesday! I hope all of my U.S. friends had a fabulous Thanksgiving weekend! I spent Friday creating and relaxing, but knew I needed to get going on the Christmas decorating so the fall decorations got taken down, then dusting and getting ready to put up Christmas! Speaking of Christmas, I've made quite a few Christmas cards for the Flash Sale and they've all been red and green! I decided to switch things up for this week's Flash Sale and give you a  little bit more variety with ink and paper! I love creating frosty, snowy cards, so this was such a joy to create!

This card features the darling Deer to Me stamp set that was released last year! I had so much fun with it, but didn't use it NEARLY enough! I was so happy to pull it out to create my card for this week's Flash Sale! To begin, I die cut two of everything (my dies are all still wired together) using the Deer to Me dies so I would have a lot of options with the greenery and flowers. I stamped the legs and antlers on the deer using Dark Chocolate ink to keep everything bright and white. There is a "body" stamp so you can color them any way you like. The thing I like about these deer is that the die has built-in texture to make them look like wooden deer, so you really don't have to stamp them if you don't want.

I didn't use the flower stamps at all (with exception to the centers) and just added ink; Spring Rain and Blueberry sky for added contrast. The flower centers are stamped using True Black ink. The pine wisps are stamped using Weathervane ink and the other two sprigs are stamped using Spring Rain and Blueberry Sky.
I set the flowers and foliage aside to get to work on the flowers. I used the Tag Creations: Modern Gift die collection to die cut them out of White cardstock and Spring Rain cardstock. I added some Weathervane ink to the edges of all of the poinsettias to give them a bit of contrast. I added a trio of the smallest of the Moonshine Sequins to each of the Poinsettias for some sparkle and shine!

I cut a 4 1/4 by 5 1/2 inch panel of Bitty Big: Blueberry Sky pattern paper and glued it to a Top Folding A2 card base. After that, I used the  On the Border: Splendid Snowflake frame die to die cut the white snowflake border and used liquid glue to add it to the polka-dot panel. I also die cut a Blueberry Sky frame using the Border Bling: Skinny Embossed Frame dies and glued it down. Once that was done, I was able to start adding all of the design elements to my card! I decided that the little deer needed to be "grounded" so I also die cut a vellum circle using the Love to Layer: Scalloped Circles dies. I glued it down (using glue where it wouldn't show) and then added the cute deer couple. I framed them with the poinsettias, flowers, and foliage (reserving a flower for the fawn's antlers) using both liquid glue and foam squares.


This is one of those cards where I didn't really think ahead as far as the sentiment goes. Whoopsie! ha ha! I decided to use one of the beautiful sentiments from the Peaceful Forest stamp set and heat embossed it in silver onto a rectangle of vellum. I strategically glued it using liquid glue where it wouldn't show. I finished off the card with additional sequins and a generous helping of glitter for a winter-y shine! Thanks for fluttering by!

P.S. The items included in the Flash Sale will be sent in the newsletter and included on an Instagram post. The sale will go until Wednesday at 6 PM ET!


Tuesday, November 23, 2021

Papertrey Ink November Release Day and Flash Sale

Hello friends! It's release day for the November Papertrey Ink release! Even though we packed an entire release into two days of posting, I loved every minute of the creative process using these beautiful new products! Everything will be available for purchase beginning at 10 PM ET! I think this will be a very popular release, so without causing any extra stress, if it were me, I would get my shopping done early. Keep in mind, I DON'T have any "insider" information (ha ha!) this is just my gut feeling. I also wanted to share my card for this week's Flash Sale. These products are on sale now, but you can add them to your cart tonight and still get in on the sale!

My card for this week's Flash Sale uses an assortment of stamps and dies to create a Christmas inspired "thinking of you" card! I'm planning on using it as a Christmas card, but if I need a "thinking of you" card during December, this will be used for that! To begin, I die cut the lantern, candle, and flame from the Vintage Lantern die set and stamped them in Pure Poppy, Scarlet Jewel, Ripe Avocado, Weathervane, and Harvest Gold inks using the Vintage Lantern stamp set. I set them aside and got to work on the foliage and berries. I die cut just the pieces I planned on using from the Effortless Beauties Die set; the berry clusters and leaves. I stamped them assembly line style using my mini MISTI.

Once the stamped images were all done, I got to work on the background. I cut a 4 by 5 1/4 inch panel of Soft Stone cardstock and then die cut it using the Border Bling: Tin Stitch Die to give it that beautiful detail. I added some Weathervane ink around the edges using a blending brush for some contrast. I layered it up onto a top folding A2 card base using foam squares.

I wanted to frame the lantern so I die cut the smallest frame in the Border Bling: Skinny Diagonals Frames using white cardstock and added it to the base using mini foam squares. Once that was done, I adhered the lantern to the center of the frame. The candle is popped up using a thin strip of foam tape. The "flame" is simply glued to the candle using liquid glue.

I had so much fun tucking the foliage and berries here and there until I liked the arrangement. This is one of those cards where I didn't pre-plan the sentiment! I decided it had been too long since I've used a banner so I die cut the smallest curved banner from the Banner Builder Basics. Once that was done, I chose the "loving wishes" sentiment, which is from the Just Sentiments: Belated Birthday, and curved it on my acrylic block and stamped it in black.

My tip for getting them curved the right way is to place the die cut piece under a clear acrylic block. Once that is done, I look through the block and bend the image/sentiment the way I need it and secure it to the block. Then I just stamp as usual and it turns out great! I also heat embossed an additional sentiment from the Just Sentiments: Warmth onto a strip of vellum using silver powder.

I also couldn't resist adding a few snowflakes from the soon-t0-be-released Cheerful Tag Overlay dies! They look so cute tucked in the foliage framing the lantern. Of course, I added some glitter here and there for some sparkle and shine!

This card was a joy to create and I'm thrilled to add it to my stash of holiday cards! I didn't do my Keeping Christmas series this year, so I was a little bit worried about how my Christmas stash would look, but it's shaping up nicely and I think I will have everything I need! I DO, however, really need to get going on some tags! How about you? Are you ready for Christmas? Thanks for fluttering by!


Monday, November 22, 2021

Papertrey Ink November Release Countdown Day 2


It's been a whirlwind two days, am I right? So much to see, so much to LOVE! Thanks so much for joining me again today for day 2 of the Papertrey Ink November release countdown! I also want to thank you for ALL of your sweet comments on yesterday's countdown post! You're so kind! Today is a bit of a potpourri as we switch from Christmas/winter to Thanksgiving/fall! I decided to start things off with Christmas and then we'll finish up with Thanksgiving! I'm smitten with everything being showcased today, so I guess what I'm trying to say is that I LOVE this entire release and I hope you love it as much as I do!

My first card uses a fun new set called Adorning Trees. This is a take on modern Christmas trees that are popping up in the DIY world! This card also features the new Inside Greetings: Heaven and Nature Sing. I've already stamped these beautiful greetings inside of a few of the cards from this release!

I heat embossed the sentiment in silver onto a strip of vellum to match the silvery starts that accent the top of the large tree and the two small trees.


I die cut two of each of the trees so that I could sandwich the "wire" pieces in between the two trees.

I love the two different snowflake images that you can decorate the trees with as well.

And now onto Thanksgiving! This little cutie is the newest member of the Feathered Friends family....meet Mr. Tom Turkey! I decided to make my turkey a little bit non-traditional and patterned him after a porcelain turkey decoration.

I die cut all of the pieces from white cardstock and then colored them using an assortment of Distress Oxide inks. I used liquid glue to glue all of the tiny pieces in place and then used foam squares for the body and head. the super tiny pieces to accent the wings were die cut, but then I left them on the cutting plate and added the color right there before removing them. I actually just took them off one at a time so I could easily put them in place.

I added a few pumpkins/gourds from the older Simply Gourd-eous stamp/die set stamped in the same colors that I used on the turkey. I also couldn't resist adding a few leaves from the Into the Blooms: Dahlia die set.

The "count your blessings" sentiment is from the Just Sentiments: Grateful Heart stamp set and is stamped in brown and then cut using sharp scissors to make the notched ends.

I added glitter to this card as well because I just love it so much!


My final card for today and for the release uses the new Feathered Friends Mini 17 stamp/die set. I chose to use the same colors from the stamp guide. When there are a lot of little images, sometimes I don't know what colors to pick, so I just kept it safe and traditional! ha ha!

I actually die cut and stamped 4 turkeys. I find that once I have everything lined up in my MISTI, it just makes sense to make multiples, especially with a set like this with a lot of tiny images.

I used the On the Border: Fall For Foliage die to cut the border. I used an assortment of Distress Oxide inks in fall colors to bring it to life. I layered the oval onto a Honey Nut card base using foam squares and then glued the border over the top.

The sentiment is stamped on the oval using black ink with a few sequins framing it. I layered the turkey down in the corner with an assortment of leaves left over from the Joyful Florals card I shared yesterday and a few leaves from the Into the Blooms: Poinsettia die set. I added some glitter and brown ink splatter for added detail. Well friends, this concludes the countdown and everything will be available for purchase tomorrow night at 10 PM ET. Thanks for fluttering by!


Sunday, November 21, 2021

Papertrey Ink November Countdown Day 1

I'm thrilled to be here today welcoming you to day 1 of the Papertrey Ink November release countdown! We've got two days jam-packed with so many new products that are sure to make your heart skip a beat! I'm over-the-moon excited to share all of this holiday goodness with you today, so grab a cup of cocoa, get comfy and let's get started!

My first project for today is a set of Christmas tags using the AMAZING new Holiday Cheer Gift Tag Dies, Holiday Cheer Overlay dies, and the new Just Sentiments: Holiday Tag stamp set! If you saw my sneak peek the other day, then you already got a glimpse of these beautiful new dies!

For this set of tags, I wanted to showcase each of the 5 different tag shapes; ornament, tree, star, bow, and present/gift. I die cut all of the main tag pieces from regular colored cardstock and then die cut the overlay pieces from gold glitter cardstock! It's such a quick and easy way to add instant holiday sparkle and shine without any extra work!

I decided to create three tags that can be opened with a greeting stamped inside. I felt like the tree, ornament, and star would work nicely for this technique. I measured each of the three dies to get a rough estimate on size and then all you need to do is place the die slightly below the score line to create a folded shape. I then layered the decorated and embellished piece on top.

I also added some shading around all of the tags except the Kraft star to give them some added detail and dimension.

The new Just Sentiments: Holiday Tags stamp set is so fun to accent these cute tags. My favorite is this "Special Delivery from the North Pole", but there are so many other cute options that I will be showcasing today!

Next up is a cute stationery box that I gussied up using the bow from the Holiday Cheer Gift Tags. I have made these boxes before, and honestly, from this picture it really just looks like a card, doesn't it? I think I might recreate this same design for a card!

You can tell it's a box a little bit better in this photo. I die cut the bow from Berry Sorbet cardstock and then added Pure Poppy ink around the edges of each piece to really give it some dimension. I added the added glittery die cuts that are from the Holiday Cheer Overlay die set. I layered these ones a little bit differently than I did on my earlier tag. Honestly, you can just do whatever makes you happy!

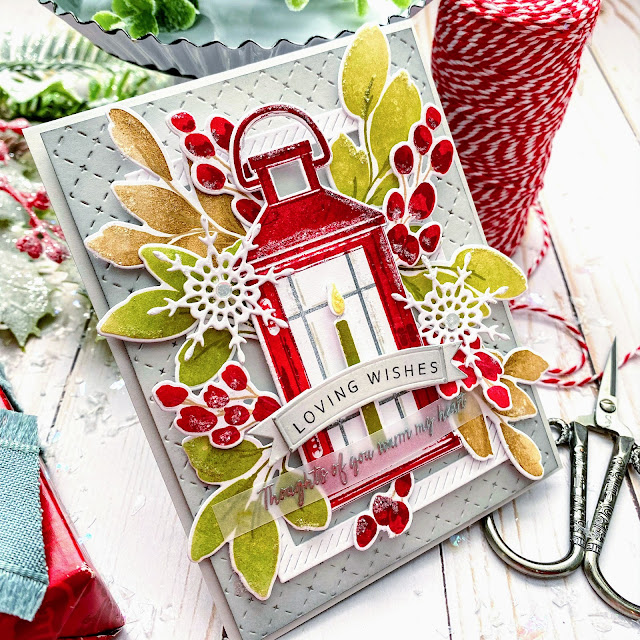
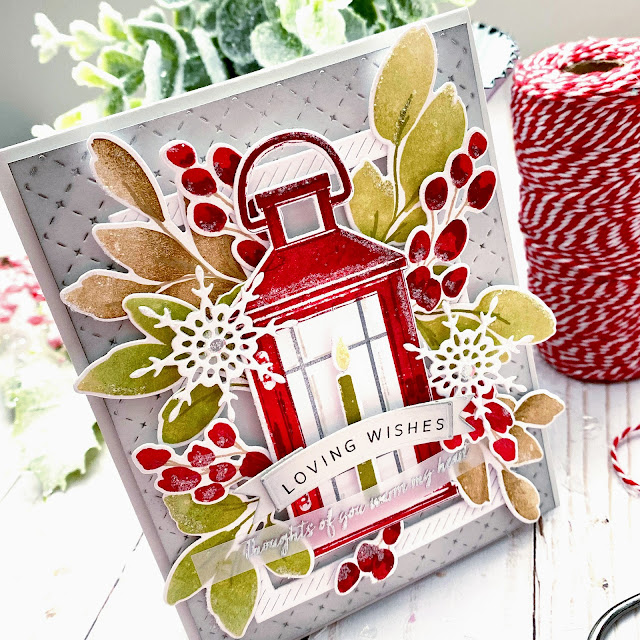
This is another one of my favorite images from the new Holiday Tag set. I added some foliage from a new set called Corner It: Festive Holiday that I will be showcasing a little bit further down in today's post. Let me just tell you know...I am in LOVE with this sweet set! These pine boughs are the perfect touch for pretty much ANY holiday design! As soon as I stamped them, I knew they'd be getting a workout, and I was right!

The base of the box is Berry Sorbet cardstock and the lid is Green Parakeet with Bitty Big: Green Parakeet pattern paper panels glued to each of the 5 sides. I just love this twist on traditional Christmas colors! 

Once the box was done, I layered a Mix and Mat: Berry Boughs Diecut over the top of the lid using foam squares. I added some New Leaf ink around the edges before I adhered it to give it some dimension.

I measured the tails of the bow tag and then cut a strip of Berry Sorbet cardstock the same width. I added some matching ink blending as the bow and then adhered it over the top of the first die cut. I also added a length of Berry Sorbet 5/8 Inch Grosgrain Ribbon and wrapped it around the lid of the box and secured it inside using glue dots. I wanted to give the illusion of a wrapped gift without having to actually un-wrap anything at all! The recipient can simply pull the lid off and keep all of the cute details in place!

I haven't decided what I'll put in it, or who it will go to, but it would make a really cute box to hold a set of the new Holiday Cheery tags!

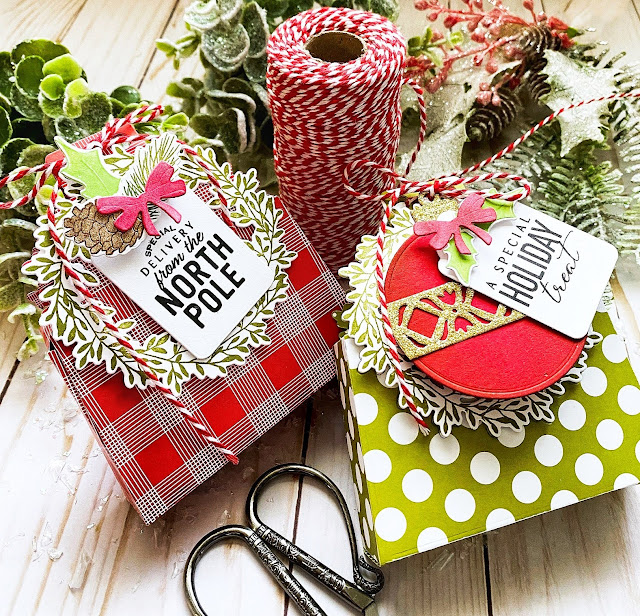
My third project using the Holiday Cheer tags is a pair of treat boxes. I really wanted to use the "A Special Holiday Treat" sentiment from the new Holiday Tags set, and I thought the cute Wreath Favor Box Die would be the perfect thing!

I couldn't resist making another one using my favorite new sentiment! ha ha!

The cute bow and holly are from the new Corner It: Festive Holiday stamp set that I talked about earlier. I die cut five of everything and stamped them all out so I could use them for the entire release! I just love having little details like this to add here and there and they look so cute on these tags!

The wreath is from the Wreath Favor Box Sentiments stamp set and is the perfect backdrop for these cute tags!

I used pattern paper to give these two boxes instant charm without any extra work! I tied them up with Baker's Twine.

For this plaid box, I lined the die up with the lines from the plaid to make sure the box wouldn't be wonky!
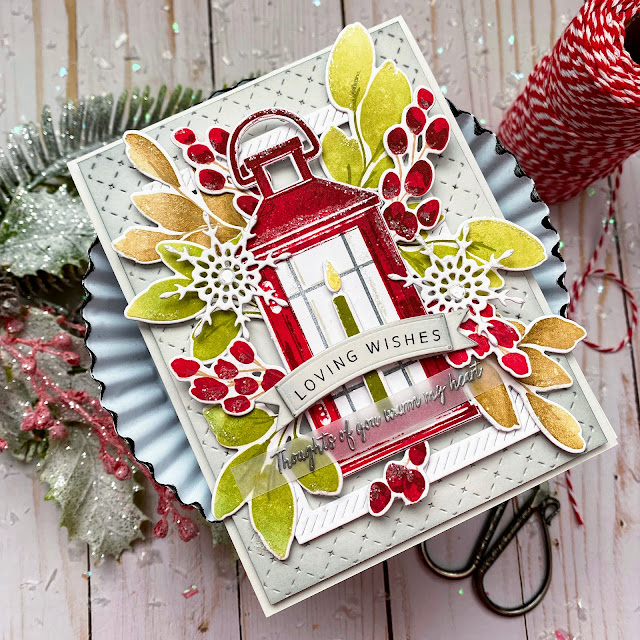
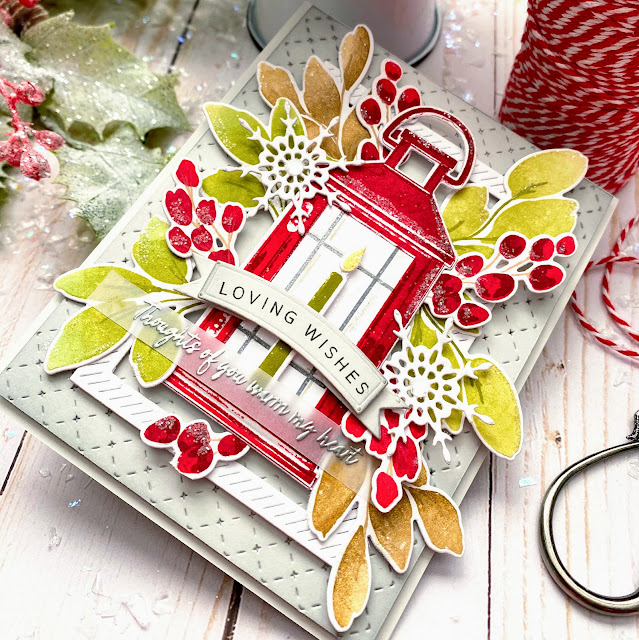
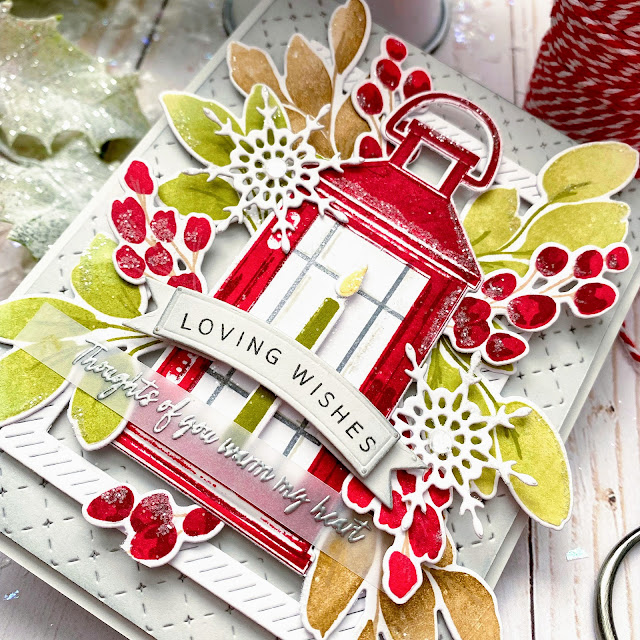
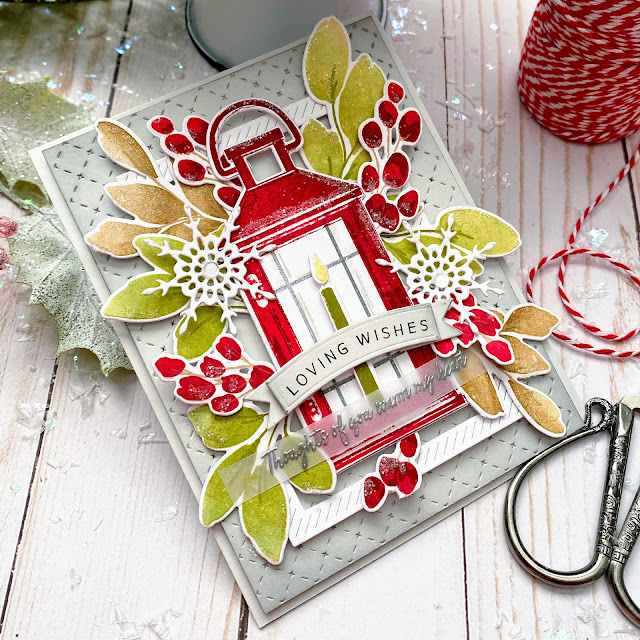
My next card features the latest addition in the Into the Blooms family...this one is the new Into the Blooms Peonies! I couldn't resist working them into a holiday card, even though I don't think of peonies as holiday flowers! ha ha! I've paired these gorgeous blooms with the new Just Sentiments: Heaven and Nature Sing! I'm obsessed with this beautiful new sentiment set and can't wait to use it all season long!

I had a BALL creating this card. To begin, I die cut the Antique Wishes frame from Kraft cardstock and then stamped the solid image from the Antique Wishes stamp set using Fresh Snow Ink and then stamped the detail portion using Dark Chocolate ink to give it some contrast.

I set the frame aside and got to work on the flowers and foliage. I die cut the Into the Blooms: Peonies from Vintage Cream cardstock and then added shading using Distress Oxide inks. I added some additional shading to the built-in score marks using a colored pencil. I glued them together using a combination of liquid glue and foam squares for realistic dimension.

The leaves are from both the Into the Blooms: Poinsettia and the Into the Blooms: Dahlia die sets. I also couldn't resist adding a few pine sprigs from the Tag Creations: Modern Gift die set. I used an assortment of Distress Oxide inks to color the leaves and pine sprigs.

I heat embossed the sentiment using gold powder onto a strip of vellum. I layered it over a panel that uses the Cover Plate: Ornate Die and wrapped it around and secured it with a tape runner. I layered the frame over the top and had fun arranging the flowers and leaves. I couldn't resist adding a few snowflakes from the Holiday Cheer Tag Overlay dies with sequins in the center and of course, glitter and some white paint splatter.

My next card features the precious new Joyful Florals and I have to admit, they truly are joyful! For those of you who've been around here a bit, know how excited I am about the new Large and Small Dimensional Bow die sets! I used a simple bow from the small set to accent this card, but you bet your bottom-dollar that I'll be putting a bow on everything from here on out! LOL!

My card also features a few sprigs and leaves from other sets as well; I've linked them in the previous card, but they are the pine boughs from the Tag Creations: Modern Gift and the leaves from the Into the Blooms Poinsettia and of course, I actually used the poinsettias as well on this card.

I love how nicely Ocean Tides ink looks around a panel of Aqua Mist cardstock. It gave me all the vintage Christmas vibes that I so dearly love; popped on top of a Pure Poppy card base and a Pure Poppy dimensional bow was the cherry on top!

There are two fabulous sentiments included in the set. I chose to use the "warmest wishes" sentiment, but there is a fabulous LARGE sentiment with a coordinating die that needs to be used ASAP! Quite a few of the other designers have used it so you won't want to miss that!

I had so much fun tucking berries and sprigs here and there until I liked the arrangement1 I added glitter and sequins for that holiday shine that is a MUST in my book!

I used hot glue to secure my bow, and I find that using a pencil or a tool that same size is perfect for rolling the paper before assembling to get a natural curve to the paper.

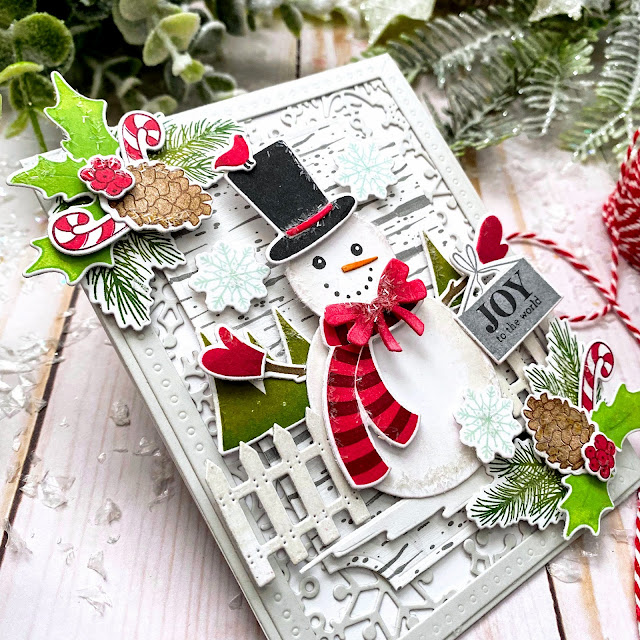
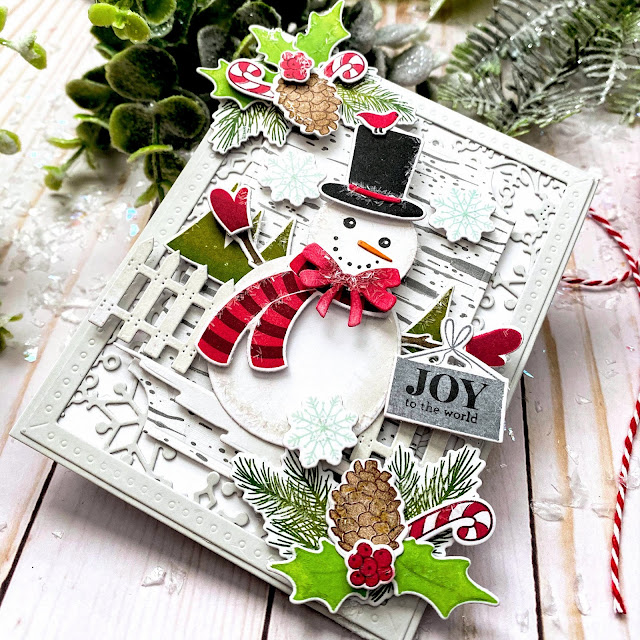
And last, but CERTAINLY not least, is the precious new Jolly Snowman stamp/die set! I've fallen in love with him and can't wait to use him all winter long!

I had a ball stamping his cute accessories to get him ready for his holiday show! His sign says Joy to the World, but there are so many other cute options included in the set!

I adorned the corners of this card using more images from the Corner It: Festive Holiday stamp set. I used the pine boughs, holly leaves and berries, pinecones, and of course the candy canes and snowflakes!

I added the bow included in the corner set over the top of his scarf to really get him looking fit for the holiday! A generous sprinkling of tinsel glitter finishes up this card! Thanks for fluttering by!
P.S. Join me again tomorrow for day 2 where we'll finish up the countdown!