Showing posts with label Pretty Pink Posh. Show all posts

Wednesday, September 25, 2019

Keeping Christmas {Wishing you sweet Joy}


It's the 25th; time for September's installment of the Keeping Christmas Blog Hop! As soon as Christmas hits the Instagram feed, you know things are getting serious! LOL! I've hesitated sharing my Keeping Christmas posts on Instagram for fear of them looking out of place, but that is no longer the case! And...I have officially started listening to Christmas music....for crafting, that is! Here is the list of the other designers' blogs so make sure you pop by each one of them to see what they've created this month!
Broni Holcombe (off this month)

I'm obsessed with the new Seasons of Joy stamp set and had so much fun making THESE projects for the release! I decided to make a set of four gift card holders using the same idea, but tweaking a few things here and there.

To begin, I die cut the wreaths using the Season Of Joy die collection and then used my MISTI to stamp all of the different images to create the multi-colored wreath. The thing I love about this set, is that is also has a one step wreath image included in the set for those quick projects. I'm sure I'll be needing that one the closer we get to Christmas! LOL!

I also die cut the JOY letters and stamped those with black ink. The sentiments are heat embossed in white onto sentiment strips to really make them pop! I used this particular sentiment because I may use these gift card holders to hold a gift card to a local sweet shop, so that will be perfect!
I used the new Tag Creations: Modern Gift die collection to die cut the four gift card holder bases. I used Pinefeather and Pure Poppy cardstock and cut two of each color. Once that was done, I did a little ink blending around the edges using coordinating ink and the fabulous Taylored Expressions Blender Brushes. I love that there is a brush for each of the rainbow colors!


At this point, I was all ready to get everything assembled. I used foam squares in two sizes as well as some liquid glue to get everything adhered. 

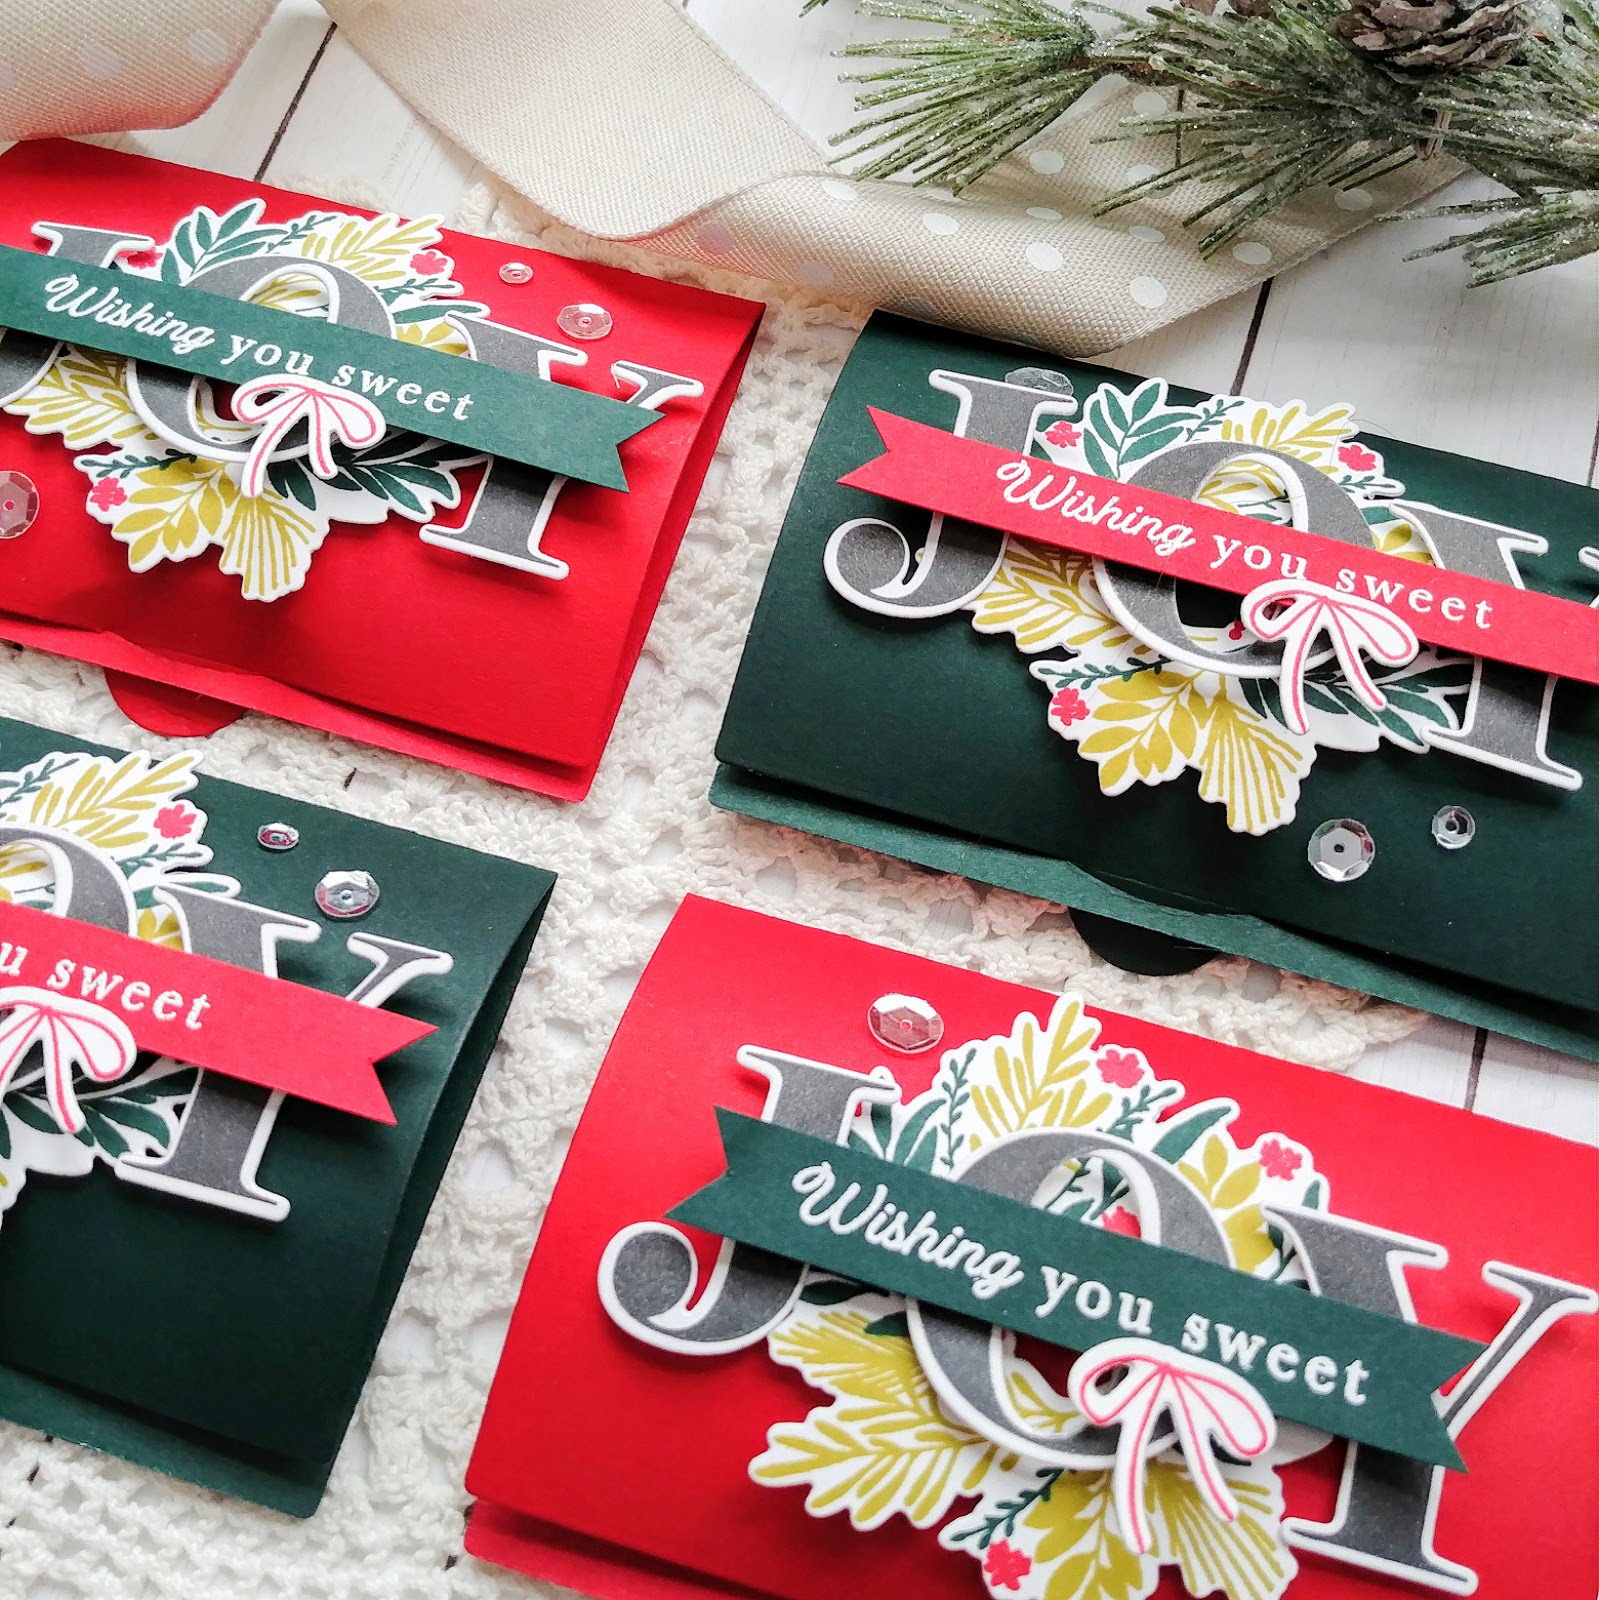
I'm 100 percent sure I'm not folding these right and I absolutely 100 percent don't care, either! LOL! I really like the rounded edge that they have; more like a gift. I also love that they have a hole on the back so they can be used as a tag if need be.

Last year I gave quite a few actual gifts with a gift card attached, so these will be perfect for those situations! Or...they don't have to be attached to anything at all.

These worked up pretty quickly, which is always a plus! I hope you all get a chance to get started on your holiday crafting! Thanks for fluttering by!

Tuesday, December 11, 2018

Tuesday Ideas {Sending Hugs}

Welcome! I'm over on the Precious Remembrance Shop Blog today sharing this quick and easy Valentine's Day idea {or even thinking of you}! I've been having so much fun creating my own custom backgrounds using the smaller images in the stamp sets, so that is what I did today! I stamped one of the smaller heart images from the Love Coupon stamp set using Versamark ink onto a 4 by 5 1/4 inch piece of pink cardstock. I poured Wow! puff white embossing powder over the top and heat set it for a fun, textured look.

I adhered a Pink Doily over the top using some Scor Tape for security. Once that was done, I stamped the "sending hugs" sentiment in black in a random, yet thoughtful way. This particular sentiment is from the Everyday stamp set.

I created a custom tag using the sentiments from the Love Coupon stamp set. The cluster of pink hearts at the end are from the Everyday stamp set as well. They pair so perfectly with the heart image that I used for the background. I added a silver eyelet and a bow of black baker's twine for some added texture and detail.

I finished the design off with a trio of sparking clear sequins for some shine! I hope that you'll try creating your own custom backgrounds using the smaller images included in your stamp sets! Thanks for fluttering by!

Wednesday, November 21, 2018

Mix it Up #49 {Comfort and Peace}

Welcome! Today I am sharing the card I made for this month's SugarPea Designs Mix it Up Challenge! Unfortunately, I needed a sympathy card, so I used this month's color combination for today's design. They are a little on the somber side, which I try and stay clear of for sympathy cards, but they happen to be a favorite of the deceased. I realize that she isn't getting the card, but I think it would bring cheer to her family by seeing her favorite colors. 

I hope you get a chance to play along! You can read about all of the details on the SugarPea Designs Blog!

For today's design, I heat embossed the flowers from the Pretty Peonies stamp set onto a piece of water color paper. Once that was done, I got to work watercoloring the flowers and background using re-inkers. After it was dry, I die cut the entire panel using the largest die from the Card Front Element Builders. I waited until I was done watercoloring to do the die cutting, because I wanted to see if the card front would flatten a bit after all of the watercoloring. It really does help. I added some gold paint splatters using the gold from my Gansai Tambi watercolor set.

The sentiment is also heat embossed in gold onto a strip of grey cardstock and added to the watercolor piece using foam squares. The entire focal panel is mounted onto some fun foam and then adhered to an A2 card base. I can't wait to see your card in this month's gallery! Thanks for fluttering by!

Tuesday, September 18, 2018

Tuesday Ideas {You inspire me}

I'm over on the Precious Remembrance Shop Blog today sharing this bright and vibrant card! I love mixing patterns but don't do it nearly enough anymore! My sister gave me a gorgeous pad of Martha Stewart pattern paper for my birthday that I used for today's card. 

I stamped and heat embossed the insulated cup from the Coffee Love stamp set twice. Once onto the purple print and then again onto the black. I also heat embossed the little "enjoy" sentiment onto the coffee cozy. 


I brought in a third larger print which I ran through my paper crimping tool. I just love the look of corrugated paper paired with a warm drink design. The flower print is perfect for the insulated cup to nestle into. I also stamped and heat embossed the two patterns above and below the floral print. 

I also stamped the circles from the Positive Thoughts stamp set in black ink. I thought it looked like the wet rings that a cup leaves behind. I also stamped the "you inspire me" sentiment at the bottom of the card base. A few sparkling clear sequins here and there add  some additional sparkle and shine! Thanks for fluttering by!

Saturday, August 25, 2018

Keeping Christmas {Season's Greetings}

Welcome, friends! It's the 25th and that means it is time for the monthly "Keeping Christmas" blog hop! With summer winding down, Christmas will be here before we know it! Also, don't forget to hop along to all of the designer's blogs to see what fresh Christmas inspiration they have in store for us! 


Nina Forsyth (off this month)


I've generally steered clear of making Christmas cards for this particular hop because of my involvement with the Merry Monday Challenge team, but now that it has closed, I feel the need to make a few more Christmas cards for my stash before the Holiday season hits! I found my inspiration for today's card in the most unlikely of spots; my son's swimming lessons, of all places! LOL! One of the cute, young swim instructors had on a darling Christmas bathing suit that I knew could translate into a fabulous card!

The background of the suit was baby blue with candy canes and holly all over it in a random pattern. The straps were peppermint striped, which I was hoping to incorporate along the bottom or something, but I like how it turned out without it. I really wanted to snap a picture of the suit, but felt like I would be a total creeper, especially with it being a bathing suit! Ick! LOL! So...I just used my memory and I think it turned out nicely!

I used Tumbled Glass Distress Oxide ink to blend a panel of color. I used the A2 Vertical Stitched die to die cut it after I had the blending done. I prefer to blend and then die cut it so the edges are even. Once that was cut, I was able to get to work on the images. I used the peppermint sticks and candy canes from the Candy Cane Christmas stamp set. I die cut a lot of the these using the Candy Cane Christmas Die collection. Once they were all cut it was easy to get them stamped in Pure Poppy ink. I did the same thing with the Holly. I used the Spruce and Sprigs stamp set and the coordinating Spruce and Sprigs die collection. I spritzed the background piece and all of the stamped pieces using Shimmer Spray for some holiday sparkle!

I used the candy cane images if the crook would show, and if not, I just used the straight peppermint sticks for the ends that are coming in from the outside edges of the card. I hadn't really decided how I would incorporate a sentiment. This can often times be detrimental to the end result of a card, but I had high hopes I could figure it out. I thought it would be SUPER cute to bend a small sentiment and stamp it repeatedly in the bends of the holly leaves, here and there, but I didn't dare risk ruining all of my hard work. I'll just have to revisit that idea on a later design! 

In the end, I decided on one of my go-to sentiment solutions and that is embossing on vellum. I didn't want to hide any of my beloved background or chop the visual balance of the card, so vellum was the perfect solution. This particular sentiment is an oldie, but goodie. It is from the old SU! set called "Many Merry Messages". This is one that I will never part with! I also stamped one of the coordinating verses on the inside in red ink. Everything is popped up using foam squares, including the blue panel onto the card base. I glued on a trio of sparkling clear sequins for some extra shine. Thanks for joining me today! Don't forget to head to the other designer's blogs to see what they have come up with! Thanks for fluttering by!

Friday, August 3, 2018

I'm here for you {rain or shine}


I'm playing along with two challenges today; CAS[E} this sketch! #283 as well as the current CASology #309. I took a gamble combining the two because I {may} have added too many layers for the CASology challenge, but I had fun and that's what counts! LOL! I kept my photos CAS as well...it was a struggle to not add some props, but I resisted!


This is the first time I have participated in either one of these challenges, but when you have the amazing Stitched Rays Coverplate you kinda have to! Ha ha! 

I combined it with the sentiment and clouds from the Sealiously stamp set and coordinating Sealiously Confetti Cuts. The square framing the sentiment is from the Stitched Squares Confetti Cuts. I just love the extra detail that the stitching adds to the card!


I just love how the clouds look embossed in white onto vellum! The only tricky part is adhering them! LOL! How I wish there were invisible foam squares! I matted everything onto a rectangle of yellow polka dot paper that is from the newly released Cue the Confetti 6 by 6 paper pad. It adds just the right amount of fun and whimsy but keeps it CAS. Thanks for fluttering by!


Friday, July 20, 2018

Color Throwdown Challenge #502 {Let's Shell-ebrate!}

My one and only daughter's birthday is on Sunday and I wanted to make her a card that she hasn't already seen, so I created this for her using this week's Color Throwdown Challenge. I just love the cool blue tones and knew it would make a fantastic sea life card.  I have been dying to ink up these turtles from the Salt Air: Fauna stamp set, but I didn't think I'd be making them grey and blue! LOL! I think they look adorable in these colors, though!
 
I didn't have that bright cobalt blue, so I used the closest thing I had, which is Enchanted Evening. I absolutely LOVE  this inspiration photo and almost used the new Fence Line: Summer because of it!

To begin, I stamped the Text and Texture: Ocean stamps set onto Fresh Snow Linen Cardstock in Hawaiian Shores Ink. I used my MISTI so that I could get it nicely saturated, because of the texture of the linen cardstock. I just love the look! I also used an ink blending tool and added in additional Hawaiian Shores ink over the top. I layered that onto an A2 Linen Cardstock base using foam squares.


I can't get enough of the new Pierced Feature Frames and used them to frame this underwater scene. Everything has been spritzed with Shimmer Spray so you can see the glittery flecks in this close up photo.

The turtles are stamped in grey and blue as I mentioned before. I think they look quite cute like this! They are die cut using the Salt Air: Fauna die cuts . The sentiment is from the super cute Salt Air sentiments. I also decided to add some real sea shells onto the bottom to enhance the sentiment. 

The plant life is from the Reef Builder die set. The thing I love about this particular set is that I can die cut everything in white and then use ink to create the color combinations that I want. I left one stark white because I liked the stark contrast it added to this card! I also added a few sparkling clear sequins and some Nuvo drop bubbles to enhance the underwater feel. Thanks for fluttering by!


Wednesday, July 18, 2018

SugarPea Designs Mix it Up Challenge #45

I have two cards to share with you today using this month's SugarPea Designs Mix It Up Challenge!I've included the rules for the challenge below,  but you can read all about it HERE
 I had so much fun creating this card and the second one is a quick and easy design! I LOVE the inspiration photo for this month's challenge and it lends itself perfectly for a fun red, white, and blue card!
 
I love the Lantern SugarCut and thought it would be a fun starting point for this card. Usually I have some sort of an idea in mind before I begin a design, but for this card, I just decided to sit down and have fun seeing where it took me. I die cut the lantern four times from red paper and glued it together using liquid glue. I like how sturdy it makes the piece and gives it extra dimension. The grey pieces are only die cut once and just glued to the top layer. 

The "so happy for you" sentiment is stamped in the middle of the white rectangle using both black and grey ink. I love the Sweet Sentiments: You stamp set because of all of the versatile sentiments. The stars are also included and I stamped each of the three sizes in either red or blue.

I also added in a few sparkling clear sequins for some added sparkle and shine. I layered this entire piece onto a grey piece of cardstock that has been cut using the Postage Stamp SugarCut

I used this awesome striped paper from the Sugar and Spice paper pad. It actually had a row of men's neckties in the center, but the lantern piece covered that up nicely and left me with the perfect backdrop for my card. I also added some machine stitching around the edge of the card for some extra detail.
This second card is simple and fun using just a few supplies.
As usual, I like to use both sides of the challenge, but I think you could say I took a liberal approach this month. I actually didn't even try using the sketch for the first card...I just had fun seeing where it took me. I really love the colors in the inspiration photo, as well as many of the little details such as the bowl and the sprinkles. I thought that by using the Large Striped Coverplate I could mimic the look of the bowl. I die cut it using red cardstock and layered it onto a Rustic White cardstock base using liquid glue.

The sentiment, which is from the Parisian Holiday stamp set, is heat embossed in white onto a black sentiment strip.  I just adore this little croissant and have used him quite a bit. His trio of balloons were beckoning me because I knew that I could make them red, white, and blue, just like the french flag. This little guy is from the Ooh La La stamp set and is colored using Copic Markers. It is die cut using the coordinating Ooh La La sugarcuts. The balloons have a coating of crystal glaze and just a few sprinkles of iridescent chunky glitter, because I just can't  help myself!

As I mentioned earlier, this card is VERY simple, but adding in all of the rainbow sparkle gems really makes is sparkle and shine and adds in some of those fun sprinkle colors. Thanks for fluttering by!