Showing posts with label Pinkfresh Studio Design Team. Show all posts

Thursday, June 24, 2021

Pinkfresh Studio {Happy Birthday}


 Hello and welcome! I'm happy to be here today sharing a birthday design using a few of the new release items such as the new Small Butterflies hot foil plate and the beautiful new Hydrangea and Rose washi tape. I had stenciled a bunch of butterflies to use on a project for the release, but they ended up being WAY too bright for the project I planned. I was thrilled to find that by using the hot foil plate with vellum, it was the perfect overlay for these stenciled butterflies. It toned them down just enough for this soft birthday design!

To begin this card, I used the Layered Sunburst Stencil set to create the soft background using Sparkling Rose, Soft Lilac, and Raspberry Bliss inks. I used the Essentials: Stitched Rectangles to die cut the edges for a finished look. I set that aside and got to work on the other design elements. As I mentioned earlier, I had already stenciled the butterflies, so all I needed to do was add the hot foiled vellum overlays! I used clear liquid glue to secure them in the center.

I die cut the gold circles using specialty gold cardstock and the Essentials: Stitched Scalloped Circles and then added them to the stenciled background using mini foam squares. I added the beautiful flowers from the Hydrangea and Rose washi tape and then let the butterflies float here and there for an organic feeling!


I used the Perfect Sentiments hot foil plate for the sentiment. I used gold foil so that it would match both the hot foiling on the butterflies and the gold on the washi tape. I added a few gems here and there for additional detail and shine! Thanks for fluttering by!

Monday, June 21, 2021

Pinkfresh Studio June Washi, Stamp, Die, Stencil, and Hot Foil Release Blog Hop


Hello and welcome to the Pinkfresh Studio June release blog hop! I'm sharing two projects with you today using a few of the new products! Make sure to leave a comment here and on every stop of the hop to be eligible to win one of 10 $25 gift certificates AND leave a comment on the You Tube channel page and Facebook page to be eligible for a chance to win the ENTIRE June release! 

As I mentioned earlier, I'm sharing two cards with you today! Up first is this fun rainbow design which is similar to the last Pinkfresh project I shared, but I used a different rainbow and I added the darling new Small Butterflies Stamp Set as well as the Small Butterflies Layering Stencils and coordinating Small Butterflies Die.

To begin the butterflies, I used the stencils using shades of orange and yellow to create Monarch type butterflies. I thought they would accent the rainbow nicely without being too busy.

Once the stenciling was complete, I used the coordinating stamp to add the detail images. Once that was done, I used the dies to cut the butterflies out and set them aside.

I felt like this particular sentiment was absolutely perfect for this butterfly design and so I stamped it in black at the top of an A2 sized white card base. This sentiment is from the previously released Floral Bunch stamp set as well as the flowers.

I die cut all of the pieces of the Color Block Rainbow Die and then put them back together using foam squares for dimension. I layered the flowers hanging over the edge and then squared them up using my paper trimmer.

I added the butterflies here and there using additional foam squares. I'm thrilled about the fabulous new gold Metallic Pearls! They are so much fun and I added them to a few of the butterflies here and there!

My second project for today uses the new Floral Vase Layering Stencils which coordinate with the previously released Floral Vase Stamp set. I used to color this set with Copic markers, but now I can do it quickly and effortlessly with the new stencils.

I used the outline stamp on both images to give them the added detail over the stenciled designs.

I love the look of the vase, so I decided to add some watercoloring to the background using ink, a blender brush, and a few spritzes of water! Easy peasy!

I added a few jewels as well to add some sparkle and shine!

Don't forget to head to the other designers' blogs! Thanks for fluttering by!

You are invited to the Inlinkz link party!

Click here to enter

Friday, June 4, 2021

Pinkfresh Studio {Flower Power}


 Hello friends! I'm excited to be here today sharing a bright, fun rainbow/floral design! When it was all said and done, I thought it had a 60's "Flower Power" vibe, hence the title of today's post! This is one of those cards that evolved on its own and I was just along for the ride! ha ha! My original plan didn't work out, but what came in its place is so much better!

To begin this card, I die cut the rainbow strips using the Color Block Diagonal Stripes die using different colors of cardstock. I ended up using 11 in total to give the rainbow the gradient look that I adore! I cut a piece of white cardstock measuring 4 1/4 by 5 1/2 inches and added the strips to the top using liquid glue. I purposely left the corners bare, but in the end it didn't matter since I covered them up with the flowers. 
I'm obsessed with the new Lots of Love die set and knew it would be perfect with the rainbow strips. I used a few of the same colors of cardstock to die cut the letters and added them to the white shadow using liquid glue. The heat embossed sentiment that is underneath is from the My Favorite Things to Say 2 stamp set.
I really love the Floral Bunch suite of products and knew these daisies would be perfect for this flower power design! I used the Floral Bunch stamp set and the Floral Bunch Die to stamp and die cut and then finished it up with the fabulous Floral Bunch Layering Stencils
From there, I just placed the edges of the image over the corners and adhered them with foam squares and then squared them up with my paper trimmer. Of course I had to add a few jewels, which you can now buy individually! I had so much fun creating this card! Thanks for fluttering by!

Monday, May 24, 2021

Pinkfresh Studio May Essentials Release Blog Hop

Welcome to the Pinkfresh Studio May Essentials Release Blog Hop! I'm sharing three projects with you today using a few of the new Essentials that you're sure to love! I always get so excited for the "Essentials" releases because the new products give me new ideas to freshen up my designs and to keep those creative juices flowing!
Before I dive into the details of my projects, there are a few details to make you aware of! As always, please leave a comment here and on all the stops of the hop for a chance to win one of 10 $25 dollar gift certificates to the shop! Also, head to the Pinkfresh You Tube and Facebook pages for two chances to win the ENTIRE release!


As I mentioned earlier, I have three projects to share with you today! Up first is something I am SUPER excited about and that is the new Mini Slimline Essentials Bundle! This particular suite of products is jam-packed with everything you need to make mini slimline cards! I can tell I will be using these A LOT!

I'm also beyond excited for the new Mini Slimline Envelope Die Set! I've always loved making my own envelopes and the fact that there is a die makes it even better! You know all of that 12 by 12 pattern paper that you've been hoarding? Well, now you can make your own envelopes to put your mini slimline cards in! There is also a new slimline envelop die for all of your regular sized slimline cards! 

To begin this mini slimline card, I used the Slim Leafy Squares stencil and rainbow colors to create the background panel. Once it was done, I die cut it using the largest diagonal stitched die from the new bundle! I also die cut the circle, which is also included in the bundle.

For the sentiment, which was super hard to photograph (grr), I did some quick inkblending onto  a white piece of cardstock and then die cut it using the Love You the Most die. I glued it all together and then added some Nuvo Crystal Glaze over the top of the letters to give them that retro puffy sticker look! The butterfly is from the Butterflies stamp set that was released last month! And of course, I couldn't resist making a rainbow mini slimline envelope to match!

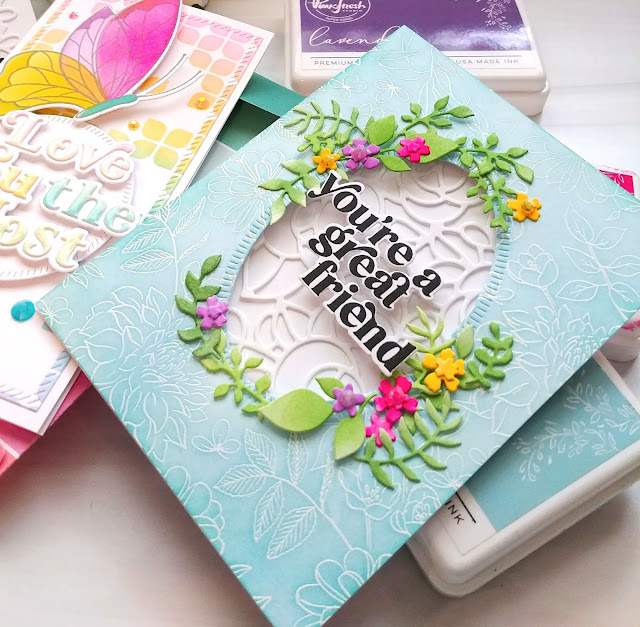
My second card for today uses the AMAZING new Blanket Stitched Oval dies! These are one of those die sets that you KNOW you will be using again and again! I also used the delightful new Garden Wreath dies that were released last month!

To begin this design, I heat embossed the Enchanted Blooms cling stamp and then added Ocean Breeze and Aquamarine ink over the top. Once that was done, I used the smaller of the two oval sets to die cut the opening. I saved the middle portion and used it on my last card for today. I layered the embossed panel over the top of a white card base that has the flower die cut piece using the Modern Bloom die. I used to shy away from using this but as soon as I got my Gemini Jr., it cuts like butter and I can't stop using it!

I layered the leaves and flowers around the oval using liquid glue. I added the "you're a great friend" sentiment to the middle using foam squares.

My third and final card for today's hop uses the other butterfly that is included in the butterfly set I used on my first card. As you can see, I used that middle portion of the emboss-resist background from my previous card. 

I also used the largest oval to go behind the smaller blue oval. I heat embossed the sentiment using white powder on a black strip of cardstock to make it pop! Before I send you off to the other designers' blogs, there is something that I think you'll all be happy about! I love to use the Essentials: Jewels on most of my projects and know you can buy them in each individual color so you can replenish your favorites or simply purchase your favorites! With that, I'll send you on your way for the rest of the hop! Thanks for fluttering by!


You are invited to the Inlinkz link party!

Click here to enter

Thursday, May 20, 2021

Pinkfresh Studio {Bloom with Grace}


Hello friends! I spent some "just because" crafting time the other day to create this BLOOM card using the new Be Strong stamp set and coordinating Be Strong layering stencil set and die. This one is particularly fun because even though the stamp/stencil is one image, the die cuts out the individual flowers so you can try all kinds of different design ideas!

It's no secret how much I love to use alphabets on my cards and one of the ways that I like to incorporate them is by using one of the key words in a smaller sentiment that is included in the stamp set, like the word "BLOOM" in this particular sentiment. I die cut the letters using the Kelly alpha upper case die, twice for each letter and glued them together with liquid glue. I added some Slumber ink over the top for a hint of color.

I added the letters to a white panel measuring 4 by 5 1/4 inches using small pieces of foam squares. Once that was done, I was ready to add the stamped/stenciled flowers. To create these flowers, I die cut the pieces first and then did the outline stamping. Once that was done, I was able to add the color using the coordinating stencils. I love watching them come to life as each layer of color is added!

I tucked the flowers into the empty white space using mini foam squares and then trimmed the sides using my guillotine paper cutter to square it up. I was able to use some of the discarded pieces to add to some of the smaller empty spaces.

The sentiment is heat embossed in white and layered over the top of some of the letters using black foam squares. The finishing touch is a few jewels in both purple and sapphire here and there. I added the entire panel to a top folding black card base to ground the design! I plan on using this as an unconventional graduation card that my daughter will be giving to one of her friends! Thanks for fluttering by!


Tuesday, May 18, 2021

Pinkfresh Studio {Rare and Beautiful}


 Hello and welcome!  I'm sharing a bold floral card using some of my new favorites! I'm in a "black background" phase right now, so I had fun creating this particular card with black cardstock and white embossing powder paired with the stamping/stenciling!

To begin, I used the Floral Bunch Die to die cut the base for the stamping/stenciling. From there, I stamped the flowers using the Floral Bunch stamp set and then used the coordinating Floral Bunch layering stencil set to bring this beautiful floral image to life. I chose Ballet Slipper, Sparkling Rose, and Raspberry Bliss ink for the main flower image and Lavender and Regal Kiss for the purple flowers. The leaves are inked with Grassy Knoll and Emerald ink for this bright, bold design!
Once I had the flower piece complete, I got to work on the background using the fabulous Diamond Tiles Cling Rubber Stamp. I heat embossed it in white onto the black cardstock for a dramatic, bold look. I also die cut the Stitched Scallop Rectangles using the same black cardstock and layered it over the heat embossed panel using foam squares. From there, I added the flowers using additional foam squares. Now, please note, this is one large image, but I strategically cut it to give me the split piece to maximize my efforts and use this floral cluster in a different way!

I'm currently obsessed with this particular sentiment from the Rare and Beautiful stamp set so I heat embossed it as well and added it over the top of the panel using additional foam squares. I added a few jewels as well for some sparkle and shine! The entire panel is layered onto a top folding A2 card base using foam squares. Thanks for fluttering by!

Thursday, May 6, 2021

Pinkfresh Studio {Lots of Love}


 Hello friends! Today I'm sharing a fun floral card using some of the beautiful new products from the latest release! When I set out to create my card for today, it was headed in a completely different direction that where it ended up! To begin, I used my large memory MISTI to stamp the gorgeous new flowers from the Heartfelt Thanks slimline stamp set. Now, this is made for slimline cards, but that doesn't mean it can't be used for A2 cards as well, like I'm showing today.

Once it was stamped onto a smaller panel, I used the coordinating Heartfelt Thanks slimline layering stencils. I chose Sweet Mustard, Marigold, and Clementine ink for the blooms and Fresh Pear and Olive for the leaves. Now, I had originally planned on this being the main panel for my card so I cut it using the Essentials: Stitched Rectangles, but in the end it didn't show, so you could omit that step. I DID, however, end up by using it on the plaid background which I will talk about in a bit.
Once I had the flower panel finished, I got to work on the large "lots of love" sentiment. I love these new sentiments because they have the "shadow" portion included! I chose to die cut the letters from black cardstock and the shadow piece out of white using the Lot of Love die set. I used liquid glue to adhere the letters.
My original plan was to use this large sentiment directly on the floral panel. I fussed with it a bit but decided it needed "something more" to ground it, or in other words, anchor it to the busy floral background. I decided to create a plaid background using the Diamond Plaid stencil set to serve as a hint of detail around the edge of the floral panel AND I could cut the middle portion out to create the anchor I needed for the sentiment. 
As you can see, that ISN'T what I ended up by doing! ha ha! I decided to create a larger window by using the Essentials: Pretty frames die set and using the plaid as the top layer and the flower layer to peek-a-boo through the opening, hence the title of my post: Reverse Backgrounds! This window was the perfect place to add that large sentiment with the "You deserve it all" portion tucked underneath. I love how this turned out, which was completely opposite of what I was originally going to do! I hope you get a chance to play around with some "reverse backgrounds" as well! My rule of thumb is to make sure you use scale to your advantage when choosing the flowers and pattern! I finished off this card with a few leaves from the Leafy Branch die. Thanks for joining me today!
Once it was stamped onto a smaller panel, I used the coordinating Heartfelt Thanks slimline layering stencils. I chose Sweet Mustard, Marigold, and Clementine ink for the blooms and Fresh Pear and Olive for the leaves. Now, I had originally planned on this being the main panel for my card so I cut it using the Essentials: Stitched Rectangles, but in the end it didn't show, so you could omit that step. I DID, however, end up by using it on the plaid background which I will talk about in a bit.
Once I had the flower panel finished, I got to work on the large "lots of love" sentiment. I love these new sentiments because they have the "shadow" portion included! I chose to die cut the letters from black cardstock and the shadow piece out of white using the Lot of Love die set. I used liquid glue to adhere the letters.
My original plan was to use this large sentiment directly on the floral panel. I fussed with it a bit but decided it needed "something more" to ground it, or in other words, anchor it to the busy floral background. I decided to create a plaid background using the Diamond Plaid stencil set to serve as a hint of detail around the edge of the floral panel AND I could cut the middle portion out to create the anchor I needed for the sentiment. 
As you can see, that ISN'T what I ended up by doing! ha ha! I decided to create a larger window by using the Essentials: Pretty frames die set and using the plaid as the top layer and the flower layer to peek-a-boo through the opening, hence the title of my post: Reverse Backgrounds! This window was the perfect place to add that large sentiment with the "You deserve it all" portion tucked underneath. I love how this turned out, which was completely opposite of what I was originally going to do! I hope you get a chance to play around with some "reverse backgrounds" as well! My rule of thumb is to make sure you use scale to your advantage when choosing the flowers and pattern! I finished off this card with a few leaves from the Leafy Branch die. Thanks for fluttering by!