Showing posts with label Nuvo Drops. Show all posts

Tuesday, October 6, 2020

MFT & Friends October 2020 Release {Merry and Bright}


Hello friends! I'm super excited to be a "MFT Friend" for the October My Favorite Things release! I've had so much fun using many of the new products so I have A LOT to share with you today! You can read all about the new release over on the My Favorite Things Blog as well!

My first card for today uses the FABULOUS new Merry and Bright Die-Namics. I chose to die cut it twice out of white cardstock and then add the color using blender brushes and ink. I used the same color inks as the stripes in this fabulous new pattern paper pad called "Christmas Cheer". I've used it a lot for today's projects because it is just so cheery!  I don't have the links to each of the new products, but you can find the new release HERE.  I layered the colored letters on top of the second set I die cut using liquid glue for nice and sturdy pieces.

I layered them onto the snowflake panel using little strips and pieces of foam squares for dimension and then added a coat of Nuvo Crystal Glaze over the top and a sprinkling of coarse crystal glitter to the tops to look like snow.

I'm in love with the sweet penguins from this new Holiday Penguins stamp set. I decided to use one to accent this fun design! He has a White Nuvo drop on his Santa hat and I added a die cut candy can to his flipper for some added holiday charm!

I layered the snowflake panel onto a panel of the colorful striped paper to pull it all together! This is all on a top folding A2 white card base.

Here's another card using more sweet images and a sentiment from the new "Holiday Penguins" stamp set! They are just too cute and I know I will be using this set all season long! The sentiments are perfect for gift packaging and tags!

I created the background panel using Distress Oxide inks and some white paint splatter for a winter-y look! I stamped the images and then colored them using an assortment of alcohol markers and then die cut them using the coordinating Holiday Penguins Die-Namics.

The sentiment is stamped directly onto the die cut Snowy Hillside that was released last year. They worked perfectly to build this holiday scene. I layered the snow using foam squares for a dimensional scene.

I highlighted the tree by adding a die cut circle using pattern paper from the Christmas Cheer paper pad. The snowflakes are the "freebie" die with a qualifying purchase. They are called "Sweet Snowflakes" and are perfect additions to your winter/Christmas projects!

I added an assortment of Nuvo drops to the ornaments to give them some shape, shine, and color! A few sparkling clear sequins finish off this design!

Next up is a little duo of tags using the super sweet new Pure Innocence girls called "Sweet Christmas Wishes"! I couldn't decide between red or green striped tights, so I made one of each! ha ha!

I used one of the fun new sentiments from the Holiday Penguins stamp set, but the Pure Innocence set has some fabulous sentiments as well!

My last card for today uses another one of the adorable new Pure Innocence girls...this one is called "Reindeer Games", of course! Ha ha! I paired her with the fabulous new sentiment stamp called "Wishing You a Very Merry Christmas".

I haven't used an actual bow on a card in forever, but I felt like this cheerful design was begging for one! What do you think...bow or no bow?

I had such a good time using all of these fabulous new products...I didn't get a chance to get a few inky, so I'm sure I'll be using them shortly! Thanks for fluttering by!


Saturday, August 29, 2020

Sunny Studio Stamps {You're on my nice list}

Hello and welcome! I'm doing a guest post for Sunny Studio Stamps on their BLOG today using some of the holiday stamps from their latest release! I thought I'd share my projects here as well, so thanks for joining me!  I love all things Santa, so the new North Pole stamp set with both Santa AND Mrs. Claus is just up my alley! 

I paired it with the fun and versatile Winter Scenes stamps to really bring this holiday card to life! The background is created using Tumbled Glass and Faded Jeans Distress Oxide ink for a winter-y looking sky! I also added some white paint splatter for a snowy look.

The images are all stamped in black and then colored with an assortment of alcohol markers. I added some coarse crystal glitter to the tops of the trees, the rooftops, and snowdrifts. Of course I just HAD to add a few of the cute accessories included in the set, like the North Pole, the gift and Santa's "nice list". The sentiment at the top works perfectly with this little addition.

The entire panel is added to an A2 cardbase with a panel of Classic Gingham Pattern Paper for just a hint of added detail. I added a dot of Crystal Glaze to Mrs. Claus's glasses and the top of the North Pole. A few sparkling clear sequins finish off this holiday scene.

As I was coloring the Winter Scene panel for my first card, I realized how perfectly it would work for a tag. I colored another scene and then cut it in half to create the backdrop for these two tags.

Mrs. Claus is offering a plate of cookies sprinkled with a touch of glitter. I feel like this sentiment is perfect for this tag and will be perfect to add to a package of homemade holiday treats!

Santa is sporting his "all important" list again, so I had to use the "You're on my nice list" sentiment once again. For those of you who aren't tag makers, per say, these tag designs would be perfect of add to a card base for a fun holiday card as well!

My last card for today uses the cute and playful elves from the North Pole stamp set. I inked up each of the 4 elves twice and colored them exactly the same for ease and speed. I did very simple coloring since there are so many elves.

Once they were die cut, I added them to the gingham background in a way that you might see a pattern on wrapping paper. I added them using foam squares in the arrangement that I liked, adding the punny sentiment at the top.

Once the elves were in place, I cut the edges using my paper trimmer making little hats and feet go flying! LOL! I actually put those little snippets to good use and added them in to the design here and there. I also added in a few packages and North Pole images to fill in the gaps.

The White Nuvo Drops are added here and there for some added detail. The elves' jingle bells and the tops of the North Pole all have some Crystal Glaze over the top for added shine and detail. The entire panel is added to a top folding A2 card base using a tape runner. I feel honored to have been asked to do this guest design project! Thank you Sunny Studio Stamps! Thanks for fluttering by!


Monday, August 24, 2020

Flash Sale {You are AMAZING to the core!}


Welcome to this week's Papertrey Ink/Ink to Paper Flash Sale! As usual, the sale will run from 12 noon today until 12 noon on Wednesday, August 26th! I'm revisiting the darling Tag Creations: Delightful Bunch stamp set which is just perfect for this time of year! I chose to use some different colors for the apples to change things up!
This week's Flash Sale will include:


Dies: Tag Creations: Delightful Bunch this will be for pre-order. The other items in your order will be shipped out and then the dies will arrive in 2-3 weeks.

My kids are headed back to school tomorrow for 2 days each week and 3 days at home for remote learning. These tags will be the perfect addition to the teacher gifts that will be headed out the door. I made THESE a few week's ago for the Flash Sale and these tags will complement them beautifully! I just love the pink and lime apples! I think I'd really enjoy picking apples from an orchard filled with pink and green apples! 
Whenever I use this stamp/die collection, it reminds me of the Anne of Green Gables series with Megan Follows as the actress, when her and Katherine are out picking apples. It's right before she meets Gilbert on the bridge, which is always such a fun part! ha ha!


I couldn't resist adding some coarse crystal glitter to the apples and leaves for some added detail. The Nuvo drops help make the apples look crisp and juicy, don't you think? The sentiment on each of the labels are heat embossed in silver for a fun touch!
The kids were able to pop in for a socially distanced Open House last week, so they got to meet their new teachers. They seemed pleased, which is always nice! I hope the teachers like their Back-to-School gifts. I ended up getting some Apple soap from Bath and Body Works, gum, gourmet popcorn, EOS lip balm, a KIND bar, lotion and a gift card to Amazon so they can get a few things that they need. These tags will be attached to the bow that ties up the cellophane that the baskets will be wrapped in! I'm using the little baskets I bought for May Day which will be just the right size! Thanks for fluttering by!


Wednesday, August 19, 2020

Warmest Birthday Wishes

I thought I'd better pop in with these cards I made back in July before summer disappears! They are super simple, but they use the darling Summer Vibes stamp set that was a must-have for me! I got it when it was first released and there it sat, unused! Boo! I decided that I'd just do some simple ink blending and coloring to create some quick birthday cards!

I used the fabulous Cloud Mix-ables Stencil for the sky and some Scattered Straw Distress Oxide ink for the sand portion. I used my color spritzing tool (photo of this near the bottom of the post) to create some sandy specks at the bottom of the panel.

I die cut the panel using the Diagonal Stitched Rectangle dies to give this simple card some extra detail. After that was done, I stamped all of the images in black and then colored them with Copic markers. I don't do nearly as much coloring as I used to and I forget how therapeutic it is! I used the Sunny Vibes Die-Namics to die cut all of the colored images. I arranged them on the card here and there for a beach-y scene! This is my favorite of the two because it has a bit more depth to the scene.

This one is a little bit more plain, but I just adore that sweet little bunny working on her sandcastle! The shell and sun both have a coating of Nuvo Crystal Glaze over the top. After I had photographed the cards, I decided that the umbrellas need some glaze as well, so they are shiny now, too!  I added a trio of White Nuvo Drops to the centers of the palm trees as well as some sparkling clear sequins. The sentiment is stamped onto a strip of white cardstock and added to the panel using foam squares. 

For those of you who have asked about the color spritzing tool....this is it! It is from my SU! days and I still have all of the markers that fit with it. This is how I add a lot of the ink splatter to many of my designs.

This little kitty is just the cutest, don't you think? I added it to the inside of the card using foam squares. The sunglasses also have a layer of glaze for some realistic shine. I thought this SENTIMENT was the perfect touch to accent this bibliophile kitty! ha ha! I gave one of these cards to my son for his August birthday and the other will be heading to one of the kiddos from church in the next day or two! 
I'm glad I got these cuties inked up, but guess what? I still have MORE summer stamps that I haven't used at all! Those might have to wait until next year! So sad! Summer goes by way too fast! Anyway, thanks for fluttering by!
 

Monday, August 17, 2020

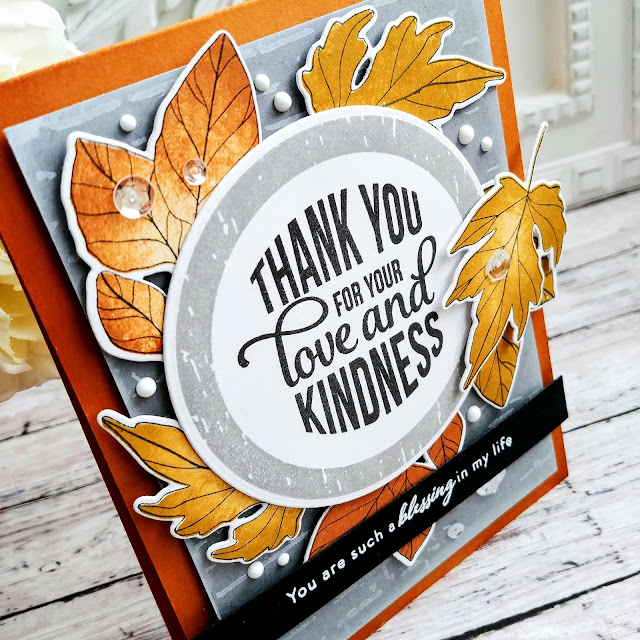
Flash Sale {Thank you for your love and kindness}


I hope you all had a wonderful weekend! I'm back again today for this week's Papertrey Ink/Ink to Paper Flash Sale! If you'd like a  sneak peek of each week's Flash Sale, make sure to check your email for the Papertrey Ink newsletter each Sunday evening! We're transitioning to autumn projects, so I've selected some fun colors and stamps for this week's Flash Sale! This sale will begin on Monday, August 17th at 12 Noon EDT and go until Wednesday August 19th at 12 Noon EDT.


If you read my blog last week, then you already know that I'm trying to remedy my neglect of Honey Nut and Saffron Spice! I decided to bring these two beauties to life on today's cards! I used both the ink and the cardstock for a cohesive look.


I used quite a mix of stamps to pull these two autumn designs together! I love mixing a bit of this and that when I create my cards. My first step was to get the focal images/sentiment stamped. I used the It's A Sign: Wood Frames stamp set and die collection for the circle portion. It is stamped in Weathervane ink and then the sentiment, which is from the It's A Sign: Love and Kindness stamp set, is stamped in black. 

From there, I got to work on the leaves. The oak leaves are stamped in Fine Linen and Saffron Spice ink and the other larger cluster of leaves are stamped in Fine Linen and Honey Nut ink. I used a small blender brush to tap the inks together where they meet for a two-toned, seamless look.

I also added a heat embossed sentiment from the Just Sentiments: Grateful Heart stamp set at the bottom to give the card some contrast and reinforce the salutation. 

I stamped the Rustic Brick Background in white onto a panel of Weathervane cardstock that measures 3 3/4 inches by 5 inches. I also added some extra white ink around the edges of the panel by simply  using the edge of the ink pad.  I cut and scored two card bases; one out of Saffron Spice cardstock and one out of Honey Nut. Each one got some sponged ink around the corners for added contrast. At this point, all of the elements were ready to layer together!

This is always the fun part when it's time to put everything together! I used foam squares to add everything onto the card bases. Once they were all assembled, I added some White Nuvo Drops around the leaves and a few sparkling clear sequins here and there for some sparkle and shine. These were a lot of fun to put together and will be perfect to add to my growing autumn stash! Thanks for fluttering by!


Sunday, August 9, 2020

Sending you Sunshine!


Happy Sunday friends! I've got a busy week ahead of me and you'll be seeing the blog go from Summer to Fall before your very eyes! Before that happens, I still have summer projects that I'm wanting to share AND more summer projects I'm still wanting to make! How about you...are you ready for Autumn crafting, or are you still hanging on to Summer?  


I was thrilled to have been asked to be a guest designer for the Honey Bee Stamps Hello Summer release back in July! You can see my projects HERE. I fell in love with many of the other products from the release and ended up buying a few of my favorites! They've been patiently waiting for me to use them and I finally did! LOL!
For today's card, I used the fabulous Tropical Bouquets Honey Cuts to create this Summer-y design! I had originally planned on putting everything on a black panel, but in the end, this beautiful teal blue won! I love how well it complements the bright colors of the flowers and foliage!


I die cut everything out of white cardstock and then just used ink and blender brushes to give them their color. I also added some ink splatter to the Hibiscus blooms for added detail.

Before I arranged them onto the blue panel, I added some darker ink blending to each of the four corners to give it some added contrast. Once that was done, I added the leaves and flowers using foam squares and liquid glue to get everything in place.

I heat embossed the "sending you sunshine" sentiment, which is from the Wish You Were Here stamp set, and then die cut it with the Wish You Were Here Honey Cuts. I used the same cardstock as the background to give it a seamless look! I added it over the top of one of the leaves using additional foam squares.

The flowers each have a jewel glued in the center for some sparkle and shine. I also added some Nuvo drops here and there to give the card additional contrast. It helps balance the white of the leaves and the heat embossed sentiment. This was a fun "just because" card that I thoroughly enjoyed making! I think today might be the day to sit down and write out a few notes inside the rest of my summer cards! Thanks for fluttering by!