Showing posts with label diecuts. Show all posts

Wednesday, August 20, 2025

You're Amazing, Teacher!

I just can't stop with the back-to-school themed projects! You could definitely switch out the sentiment on this one and make it an any occasion card, really! The inspiration for this card was the flag, silly as that sounds! I passed a school and saw the flag waving in the wind and I thought, oh, I should do a schoolhouse inspired card! While it didn't end up like that, it was definitely the starting point! ha ha! I had so much fun creating the clock on my last card I thought it would be fun to make a clock for my school card with the flag, but as you can see, there is no clock in sight! The clock just didn't work so I had to pivot, but I'm so glad I did because I really like how this card turned out....soft and summery, with a hint of autumn!

I won't bore you with the details of how I switched gears a thousand times, so let's just dive into how I created it! To begin, I used the cute flag dies included in the Patriot Die to create Old Glory on the cute pole. I cut everything from white cardstock and then used blender brushes and dye ink to color the pieces. The pole is cut from silver cardstock and then I glued everything together with liquid glue. I set that aside to dry and got to work on the the flowers. I used the Into the Blooms: Coneflower Die. I didn't participate in the release when these were introduced, so this was the first time I used them and I am hooked! The bee was left over from another project so I added it to the flower using liquid glue.
I had the notebook and pencil leftover from the previous school-themed projects I've shared over the last week or so. When I was making the acorns for one of the cards, I also made this cluster of white flowers so it was fun to use it on this card.
Fort he sentiment, I die cut the main portion in gold using the Teacher Wafer Dies and then the shadow from vellum. I glued them together and let them dry. The "You're amazing" portion is heat embossed in gold on a strip of Kraft cardstock. I dug through my mini sentiment sets until I found something that would accent the teacher word nicely. This one is from the Just Sentiments: Everyday Mini Stamp Set. It's not one I use very often, but I really should because it has some of those sentiments that can be used for just about anything!

For the background, I used the Cascading Stars Hot Foil Plate with Spellbinders Champagne Foil. I love the champagne foil more than gold because it's not quite so yellow. I had fun adding the elements to the background. The sentiment is strategically attached with liquid glue applied ONLY to the areas where they touch something else.

I added some black ink splatter and then trimmed it down to fit inside the frame. I wanted the card to have additional dimension, so I added the entire framed background to a top-folding A2 card base using foam squares. I think I'm going to save this to be used for teacher appreciation next May, but I had so much fun creating it while getting in to the back-t0-school frame of mind! Thanks for fluttering by!


Sunday, August 17, 2025

You are Timeless

Hello and welcome, sweet friends! I'm thrilled to be here today sharing this soft, floral card! If you stopped by the other day, you would have seen the butterfly sympathy cards I made for The Greetery. I had one lone butterfly left and she just seemed so lonely sitting there by herself. I decided to put her to good use on today's card! 

The background was created exactly like my HOME card I posted the other day. I fell in love with that background and I'm now convinced no other background will ever compare! ha ha! I cut an A2 panel of white cardstock and then used the Show Your Stripes Stencil Collection. I used Pixie Spray because the stencil has a tendency of moving while stenciling and I wanted the lines to be crisp. I used the stencil on the front side and then flipped it around to the other side to create the diagonal plaid. Once I have used the Pixie Spray, I find that it leaves a residue on the cardstock, but if I rub an adhesive remover eraser over the top, it cleans it right up!

Once that was done, I die cut the frame piece using the Reflections: John 1 Die and added it over the stenciled panel using foam squares. I used quite a few because I wanted it to be nice and sturdy without any drooping areas.

I adore this clock; I used the Clock Hot Foil Plate using Champagne foil on Sweet Blush cardstock. I used a Spellbinders Nesting Circle Die to cut it out. I added it to the center of the background panel using foam squares.

 I loved the bow and the flowers look from the HOME card I posted last week so I decided to recreate it, but with die cut flowers rather than stamped ones. I like both looks for different reasons! The flowers are all from the Into the Blooms: Wild Wood Die and are cut from white cardstock and then colored with blender brushes and dye ink. I arranged them around the clock using foam squares and liquid glue.

The sentiment was stamped using the It's Time Stamp Set using black ink. The finishing touch is the beautiful butterfly just begging for her time to shine! (pun intended?) ha ha! The entire panel is added to a top-folding A2 card base using liquid glue! I had so much fun creating this card! Thanks for fluttering by!


Saturday, May 10, 2025

For Mom

Hello and welcome, friends! I hope you've all had a great week! It's been busy around here, but I wanted to pop in for some last minute Mother's Day inspiration! I used some products from the latest Papertrey Ink release along with some older favorites for this Mother's Day card.

To begin, I die cut all of the pieces for the flowers and leaves using the Into the Blooms: Anemones Die. Everything is cut from white cardstock with the exception of the flower centers (those are cut from gold). I used Harvest Gold ink for the flowers and Ripe Avocado, Stormy Sea, and Spring Moss ink for the leaves.

I gave all of the flowers and foliage a spritz of Shimmer Spray and set them aside to dry. For the background, I used the Fall Harvest Hot Foil Plate with gold foil on Lilac Grace cardstock. I used a corner rounder punch on the corners for a professional look.

I heat embossed the sentiments, which are from the Larger Than Life: Mom mini stamp set, using gold powder on a strip of velum. I let that cool while I worked on the next steps.

I used the Reflections: Numbers 6 Die for the anchor point for the flowers and foliage. I added it to the background using foam squares and then arranged everything until I was satisfied with the arrangement.

I wrapped the vellum strip around the card front and secured it to the back of the background panel using Scotch tape.


The entire panel is glued to a top-folding A2 card base using liquid glue. I used pearls for the berry sprig and a few on the left side for balance. I also added the gems to the flower centers. This design would work well for quite a few different occasions: wedding, birthday, thinking of you, etc.
 I hope you have a wonderful weekend! Thanks for fluttering by!


Sunday, September 8, 2024

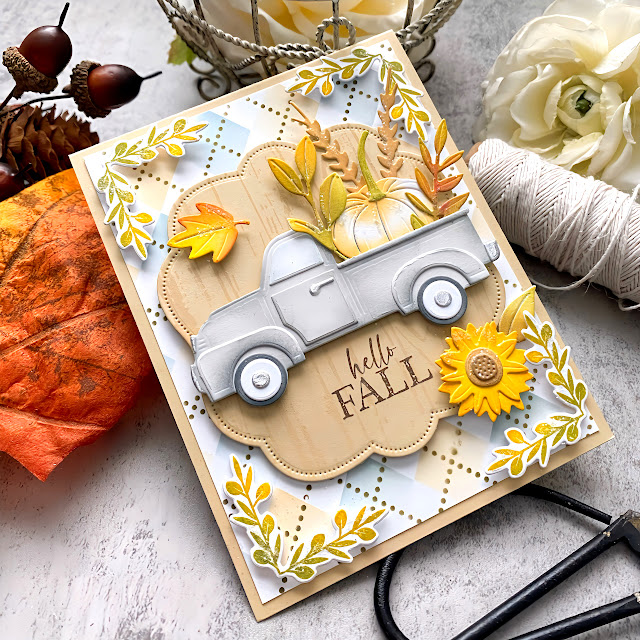
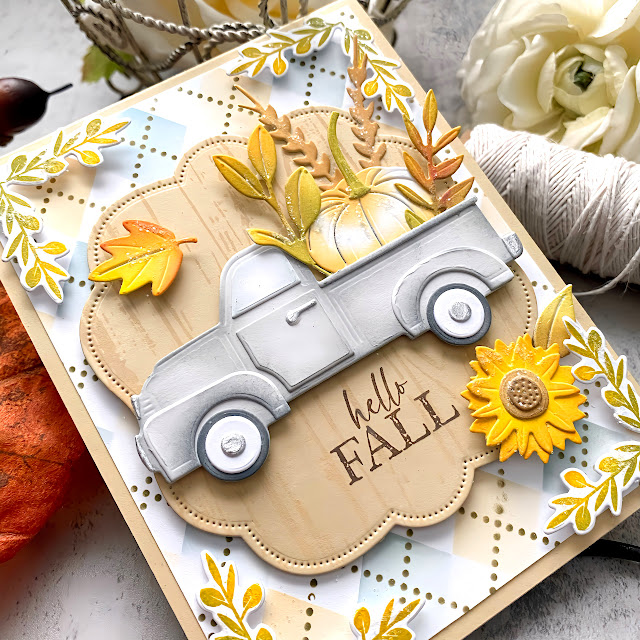
Project Inspiration {Hello Fall}

It's my turn for the Papertrey Ink Project Inspiration Feature! I will share step-by-step photos on how I created this muted autumn card using some of my favorites, both older and new!

To begin, I used the darling Argyle Stencil Collection on a 4 by 5 1/4 inch panel of white cardstock. I adhered it to a top-folding Fine Linen A2 cardbase using liquid glue.

I used the Weathered Wood Background on a piece of Fine Linen cardstock using antique linen distress oxide ink. I cut it using the Love to Layer: Lovely Brackets die and then stamped the sentiment that is included in the Just Sentiments: Happy Fall stamp set

I added the truck, that was cut using the Patriot die using foam squares. 

I tucked all kinds of autumn goodies that are die cut using the new Bountiful Cornucopia die.

The finishing touch is some details to the corners using the Corner Decor stamp set.

I really like how soft and subtle this card turned out! Fall usually takes a little while to get intense, so this is perfect for saying hello!

I gave it a spritz of shimmer spray and added some glitter here and there.

I didn't take a picture, but I've been using the sentiments from the Inside Greetings: Fall Mini stamp set.

Thanks for fluttering by!


Tuesday, April 9, 2024

The Greetery {A Note to Say...Hello!}


Hello and welcome friends!  I'm popping in with something fitting for the upcoming spring season. As I was preparing my Easter dinner and dessert, I chose to serve strawberry shortcake and those beautiful berries inspired today’s project. When the To Pie For Die came out, it was autumn pie season so I was thrilled to pull it out for the spring season and make something fresh and fruity!

To begin, I die cut the strawberries using the BotaniCuts Strawberries Die  from white cardstock. I used finger daubers and Distress Oxide inks to add the color to both the greenery, berries, and flowers. I added some extra detail using colored pencils to the individual leaves, the berry tops, and the little strawberry blossoms. Once that was done, I set them aside and got to work on the pie.


As I mentioned earlier, I used the To Pie For Die; I die cut the crust portion from Fine Linen cardstock and the “filling” portion from white cardstock. I used the extra bits of lattice strips to weave though crust for an authentic lattice pie crust. I used some brown ink to add to the edges of the crust for that “golden brown” look and over the top of the intersecting lattice portions for realism. The “filling” was colored using the darkest ink I used on the berries. I glued the entire thing together to complete the pie and set it aside.


The background was created using the Square Dance Stencil. I used the same color ink for all of the steps for a subtle tone-on-tone look, but used different pressure for each of the steps.
 I added some ink splatter in a darker ink for some contrast and interest. I added it to a top-folding A2 card base using liquid glue and then got to work with the arrangement of the card. I didn’t have a “set” idea for the sentiment so I had fun looking through options, but finally settled on the Scripty Hello Die and the accent sentiment from the Scripted Sentiments Stamp Set.

I used the swirly portion from the Frosted Frames Die and left the loops intact because I like how it “grounded” the frame a bit more. I added it to the stenciled background panel using liquid glue. I added the pie with foam squares pretty much in the middle of the card, added the berry cluster using additional foam squares. The sentiments are also added using mini foam squares. I added a few berries and leaves to the bottom with some additional blossoms for added interest. This is one of those cards that just makes me happy and I sure hope that it makes the recipient happy, too! Thanks for fluttering by!

Friday, March 15, 2024

The Greetery {Chocolates and Flowers for Mom}


Hello and welcome, friends!  I'm happy to be here today with a fun Mother’s Day project using the new To Mom with Love stamp/die set as the focal point and then traditional Mother’s Day accents: flowers and chocolate!  Mother’s Day is just a few short months away and I find that it’s always good to ensure that YOUR mom or mother-in-law is taken care of long before the actual day so you don’t have to endure stress on YOUR special day (if you’re a mom). Mother’s Day can be tricky for some and for those of you who struggle on that day, please know you’re in my mind and in my heart.  That being said, this card design transcends beyond Mother’s Day; simply switch out the large focal sentiment for a birthday or thinking of you sentiment, whatever your needs may be.

To begin, I die cut quite a few flowers and greenery using the Winter Medley Die and then colored them with distress oxide inks. I used a foam mat and the smaller end of my stylus to give the flowers shape and then glued them to the greenery. I added a black dot to the center of each flower using a fine-tip Sharpie marker. I gave them a spritz of Shimmer Spray and set them aside to work on the chocolates.

I used the Curio Confections Die and cut out all of the pieces and then just had fun coloring them. I die cut the paper liners from vellum and then added the chocolates using foam squares for dimension. I added some Strawberry Bits and some Flower Bits to the chocolates for added detail. I simply glued them to the top of the chocolates using liquid glue. I find that a gem picker comes in handy to add embellishments like this.

Once the flowers and chocolates were finished, I got to work on the background. I used the Curio Divider & Details II die for both the outer frame and the liners die cut from pattern paper. This particular pattern paper is from a 12 by 12 pad from Recollections called Floral Fantasy. I didn’t notice when I chose it that the tiny detail of the pattern is a crown, just perfect for Mom! I die cut the divider portion three times from Kraft cardstock and then glued it together using liquid glue. I added some brown shades of distress oxide ink near the joint of each section. I layered it onto an A2 panel of white cardstock using additional liquid glue and then secured each of the liners using a tape runner.

Once that was done, I just had fun adding all of the chocolates! I heat embossed the sentiment in gold onto white cardstock and then using the To Mom With Love Die to cut it out. I layered it over the chocolates using foam squares. Once that was done, I added the different clusters of flowers here and there until I was satisfied with the arrangement. I gave the chocolates and flowers a generous sprinkling of glitter and then mounted the entire panel onto a top-folding A2 white card base using liquid glue! This card was a joy to create and I’m so glad that my Mom’s card is taken care of this early! No procrastination for this girl! Ha ha! Thanks for fluttering by!

Monday, February 5, 2024

Papertrey Ink Project Inspiration

Happy Monday, friends! I had a project featured in the Papertrey Ink newsletter last week, so I thought I'd also share it here and provide a few more details on how I made this card. I have step-by-step photos that should help, too! I'm currently obsessed with die cut and colored flowers, if you haven't noticed, so that was the starting point for today's card.

I feel like I do a lot of "flowers framing a sentiment" type cards so I thought I'd change it up and use this cute Country Handbasket Die to fill up with the cute die cut blooms! I die cut it out of Kraft cardstock and then added some shading using Classic Kraft ink and a blender brush for added depth and dimension.

I glued the two pieces of the basket together and then got to work cutting and coloring the flowers. All of the flowers used on this card are from the Into the Blooms: Wreath die. I'm currently obsessed with the flowers and have used them on quite a few projects lately, but since I took December off, I haven't actually used the wreath portion included in the dies....I really need to remedy that! I colored the flowers using assorted Distress Oxide inks and finger daubers.

I die cut the border using the lovely Border Bling: Scalloped Frame die using Sweet Blush cardstock adn then added some Saltwater Taffy Distress Oxide ink around the edges. I glued it onto a top-folding A2 card base using liquid glue. I then added a white oval that was cut using the medium-sized oval from the Love to Layer: Ovals Die. I adhered it to the card base using foam squares.

I decided AFTER I added the oval which sentiment I wanted to use, but I would suggest stamping it BEFORE , so that you don't have to worry about the foam squares underneath. ha ha! The sentiment is from the Garden Blessings stamp set and I stamped it in black ink. I added some black ink splatter, Moonshine sequins, and glitter. The flowers are arranged using both liquid glue and foam squares.

After I color the flowers, I used a foam mat and a stylus to shape the flowers. I didn't shape the pinks ones, though, just the yellow, blue, and white.

You could change up the color combination to create something more moody or seasonal depending on what you like! Thanks for fluttering by!


Tuesday, December 19, 2023

The Greetery {Christmas Garland Slimline Card}


Hello friends! I’m happy to be here today sharing a slimline card that features some of my absolute favorites from the latest release from The Greetery! I had wanted to make a card featuring a wooden ball garland for the release, but just didn’t end up executing that particular idea. I couldn’t get it out of my mind, so I was happy to create this card to share with you today!

To begin, I die cut 4 wreaths using the Magnolia Wreath die from white cardstock.  I used twisted citron, mowed lawn, and rustic wilderness Distress Oxide inks and a finger dauber to bring them to life. I adhered two wreaths together using strategically places foam squares to give me two finished wreaths. I knew I would want additional greenery for my design, so I also die cut some BotaniCuts Juniper pieces to tuck here and there.  I set them aside and got to work on the bead garland.


I used the Ribbon Maker: Wood Bead Garland die and die cut the curvy design 4 times from Kraft cardstock. I glued two together for a nice, sturdy piece and then added some brown ink around the edges for contrast and depth. I glued them together after I had fussed and fidgeted with how I wanted the garland to hang for this design. I ended up cutting off the pieces at the top so it would hang just right; you can adjust things how you need if you’d like to try this idea!

Every Christmas, I add a beautiful icy garland over my fireplace, but have fun adding all kinds of “extras” like snowflake ornaments, icicle ornaments, etc. so of course I needed to give this garland some “extras” as well! I added both sizes of tassels using the Tassel Large Die and the Tassel Small Die.  I simply die cut them from Rustic White cardstock and adhered them together. I couldn’t actually thread them through the bead garland because of size, so I simply snipped a strategic slit in the loop and added them that way, securing them with foam squares. I also added a few gold glitter stars in two sizes; you will find these darling stars in the Rustic Star Small die collection and Rustic Star Large die collection.

I was having a hard time deciding on a sentiment, but I knew it would need to be one with a coordinating die, so I chose the gorgeous Comfort and Joy stamp setwith its coordinating die. I heat embossed it in white onto black cardstock and then die cut it. The black and white provided the perfect contrast against the red and greenery.


For the background, I die cut the largest panel included in the Nordic Slimline die collection out of Pure Poppy cardstock. I added that to a slimline-sized Kraft card base using foam squares. Once that was done, it was finally time to pull it all together….my favorite part! Once I had the wreaths, garland, and tassels in place, I added some white paint splatter. The stars are added using liquid glue and then everything got a generous sprinkling of glitter for that holiday sparkle I love so much! I also gussied up a Kraft slimline envelope using the Snowflake Prints Stencil and the Four Square Holiday Tags stamp set. I don’t often make slimline cards so this was a fun change-of-pace for me! I hope you’ll try your own garland card! Thanks for flluttering by!