Showing posts with label SFYTT. Show all posts

Monday, April 16, 2018

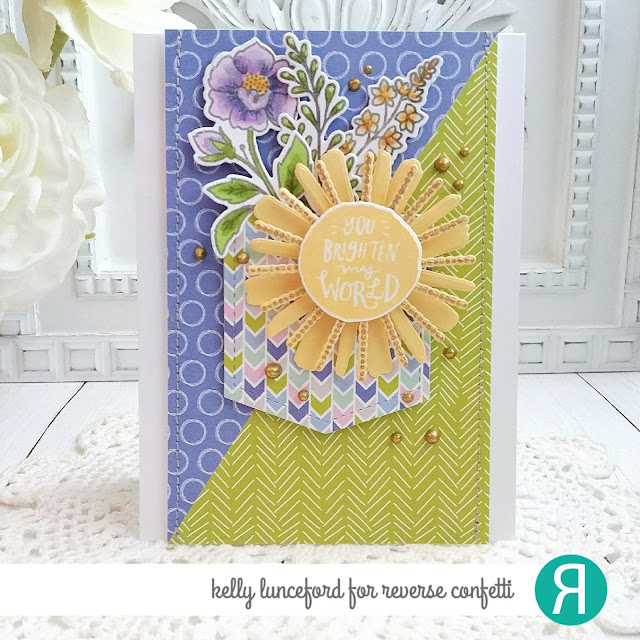
SFYTT #59 {You brighten my world!}

Hello friends! Today I am sharing my card using this month's SFYTT, which is the VERY LAST ONE!! Jen is going to be bringing something new and fabulous to the table, so if you want to participate, now is your chance! Sketch challenges really stretch me as a designer and get my mind working in different ways, which is always good!
 
To begin, I got to work cutting some of the fabulous patterns from the Fun Times pattern paper pad. I have used this so much I am running out! Ack! In fact, I had the card almost complete when I realized that I had pieced the front panel incorrectly. I had used my last piece of one of my favorite patterns. so I couldn't use it! Oh well...there are lots of other fun prints, so I used the green instead, which looks great since they all coordinate! 


I did some machine stitching down the two sides of the pattern paper panel. I actually added these pieces to a panel of white cardstock for durability since I added it to the white A2 card base using foam squares. I used the Tie-rific Confetti Cuts as the focal point for the card. I knew that I would be using the My Sunshine stamp set and the coordinating My Sunshine Confetti Cuts. It reminded me of one of my school books from Elementary school called "Pocket full of Sunshine"! LOL! That became the theme of my card!

I also used a few of the Tall Blooms to tuck inside the pocket for some added color and interest.


I did some gold heat embossing on the rays of the sun, so I added a few gold nuvo drops here and there for some added detail and shine.

I hope you'll get a chance to play along with this final SFYTT! Thanks for fluttering by!
Friday, March 16, 2018

SFYTT #58 {Make a Splash!}

Hello friends! I'm super excited to be participating in my first SFYTT as an official Reverse Confetti Design Team member! I love this month's sketch, partly because when I saw it, I  knew it would be a perfect fit for this adorable new Sealiously stamp set and coordinating Sealiously Confetti Cuts! Aren't they just the cutest? I knew that an alcoholic ink background executed with the right technique, would really "make a splash"! LOL! I shared how I created this background further in the post.

To begin, I stamped the adorable seal, splashes and puddle image and got to work coloring them using Copic markers. I used an assortment of cool greys for the seal and blues, of course, for the puddle and drops. Once they were colored, I die cut them and then added some Wink of Stella all over. I also added some Nuvo crystal glaze to each piece. I just love how it makes the seal look; so shiny and slippery wet!

The circle is die cut using a piece of the new Fun Times 6 by 6 paper pad. I love how versatile it is, but I think I may have mentioned that about a bajillion times during the release! Ha Ha! The "make a splash" sentiment strip is from the same pad. I also added a strip of Midnight cardstock above it as per the sketch.

To begin, I set my work space up so that I wouldn't make a mess. I used a piece of Yupo paper and an assortment of alcohol inks and silver metallic mixative. The photo shows gold, as well, but I ended up by only using silver. Also, I have my blender tool with a piece of felt attached, but I didn't end up by needing this for the effect I was trying to achieve.

I added drops of the assorted inks in a circle because I wanted to keep that look for the sketch. I added the silver mixative in here and there as well. After that was done, I dropped some Alcohol blending solution over the top and then used a straw to blow it away from the center of the page so that it would create a "splash" feeling. I kept adding and blowing it until I was satisfied with the result. 


I set it aside to dry and got to work assembling all of the pieces.

A few drops of Nuvo crystal glaze are added here and there around the splash images and a trio of black Nuvo drops completes this design. Once it was dry, I added it to an A2 Iced Aqua card base. I had too much fun creating this! I hope you'll play along! There is a chance to win a $20 gift certificate to the store! Thanks for fluttering by!


Friday, February 23, 2018

Color Throwdown #481 and SFYTT {Baby, it's Cold Outside!}


We're having the most beautiful snowstorm today and I couldn't be happier! The roads were okay when I took the boys to school and I've been able to just be home getting things done around the house. I was itching to get inky with this week's Color Throwdown Challenge as well as try this month's Reverse Confetti SFYTT. I was, much to my surprise, last month's winner, so I was able to get this adorable Happy Winter set and coordinating Confetti Cuts! Thank you so much, Reverse Confetti! Now...disclaimer here...I DID  use purple ink...I promise! It just looks very pink in the pictures for some reason. I used Wine Ink for the blended background as well as on the two hats. I also added in some old SU! Pale Plum ink as well.


I really love this color combination and I REALLY like it for this winter card! I don't think I normally would have thought of these particular hues for a card like this, but I do! If it wasn't for the new stamp set, the current SFYTT and the current Color Throwdown, I definitely would not HAVE made this card!


To begin,I set out blending some Wine Ink onto a panel of Bristol paper for a nice smooth blend. I wanted it to have an Ombre look, so I softened it at the bottom and added in some of the lighter purple. Do you like how I layed out the ink? LOL! I just couldn't resist making it look like the sketch! After I liked how it was blended, I spritzed it heavily with Frost Shimmer Spray. Once it was dry, I dry embossed it using THIS embossing folder for some fun texture! I thought it would work nicely with all of the images from the Happy Winter stamp set.


Next, I got to work on the hats! Aren't they adorable? I love how you can mix and match all of the fun pieces! I chose one with a pattern and one with a sentiment. I then decided that I'd probably better add a square, ha ha! I layered the knit image onto a square of Dark Roast cardstock. The image running down the left side as well as this knit piece are embossed using Wow! Puff powder for maximum snowy effect!

I cut off just enough of the blended piece so that you could see the embossed detail on the left side. I matted this entire piece onto a base of Dark Roast cardstock as well. I just love these colors together, but I think I already mentioned that!


As you can see, I definitely took a few liberties in the sketch...as I always seem too! I also added a few sequins for some added shine! Thanks for fluttering by!


Friday, January 26, 2018

You're Tie-rific!

What do you do when you have a masculine thank you card to make and there is an amazing SFYTT? Definitely go with it! LOL! I was planning on using this fabulous Tie-rific stamp set and coordinating Confetti Cuts, so it was perfect! Our fabulous and amazing Principal at my boys' school had to take a leave of absence and since I am the secretary for PTA, they asked if I could make him a thank you card. Actually, who am I kidding...they asked me because I make cards! Ha Ha!

For my card, I chose an old SU! pattern paper that looks like a man's shirt. I like that it is double sided so I was able to get contrast, but only use on piece. It happened to be my LAST piece of this particular pattern, so I couldn't make ANY mistakes! Guess what? I did! I'll fill you in on my crafty mistake erasing fixes throughout the post. LOL! I'm certainly not too proud to say I make mistakes! 


To begin, I started assembling all of my "sketch pieces". That's what I love about sketches...you simply compile a list of things that need to go on the card and then work from there. I absolutely LOVED my time on the SFYTT team back in the day! Those are still some of my favorite cards! I created an A2 top folding card base using Kraft cardstock. I then cut the patter paper to adhere onto the base. The argyle piece was cut and then layered onto a mat of Kraft paper for some added interest and durability. It is the reverse side of the pattern paper. I also added some machine stitching for some extra tailored detail. You can see some Father's Day cards I made last year using a lot of the same elements HERE.

The pocket is die cut using the same pattern paper. Now here comes the first mistake...I didn't realize that I had some kind of blemish on the paper. I was COMPLETELY finished with the card when I noticed it and since it was the last sheet of paper, I didn't have a large enough piece left to make a new pocket. I had to die cut a strip and adhere it in the middle to hide the blemish. You can probably see the seam now, can't you? But I'm betting you most likely didn't notice it before...at least I hope you didn't! Ha ha!

The bow tie is die cut from a piece of blue cardstock using the Simple Gift Bow die cut. When I used it on THIS card, I couldn't help but think it looked like a bow tie! When I added it to the frond of the card, realized that I needed a little bit of foam tape underneath the left side. I added some, but it was hanging down so you could see it. When I tried to lift it up, I ripped the card! Ack! I had to use one of my coordinating Copic Markers to color in the paper to have it match! The sentiment is heat embossed using gold powder for some added warmth and shine. I also added some little buttons as per the sketch, but they look so perfect, I was glad for the addition!
 \

Our school theme this year is "rock and roll" and our Principal has been a rock star, both figuratively and literally! He has done so many amazing things for our kids this year; slept on the roof of the school ALL NIGHT, dyed his hair,performed a lip sync in full Heavy Metal regalia for the students! He's been so much fun! So...I couldn't resist adding something fun and unexpected to the inside! I hope he likes it! Thanks for fluttering by!

Sunday, January 29, 2012

Tea for Two, Me and You

Hello! I know you all might just die of shock that I am posting. I needed a card...not just a quick card, but something a little more special. I have been doing a lot of "quick" cards; just to get by here and there, but not today. Not only that, but I needed a little "creative" therapy. For times like this, I find it is best to go to your tried and true stamps; for me it is "Tea for Two" from Papertrey Ink. I am a little rusty, too, so I needed something that I felt comfortable with. I also decided to use Jen's January SFYTT. Once I got to work, it seems like I haven't been away for so long.
This card is going to a sweet friend and I hope she likes it.

Once I got started, I realized that my color scheme was just a hair Christmasy, but maybe a little Valentinesy, too? Hopefully.

I thought the papers went well together, regardless. I used nestablities for the circle pieces, but hand-cut the tea pot, even though I own the die. I actually really enjoy cutting out that darn tea pot. Go figure! I guess it is part of the "creative" therapy I was in need of. The card is pretty straightforward, so rather than go on and on about that, I hope you don't mind me filling you in on some things that I have been up to in the last little while.

For starters, Rowan turned two! Can you believe it? We had a simple little family party for him and then took him to the local children's museum for some fun! He is so adorable! We went to Disneyland at the beginning of the month and had a lot of fun! The babies were both sooooooooo good! It was amazing! Rhys will be six months old on Thursday! I can't believe that one either. Where does the time go? He is sooooo good and so sweet, I just feel so blessed. Things get crazy with the two babies, but it is sooo much fun!!!! They actually nap at the same time in the afternoon which would give me some fabulous stamping time if I had my space all set up. Hopefully soon! I told my husband today to buy me a tuff shed and I will go set up shop in that! LOL! I hope that you are all well, too. I have some fun Valentine's Day projects that I am hoping to get done, so stay tuned. Thanks for fluttering by!

Friday, June 17, 2011

Plant Kindness, Grow Love *SFYTT*

When I said there would be a delay, I really didn't think it would be THIS long! I sincerely apologize. For those of you who read my blog regularly, know that I have given up my craft space. I am still homeless as far as a new craft space goes. It is making it VERY difficult to get to my supplies and create. It is driving me bonkers, but I know that it will be remedied in time. You will all be the first to know when it happens! LOL! In the mean time, I am trying to take care of my family, get things ready for the baby and have a fun summer!


For this month's sketch, I chose to use some Flourishes stamps which I love. I am really obsessed with geraniums this year. I have always loved them, but I made a special point to plant quite a few this year. Last year when I would take Emma to summer school, there was a house that had the most beautiful yard and as I took a closer look to see what it was about the yard that I loved, it was the multitude of bright pink geraniums that caught my eye. So....I decided to use the geranium image, of course.


The papers are from an old MME slab and the ribbon is from PTI. The focal image and slide are die-cut using Nestabilities. The image was stamped with Palette Black ink and colored using copic and prismacolor markers. Very straight forward; but I love this sketch and can see myself using it again and again!


I am watching three of my neices and nephews today, so I had better dash, but thanks for fluttering by! Don't give up on me, yet! LOL!


I hope you all get a chance to play along this month. This month's sketch would be perfect for all of the Father's Day cards we all need to make! It is simple and straight forward without a lot of fuss!

Saturday, June 4, 2011

SFYTT Delay!


hello! I just wanted to let you know that I will be a bit behind on getting my design using the new June SFYTT posted! Here is the sketch so you can get started, though! Have a great weekend! Thanks for fluttering by!

Thursday, May 26, 2011

Teacher's Apple

Tomorrow is the last day of school for my kiddos! I still don't have a "crafting space" but I needed to get the teacher's cards and gifts done regardless. My daughter has two teachers; one for the morning and one in the afternoon. On Friday's, one of them doesn't come at all, so I had to make sure I sent everything today. After all of my careful planning, my daughter told me that the other teacher wouldn't even be there for the last two days! Oh well! I told her to stick it on her desk and pray that she comes back to clean upI wanted an "Americana" theme for the cards since I had purchased the new "Apple Pie" hand soap and sanitizer from Bath and Body Works. I thought it worked nicely for a teacher. I am so proud of myself that I didn't use Olive and Red this year, like I usually do!


I used this month's SFYTT sketch and some left over Graphic 45 paper from this project. I had just enough to get the three cards done with a few scraps to spare. This month's sketch is sponsored by Your NExt Stamp and I think you still have time to take advantage of the 10 percent off sale. Check my last post for more info! I chose to use "Teacher's Apple" from PTI. It is the perfect set to have on hand when you have little ones going to school. I have used it every year since I bought it and have loved having it!


Everything is pretty straightforward, but I did use some super thin cork paper for the scallop around the focal image. It is super easy to punch and I love it. All of the buttons and ribbon are from PTI as well. I hope you get a chance to play this month; you still have a few days left.


The construction projects are taking much longer than expected. The sheetrock is all done in the bedroom, but it still needs to be taped and mudded (that doesn't sound right)painted, electrical finished, carpeted and then the fun part; moving all of my son's stuff downstairs! I can't even begin to work on the baby's room until all of that is done! This baby is coming whether we are ready or not! I am feeling great right now despite a big belly that makes it hard to bend over. We have had a ton of rain so the temperatures have stayed cool which has been a benefit for a pregnant gal! Once the heat hits, I think I will swell up like I did with Emma. Once all of the construction is done, my son is moved and the baby's room is done, I can focus on getting my space put together. Right now my crafting is on the "way" back burner. Thanks for fluttering by!

Saturday, May 7, 2011

Cute as a Button *SFYTT*


I can't believe it is already May! I think I say that at the beginning of every month, but seriously...where does the time go? I am happy that it is May and the flowers are blooming and the weather is warming up (at least some days here in Utah) and school is almost out. I can't believe my kids only have three more weeks! Well...since it is the first Saturday of the month, you know what that means....another great SFYTT! I really love this month's sketch and I think I will be using it often. For some reason I really like it when the sketch involves some sort of circle. This month's sketch is sponsored by Your Next Stamp. I love their sweet, fun and whimsical images. As you can see, they are offering a discount to all of the SFYTT particpants so you will definitely want to check it out.


I was in need of a baby card so I chose to use my go-to baby set from PTI, "Baby Button Bits". If you read my last post, you know that I have been in "stamping limbo" which is still the case. It took me forever to get all of the supplies to get this card done and I even simplified it. I can see why people don't stamp if they don't have a "space" to do it. I know that my situation is only temporary, but if it was going to be like this forever, I think I wouldn't stamp as much. So...for those of you crafters who don't have your own space, I feel your pain!!!!
For my card, I started with a Kraft base and used kraft for all of the mats and the focal image. The pattern paper is from My Mind's Eye and is quite old, but I love it and it worked out perfectly for the look and feel I was going for with this card.


I stamped the image using white ink and then colored the snail using a copic marker. I used my PTI die cut to make the ric-rac border and used the scraps from either side to add to the left edge of the card as well as the opening, too. Since my "supplies at hand" are limited, I opted to stretch what I already had, and I think it turned out great!

This is the sketch for May. I hope you all get a chance to play along. It's not too late to sit down and make a card for Mom! This sketch would be perfect! By the way, Happy Mother's Day to all of you Mother's out there!

You won't want to miss the other designers:!Jen Del Muro and New Guest Designer

We are proud to welcome Jen Tapler as the newest SFYTT sister!


Susan Liles ,

Amy Sheffer


Jodi Collins


Kerry Johnson Thanks for fluttering by!

Saturday, April 2, 2011

Egg*stra Special Friend *SFYTT*


It's the first Saturday of the month and that means a new SFYTT! The weather has turned warm; at least for a few days, so I thought I would make a springy creation! Spring is definitely one of my favorite seasons!

This month's sketch is sponsored by Unity Stamp Company.


For my card, I started out making all of the panels and pieces using "Pretty Pastels" paper from PTI. My stamps are also from PTI.


The stamping is actually quite minimal on this design. I kept staring at my stamps hoping to find something that required some coloring, but decided on this instead. I got so used to coloring during my guest designer position with flourishes, it seemed weird not to color.


Since the stamping was so minimal, I decided to spice things up by adding some tiny rhinestones to the centers of all of the flowers around the focal image, add some sewing. I also played around with the sentiment to give the card some more visual interest.


I was wishing I had some egg shaped buttons to go along the bottom, but I didn't so I just used some coordinating PTI buttons.
As you can see, this month's sketch has a lot of fun options, especially with pattern paper or different textures. I hope you all get a chance to play along this month! You won't want to miss the other designers! !Jen Del Muro and New Guest Designer and welcoming Terri Moore Amy Rohl ( we are saying goodbye to her (sniff, sniff) Susan Liles (she is sitting this one out) {HUgs} Amy Sheffer Leigh O' Brien, (we are saying goodbye to her as well (more sniffles) Amber Hight Megan Lock Sony Christoph Jodi Collins CAROLE Kerry Johnson Thanks for fluttering by!