Wednesday, March 30, 2022

Welcome to the Neighborhood

You might be thinking that it's Groundhog Day around here or something!  I made this pair of cards the day after I made THESE cards because I was in need of a "welcome to the neighborhood" card and didn't have a lot of time or brain power! ha ha! It was easy just to copy the same layout and paper choices but add in the cute birdhouses and flowers. I'm partial to creating welcome cards that are seasonal, so the Home to Roost stamp set (retired) was a perfect choice for these spring cards.

I made two, even though I only needed one, because I never seem to have any welcome cards on hand. That being said, I really need someone else to move in to the neighborhood before spring is over! ha ha! 

I thought it would be fun to make it look like the birdhouse was perched in a blossoming tree so I added these flowers from the Into the Blooms II die collection. I colored them with Distress Oxide inks and glued them together with foam squares and liquid glue.

I made a few extra birdhouses so I decided to create a coordinating tag for each card. I usually wrap the welcome gifts/baskets in cellophane so it's nice to have a tag to attach to the wrap.

To be honest, this is one of those "for me" posts, so I don't forget these cards when I need to make something quick in the future! ha ha! I have a tendency of copying myself when I'm pressed for time! Thanks for fluttering by!


Monday, March 28, 2022

Flying By to Say Hello!

I hope you're all having a great start to your week! I had some fun, crafty time creating this butterfly card for this week's Papertrey Ink Flash Sale! I chose the whimsical Flying By stamp set to use for this bright, floral design! When this set was first released last year, I chose to heat emboss the butterfly in white and then used the emboss/resist technique to add the color. For today's card, I stamped the outline in black and then used the multi-step stamps to add the color

I chose Aqua Mist, Hawaiian Shores, Harvest Gold, and Summer Sunrise inks to bring the butterfly to life. I have to admit that I like having the body of the butterfly black so that it looks realistic and stands out!
Once the butterfly was finished, I die cut all of the pieces (and two extra leaves) from the Into the Blooms II dies and then colored them with Distress Oxide inks. I've never used all of the blooms from this collection on one card, so this was fun to cluster them together for the butterfly to perch on.

The background was created by layering a white piece of cardstock that was die cut using the Cover Plate: Herringbone die. I glued it to a top folding A2 card base and then added some Aqua Mist ink near the center using a blender brush. I also added some Hawaiian Shores ink splatter.

I layered the leaves and flowers along with the butterfly. The "flying by" portion of the sentiment is die cut and stamped in black and added to the wings using foam squares. I heat embossed the "to say hello" portion using white powder onto a strip of True Black cardstock. I trimmed it down and carefully tucked it underneath the die cut sentiment. I finished it off with a sprinkling of glitter! Thanks for fluttering by!


Friday, March 25, 2022

Papertrey Ink March Release Day {Grateful to have you in my Life}

Hello and welcome! It's release day for all of the beautiful new products included in the Papertrey Ink March release! I'm always a big fan of the Into the Blooms series, so I was really excited to ink up a few more of these beauties for today's card!

I wanted to switch gears a little bit and go for something a bit dramatic! All of my spring and Easter cards so far have all been done up in pastels (which I LOVE), but it's always fun to try something different!

I die cut enough pieces to make two of each of the different styles of tulips, but in the end, I only used three which means I have three left over for another project in the future. I inked them up using finger daubers and Distress Oxide inks. The leaves are colored using Twisted Citron, Mowed Lawn, and Rustic Wilderness. The yellow tulips are colored with Squeezed Lemonade, Wild Honey, and Mustard Seed (with a touch of random brown and a touch of Abandoned Coral). The pinkish-red tulips are colored with Abandoned Coral, Festive Berries, and Barn Door. I also added a touch of Black Soot and Aged Mahogany.

The background is die cut using the new Cover Plate Decorative Circles adhered to an A2 black card base using liquid glue. I toyed around with the idea of adding some sort of frame to the middle, like the pierced feature frames, but in end opted against it so that more of the beautiful background could show.

I arranged the flowers and leaves how I liked using both liquid adhesive (for the stems) and foam squares for the leaves and blooms. I used Stampin' Dimensionals in black, which is perfect for the black card base.

I added some studio Katia gems and some glitter to the leaves and flowers. The sentiment, which is from the Perfect Pairs: Commodities stamp set, is placed at the base of the flowers for contrast! I had so much fun creating this! Everything from the new release will be available for purchase tonight at 10 PM ET. Thanks for fluttering by!


Thursday, March 24, 2022

Papertrey Ink March Release Countdown Day 4

It's the 4th and final day of the Papertrey Ink March release countdown! I have two cards to share with you today; up first is this floral card featuring a new suite of products called Dahlias. I used the new Dahlia stencils to create the background (I actually didn't use the stamps or dies). I chose to accent the beautiful soft stenciling by adding some of the Into the Blooms: Dahlia blooms and leaves.

I absolutely adore the way the life-like flowers looks with the stenciled ones in the background. 

The softness of the stenciled flowers allowed me the perfect spot to place the sentiment, which is from the new Just Sentiments: Quoted. I stamped it in black so it would pop against the purple.

Once the focal panel was complete, I added it to an A2 panel of Bitty Big: Aqua Mist pattern paper. The entire piece is adhered to an A2 card base.

I couldn't resist creating another stenciled background and I also couldn't help making this new Feathered Friends 21 Die bird look like the cutie from yesterday. Using the die cut pieces made it a little bit trickier, but I think he/she turned out pretty good.

I had a few leftover stamped pieces from my Posies and Sprigs card, so they turned out to be the perfect thing for this bird to rest/perch on.

Thanks for joining me for the countdown! Everything will be available for purchase tomorrow at 10 PM ET. I have a bonus card to share with you tomorrow using some of my new favorites! Thanks for fluttering by!


Wednesday, March 23, 2022

Papertrey Ink March Release Countdown Day 3

I can't believe it's already the 3rd day of the Papertrey Ink March release countdown! I'm sharing two cards today and up first is this floral card featuring the newest Feathered Friend! This particular bird has stolen my heart; I just think it's sweet as can be! My sweet sister sent me a digital card that featured a blue bird with a pink/blush tummy, so that was the inspiration for today's bird!


Once the bird was complete, I set it aside and used the new Berry Branch stencils to create this background panel. I added the Picket Fence that is die cut from white cardstock using foam squares to give it some dimension.

I die cut the flowers and leaves using a selection from the Into the Blooms II dies and colored them with Distress Oxide inks. I arranged them around the fence and then added the bird perched on upper flower.

The sentiment, which is from the new Inside Greetings: Quoted stamp set, is heat embossed in white onto a piece of vellum. I strategically added liquid glue to the back of the white letters and then adhered it to the flowers.

The small yellow flower in the upper left corner is a left over from my  next card. I thought it balanced out the yellow of the larger flowers and created a visual triangle.

My second card for today uses the new Posies and Sprigs stamp set paired with the new lace edge dies. This is a pair of dies that allows you to create these fun lacy corners. There are quite a few possibilities, but I just opted for a very straightforward approach.

As you can see, I'm really loving this particular sentiment; maybe it's because I feel so flawed lately! ha ha!

I added glitter and sequins, of course, to finish off this floral design!

Join me again tomorrow for the 4th and final day of the countdown! Thanks for fluttering by!


Tuesday, March 22, 2022

Papertrey Ink March Release Countdown Day 2 {You Make the World a Better Place}

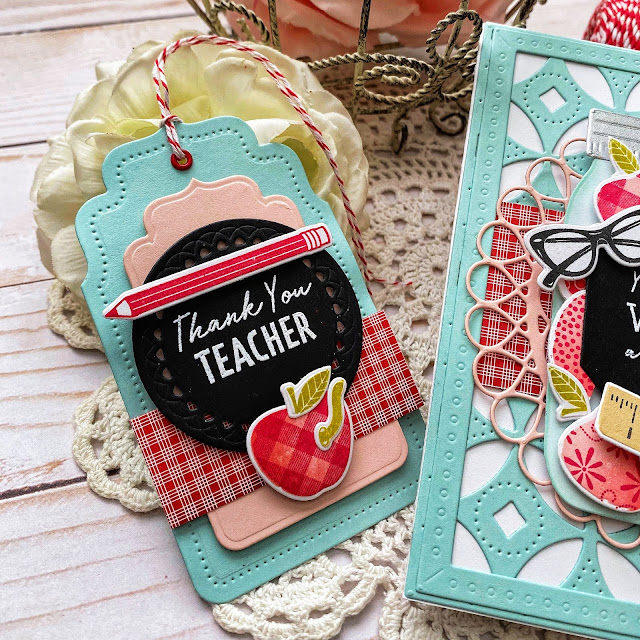
Welcome back for day 2 of the Papertrey Ink March release countdown! Even though it seems faraway, I know that the end of the school year and Teacher Appreciation Week will be here before we know it! With 3 kids in Elementary School I will be needing a lot of teacher thank you cards and gifts! The two new sets that will be showcased today are the Treasured Teacher and Treasured Teacher: Apple Prints stamp/die set.

I knew these cute new sets would work perfectly to accent the fabulous Go-To Gift Card Holder: Pencil Die. I had so much fun putting this together using some of my favorites!

As you can see, once you pull the eraser portion from the main portion of the pencil, it reveals a gift card!

The gingham apple and the floral apple are both from the new Treasured Teacher: Apple Prints stamp set, but the rest of the stamped images, including the stem, are from the Treasured Teacher stamp set.

My next project for today uses ALL of the apples from both the Treasured Teacher: Apple Prints stamp set as well as the apple from the Treasured Teacher stamp set. I inked up each apple using the solid apple image using Sweet Blush ink with a bit of Berry Sorbet ink. I added it in different places on the apples since I knew I would be putting them in the JAR.

I heat embossed the sentiment in white on black cardstock for a chalkboard look. I tucked the stems here and there as seemed fitting.

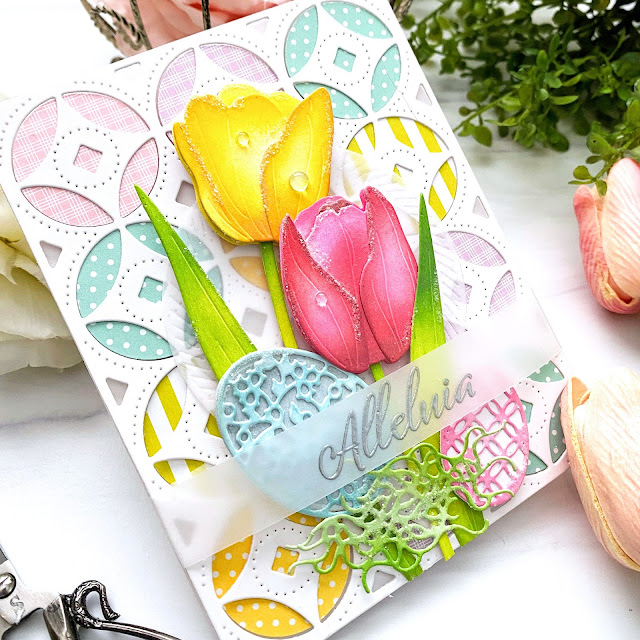
I'm OBSESSED with this new Cover Plate: Decorative Circles die! As soon as I cut it out of Aqua Mist cardstock, I thought it looked like a quilt. I couldn't get that idea out of my  head, so my last card for today uses it in a quilt-like way.

I couldn't resist creating a coordinating tag, especially to feature the darling worm emerging from the gingham apple! So cute!!!

Next up is an artsy card to showcase a few of the fun coloring tools included in the new Treasured Teacher stamp set; like the crayons and the paintbrushes!

I did some quick watercoloring on a panel of watercolor paper and let it dry. Once it was dry, I added the sentiment stamped in black.

From there, I simply added a few of the stamped pieces arranging them with foam squares. I spritzed the entire panel with shimmer spray and finished it off with a trio of sequins. The watercolor panel is adhered to a Soft Stone card base using foam squares.

And last, but not least, is my "quilt" card! This was such a fun and easy background to create and would be perfect for a baby card, seasonal cards, etc.
I used a 1 1/4 inch circle punch to cut the 5 different colors of Bitty Big paper. I chose to use the smallest of each of the patterns to keep the scale right for the project. 

The entire panel uses 12 circles and the punch made it so quick and easy to get everything cut. I turned the Cover Plate over and added glue to the where the center of each circle would be {you can see the smaller pierced circle and diamond in the center}. From there, I simply placed the punched circles over the glue, making certain to have the pattern that I wanted to show go on facing the right direction. You will be working backwards since it is turned on the wrong side. Hopefully that makes sense.

It didn't matter where I placed the polka dot patterns, but I paid special attention to make sure the plaid and striped patterns were straight.

I thought this background would make a beautiful Easter card, so I colored a few more tulips and leaves and added in a few Elegant Eggs.

I think I may need to apologize up front for how many "quilt" cards you may be seeing in the future! ha ha! Thanks for fluttering by!


Monday, March 21, 2022

Papertrey Ink March Release Countdown Day 1 {Everything's Coming Up Tulips}

Hello and welcome to day 1 of the March Papertrey Ink release countdown! I've been anticipating the time when the tulips will be blooming, but in the meantime, these paper tulips will have to do! I can see the tips of the leaves poking their way through the dirt, so I know they're on their way! My first card for today uses the new Into the Blooms: Tulips dies along with the beautiful new Elegant Edges: Lace die. I've also used one of the new sentiments from the Just Sentiments: Quoted stamp set to finish it off.

The Into the Blooms: Tulips die collection includes two styles of stems, two leaf options, and three different blooms that allow you to create realistic bunches of gorgeous tulips! I die cut all of the pieces I would need for this card from white cardstock and then colored the different pieces using Distress Oxide ink.

The background was created by adding some Aqua Mist ink to the base of an A2 card near the bottom. I also added some Hawaiian Shores ink splatter. The sentiment is stamped in black. I used the placement of the sentiment to determine where I would cut the lace portion. I simply used some Washi tape to secure it in place and then ran it through my die cutting machine. You have the option to allow the lace portion to float on a panel rather than cutting the scalloped border at the bottom. I chose to keep die intact to cut the edge; if you don't want that, simply cut the dies apart. I can't wait to explore even more design possibilities with this beautiful new die.

I added the same ink blending to the lacey panel and then adhered it to the card base using foam squares. The tulips are arranged using liquid glue and foam squares. I finished it off by adding some glitter and a few rainstones.

This next pair of cards uses the new Vase Collection 8 stamp/die set. I absolutely adore this weathered watering can; just perfect for the new Totally Tulips stamp/die set.

I chose to use the large cluster of tulips that is offered in the stamp set, but it also has single blooms, stems, and leaves so you can make a custom bouquet. I did add in two of the single leaves to give the clusters more depth.

Once the tulips and watering cans were stamped and ready to go, I got to work on rest of the design elements. I felt like the new Picket Fence die was begging to be the backdrop to show off these new tulip stamps! I created the ink blending on the background for both cards the same way as I did on the first card. I used foam squares to pop up the fence die cuts.

Please note: I stamped the sentiments, which are also from the Just Sentiments: Quoted stamp set, at the top and then adjusted the height of the fence die cuts to make them the right size.

I added more visual depth and interest by adding a few flowers and leaves from the Into the Blooms: II die. I love how well they work with the tulips!

That's all for today, but join me again tomorrow for A LOT more inspiration! I have so much to share with you! Thanks for fluttering by!