Showing posts with label Easter. Show all posts

Wednesday, April 16, 2025

He Has Risen, Just as He Said

Well friends, this is the last "leftovers" post using bits and pieces from the last few months of crafting! I was so pleased with how many pieces I was able to use since I had worked so hard ot create each and every piece. I mentioned before, but I didn't end up throwing much away at all, which made me so happy! Now I have a nice clean slate for all of the fun events and things that happen at the latter part of spring, so stay tuned for all of those fun projects coming your way soon!

I decided to create a floral bouquet using different flowers from three different projects. The tulips are from THIS collection of cards and the forget-me-nots were made for THIS release; the honeycomb chick box/basket.

The other floral clusters were leftover from yesterday's post from The Greetery.

I chose to add some blue ink and splatter under the flowers to anchor them a bit and then stamped the sentiments using the Hymn Sing: Easter Refrain stamp set.

It felt a bit naked, so I used the photo corner die from the retired Fairytale Christmas kit from PTI. I layered it at an angle on some of the large gingham paper I've been using this spring. I don't normally put things on angles, but you couldn't see any of the white on the gingham paper if it was straight and I liked the white! ha ha! I hope you all have a wonderful Easter celebrating the miracle and wonderous gift of our resurrected Lord and Savior, Jesus Christ! Thanks for fluttering by!


Monday, April 14, 2025

Christ the Lord is Risen Today!

Hello and welcome! I'm back with the third card using up leftovers from past projects, so thanks for joining me today! This card came together the fastest: I had stamped the background panel for the Bunnies and Bow release, but it was slightly crooked so I didn't use it on my release project! I'm feeling quite proud of myself that with the arrangement of flowers and some creative cutting, it's not crooked at all!

I stamped the panel using the Hymn Sing: Christ the Lord is Risen Today Stamp and then the flowers, which are leftover from THIS card. I think in that post I mention that I stamped two of everything and so here is what I did with the second set!

I stamped the Happy Easter sentiment, which is from the Hymn Sing: Easter Refrain Stamp Set, in black at the bottom for some contrast.

I really like how soft and pretty this card turned out! I have one more card to share, AND as mentioned on my first "leftovers" post, you will see I was running out of leftovers! ha ha! Thanks for fluttering by!


Saturday, April 12, 2025

Easter Blessings

As promised, I'm back with my next card using all of the leftover spring/Easter pieces from previous projects. While this card has quite a few little pieces, it came together in a snap because I already had all of the pieces ready to go! It was all just fun as I used things here and there!

The background for this card was all ready to go because I thought I messed up on one of the my backgrounds for the Bunnies and Bows collection, but I realized my mistake would be covered, so I abandoned the second background which ended up coming in handy for this card.

I had the focal panel cut from the  Love to Layer: Laced Edges Die all ready to go as well so it was just a matter of adding all of the sweet details.

The Bunny Tales and Easter Blessings sentiments AND the bunnies and frame are all from the Bunny Tales Stamp Set. I have had so much fun with this particular set this spring; it's going to be hard to put it away until next year!

Another bow from the Tiers of Cheer: Easter stamp set found its way to the top of the frame, but I just love the fresh aqua with the purple! The two pansies are from THESE cards and I just love cute they look at the bottom of the frame! I tucked a few floral clusters from an upcoming project from The Greetery, so stay tuned for that! I love how this card turned out and I have to say, it was so nice how quickly it came together because all of the pieces were ready to go! Thanks for fluttering by!
P.S. I still have two more cards to share so be on the lookout for those!~


Thursday, April 10, 2025

Easter Tiers of Cheer

Spring is definitely springing around here which means it's just about time to be winding down with Easter crafting! ha ha! Go figure! But, we all know how things work in the papercrafting world and there's always something new and exciting just around the corner! I took some time to clean up my desk and in doing so, I needed to either throw away all of the leftover bits or put them to good use! I had put so much time and effort into creating them, so I decided putting them to good use was the best option! So, that means I'll be sharing 4 projects over the next week or so leading up to Easter that showcase all of the leftover bits! I'm also just not quite ready to say goodbye to all of the sweet early spring things like bunnies, chicks, eggs, bulb flowers, etc.

Also, because I was pulling bits and pieces from all sorts of different past-projects, there will be quite a bit of mixing brands, so just be aware. I will link everything so you know where it comes from.

My first card uses the darling new Tiers of Cheer: Easter Stamp Set. I made 3 cards for the release using this particular stamp set so I had quite a few leftover pieces to pick and choose from. The background was from a card I was hoping to make using the Love to Layer: Scalloped Diamonds Die and turning them into kites, but I just couldn't make it work so I had this extra ink blended and splatter panel. It was actually the perfect backdrop for the tiered tray.

I had so much fun "decorating" the tray using all of the leftover pieces. I also found that the leftover florals from the  Bitty Botanicals Stamp + Stencil were the sweetest addition to the tray, tucking them in bowls, the watering can, etc. This is my favorite card using this set and I think it's because of the addition of these sweet florals.

The Easter sentiment was leftover from my projects for the Bunnies and Bows release and is from the Spring Crest Stamp Set. I also used one of the companion sentiments for the He Is Risen portion, which is stamped directly on the tray. When I spritzed the card with shimmer spray a large drop ended up on the sentiment....ugh! I can't decide if I should just leave it or fix it! I was beyond bugged but things like that happen and it's not the end of the world since I CAN stamp another one.

The bow on the aqua bunny on the bottom of the tray is from the Bows Galore Die and I just love how it looks on this cute bunny. I like it better than the stamped bow on the watering can. I had so much fun creating this card and it used quite a few of my leftover goodies. I did end up throwing away any remaining pieces from the Tiers of Cheer stamp set because there wasn't enough of anything to make another card, so unfortunately, those ended up in the trash. Join me again soon for my next card! I will be sharing them in the order I made them, not that it matters, but you will see how I started running out of things to use, but I was proud that I used almost every last little piece! ha ha! Thanks for fluttering by!


Friday, April 4, 2025

The Miracle of Easter

Hello friends! My Easter stash is growing and I'm so excited! I'm also excited that Easter is so much later this year than it was last year so I have ample time to make special preparations! As you can see, I made two cards to share with you today using the same basic elements with different sentiments.

To begin the pair, I die cut all of the pieces for the tulips using the Into the Blooms: Tulips Die from white cardstock and then colored them using distress oxide inks and finger daubers. I used a combination of liquid glue and foam squares to assemble the blooms.

For this card I used the Thoughts of Easter Sentiments Stamp Set; I stamped the verse in black on Lilac Grace cardstock and then stamped the Rejoice! on white and die cut it using the Thoughts of Easter Sentiments Die.

The background on both cards is the same. I used the Fantastic Front: Scalloped Frame Die and cut it from white cardstock. I added it to an A2 panel of Lilac Grace cardstock using foam squares. I added the tulips to the center of the Rejoice card using foam squares and added teh sentiments.

This card features the Reflections February stamp set and the coordinating Reflections: February Die. I heat embossed the verse in white and then die cut it out. I prefer to do the embossing first so it won't warp the die cut piece.

I added the sentiment to the background panel and then arranged the tulips around the edges. Each card got a few dew drops on the leaves and tulips for a fun springtime effect. Thanks for fluttering by!


Wednesday, March 26, 2025

Project Inspiration {Love and Happiness on Easter}

It's my turn for this week's Project Inspiration from Papertrey Ink (actually last week) so I wanted to share it here with more detailed steps and instructions.

This card was a joy to create and came together quite quickly once I figured everything out. It should go a lot quicker if I were to recreate it or for those of you who'd like to give it a try.

To begin, I created the background using the watercolor stencils included in the Elegant Notes Stationery Kit using Aqua Mist, Pale Peony, and Lilac Grace ink. I trimmed it down to measure 4 by 5 1/4 inches.

I used the Elegant Eggs Die to create the eggs. I cut everything from white cardstock and then used ink and blender brushes to add the color. I adhered them together with liquid glue.

I used the Bows Galore Die to create all of the bows. Once again, everything was cut from white cardstock and then I colored them with ink and blender brushes.

I stamped one of the Easter verses included in the Thoughts of Easter Stamp Set with black ink.

I arranged all of the eggs, bows, and butterflies using foam squares and liquid glue.

I added the Rejoice portion of the sentiment, added the panel to a top-folding A2 Pale Peony card base using foam squares.

I added a generous spritz or two of shimmer spray and some glitter to finish it off!

This was such a fun card to create and I've added it to my growing stash of Easter cards!

Thanks for fluttering by!


Monday, March 24, 2025

Rejoice! {Easter Wishes}

Hello and welcome, friends! I'm happy to be here today sharing an Easter card using some of my favorite springtime products!  My project for today features the beautiful Into the Blooms: Spring Nest Die that was released last year and continues to be a favorite of mine. I use the flowers and foliage for all kinds of floral projects year-round!

To begin this card, I die cut the large pieces for the nest once, but all of the other pieces I cut four times so I would have a lot of options once I started "building" the nest! I die cut everything from white cardstock and then colored the pieces with PTI inks and blender brushes. I used liquid glue to assemble the flowers and the stems on the leaves. The nest was also put together with liquid glue. I have used foam squares in the past to give the next depth, but I didn't do it this time and I think it turned out fine.

The eggs are also colored with ink and then I used the old SU! color spritzing tool and a brown marker to add the splatter to the eggs, which I think adds realism to the eggs. 

I used the largest and middle sized flowers to stack together to create a fuller looking bloom and added interest. I used a stylus and a foam mat to give the flowers the cupped shape and then carefully added the small centers using liquid glue. For the smallest flower centers, I colored them with a green marker for ease.

I cut a panel of Spring Moss cardstock measuring 4 by 5 1/4 inches and then used the Simple Stitch Crochet: Large stencil collection for the pattern. I only used one of the stencils to give the appearance of leaves rather than crochet. I used a light hand with Ripe Avocado ink and then added some additional ink around the edges for dimension. I also die cut one of the beautiful scalloped borders included in the On the Edges: Scallops Collection Die and secured it to the stenciled panel using 1/8 inch ScorTape.

I used the largest die included in the Love to Layer: Arches Die set, blended a hint of speckled egg distress oxide ink around the edges, and then stamped the sentiment from the Thoughts of Easter Sentiments Stamp Set in black at the bottom.

The Rejoice! sentiment is from the same set and I used the coordinating Thoughts of Easter Sentiments Die to cut it out. I used small pieces of foam squares to add it to the nest. 

I used a piece of pattern paper from a retired collection called Pretty Pastels and adhered it near the bottom and then layered the arch over the top using foam squares. 


I glued the entire background onto a top-folding A2 card base using liquid glue and then added the He is Risen sentiment to the inside (not shown) with a few additional eggs. I gave it a few spritzes of Shimmer Spray and called it done! Thanks for fluttering by!


Thursday, March 20, 2025

The Greetery {Bunnies & Bows Collection}

Hello and welcome, friends! I'm thrilled to be here today sharing projects made with the oh, so sweet Bunnies and Bows Collection from The Greetery! This is such a fabulous collection of products to usher in spring and even use year-round! Before I dive into the details of my projects, you'll want to be aware of a few details; first, you can read all about each of the new products on The Greetery Blog for the official "meet and greet". Next, make sure to leave a comment here, and on each of the designers' blogs for a chance to win one of 2 $50 gift certificates to the shop! The new release will be available for purchase on Friday, March 21st at 10 am EDT.


My first card for today features the adorable new Bunny Tales stamp/die set. Half of the designers chose to use this set with a non-book theme and the other half will be showcasing it with the previously released Have a Spine Die, etc. to show how cute it is to create a storybook type card. As you can see, I'm part of the non-book half and I've chosen to create an Easter card just bursting with springtime joy!

My oldest son was born in April, so Peter Rabbit has been a part of his/our life since day 1. This sweet Bunny Tales stamp/die set reminds me so much of those precious Peter Rabbit days. 
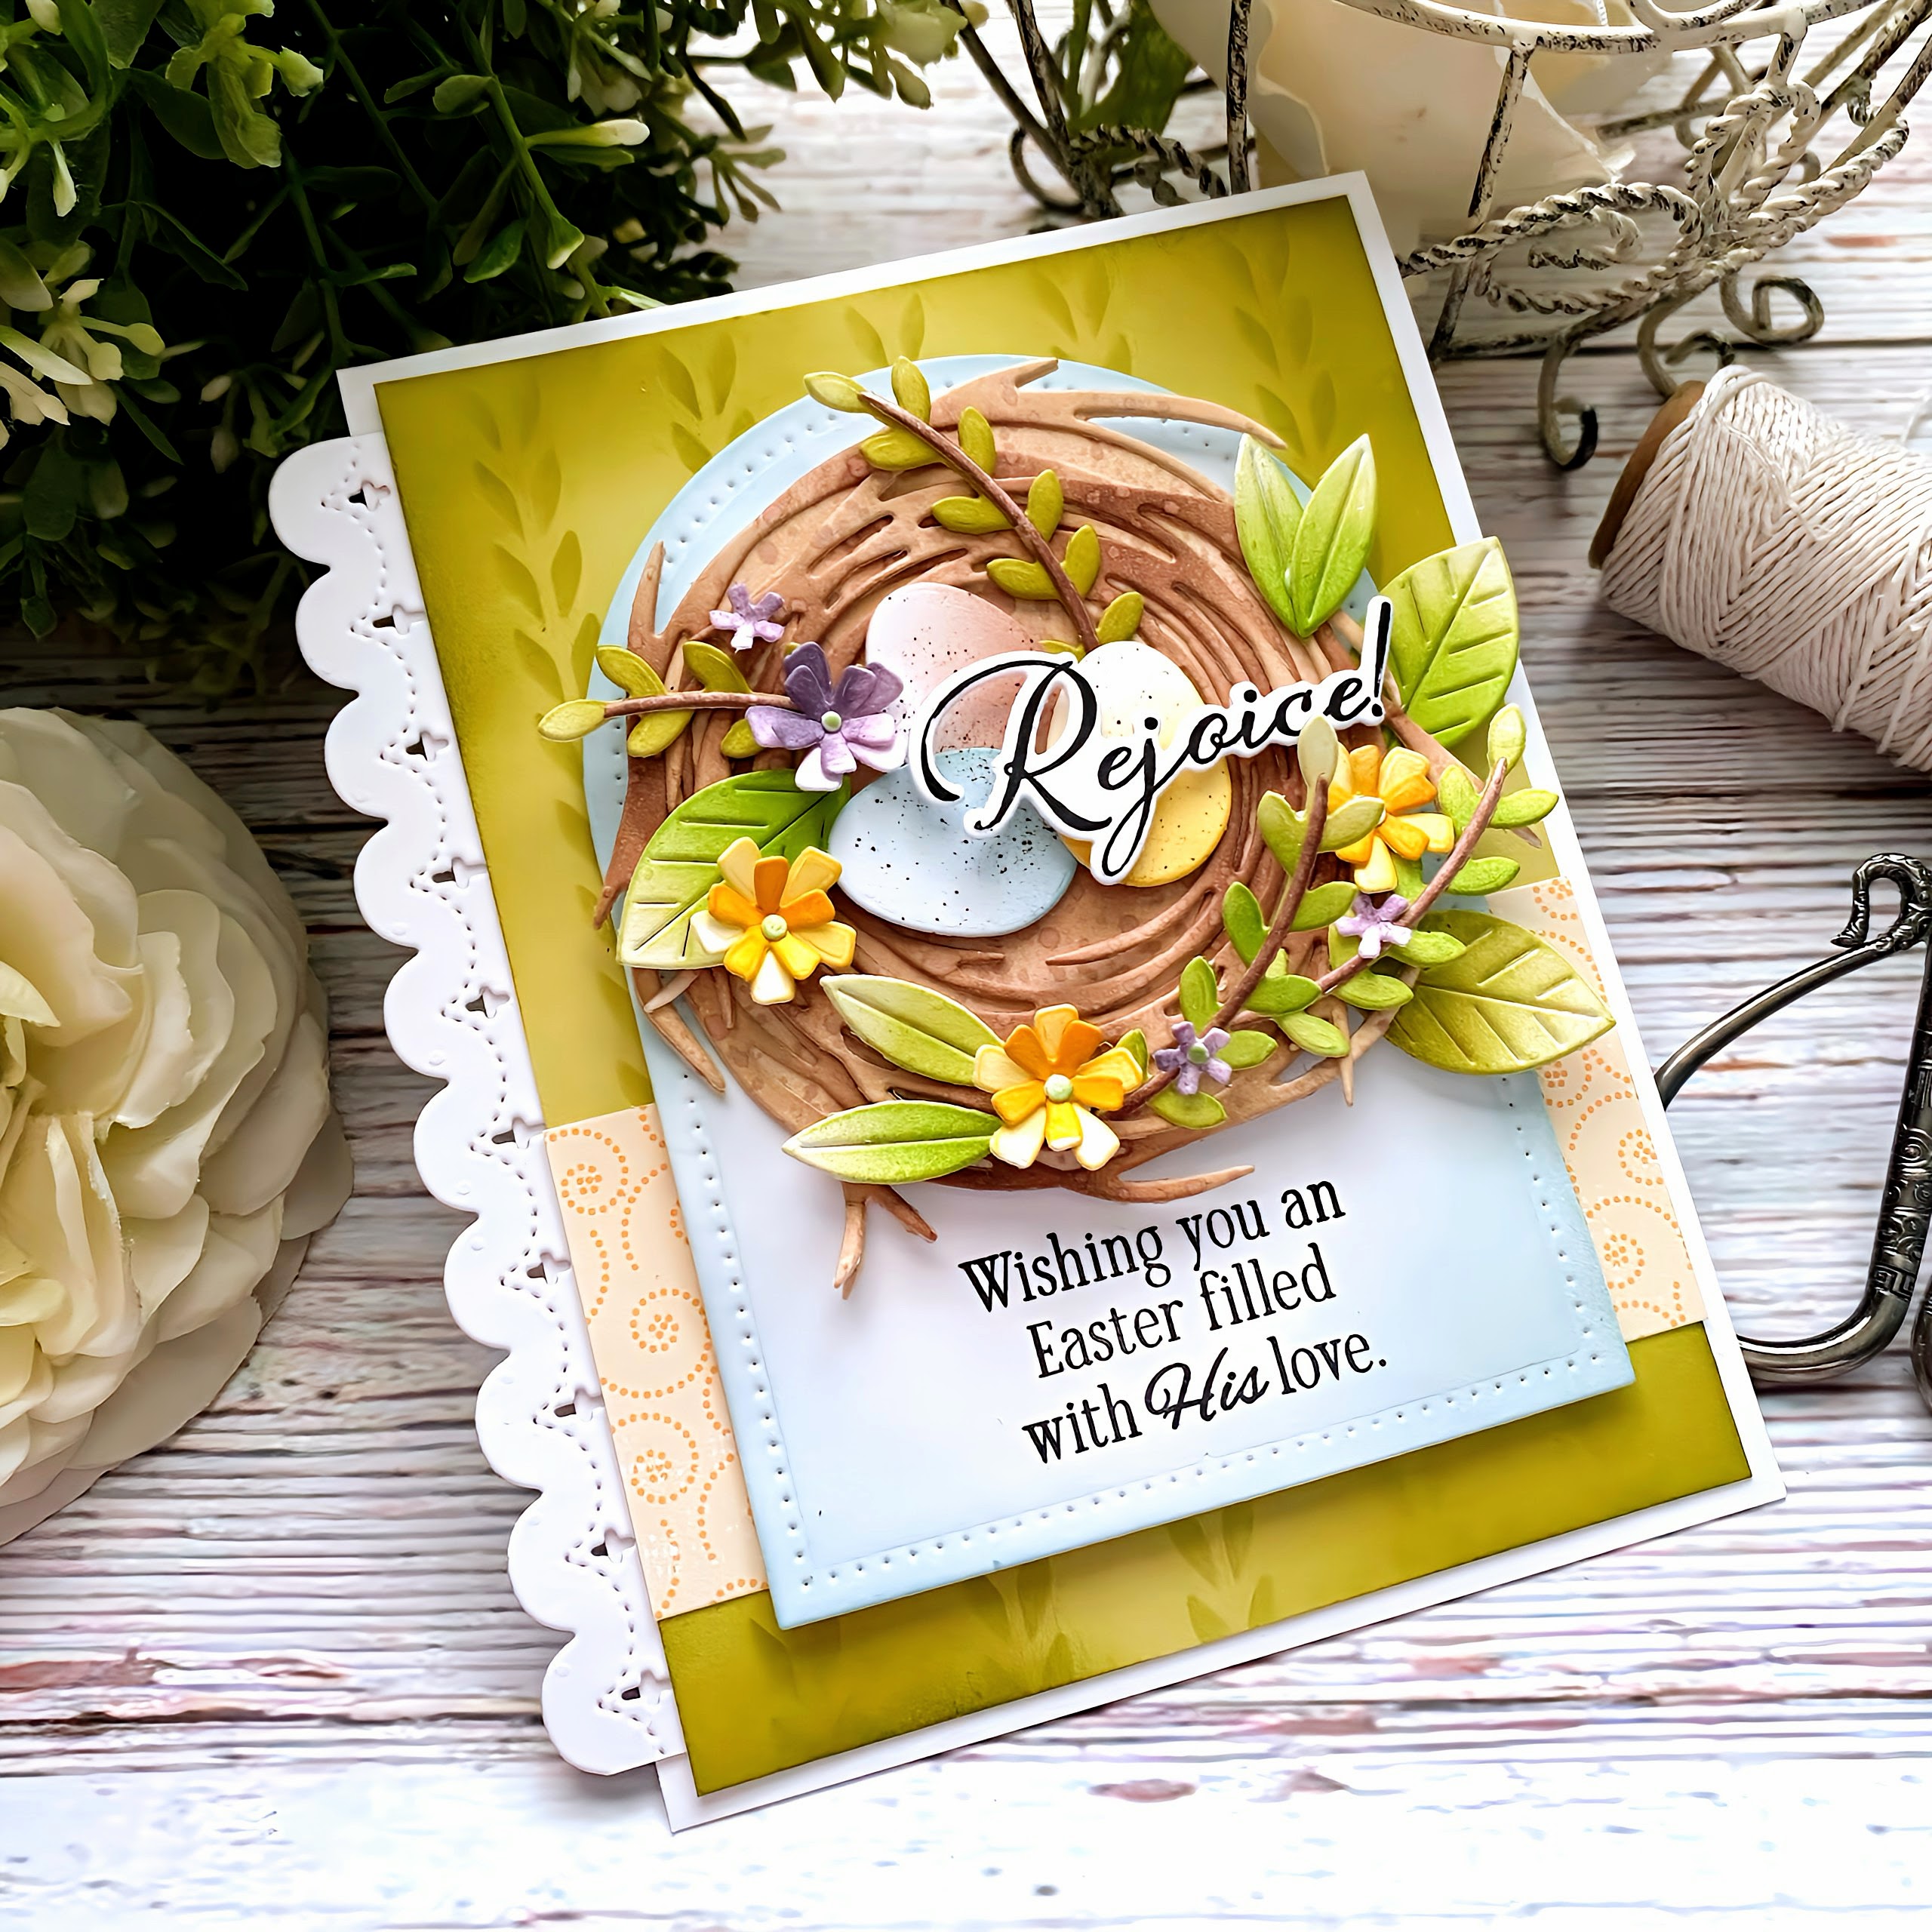
To begin this card, I die cut all of the pieces included in the Bunny Tales Die and got to work stamping everything with the Bunny Tales stamp set. I knew I would be making an Easter or spring card, so I only stamped a few of the smaller sentiments and the large Bunny Tales image. 

I'm obsessed with the cute line-art bunny pair; I stamped it in Classic Kraft ink and then added a bit of shading using the same ink and a blender brush. Each bunny got a pom-pom tail that will be available for purchase with the rest of the Bunnies and Bows Collection. The frame was stamped in Certainly Celery ink and adhered to one of the arches included in the A2 Arches Die.

I die cut the background using the A2 Stitched Scallops Die and then added the gingham pattern using the Scalloped Gingham Stencil. I used speckled egg distress oxide ink and then twisted citron for the border. I layered it onto a top-folding A2 card base using foam squares.

I placed the Bunny Tales sentiment at the top and then added the focal arch . The bow at the top and the flowers are included in a new suite of products that I'll be showcasing after the next project.

Cheep, cheep! How cute is this Hey Honeycomb Chick? I just can't get over her! And, Mr. Bunny is trying to steal the show over in the corner! ha ha! This project is a basket/box with a handle, but it's a little tricky to tell from the photos. I have a few close-ups later on that will hopefully allow you to see it a little bit better. That being said, if you're not a 3D project kind of person, the front of this box is A2 sized so you could use this same idea for a card!

This cute chick is just like the other Hey Honeycomb products. I die cut her from Lemon Tart cardstock and then added some ink around the edges for some depth and dimension. Since this is a basket/box, I opened up the honeycomb for maximum cuteness, but there is a coordinating Hey Honeycomb Spring stamp set that features all kinds of cute sentiments so you can let the recipient know how to open and stick the honeycomb if you're going that route. I used one of the sentiments from the set and then die cut it using the Sentiment Suite Basics Die.

For the handle, I used the Ribbon Maker: Petite Scallops Die and then secured it to the sides of the box/basket using brads. I knew it would be important to be able to swing the handle forward or backward to fill the basket or to take goodies/gifts out.


This gives you a side view; it measures 4 1/4 inches wide by 5 1/2 inches long with a 1 inch side. I was using an 8 1/2 by 11 inch piece of cardstock, so I was limited with the measurements. You could definitely use larger cardstock to make a bigger size, but this would be perfect for a set of notecards, treats, and small Easter gifts.

I added some spring color with clusters of flowers using the BotaniCuts Forget-Me-Nots Die. I haven't used this die in quite some time, so it was fun to get it out and create these cute little bouquets. I thought the Winter Medley die deserved a much needed break! ha ha!

I pulled out the Ribbon Frame Die and coordinating Ribbon Frame Stencil to frame this cute chick.

As I mentioned before, Mr. Bunny is trying to steal the show; he is equally cute and is part of the Bunnies and Bows release! I can't wait to see how the team has used this cute suite of products!

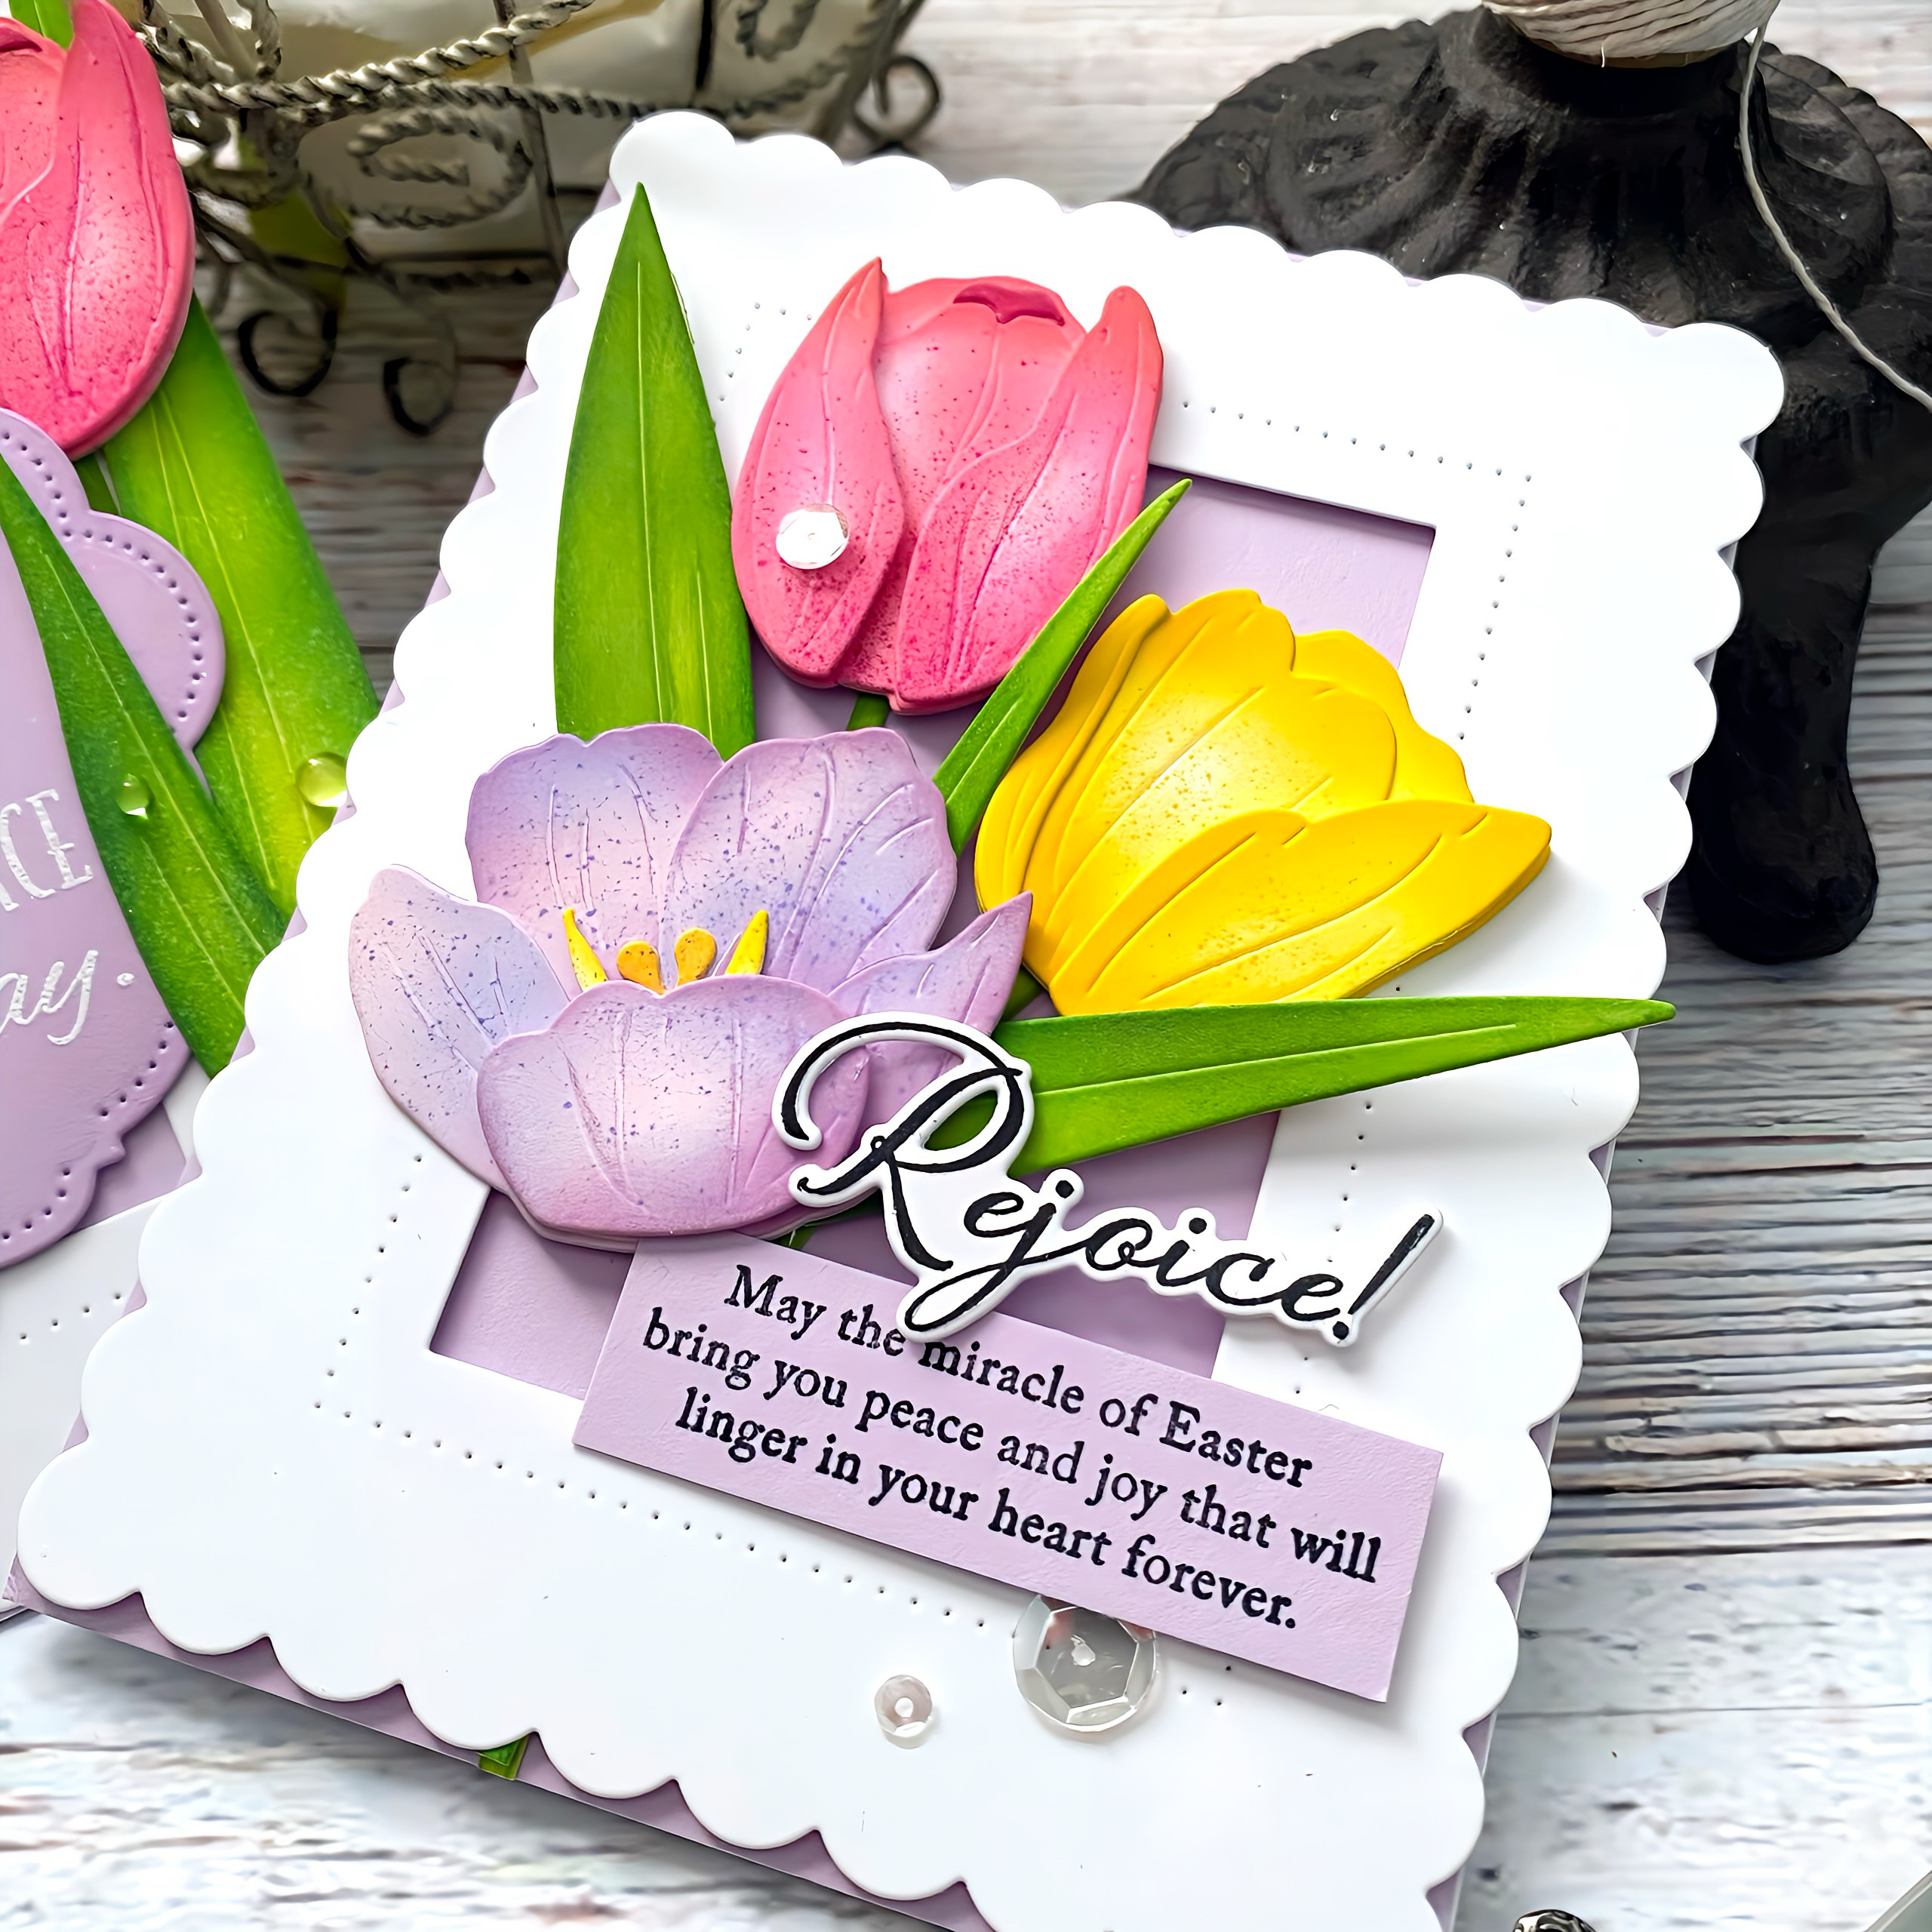
My next project features the new Bitty Botanicals and Diamond Ribbons paired with a few things from Bunny Tales because it's just too cute! To begin this card, I used the new Diamond Ribbons stencil on a panel of Powder Green cardstock. I blended some Mint Julep ink to give each of the diamonds some shading for depth.

I used the Diamond Ribbons Die and glued it over the top using liquid glue. I added the little dots at each of the joints using liquid glue. The bows that I used on this card and on the Bunny Tales card is also from this Die. It comes with an assortment of different shapes and sizes.

The flowers were created using the new Bitty Botanicals Rubber Cling stamp and the Bitty Botanicals stencil. You stamp the stems and then add the blooms using the stencil; this creates a lovely panel that can be used as a background, or you can use the coordinating die that cuts them all out at once and use them individually as I've shown here.

I added some details with colored pencils and then popped them up all around the focal panel created using the Bunny Tales Stamp/Die.

If you snip the dies apart that are for the frame, you can use it a few different ways; I die cut the frames first, then snipped them apart to create a "backer", but it will be easy to use washi tape to line them back up for future projects.

I left the bunnies bare....no shading so you can see how cute they look just left alone, too! They did both get a pom-pom tail, though...just too cute to resist!

The sentiment is also from the Bunny Tales stamp set.

My final projects for today feature the beautiful new Spring Crest Stamp/Die set paired with the Hymn Sing products....I just can't get over how elegant these new products are!

This is the direction that the new Spring Crest Stamp/Die was designed to go, but my other card shows it the other direction for options.

The Lilies are upside down, but I don't think it looks out of place! This card uses the Hymn Sing background stamp, but I omitted the title of the song by covering it up with a post-it note so I could stamp one of the arched sentiments from the Hymn Sing stamp set.

The "Happy Easter" sentiment is included in the Spring Crest Stamp/Die set.

The sentiments and sheet music are stamped using Stampabilities Gold pigment ink.

The background is stamped in Pale Peony and the focal sentiment is also stamped in gold.

Please note: the focal sentiment piece is die cut using the Crest No 3 die and doesn't necessarily need to be used with the Spring Crest stamp/die.

Well friends, this concludes my post for today! Everything will be available for purchase tomorrow at 10 am EDT. Don't forget to leave a comment here, and on each of the designers' blogs, for a chance to win one of two $50 gift certificates. Thanks for fluttering by!


Kelly Lunceford (you are here)