Showing posts with label sewing themed cards. Show all posts

Friday, March 14, 2025

The Greetert {Thanks SEW much}


Hello and welcome, friends! I'm popping in today sharing a pair of cards featuring the Handiwork Collection. This is one of my all-time favorite collections, but I haven’t created with it NEARLY enough! I absolutely love doing embroidery, so it’s always fun to play with stamps/dies that align with other hobbies and passions. 

I knew I wanted to make two cards; one with a round hoop and one with an oval. To begin, I die cut the hoops using the Hoopla Oval Die and the Hoopla Round Die. I cut the hoops from white and then colored them with sponge daubers and distress oxide ink. I also used the same dies to cut out the hardware for the hoops using both gold and silver cardstock for that realistic metal look. I glued the hardware to the hoops using liquid glue.

I used the Hoopla Round Inserts Die and the Hoopla Oval Inserts Die to cut out the portion to fill the hoops. I glued the hoops over the top and set them aside to dry while I got to work on all of the embroidered elements. I decided where I wanted the sentiment for the oval hoop, so I stamped that as well. Both cards feature sentiments from the Sew Vintage Stamp Set.

 I used the Embroidered Blooms Die and cut everything from white cardstock and then colored each piece using sponge daubers and distress oxide ink. I layered them over the top of the hoops/inserts with exact placement and then used Press n’ Seal wrap to lift everything up all together and then applied glue to the back. Once that was done, I simply placed it back where I laid it out originally, pressed it down until the glue set a bit, and then removed the press n’ seal wrap. This is one of my favorite techniques/tools to use for this type of a project!

I used the Notionable Die for the scissors and the thimbles. I cut them from gold cardstock and also from Kraft cardstock. I glued each gold piece to a Kraft piece to give it added stability. I find that metallic cardstock has a tendency of curling and it’s not as thick as regular cardstock so like to reinforce it. Once that was all done, I used a gold brad to secure the scissors together. I bought some of the cute Screw-top Mini Brads that are in the shop, but do you think I could find them? Nope! Argh! Once I find them, I will be putting them right next to the Notionable Die so that they are always together! Ha ha! Needless to say, that would have been MUCH cuter! ****edited to add****guess what I found? ha ha!

For the background, I used the Embroidered Background  on two A2 panels of Concord & 9th Nectar cardstock using Saltwater Taffy for the oval hooped card, and Tattered Rose for the round hooped card. I did trim down the panel for the round card to measure 4 by 5 ¼ inches. I stamped the other sentiment directly onto the nectar panel in black ink and then added the hoop using foam squares.

I thought I’d reinforce the “love” theme and add a few of the corners included in the Romantic Corners Die from the recent Bibliophile release. I attached both panels to top folding A2 Vintage Cream card bases. I added the scissors using foam squares, with the ability to move the scissors on the round hoop card; I just love how fun that is! I hope you’ll take some time to revisit one of your favorites, but perhaps neglected, collection and have some crafty fun! Thanks for fluttering by!Handiwork Collection

Friday, August 11, 2023

The Greetery {Sew Grateful For You}


Hello friends! I'm happy to be here today sharing a fun card using products from the Handiwork Collection rom The Greetery! I’m currently obsessed with the Rose Tapestry Stencil so that was the starting point for today’s card. I’ve mentioned it before, but there is something so magical about watching a background come to life with layering stencils! I have a tendency to just stare at them mesmerized and tempted to just leave them as is! That being said, I don’t think Betsy would be very impressed if I just shared a stenciled panel! LOL!
I’m particularly smitten with the rose that’s almost in the center, so I chose to frame that particular rose using the Hoopla Round Die. I die cut the hoop from white and then colored it using a few brown Distress Oxide inks. The silver ‘hanger’ at the top is also die cut once from white cardstock and then one more time from silver cardstock for realism. I simply glued the two together for a sturdier piece and then glued it to the top of the hoop.
 I die cut the ‘sew’ word using the new Stitched Sentiments Die using black cardstock for contrast. I strategically glued it to the hoop using liquid glue and then added the hoop to the background using foam squares for dimension. I chose to accent the ‘sew’ word using the ‘grateful for you’ portion of the sentiment found in the Stitched Sentiments stamp set. I heat embossed it in white onto a black strip of cardstock for contrast.
I die cut and stamped flowers and leaves from the Floral Sampler stamp/die set using Distress Oxide inks.  I arranged them around the hoop and sentiment until I was happy with the arrangement.  I did use the French knot dies from the Embroidered Blooms Die to add to the centers of two of the flowers; it just gives it some variation and added detail. That’s what’s so great about this collection…. you can mix and match things to your heart’s content!
For those of you that saw my Rose Tapestry card for the release, I used the Aida Cloth Texture Plate over the top of the stenciled panel and I absolutely LOVED the texture and feel that it gave that card, but for today, I chose to leave it ‘as-is’ for something a little bit different.
I had so much fun creating this card to add to my thank you card stash; it is currently depleted after a round of thanking a few friends who helped me a few months ago. I love how unique this particular card is with all of its ‘sewing’ charm! I like having all different types of cards in my stash to have on hand for just the perfect time! Thanks for fluttering by!

Thursday, July 27, 2023

The Greetery Handiwork Collection Day #2

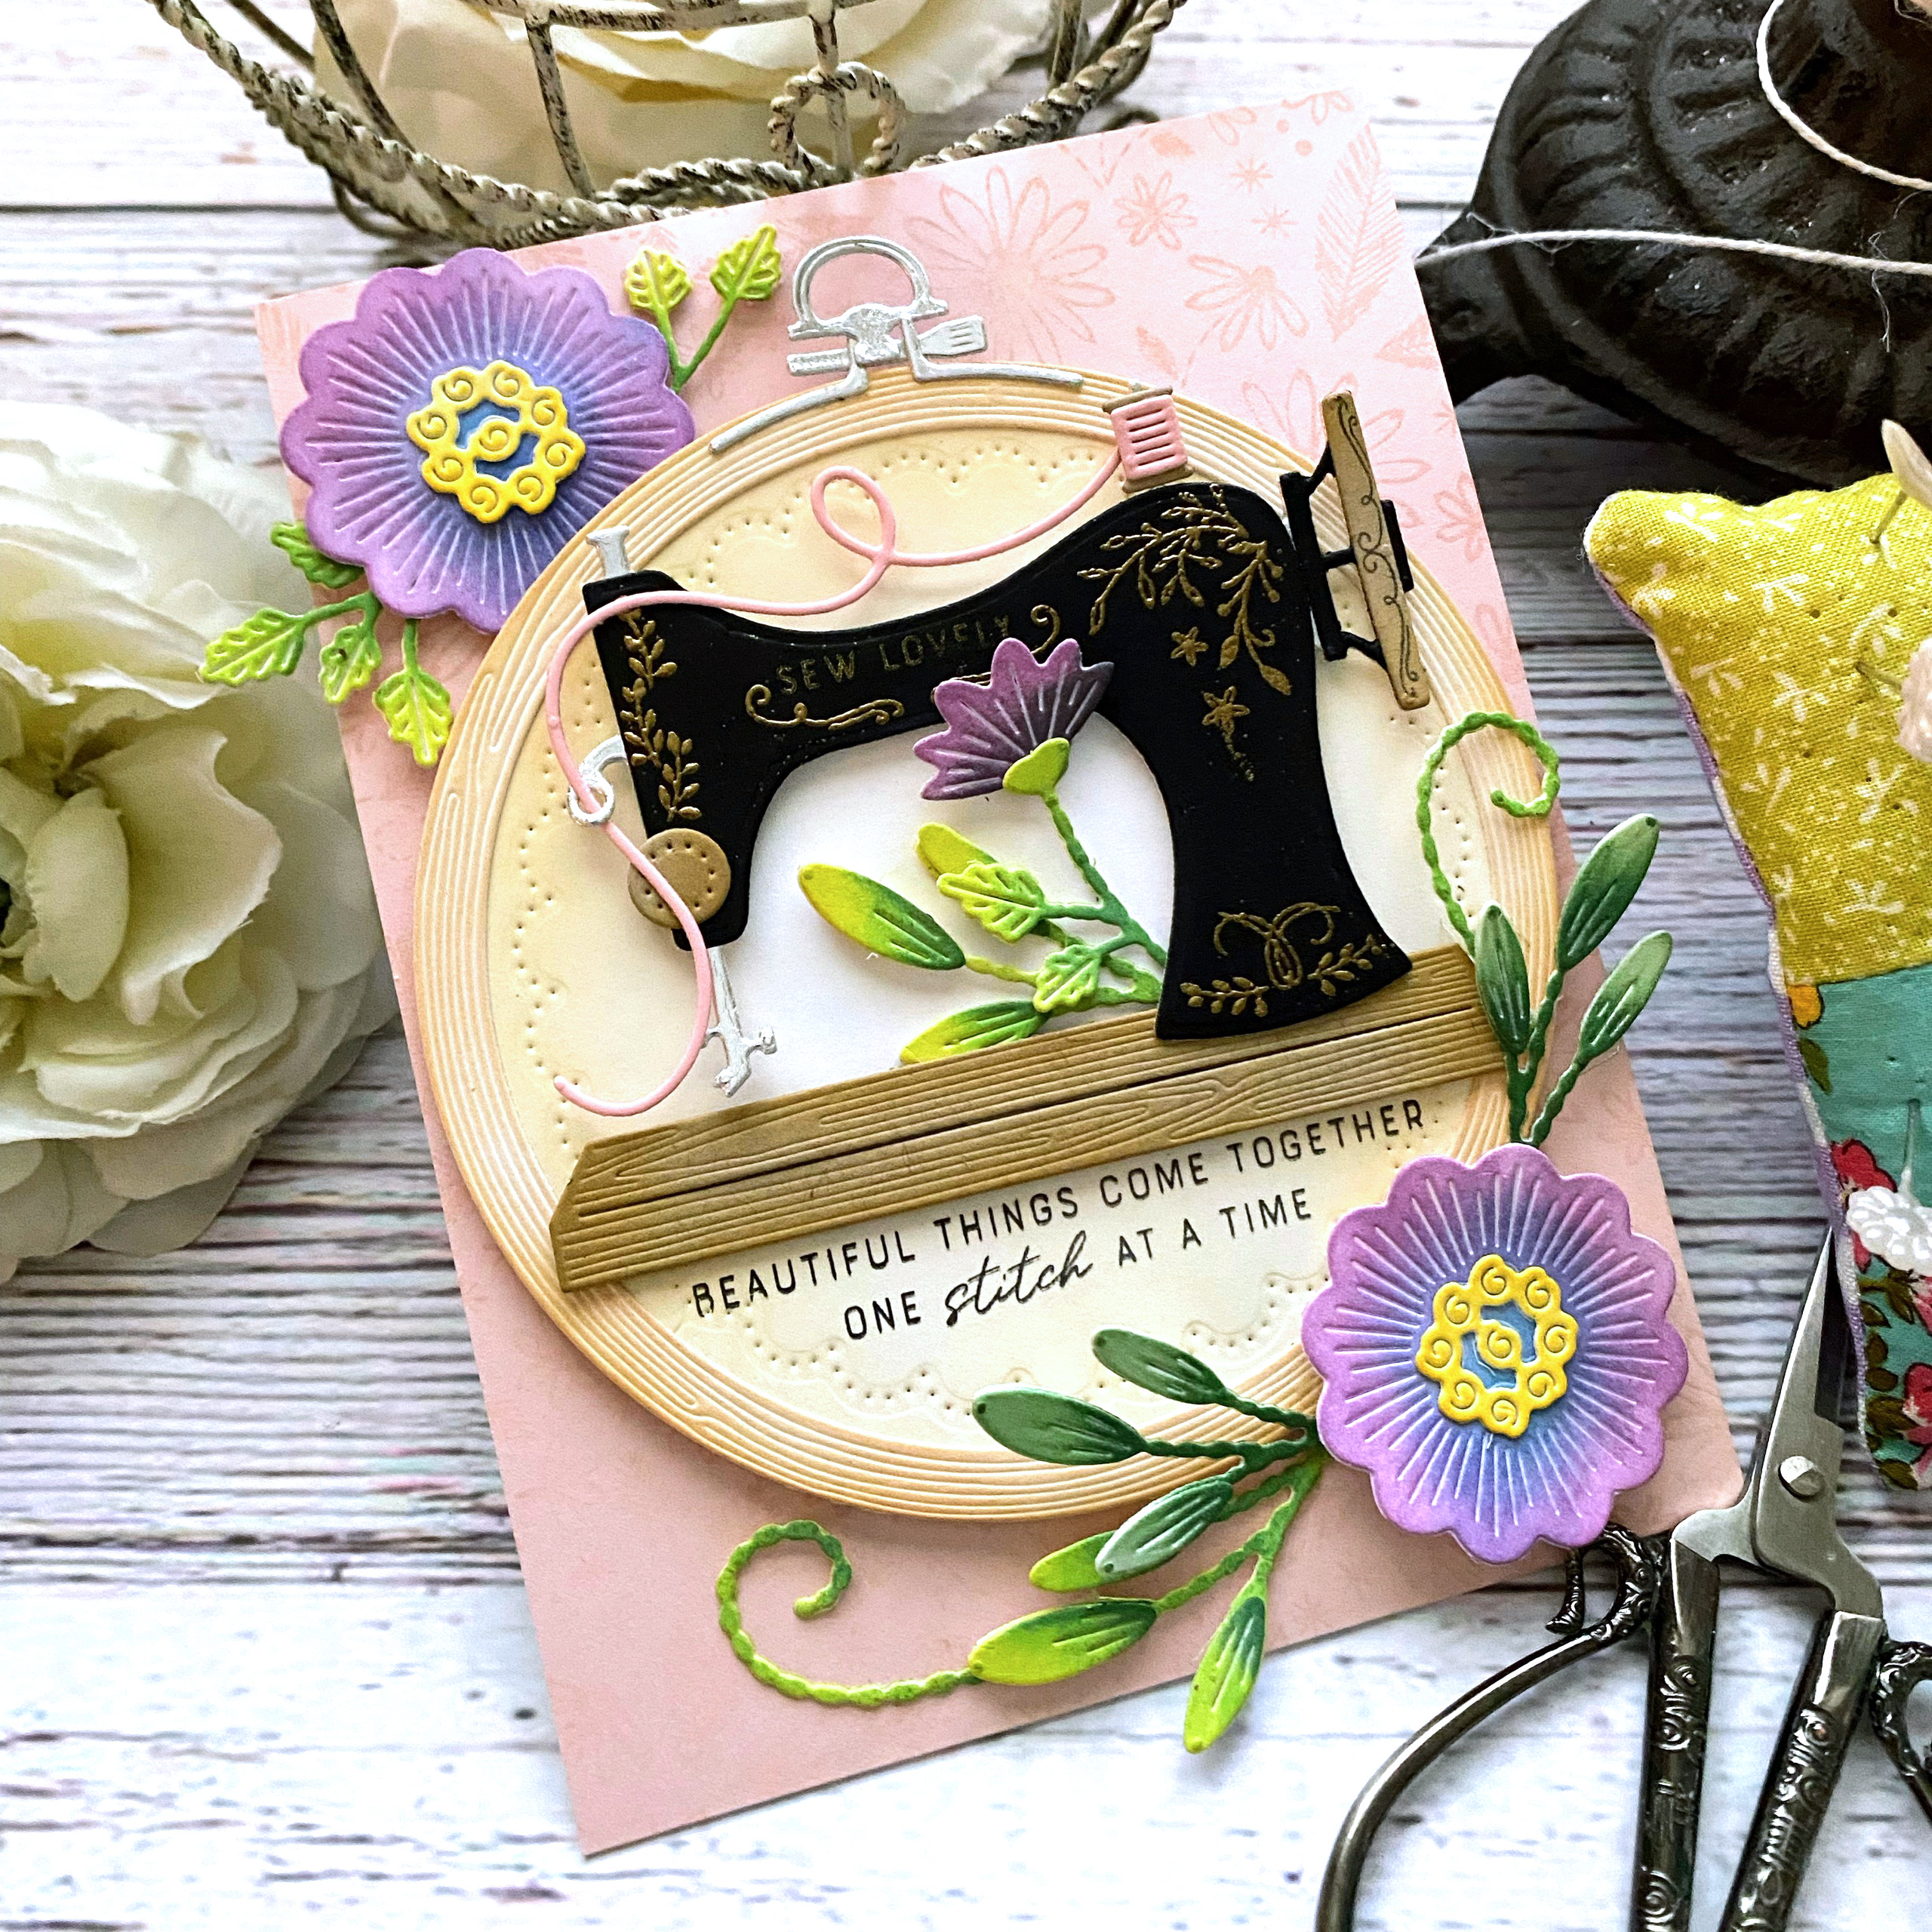
Hello and welcome back for day 2 of full reveals for the Handiwork Collection from The Greetery! I'm glad you're all loving this new release as much as I am...thank you for your sweet comments yesterday! The official "meet and greet" for today's featured products is HERE; you'll be able to see all of the details for each new product. Also, make sure to leave a comment here and on all of the designers' blogs for a chance to win one of two $50 gift certificates to the shop!
My first card for today uses the precious new "Sew Vintage" stamp/die set. I am absolutely smitten with it. It is easy to assemble and 'sew' much fun! 

It comes with a handy guide to ensure you will get great results. I was a little worried thinking I would have to stamp a bunch of these tiny filigree details on the machine, but it is all one stamp and then you can add the little word sentiments on the top. I chose the darling 'sew lovely' sentiment, but there are a few others for variety.

For this card, I used the Hoopla Round die and the Hoopla Round Inserts die. This provides that sweet stitched detail around the edge, just perfect for this card. 

The beautiful sentiment underneath the  machine is also from the 'Sew Vintage' stamp set.

I couldn't resist adding a few more of the Embroidered Blooms that were showcased yesterday; they give the perfect touch for this card.

I did a tone-on-tone effect with the Embroidered Background stamp; Sweet Blush cardstock and Tattered Rose Distress Oxide ink. You can see it a little bit better on the top right corner.

Eep! My second card for today uses the CUTEST new Notionable die....it is the cutest thing EVER!!! The scissors, the tomato pin cushion, the thimble and thread....EVERYTHING!!! I used a brad so the scissors are hinged and actually work! They are stuck down, but still....right????

I thought it would be fun to create a 'sewing box' type card using the beloved Curio: Cover Die and the Curio: Divider and Details die. For those of you who don't know, I also have a (much neglected) sewing blog called Thimbles and Thread and this whole release is calling me to get back to it! ha ha!

I used all of the elements included in the Notionable Die collection....you will find a set of four pins with toppers you can customize, a thimble, thread spools, thread, tomato pincushion, scissors, and a nedle. Everything is perfectly designed so that they almost look real, especially the adorable scissors!!!
 The sentiments are both from the Sew Vintage stamp set and I just love how they work so perfectly with all of these sweet dies. I also tucked a Hoopla Mini in the right hand corner; the heart one, of course, to tie in the "love" theme.


I used the Embroidered Background stamp for the base of the sewing box to give it some added detail and "sewing" charm.
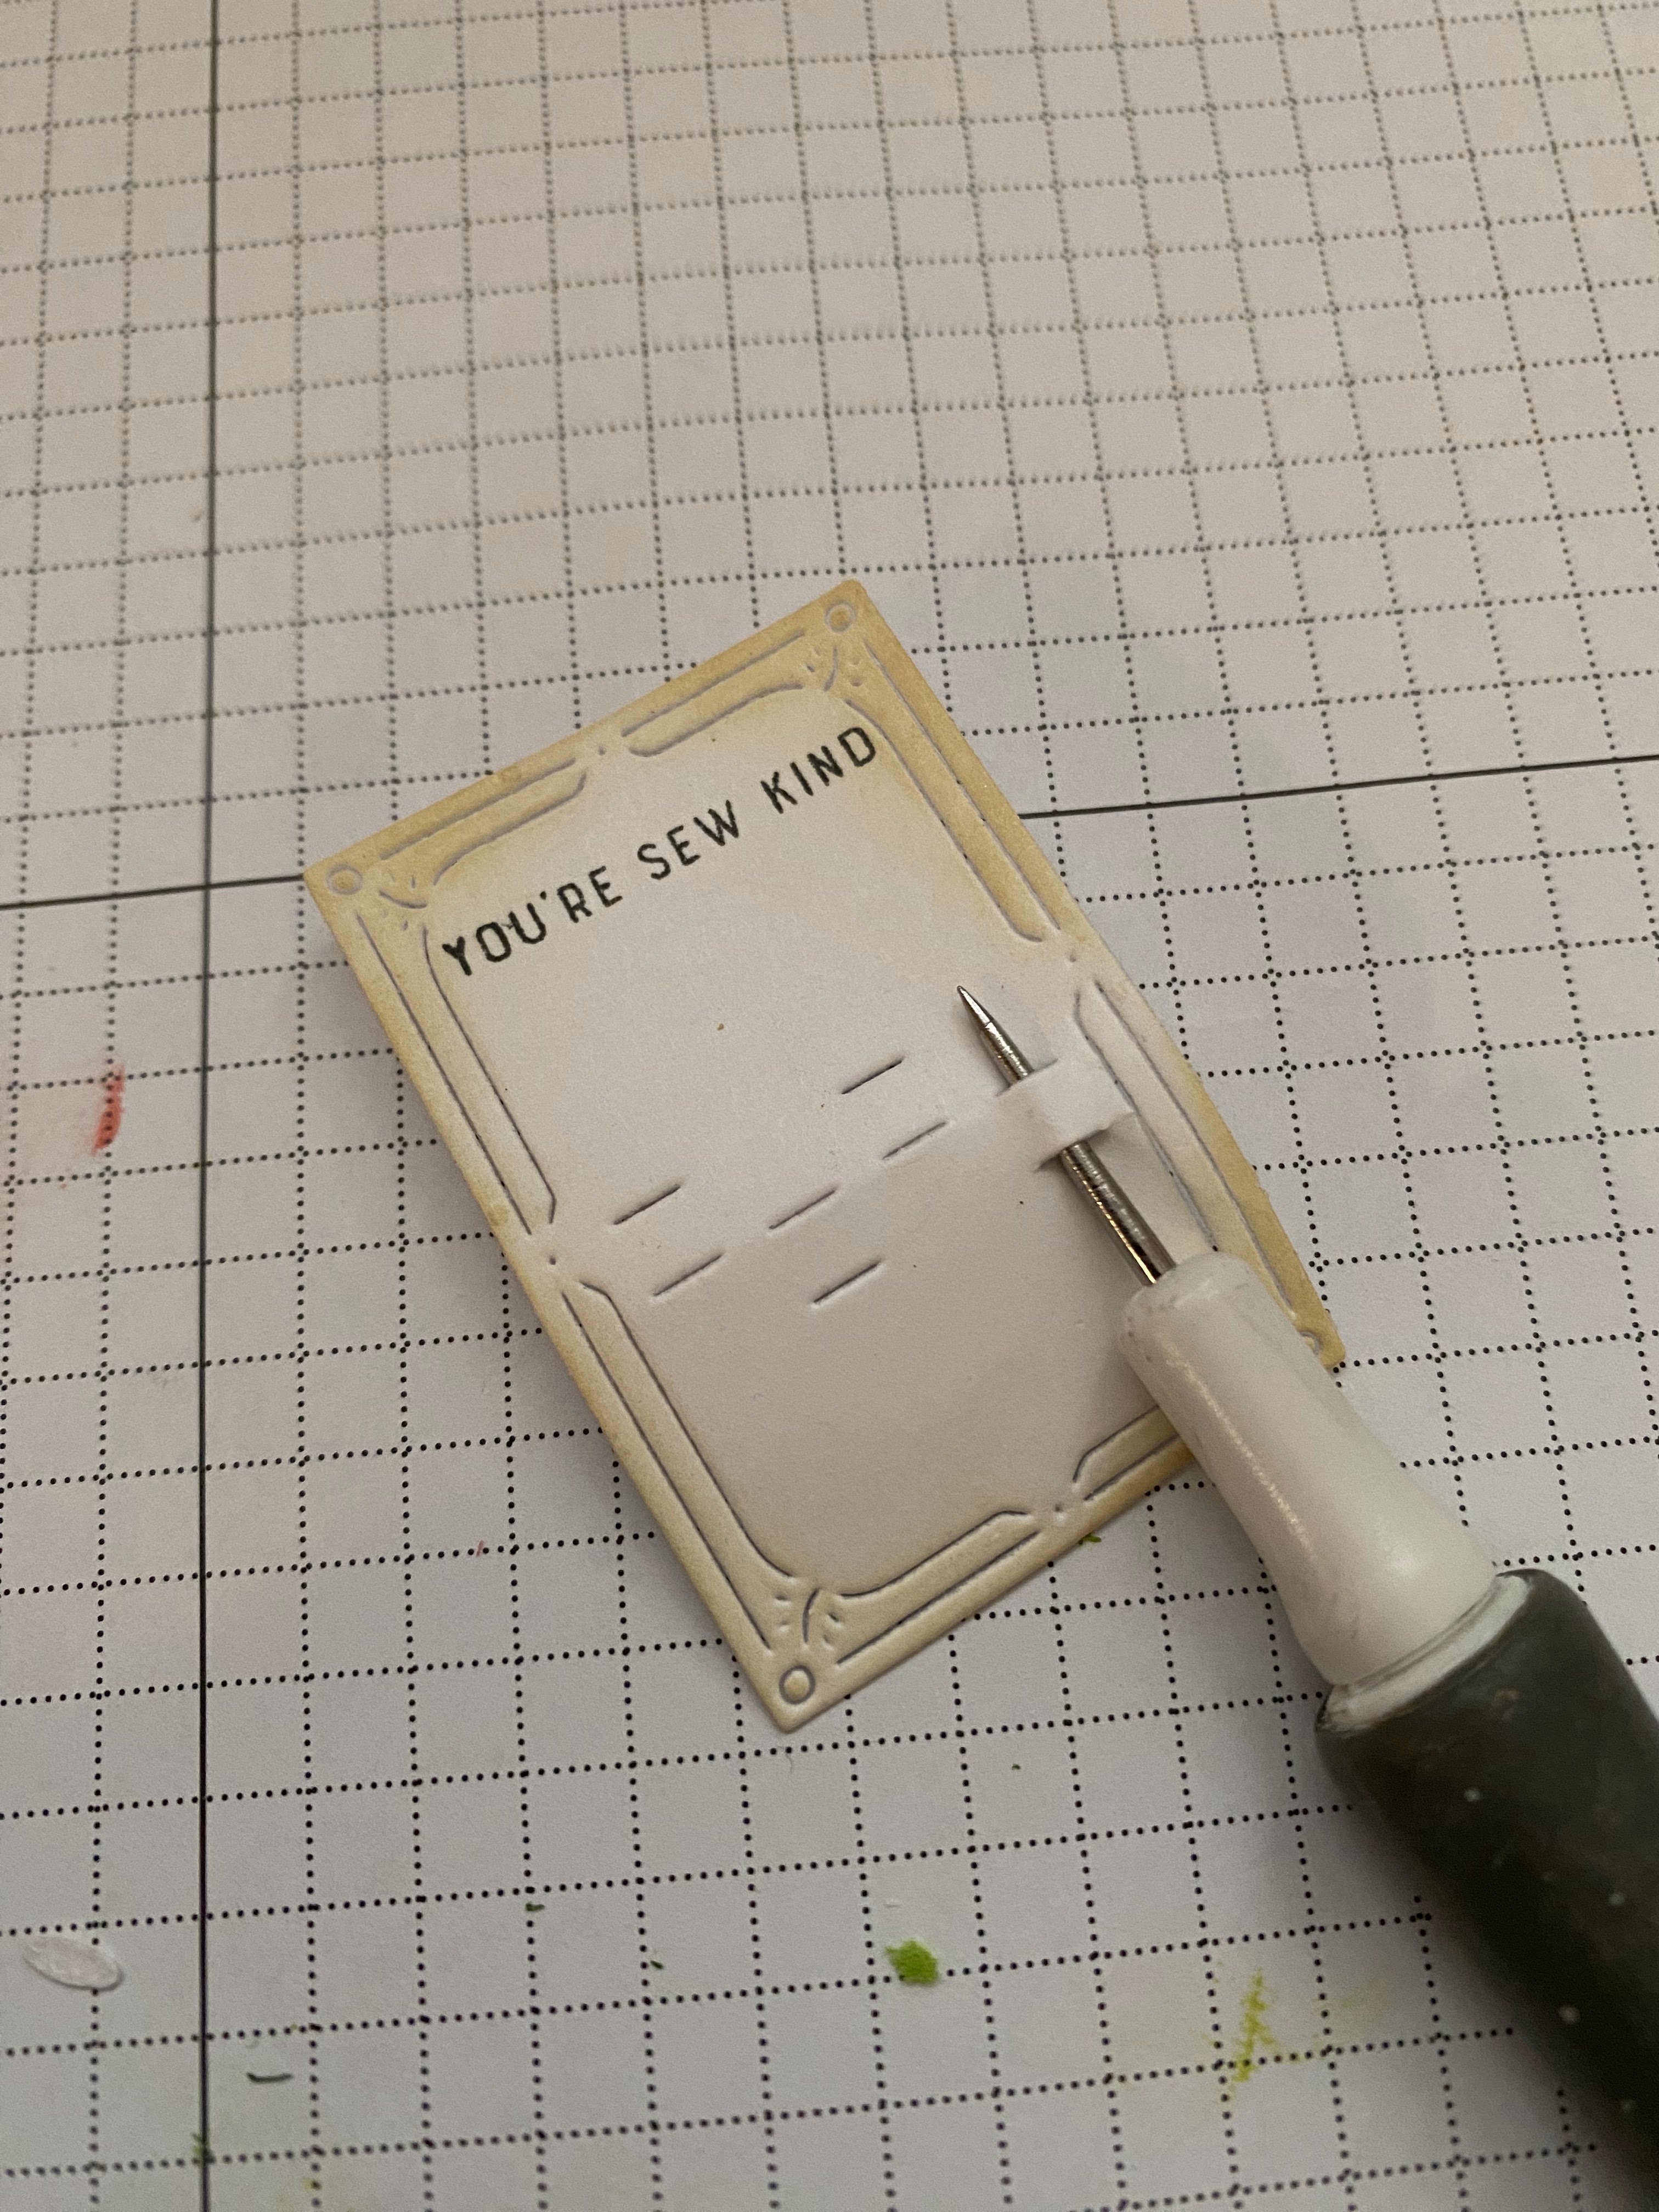
Here's a little peek at the process I used to allow me to get the pins on the pin card. Since they are actually paper, it was a little tricky to get them down the slits. I used my paper piercer to open the slits up a bit and then I put the pins in. I secured them in the back of the pin card using scotch tape. This is the same technique I used to get the needle into the spool of thread.


My final card for today uses the AMAZING new Rose Tapestry Stencil collection...I stenciled everything in blues and greens and then used the Aida Cloth texture plate over the top.  I was scared to try it for fear I would ruin the beautiful tapestry background, but I love the result.

For this card I wanted to create an 'in-progress' type look. I chose to use the scissors, thread, and thimble as focal points and then the sentiment to reinforce the theme. 

I also used another Embroidered Bloom on the corner over the hoop for added detail.


The sentiment is heat embossed in silver to accent the metallic paper used for the scissors, needle, and thimble.

I chose to use Vintage Cream cardstock to use with the Tapestry Stencils....I felt it would give it a nice vintage look.

I'm sure the other designers will showcase how these amazing stencils look without the Aida Cloth Texture Plate, but I just love the detail it give the card!

This release is so much fun....everything will be available for purchase starting tomorrow at 10 am ET. Thanks for fluttering by!


Kelly (you are here)


Wednesday, July 26, 2023

The Greetery Handiwork Collection Day #1

I'm so excited to be here today for day 1 of full reveals for the Handiwork Collection from The Greetery! It is SUCH fun collection and I hope you love it as much as I do. You can find the official "meet and greet" over on The Greetery Blog to introduce you to all of the fabulous new products! Make sure to leave a comment here and on the other designers' blogs for a chance to win one of two $50 gift certificates!
My first card for today features the AMAZING new  Hoopla Oval Dies, the Aida Cloth Texture Plate, the new Embroidered Blooms dies, and last, but not least, the new Stitched Sentiments. I'm also sneaking a peek at the new Embroidered Background stamp that will be featured tomorrow, but I just couldn't resist!

To begin this card, I die cut the beautiful Emroidered Blooms quite a few times (you will see JUST how many over the next two days...ha ha!) and then colored them using Distress Oxide inks. I absolutely adore using multi-colored thread when I stitch, so I love how these leaves and blooms turned out! Once the flowers were done, I got to work on the hoop.

There are two size of hoops included in the new Hoopla Oval dies; I chose to use the largest of the two for this card. I also die cut the Aida Cloth background onto a panel of Fine Linen cardstock and then cut it using the Hoopla Oval Inserts die. This is a fun companion set to be used with the Hoopla Oval dies, but could also be used on their own. I colored the hoop using Distress Oxide Inks and then I die cut the 'hardware' included in the Hoopla Oval die set using metallic cardstock for the silver pieces.

I had fun arranging the flowers to make it look like a real stitched piece (and made me want to pull out a stitching project, if I'm being perfectly honest) . The sentiment was created by die cutting the Thanks portion using the new Stitched Sentiments die and then stamping it in black (I die cut it using the same cardstock as the Aida cloth portion for a seamless look) The 'sew much" was stamped onto the same cardstock and added to the bottom. There is an option for it to just say 'so much' for versatility. I just couldn't resist the punn-y sentiment! They're my favorite! I stamped the Embroidered Background using Distress Oxide ink onto an A2 card base and then added the hoop using foam squares.

My second card also uses the Embroidered Blooms dies and the Aida Cloth Background die. This card was 100 % inspired by a new dress I bought for a Fiesta party I put on for the older kids at church! It is such a fun dress and I knew I could recreate it nicely with these beautiful dies.

This card is a mini-slimline size and is just perfect to showcase all of these fun pieces included in the die set. I layered the largest of the blooms together with the smaller flower for a bold focal image. The cute 'lazy daisy' stitched pieces are so fun, too! The little french knot accents just slay me! I love making french knots on my stitched projects and these ones look so real!

The sentiment is heat embossed in white and is from the New Day Sentiments Stamp set.

I didn't use the 'Press n' Seal' technique for my cards, but it would definitely be helpful with these new dies. Since I was using my dress as I guide, I roughly laid it out and then got the main placement idea and then I just had fun. If you're wanting to be more precise, then I would definitely suggest the Press n' seal technique. It will also allow you to get all of your glue on precisely and not have any smears if you are careful. (wink)

My final project for today uses THE cutest new Hoopla Mini dies, the FABULOUS new Stitched Scallops Notecard die AND the new Floral Sampler Stamp set. I created a set of 4 of these sweet little scalloped note cards just perfect for gift-giving or for your own stash. If you stopped by for the last release, these notecards fit perfectly into the burlap sacks I showed with my greenhouse card set. I didn't want to be a broken record so I didn't showcase them that way, but it would be perfect! I also toyed around with sewing up a cute little bag to put them in, so I'll share that if I end up doing that. 

I had so much fun stamping a BUNCH of the images from the Floral Sampler stamp/die set . I also prepared four of the different Hoopla Mini hoops to use as accents as well.

The Stitched Sentiments also got to shine again on these cute notecards.

You can see the entire set here. The Hoopla Mini dies come with lots of different shapes for verstatility.

This little heart hoop is just the cutest thing, don't you think?

I can't wait to use these cute scalloped note cards again...they are just so adorable! Thanks for fluttering by!


Kelly (you are here)