Showing posts with label baby boy. Show all posts

Friday, May 23, 2025

Papertrey Ink May Release Countdown Day 1

Hello and welcome to day 1 of the Papertrey Ink May release countdown! I have quite a few projects to share with you today using some of my favorite new products! Up first is a summery card using the new Into the Blooms: Wild Wood die collection.

For this card, I die cut the wood slice pieces from Vintage Cream cardstock and everything else from white cardstock.

I chose to use Vintage Cream for the wood slices so I could use a light hand with the ink and allow some of the light color to show through without it being stark white.


The sentiment is from the previously released Blooming Beauties Stamp Set and is cut using the Just Tags Die.

For the background, I used two of the stencils from the Elegant Notes Stationery Kit with Aqua Mist ink. I also added some Hawaiian Shores ink splatter for added detail.

I added the wood slices using foam squares as well as the sentiment. Once that was done, I had fun arranging the flowers and leaves.

One of my favorite pieces in the set is the cute little bee! Of course I just HAD to add two because they're just too cute!
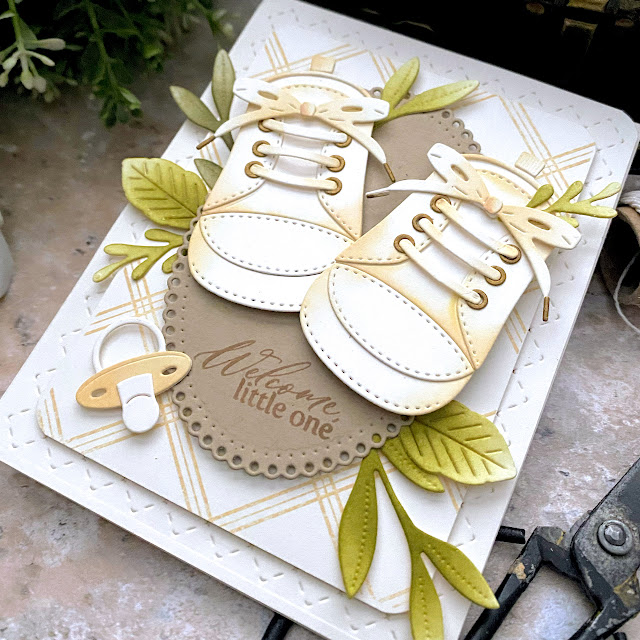
Speaking of too cute, I'm also in love with the new Baby Steps Die Collection and coordinating Baby Steps Stencil Collection.

I went for a gender-neutral color combo with this card; mostly because I'm completely out of baby boy cards, but I could always add some flowers if I ended up using it for a girl. 

I die cut all of the pieces for the shoes from white cardstock with the exception of the grommets to lace the shoes and the itty-bitty "metal" pieces at the bottom of each of the shoe laces. Those are cut from Antique Gold cardstock and attached using liquid glue.

A few tips to note: I used my quilling tool to "round" the laces before I attached them to the grommets. You could use a pencil or paintbrush as well, but I just happen to like the with of the quilling tool for projects like this. Once they each had a bit of curvature to them, I added a drop of glue to each of the ends and then used crafting tweezers to gently place the end into the grommet area. The other side goes in just the same way, but there is a bit of an arc as you guid it in.

The background was created by using the Border Bling: Tin Stitch Die and then I rounded the corners using a corner rounder punch. I also stamped a panel using the Nifty Plaid Stamp Set with Classic Kraft ink.  

I stamped the sentiment, which is from the Baby Elephant Stamp Set, onto an oval cut from Kraft cardstock using the Love to Layer: Ovals Die collection. I attached it to the plaid panel using foam squares.

The foliage is from the Into the Blooms: Wild Wood Die Collection and I tucked it here and there around the oval piece. The pacifier is also included in the Baby Steps Die Collection.

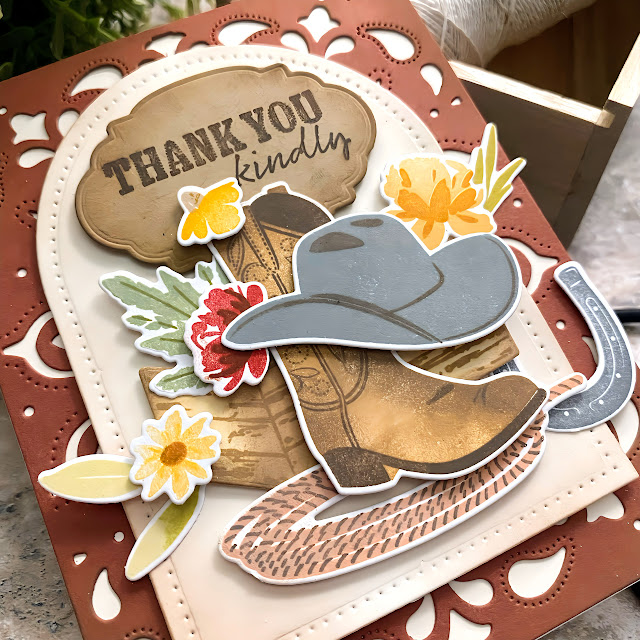
My last two projects of the day feature the Cowboy Reverie Stamp Set paired with the new Cover Plate: Banana Die. I also snuck in some florals that are being showcased tomorrow called Wild Petals; I just love how well they accent this Cowboy Reverie Stamp Set.

The Cowboy Reverie Stamp Set includes a boot, horseshoe, rope/lasso, jar, crate, hat and foliage.

I mentioned a few weeks ago that our Teacher Appreciation theme was Wild West and oh, how I wish I had all of these amazing new products; stay tuned tomorrow for even more western inspiration!

I used distress oxide inks for the boot because I love the velvety texture they give which makes the boot look more realistic.

There are three sentiments included in the set as well; I chose the cute "Howdy Friend" for this card.

This card is a little bit more masculine, but could definitely work for a female as well.

One of my sweet friends is a cowgirl, so I'm planning on gifting her all of the western style cards I make for the release!

The background for this card was cut using the Cover Plate: Bandana Die from Americana cardstock.

I really love the size of the images included in this set; not to hard to stamp with my aging eyes! ha ha!

I added a few more Wild Petals florals to this card as well.

Well, this concludes today's post, but join me again tomorrow for day 2 of the release; a little more baby, a little more cowboy/cowgirl and some other fun surprises! Thanks for fluttering by!


Wednesday, October 16, 2024

Adventure Awaits {Baby}

Hello and welcome! I'm sharing some fun non-traditional baby ideas using lots of different travel themed products from over the years. This is a "for me" post so I don't forget some of the ideas, but hopefully it will give you some inspiration as well. My friend's daughter had her first baby, and my friend's first grandbaby, so I wanted to get a gift put together. I have really been enjoying packaging up baby gifts in suitcases, but I haven't done a boy gift before, so this one was really fun! When I went shopping for some outfits, I came across some airplane themed items, so that made it even more fun!

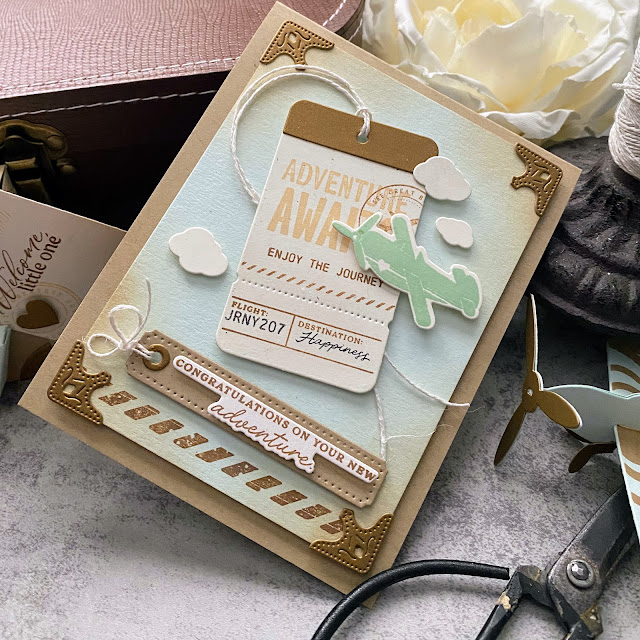
For the card, I used the Going Places stamp set and the coordinating Going Places Die along with some older, but unfortunately retired, stamps and dies. I asked Julie if she would consider creating a baby version of the Going Places stamp set, so that might be fun to see come about.  I told her how much fun I've been having packaging up baby gifts in suitcases and how much fun that would be to have!

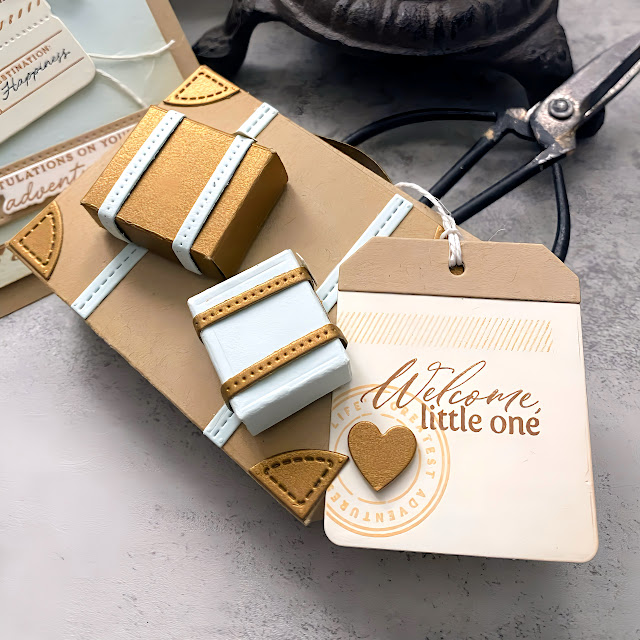
A package of diapers would ruin the aesthetic of my gift, so instead, I decided to make the Vintage Travel Suitcase Die to add a gift card to the grocery store so the new mom could get diapers and wipes, or anything she needs, really! The sentiment on the tag is from the Baby Elephant Stamp Set, which is one of my favorite baby sentiments. I added some images from the Going Places stamp set and the luggage tag itself is from the Going Places die (linked earlier). The heart was leftover from the 3-D plane from the retired Valentine's Day Love You to Pieces collection from Papertrey Ink.

I also made a few other little suitcases (not knowing exactly how I would use them) from the Holiday Hatchback: Luggage Die. I decided to just to add them to the front of the larger suitcase.

The plane and clouds on the card are also from the retired Love You to Pieces stamp/die set and the photo corners are from the retired Fairytale Christmas stamp set.


The finishing touch is a plane that I added to a Tim Holtz tag using foam squares and liquid glue. I will use this tag to tie around the bow and cellophane wrap to put it all together. 
I tucked everything into the suitcase...the flap of the suitcase will be up when the gift is wrapped in cellophane. You can see one of the inspiration outfits tucked on the right.

I hope the new mom enjoys her gift! I had so much fun putting it together! Thanks for fluttering by!


Monday, June 24, 2024

Papertrey Ink June Release Countdown Day 4

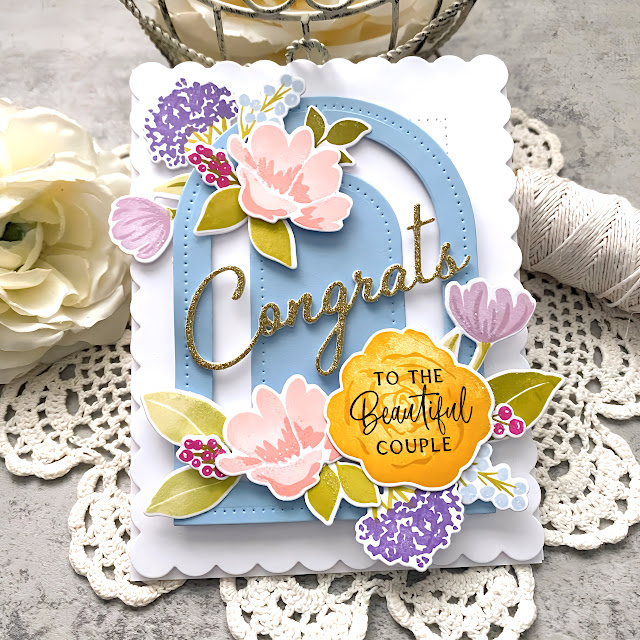
Hello and welcome to the 4th and final day of the Papertrey Ink June release countdown! Everything will be available for purchase beginning at 10 PM EDT tomorrow! My first project for today features the new Breathtaking Blooms paired with the new Love to Layer: Arches dies.

I mentioned a few days ago that I am needing wedding cards so I thought this would be the perfect opportunity to get one made! The Breathtaking Blooms stamp set is perfect for wedding season AND the new Fantastic Front: Scalloped Frame also includes the 'congrats' die, so it's perfect!

I snuck in one of the sentiments from the previously released You are Loved stamp set and stamped it directly onto the largest bloom in the new Breathtaking Blooms stamp set.

I die cut the 'congrats' word twice from white cardstock and once from gold glitter cardstock and glued them together for a sturdy piece. I simply adhered the edge of the C and the edge of the S to the arch using liquid glue.
My final card for today uses the adorable new Go-To Gift Card  Holder die paired with a few other things that have been showcased over the last four days.

I used a piece of washi tape to hold the diaper bag closed for pictures, but if you open the front, you can slip a gift card down inside (there are two slits for guides).

When I was buying the baby outfits I shared in yesterday's post, I ALMOST bought a Carter's gift card when I was shopping and now I'm kicking myself that I didn't because it would have been perfect to tuck inside!
Thanks for fluttering by!


Sunday, June 23, 2024

Papertrey Ink June Release Countdown Day 3

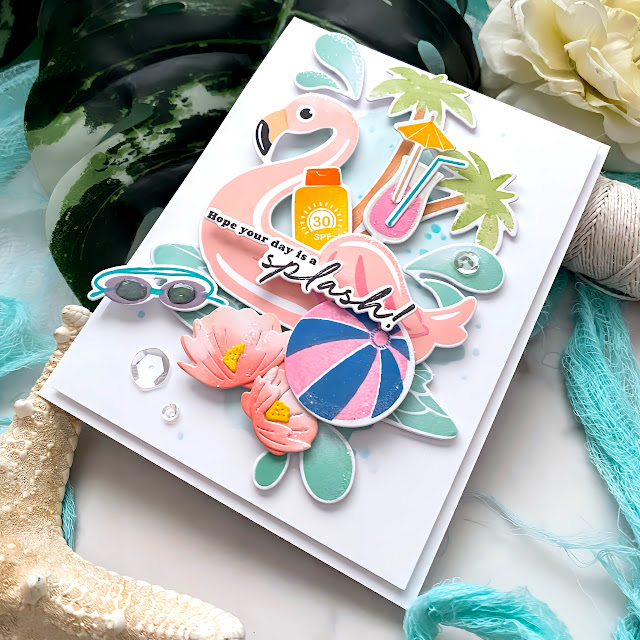
It's day 3 of the Papertrey Ink June release countdown! I'm sharing three projects using the new Soak Up the Fun stamp/die set and my last card features the new Baby Elephant stamp/die set.

This is such a fun summer set; it includes three sentiments and all of the images you need to create a fun summer scene!

I had a few flowers left over from yesterday's arch card so I added a few of those for some extra detail!

I used the Watercolor Wonderful Stencil Collection for the background to enhance the 'splash' theme! I used both a green and brown marker to give the palm trees the two-toned look; the stamp is just solid so I wanted something more realistic. I added some Nuvo Crystal Glaze to the swim goggles.

My second card for today is a shaker card; you can see the shaking bits better in the remainder of the photos, but I wanted to s how it how it looks just resting.

I used some Bitty Big: Pale Peony paper as the backdrop for the shaking sequins for added detail.

The new Fantastic Front: Scalloped Frame die is the perfect choice for a quick and easy shaker card! If you know me, you know I struggle with shaker cards, but this one was easy-peasy!

I used a few more of the leftover flowers from my wreath card for this card as well. 

I used another one of the sentiments; the die set comes with dies for the sentiments so I added it over the top of the acetate using foam squares.

My third card using the Soak Up the Fun set uses the previously released Through the Palms Hot Foil Plate. I created a quick blended panel using pinks/purple ink for a sunset type look.

It used the highest heat setting and let it heat for 25 seconds and I got a nearly perfect result!
I added the water portion and the floatie at the bottom of the scene and added  few more details.

You can really see the shine of the foiling in this photo!

I added some glitter and sequins for even more sparkle and shine!

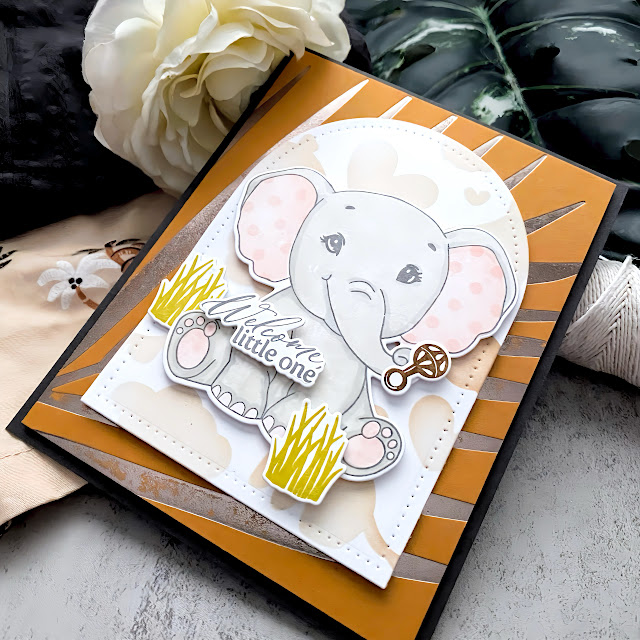
I have zero baby boy cards on hand and I have a baby gift to deliver! I took a picture with the outfits I bought in the background; this photo shows the shorts and shirt outfit which I tried to match the card to.

The outfits are jungle-themed so the new Baby Elephant set is perfect!

You can see the cute sleeper in the background of this picture. I chose to use Honey Nut cardstock with Platinum foil using the Tropical Frond Hot Foil Plate for the background. I stamped the elements from the Baby Elephant set and then mounted it on an arch that was die cut using the new Love to Layer: Arch dies with the new Baby Clouds stencil.

I did stamp pink on the ears because it just seemed like the right thing to do, but I hope it's not too girly! ha ha! Thanks for fltutering by!