Showing posts with label CAS. Show all posts

Thursday, August 7, 2025

You Brighten My Life

Hello, friends! I'm back today sharing a card that was a byproduct of the LAST card I shared! I had so many wonderful flower die cuts leftover, it felt a shame to put them back with the dies, or worse yet, be thrown away! I put them to good use on this quick and easy floral design, just perfect for a summer day!


I got to work coloring all of the leftover daisy pieces using dye ink and blender brushes. I love these bright, cheery hues that are so common with these flowers. I just had fun mixing and matching the different petals with flower centers included in the set. Once the flowers were all colored and assembled, I got to work on the sentiment. 

I die cut it twice from Kraft cardstock and once from gold cardstock. This is one of those dies where everything is connected, but I still find it a little bit tricky to get it straight. One of my tips for helping with this is to keep the middle layer in the die (second Kraft piece), glue the last layer (since you're working backwards) using liquid glue. Then punch it out of the die. From there, place the top layer (gold ) back in the die, add glue to back of the gold layer and then place the Kraft layer back in place as well. From there, I added more liquid glue and then simply placed the entire thing (yes, still in the die) to the background panel. I allowed it to dry before lifting the die off of everything. It might seem excessive, but for me, it's way better than being frustrating with a wonky die cut.

I should have mentioned this earlier; BEFORE I added the sentiment, I used the stencils included in the Elegant Notes Stationery set for the corners using Tumbled Glass distress oxide ink.

I arranged the flowers using liquid glue and foam squares. I also had leftover leaves from my last card so I tucked them here and there until I was satisfied with the arrangement.

I added the cute little bee to the bottom center flower for added whimsy.

I trimmed the panel down to measure 4 by 5 1/4 inches and then mounted it to a Spring Rain A2 panel using foam squares. I layered that onto a top-folding A2 card base using liquid glue. The flowers have some glitter for some sparkle and shine! Thanks for fluttering by!


Wednesday, February 9, 2022

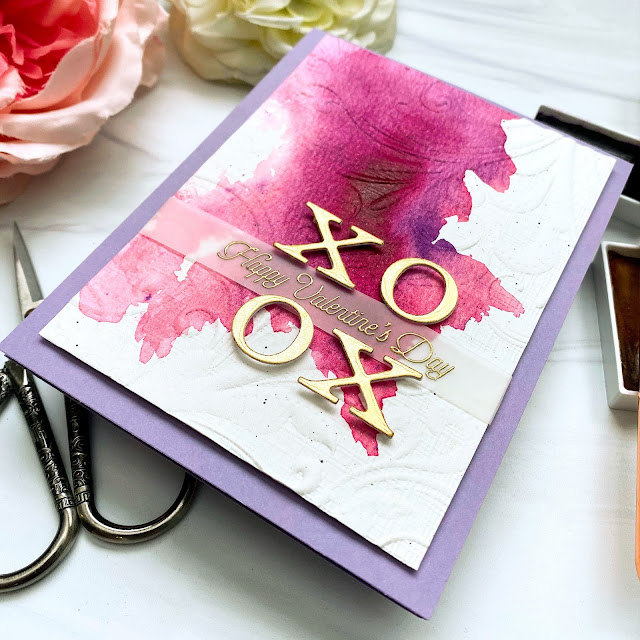
Happy Valentine's Day {A twist on an old favorite}

Valentine's Day is less than a week away....are you finished with your creating? THIS is one of my very favorite Valentine's Day cards that I've ever made. I shared it again last year on Instagram, but rather than sharing the same card again, I decided to try a fresh take on some of the things that I love most about that particular card.

I don't pull out my watercolors nearly enough and after I do, I realize I need to do it more often. Rather than creating a watercolor panel that is completely saturated in color, I decided to go for a more organic look and just let the paint, paper, and water do the work. I spritzed a panel of watercolor paper and then added in red and purple watercolor paint and pushed them around until I was happy with the results. I sped up the drying process by heating it up with my heat tool. I set it aside to continue to dry while I got to work on the letters.

 I used the Bookprint Alphabet Upper dies to die cut two of each letter; two each from gold specialty paper and two each of regular white cardstock. I glued them together for a more sturdy piece since I knew I would be popping them up with tiny pieces of foam squares. I set those aside to dry as well.

The sentiment, which is one of my favorites, is from the since-retired Be Mine, Valentine stamp set from Papertrey Ink. You could use any sentiment that you like for this step. I heat embossed it in gold powder onto a strip of vellum.

Once the panel was dry, I dry embossed it using the Regency Swirls embossing folder that was included in my Gemini Jr bundle that I got for Christmas in 2020. It is still included in the bundle, but I'm not sure if it is sold separately. It is the same embossing folder that I used on THIS card. Once that was done, I adhered the letters using tiny bits of foam squares. The heat embossed sentiment is tucked between the two rows of letters and wrapped around the panel and secured with clear tape in the back. I did spritz it with a few good sprays of Shimmer Spray as well. The entire panel is added to a top folding A2 Winter Wisteria card base using additional foam squares. I had so much fun making this new version of an old favorite! Thanks for fluttering by!


Tuesday, April 13, 2021

Ink to Paper April Release Countdown Day 3

Welcome to day 3 of the Ink to Paper April release countdown! Today we're showcasing a fabulous collection of new products! Up first is a fun new set called "Where it Leads". I chose to go with a very CAS card today. I wanted something on the artistic side so I began with a 4 by 5 1/2 inch piece of Fresh Snow Linen cardstock.

I was really nervous to not use any of the coordinating dies because one wrong move would mean that the entire panel would be ruined! I took my time and carefully placed all of the images in my MISTI to get the proper alignment.

I'm especially excited about the beautiful sentiments that are included in this set and I can see myself using them on many different cards, not just ones with the step images. 

Once I was done with all of the stamping, I decided to add just a hint of Hawaiian Shores ink around the edges for a bit of sky. I also decided to add the pierced detail around the images to give it a bit of a "frame" or focus.

I added the entire focal panel to a Ripe Avocado card base using foam squares for dimension. After it was all said and done, I think I'd like to try this same look but with the dies for a "fuller" look, if that makes sense. I love CAS cards, but you all know how much I love my layers, too! ha ha!

Next up is a fun new Cover Plate called "Scenic Path". I think this is a fun one for many different occasions, but it goes perfectly with the new Just Sentiments: Steps stamp set AND the new Inside Greetings: Steps! I DO have one of the inside sentiments stamped on the inside, but do you think I remembered to take a picture? uh-oh!

I die cut the Scenic  Pathway out of Ripe Avocado cardstock and layered it over a panel of white cardstock with clouds stenciled over the top.

I wanted a hint of added detail and color back there so it worked perfectly.

I stamped the sentiment and in black ink onto white cardstock and then die cut it with the Love to Layer: Scalloped Circle die.

I'm thinking I'll use this as a graduation card this year. Stop by tomorrow for the 4th and final day of the countdown! Thanks for fluttering by!


Tuesday, March 2, 2021

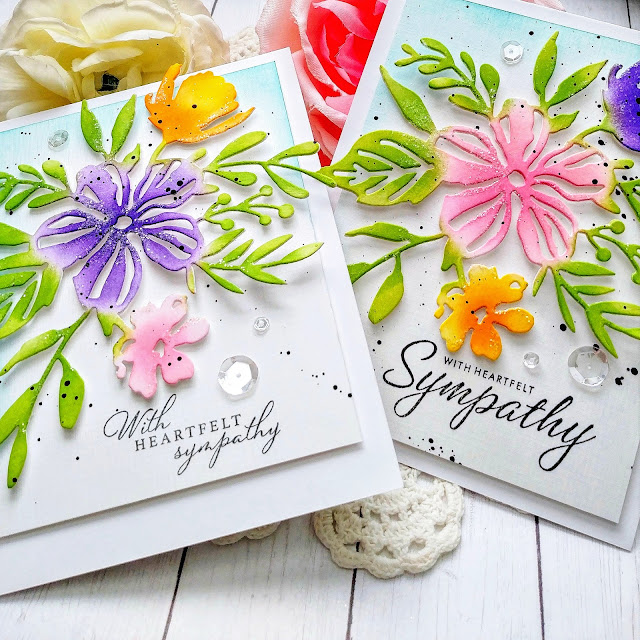
With Heartfelt Sympathy

Hello friends! You might be thinking you're experiencing Deja Vu because of the cards I'm sharing today! These are a CAS version of THESE cards that I made a few weeks ago. I really had so much fun creating them so before I put all of my supplies away, I quickly made these two sympathy cards.

I kept the coloring of the flowers and foliage (the Bouquet Backdrop Die) the same as before because I really like how it turned out. Rather than adding the frames around the panels, I chose to keep them plain but adding a hint of Hawaiian Shores ink around the edges for contrast and added depth.

This card uses one of my favorite sentiments from the Feathered Friends 4 stamp set and stamped directly onto the panel using a mini MISTI and black ink.

This particular sentiments is and oldie, but goodie, from Stampin' Up! This is one of those sets that I will never part with and I use it often! 

I added just a touch of black paint splatter for some added detail as well as some glitter and sequins. The entire focal panel is added to a top folding white A2 cards base using foam squares. I've already sent one of these out and the other one is headed out today! Boo! Maybe I need to make another set, but this time for something happy, like a birthday! Ha ha! Thanks for fluttering by!


Sunday, December 13, 2020

Ink to Paper December Release Countdown Day 3


Well friends, we're already on day 3 of the Ink to Paper December release countdown! The days are just flying by! I have two project to share with you today using another assortment of fun new products! Up first is this sweet new Dainty Daisies set paired with the latest in the To Die For Sentiments series: Never Far From My Heart!
I also paired it with the new Border Bling Skinny Heart Frames that were showcased on day 1. They add just the perfect touch to so many designs; Valentine's Day or not!

I die cut the To Die For Sentiments: Never Far From My Heart three times out of white cardstock and then glued them together using liquid glue with a precision tip. I added some Aqua Mist and Hawaiian Shores ink over the top using a blender brush!

The images from the Dainty Daisy stamp set are heat embossed using my all-time FAVORITE White Embossing Powder. Once they were embossed, I added the color over the top using  Simply Chartreuse, Harvest Gold, Berry Sorbet, and Pale Peony inks over the top with blender brushes.

I used the coordinating Dainty Daisies dies and then added them to the card front using foam squares for dimension! A few sequins finish off this cheerful design!

My next card features a fun new set called Lift Me Up! I love the simple, sketchy feel of this set that warrants simplicity, yet whimsy!

One of my favorite stampers Michele Ferguson make a box card the other day and I KNEW it would be the perfect thing to highlight this fun new stamp set!


I used the Charming Tags 1 dies to create the opening to frame this fun scene.

Thanks for joining me today and please be sure to stop by tomorrow for the 4th and final day of the release! All products will go on sale on the 15th at 10 PM ET! Thanks for fluttering by!


Friday, December 13, 2019

Ink to Paper December Countdown Day 3

Welcome to Day 3 of the Ink to Paper December countdown! The love theme continues with the new "To Die For Sentiments: Love" paired with Just Sentiments: Valentine and the new "I Heart You" stamp set! 

I went for a CAS look to create two identical cards. To begin, I die cut the "Love You" sentiments out of gold specialty paper and set them aside. I also die cut the red heart and the scalloped border and glued them together using liquid glue.

I stamped the "forever and always" portion of the sentiment onto a panel of Linen Cardstock measuring 4 by 5 1/4 inches using my mini MISTI for precision. I layered the linen panel onto a panel of 4 1/4 inches by 5 1/2 inches of Pure Poppy cardstock. Normally I would have just made the card base from the red cardstock, but this was literally my LAST piece of red! Ack! Anyway, it worked out perfectly and I just layered all of that onto white card bases.

Once that was done, I put the heart portion onto the card front using foam squares. I layered the "Love" portion using a 2 way glue pen and then the "you" portion underneath.


I really love the new "Just Sentiments: Valentine" because they work so nicely with all of the new To Die For Sentiments! 

My second project for today also uses the new "To Die For Sentiments: Love" but this time I used the word "heart". I thought it complemented the heat embossed sentiment nicely. 

I dry embossed the new On the Border: From the Heart Frame. The heart portion was the perfect size to fit the heart image from the new All About You set that was showcased on day 1. I added it using foam squares and then added the heat embossed sentiment wrapped around to the back of the embossed panel. 

I added a few burnished gold sequins to complement the embossed sentiment. I hope you've enjoyed day 3 of the countdown! Join me again tomorrow for the 4th and final day! Thanks for fluttering by!


Monday, April 8, 2019

Pinkfresh Studio April Essentials Release Blog Hop


Hello and welcome! I am so thrilled and honored to be participating in the Pinkfresh Studio April Essentials Release Blog Hop! I've got some fun projects to share with you today using many of the new essentials that you are sure to fall in love with! These new essentials that I have used today are staples that I personally have already fallen in love with and will be used often as I reach for them again and again! This post contains a lot of information and photos, as well as links to the rest of the AMAZING designers that are participating in the hop so sit back and enjoy!

Pinkfresh Studio Blog
Alix Davis
Caly Person
Cathy Zielske
Emily Midgett
Enza Gudor
Erum Tasneem
Heather Hoffman
Ivana Camdzic
Kelly Griglione
Laura Bassen
Lea Lawson
Natasha Valkovskaya
Rebecca Luminarias
Svitlana Shayevich
Yoonsun Hur
Zsoka Marko

Also, Pinkfresh Studio will be giving away the FULL April Essentials release on the Pinkfresh Blog and Instagram! Wahoo! I will also be giving away a $25 dollar gift card to the Pinkfresh Studio shop to one lucky winner who leaves a comment here on my blog!
The winners will be posted on Sunday April 14th on the Pinkfresh Studio giveaway page! You MUST check that page and claim your prize within two weeks!

Also, there will be a really cute gift with purchase! It is this darling house die that is so versatile for so many designs. This will load directly in your cart, easy peasy!

We will also be offering free/discounted shipping from April 8-11th on orders $50+. You must use the code APRESSFREESHIP50. Shipping is free in the USA, and $5.50 off for our International friends.
I gasped when I saw the gorgeous new Classic Edgers die cuts and couldn't wait to put them to use! It was hard to decide which one I like best, so I decided to just go ahead and use 4 out of the 5! LOL! I actually used a few of the other new essentials as well, one of which is the beautiful new Braided Ovals die set. These, paired with the edgers, set the stage to create a classic and clean set of note cards. I also used the Oval Foliage stamp set which complements these new essentials so perfectly.

To begin these notecards, I die cut four pastel colored pieces of cardstock using the new Stitched Rectangles to give that polished and professional edge that I am always looking for in my designs. I especially like using dies like this for CAS designs, because it adds just the right amount of detail without a lot of effort!


I die cut the white rectangle piece using the Stitched Rectangles die set as well. It comes with both clean cuts and detailed cuts, which I love. I was able to add the detail from the Classic Edgers to one side of each of these rectangles, choosing a different design for each one. I have quite a collection of edger type dies, but none of them have the sweet details like these! I will be using these quite a bit, I can tell! 

The Braided Ovals were also die cut from white and they set the stage perfectly for the gorgeous foliage and sentiments from the Oval Foliage stamp set. I am so happy with how these cards turned out!
 My second set of projects uses the new Classic Words dies that I will also be reaching for again and again. I don't own any word dies that also include the "shadow" portion, so I am so excited to have these! 
To begin today's designs, I used some Distress Oxide ink to create two blended panels that I die cut using the new Stitched Rectangles as well as the previously released Oval Foliage Die set. I have seen some of the Pinkfresh designers use this die set recently and I have fallen in  love! I am so thrilled to have this; I just love the detail it adds to my designs! This set the stage for the white "hello" and the vellum shadow. I used the bright and fun fruit from the Fruitastic stamp set to complement the words.

For this project, I used the Braided Ovals dies to create coordinating tags to go with my cards. The sentiments from the Fruitastic set are so unique and unlike any I have seen on the market previously! I love when a stamp set fills a void that I have in my collection, which sometimes seems impossible based on the magnitude! LOL!
These braided ovals nest nicely inside the foliage on the card, which is another design idea I can't wait to try, so stay tuned for that! 

My final project uses the Braided Oval again, but this time I used the larger of the two to showcase this amazing unicorn. This is the first Pinkfresh Studio stamp set that I owned and it is so much fun! It is called Magical Unicorn and I just love it! I normally just make the unicorn on a rectangle piece, but stamping it on the oval really gave the unicorn some shape and extra dimension. 


This card is very straightforward, but I had so much fun making it and adding in all of the flowers and sparkles. The horn is heat embossed in gold, which I just love! I had so much fun working on all of these projects for the release! Don't forget to leave a comment to be eligible for the 25 dollar gift card! Thanks for fluttering by!