Showing posts with label tonic studios. Show all posts

Thursday, November 7, 2019

Countdown to Confetti Day 3

Well friends, today is the 3rd and final day of the Reverse Confetti Countdown to Confetti! Today the team is showcasing a fun new sentiment set called Thank You! It has a coordinating Thank You Confetti Cuts that makes it very versatile!  Before I dive into the details of today's card, there is business to attend to! LOL! As usual, there are prizes up for grabs so make sure leave a comment on each of the designers' blogs for a chance to win a 15 dollar gift certificate as well as a comment on the Reverse Confetti Facebook page for an additional chance to win!

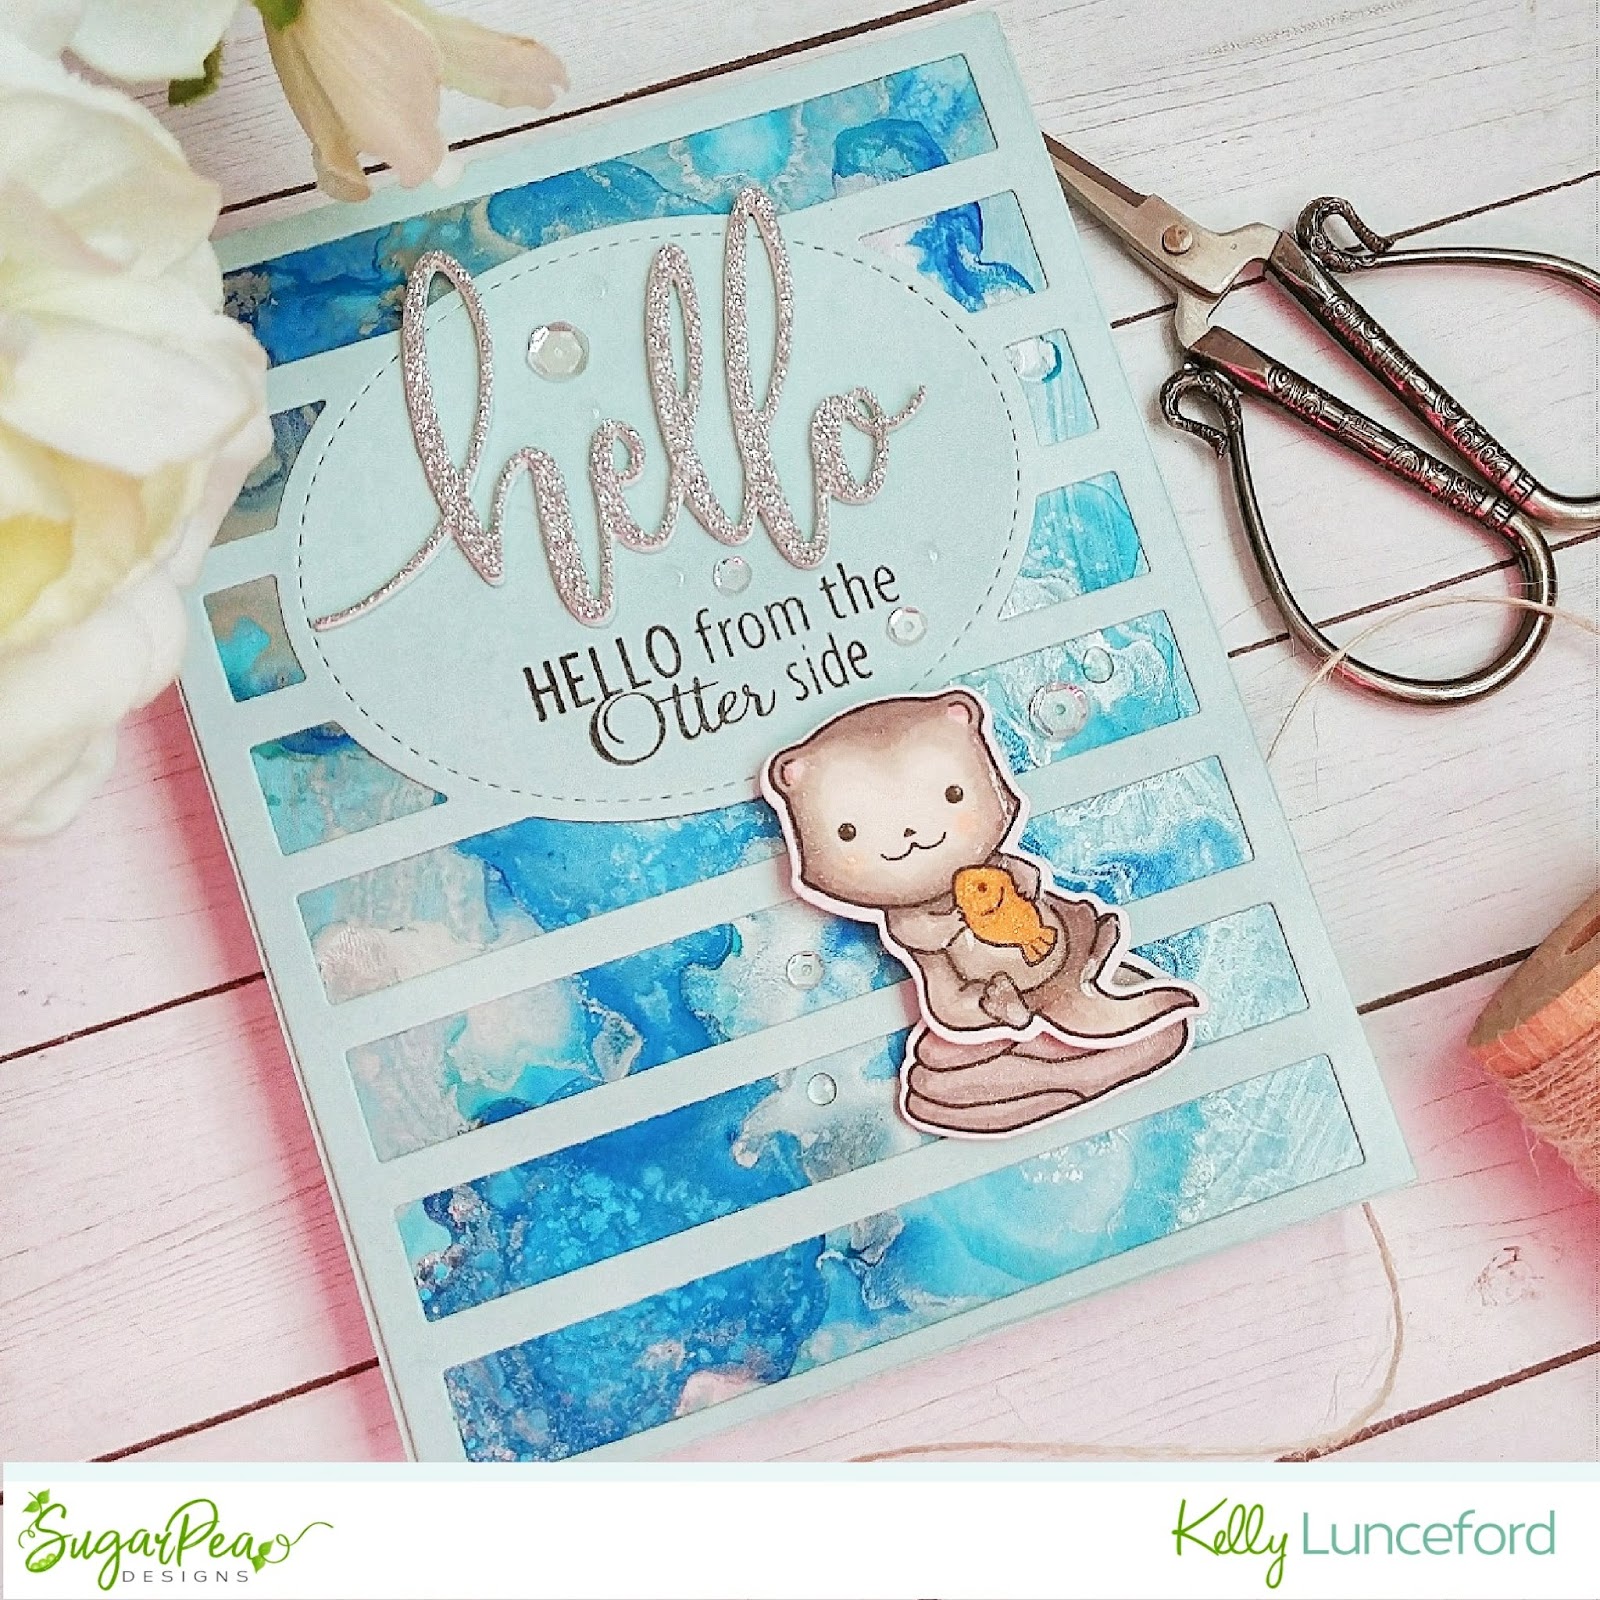
I couldn't resist using the Huggable stamp set again paired with this new sentiment set. I didn't use the bear yesterday, so I decided to use it today! I love these cute critters holding the big hearts! As promised, I also used the Circle Tag Confetti Cuts as an actual tag today! I'll also be sharing some other tags tomorrow using it as well, so stay tuned!


To begin, I cut a 4 by 5 1/4 inch panel of Kraft cardstock and then added some white paint splatter over the entire piece. I added the tag using liquid glue and foam squares. The sentiment is stamped in black and then die cut using the coordinating Thank You Confetti Cuts. I used liquid glue to attach the stamped portion to the die cut border.

The "from the bottom of my heart" portion of the sentiment is stamped in black at the bottom of the panel. I added a bow of Black Baker's Twine to the tag as well as the three little hearts surrounding the focal image. I added some glitter to the large heart and Crystal Glaze to the small hearts. The entire Kraft panel is adhered to a top folding A2 card base using foam squares for added dimension. Make sure you head to the other designers' blogs to see how they used this fun new set.
Daniel West
Thanks for fluttering by!

Saturday, October 27, 2018

Precious Remembrance Shop New Release Blog Hop!

I just love new release days! Inking up fresh, new stamps and getting the creative juices flowing is always so thrilling! Don't you agree? Today the Precious Remembrance Shop is putting on a fun blog hop to to celebrate the release of the fabulous new stamp set called Everyday! It has tons of sentiments that makes it perfect for, well...everyday! LOL! 
Would you like to win this set? Simply hop along to all of the designer's blogs {linked below} like and follow Precious Remembrance shop on Instagram and Facebook! The giveaway is open until October 30th, 2018. Winner will be drawn randomly! Good Luck and have fun!
Kelly Lunceford (you are here)


I have three projects to share with you today, the first one is this rainbow birthday ensemble. I had so much fun creating a repeated black and white background using the oblong circle image included in the set. It also has a triangle and a square which are all perfect for creating interesting backgrounds. I did end up by covering most of it up {lol}, but it won't be the last time I give it a try! 
The pillow box is tied up with a tag created using the emboss/resist technique and some rainbow ink blending. I used Distress Ink over the top for a pastel rainbow look, which I love! The "Happy Birthday" sentiment is heat embossed in white onto a black strip of cardstock and adhered to the tag using foam squares. It's all tied up with black and white Baker's twine.

I used the scattered heart image as the focal image of the card front. It is stamped in black on the lined rainbow paper and then the "Happy Birthday" sentiment is stamped below the hearts. I also added some crystal glaze to three of the hearts for some added detail. The finishing touch is a rainbow paper bow!

My second card is CAS with more emboss/resist rainbow blending. Once I had it blended, I used the same ink to add some ink splatters for an artistic look. I also stamped the "brushstroke" image in black onto a piece of white cardstock.

The "sending hugs" sentiment is stamped in black onto a white strip of cardstock and added using foam squares. I also added a thin strip of black cardstock tucked slightly underneath the sentiment strip for some added contrast. It needed something to "ground" it, and this was an easy addition.


I spritzed it with Shimmer Spray for sparkle and added a trio of Rainbow Sparkle Gems from Lucy's cards for some additional color and shine.


My third project uses the single brushstroke image in rainbow order with the hearts stamped in black over the top. 

I love how the gift card has an artistic feel, just like the images in this set. Usually gift cards are hidden inside a card, but in this case, it helps accent the design and brings in another visual element. 

I stamped the "thank you so much" sentiment above and below the gift card for balance. I love unexpected designs like this. I had so much fun using this new set! It is definitely one of those "all around" sets that is perfect for so many occasions! Thanks for fluttering by!

Tuesday, March 13, 2018

Hello from the Otter side!

"Hello from the Otter side!" Can't you just hear Adele belting it out? LOL! I'm over on the SugarPea Designs Blog today sharing this card using the newly released Otterly Adorable stamp set and coordinating Otterly Adorable SugarCuts.

During the release last month, I made most of my cards pink because it was Valentines time. Of course I was ITCHING to make a more aquatic feeling card with these adorable little otters.

I knew that an alcoholic ink background would be the perfect technique to showcase this little guy. 

I also used the new Large Striped Coverplate as well as the new "Sweet Incentive" Hello SugarCut which is the perfect companion for this particular sentiment.


I couldn't resist adding another sentiment to the inside as well as this sweet duo of otters. If you'd like more information on how I made this card, please head over to the SugarPea Designs Blog. Thanks for fluttering by!

Monday, November 20, 2017

Merry Monday #266 {Ho Ho Ho}

Welcome to this week's Merry Monday Challenge! Sue is challenging us to create a card with a Santa image! Confession: I kinda have a little thing for Santa! LOL! It's true, though! Definitely not in a creepy way, but in a way that I loved him as a child. If there was wrapping paper with Santa images on it, I WANTED THAT present, because obviously the BEST presents would be wrapped in Santa paper! Ha Ha! I especially love the vintage variety like the inspiration photo shows. If I have time this week, I'll try and share another card for the challenge, with a vintage Santa! I picked him up at Hobby Lobby last weekend and he's just too cute! Make sure to head over to the Merry Monday Blog to read all about the challenge and to see what everyone else has come up with!
For my card, I decided to use an alphabet that I got for my birthday back in August and haven't used yet. You know, I just HAD to have it and look at me, just barely getting around to it! (Hangs head in shame) It did work out nicely for the image I had in my head for the card I wanted to make, so I was glad I had it. It is the Simon Says Stitched Alphabet and I can't wait to use it again soon!


To begin, I sponged a 4 1/8 inch by 5 3/8 inch Bristol paper with Peacock Feathers Distress ink starting at the edges and working my way lightly to the center. After that was done, I mixed a little bit of the same ink with water and flecked it over the top for some added detail and interest. I spritzed it with Shimmer Spray and set it aside to dry. 
I die cut all of the Tremendous Treats: Christmas Santa shapes, stamped them in Palette Noir ink with the Coordinating Images. I colored them with Copic and Prismacolor markers. After they were done, I came back to the base panel and got to work stamping the "H" and "O" letters in Black ink. I think I stamped them to soon because one of them smeared (boo hoo), but I wasn't going to start over because I was loving the background. So...word of advice, make sure your ink and shimmer spray is properly dry!

I added the Santa images in the spaces left by each word using foam squares. I also felt like the background needed a little bit more attention, so I used a tiny little snowflake image from Eskimo Kisses here and there with Peacock Feathers distress ink stamped off once. I really like the extra detail it gave the card.

The letters are colored using Copic and Prismacolor markers. I was worried that they might turn purple with the red mixed with blue, but Copic Markers are Rockstars and proved it on this card! After they were colored, I added some Nuvo Glaze over the top as well as a sprinkling of gradiated chunky red glitter over the top. I have used the same technique HEREHERE and HERE. I just love how it looks with the red on red! It will definitely be used again this Holiday Season! I also stamped a sentiment from Christmas Critter Sentiments onto a strip of Pure Poppy cardstock and then embossed it in white. I really like how it added just a little something extra! I had so much fun on this card! I hope you all get a chance to play along! Thanks for fluttering by!

Saturday, August 5, 2017

Sweet Summertime

I've noticed that the light has started to change the last few days. As much as I love Autumn, it sent a panic through me and it reminds me that I need to savor the remainder of the Summmer; it happens to me every year. I've registered the kids for school, gotten most of the Back to School shopping done so I can just sit back and enjoy the last few weeks! I needed to make a few cards to send out this month and I thought this sentiment was perfect....and I'm obsessed with coloring these berries! I made a card earlier for the current "Make it Monday" challenge; magic slider cards. Let's just say mine wasn't so "magic"! LOL! I ended up making the colored panel into a completely different card, which I will be sharing soon. It used the berries and so I was still in the mood to color them.
To begin, I made a side folding A2 card using Spring Moss Cardstock and then die cut the 3 background "patches" using the coordinating "patch" die, but I can't find it on the PTI website to link it up. I can't imagine that they would have discontinued it and not the stamp set. Hmmmmmm.....  I decided to stamp the circular image from the Strawberry Patch stamp set using Simply Chartreuse ink rather than the coordinating Spring Moss for more definition. I was aiming for a "soft" look, but didn't want it to be washed out, either. I found this gave it a perfect balance.
The berries, flowers and leaves were all die cut using the coordinating dies and then colored using Copic Markers. After they were all colored, I added some Wink Of Stella to the highlighted areas of the berries for some added shine. I really like how the seeds on strawberries look so I added some white Nuvo Drops onto the seed portion for some dimension. I realized AFTER I added them, that strawberry seeds are recessed into the berry, rather than on top, but I still like the detail it gives the berries. I didn't have yellow drops, so I used white. I colored the seeds underneath yellow with a Copic Marker and I was hoping that the white would pick up the yellow like it has on other designs that I have done, but it didn't work. I guess the area was too small.I added Morning Dew Nuvo Drops onto the leaves, around the sentiment and the center of the flowers.
I arranged all of the berries, leaves and flowers in a cluster in the center of the card. I thought it would look less predictable and give it a little bit of interest. I also tied a bow of black baker's twine onto the side of the card to tie in the black. 
The inside sentiments are from the Strawberry Patch Sentiments and are so fun to use. I'd been missing the "much" stamp FOREVER which made many of the sentiments obsolete and I was so bugged. I FOUND IT while making this card! I was so happy! It was tucked in between the paper that is included in the stamp set. I swear I looked there like 1,000 times, but there it was! Happy Day! I also added a popped up berry to finish it off! I had so much fun putting these cards together (I made two identical cards)! I can't wait to pop them in the mail! Thanks for fluttering by!

Wednesday, July 26, 2017

The ocean in a drop!

It's been a while since I've shared a mermaid card and I have just been DYING to post this one! LOL! I made this last week but I resisted posting it so I didn't "over-mermaid"! I want all the cards to be mermaid cards! Ha ha! I am absolutely smitten with the Mermaid's Tail stamp set and coordinating dies.
Actually, it all started when I found my missing polka dot stencil from American Crafts. I've not used it in over a year, so I decided to get to work creating a polka dot background using Broken China Distress Oxide Ink and a spritz or two of Shimmer Spray on the backside of the stencil. Wow! What a bubbly, shimmery background it made! It was perfect to add this fabulous Mermaid's tail! 
I heat embossed the tail image onto a piece of Cool Caribbean cardstock using Nuvo Shimmering Pearl embossing powder. It was the perfect amount of shine for this card! I die cut it and then added it to the bubbly background using foam squares. I saw a fabulous card on Instagram from Jessica at All the Sparkle and I LOVED how she created the bubbles using sequins. While mine don't look like hers, she definitely inspired me so I wanted to give her a shout out! I used the Mermaid Mix Sequins as well as a few rain drop embellishments. I just couldn't resist and added a few more Nuvo drops here and there! The sentiment was stamped in black and then I added one rain drop to the center of the "o" in drop! It actually magnifies the "o" in a cool way! I'll be sharing a new card for The Challenge tomorrow so stay tuned! Thanks for fluttering by!


Monday, July 17, 2017

Wish you the most beautiful day!

 Hello! I hope you all are having the most beautiful day! I had some time to kill the other day while I was waiting for my daughter's dance class to end so I decided to try my hand at the "no line watercoloring" technique. I have been playing around with the Beautiful Day stamp set in the last few days. I experimented with some Copic markers on a card which I will be sharing soon. The first time I used the set I opted to use the solid images which you can see HERE. I just love the versatility that you can achieve with each of the different types of images. I love it when I can stretch a stamp set!


 Because I was just experimenting, I did some simple stamping with a reliable layout. I was really just hoping to get something that I could make into a card if it turned out.


You can see some of the shading that I did here in this photo. I haven't done a lot of researching on the subject, but I think that most people just use one shade of color and blend it out. I decided to make things difficult and use three. I will try only using one next time. 


To begin, I taped my watercolor paper onto my grid paper and stamped the images using Vintage Photo Distress ink. I did some masking so that I could have a nice end result...if I made it that far. (wink) I chose two different aqua painter pens; a fine tip and a regular tip and in the end, I ONLY used the fine tip. I liked the control I had while working!


 You can see my process here. It really is so fun and relaxing to sit and work on a project like this. Four flowers was a lot of work, especially for my first time and I did find myself getting lazy toward the end. Shame on me! I actually like the way this looks over my finished card, so I am thinking that less is more in this case. I can't wait to try it again!
 Once I was finished with the flowers, I moved on to the leaves opting for three colors for these as well. The shading on them really does create some movement where their outline images gives none. That is really when you see the magic...once they start to come alive as the water and paint hit the image.
 At this point, I was just so happy that it actually worked, so I chose to add a simple strip of vellum with the sentiment stamped in black. I also added a few sequins as well as some Morning Dew Nuvo drops here and there on the flowers as well as the leaves. I made them small and realistic looking. I added some to the card I made using Copic markers and I made them bigger and more of an embellishment rather than a realistic looking dew drop. Like I mentioned, this was fun and I can't wait to try this more often so that I can get better and better. Thanks for fluttering by!


Thursday, July 13, 2017

The Challenge #91 Sending you Sunshine!

I am so excited to finally jump on the Oxide ink bandwagon and get inky! Today's new sketch for The Challenge made it possible for me to show off a fabulous oxidized background! I love the result! I can see why these inks are so addictive! I only bought a handful of colors because my birthday is in a few weeks and I wanted to give people ideas of what to get me! Ha ha! Today's design was made using this week's challenge for The Challenge. You can check it out HERE. You can also see the other designers below.                      No automatic alt text available.            
     
I started my design by cutting a 4 by 5 1/4 inch piece of Stamper's Select White cardstock. I used two colors of oxide inks to blend onto the paper; Spiced Marmalade and Fossilized Amber. After I had it blended like I wanted, I stamped a few of the images from the Hello Sunshine onto the background using a combination of water and more ink for a nice layered effect. I also spritzed the entire piece with some water for extra oxidization.
The sunshine sentiment is die cut 4 times out of black cardstock using the Sunshine die and then glued together. Once that was done, I set it aside to dry while I worked on the rest of the card. I cut a piece of white cardstock that would fit the beginning of the sentiment as well as the die cut sunshine portion. I stamped "sending you" in Palette Black ink. The white piece was adhered to a strip of yellow and vellum cardstock for some added interest and to fit the parameters of the sketch. I used my Wink of Stella pen to add sparkle and I also added some Glossy Accents over the entire "sunshine" piece for a fabulous shine! It looks so amazing on the card. I realized mid way through my die cutting that I had forgotten to save the dot for the "i" so I used a drop of ebony black Nuvo drops which was the perfect touch to fix my mistake. It added just the right amount of dimension and shine. I added the entire focal piece to an A2 black card base.
The finishing touches include the two "hello" and "hiya" sentiments stamped and heat embossed added to the card. I usually like to do something clever or unexpected when there is a little detail like this on a sketch challenge. While it isn't super clever, it does add an extra element of whimsy. I also spritzed the sentiment panel with a few markers for some "scattered sunshine" if you will! Ha Ha! A trio of gold sequins finish the design! Thanks for fluttering by!

Tuesday, July 11, 2017

You make The World a better place

Hello! I hope you all are having a wonderful start to your week! I am simply enjoying Summer and all that is has to offer! Summer has never been my favorite season, but I am really enjoying it more and more the older I get. Perhaps it is because time flies so much quicker these days and I am desperate for it to slow down!
One of the main reasons that I am enjoying Summer so much is the added creative time I am getting! It is sunshine to my soul!
I am so happy to be part of a creative community on a regular basis again. It has been fun to reconnect with old stamping friends and make new ones along the way as well. My time away has been spent with my adorable children and babies and I don't regret that ONE BIT! 
I was so happy to sit down and make a few similar cards using Concord and 9th's Globe Greetings and coordinating dies. I have been itching to use this set with all of its darling floral images. I made a few graduation cards with it when I first got it but then it got set aside and now I am thrilled to revisit it.

I started off by stamping the various floral and leaf images onto a panel of Stamper's Select White Cardstock. I only stamped them on the right hand side since I already knew the layout I wanted to use. I stamped off the larger, bold images once and then came back in with the detail images at full ink strength. The only exception to this is the very light pink flowers. The hue of pink was too light to stamp off once, so I decided to choose a darker shade instead. I really like how these turned out. I actually wasn't planning on making a second card, but I was enjoying the stamping process and the result so much I just couldn't stop!


I die cut the globe circle portion out of white cardstock as well and stamped the images exactly the same as before. The fabulous "you make the world a better place" sentiment is simply stamped in black Palette ink. The "friend" sentiment strip is heat embossed in white onto a black strip of cardstock and adhered to the front using foam squares.
I used the To the Point Edgers dies on the colored cardstock, using different designs for each card. I've only used them once so far on THIS card so I was happy to use them again. I know I will be reaching for them often. I made sure to leave enough of the colored cardstock to have enough room to stamp and emboss the globe stands as well. I embossed the stand on the orchid card using silver embossing powder and I just stamped the image in black on the Hawaiian Shores piece. Once all that was done, it was easy to pull everything together. The finishing touches are a few Black Ebony Nuvo Drops here and there as well as a few Sparkling Clear sequins...surprise, surprise! Ha Ha! 
I didn't have a recipient in mind for these particular cards as I was really just making them to scratch a creative itch, but in the end I realized that this sentiment will work perfectly for the cards my daughter and I are creating for the Hope Squad. I stamped the same sentiment on the inside and added a stamped flower and a few leaves. I just couldn't resist adding a tiny shrinky dink using the coordinating "friend" sentiment from the front. It just pulls everything together and it is just so darn cute! Thanks for fluttering by! P.S. I'll be back on Thursday for this week's challenge for The Challenge