Showing posts with label teacher gifts. Show all posts

Monday, August 11, 2025

From Tiny Acorns

I'm so happy to be here today sharing three back-to-school cards/gift card holders using a potpourri of products! My crafty session started out because I wanted to make the cute backpack card, but then I just couldn't seem to stop!

To begin, I die cut all of the pieces three times using the Go To Gift Card Holder Backpack Accessories Die from white cardstock and then I did all of the stamping. I like having options and I figured I may as well make more than enough, especially while I have all of the images lined up in the MISTI. Because I had so many pieces, I was able to make the three cards for today with a few pieces leftover.

I did all of the stamping using the Go To Gift Card Holder Backpack Accessories Stamp Set. Once that was done, I got to work on the backpack itself. I used the Go To Gift Card Holder Backpack Die and cut the main backpack shape from Mint Julep cardstock, the front pocket from a prized scrap of Aqua Mist cardstock and the side pockets are cut from Vintage Cream as well as the loop at the top. The straps are also cut from Aqua Mist, but when it was all said and done, I should have just used Mint Julep.

I'm planning on sliding a gift card down in the slot on the backpack, so I did assemble this like you do for the gift card holder. If you're not planning on using it that way, you can just glue and stick to your heart's content! ha ha! I cut the zipper pulls from silver cardstock for added realism and attached them with foam squares.

I had fun arranging all of the elements in the pockets and at the top. 

Make sure to stamp the pattern on the front pocket if you're going to; I forgot and had to do it when it was already assembled and let's just say, there are some strategically placed school supplies to cover some problem areas! ha ha!

My favorite thing is the cute paint set; I added some Ranger Glossy Accents to each of the colors. I let it dry and then added an extra coat for maximum glossy-goodness! The background papers were pulled from the hoard of SU! pattern papers I’ve had for years! I'm so glad they got put to good use! I added a few LEAVES for that traditional back-to-school feeling.

As you can see, my second card takes us to a land lost in time! I simply ADORE the Teach and Inspire Stamp Set (retired sadly) and I don’t think anything will ever compare! This is hands-down my FAVORITE school-themed stamp set of all time! To begin, I did the stenciling on an A2 panel of white cardstock using the stencils that are included in the  Elegant Notes Stationery Kit. I know I have been using these quite a bit lately, but I'm just loving them. I'm sure it's just a phase, as I’m guessing you all can understand! ha ha!

I stamped the "Looking forward to a wonderful year" sentiment at the bottom of the panel using black ink. The vintage chalkboard was created by stamping the sentiment onto a piece of Stormy Sea cardstock using Versamark ink and then heat set with white detail embossing powder. I added a frame that is cut from Kraft cardstock to create the faux chalkboard. I added it to the center of the stenciled panel at a jaunty angle using foam squares.

From there, I had fun adding all of the stamped elements here and there until I was satisfied with the arrangement. As you can see, the paint pan got the same glossy treatment....insert heart eyes!

This card also got a few more leaves; I have been resisting autumn coming, but these leaves just felt too-perfect!

I added the entire panel to a top-folding A2 card base using liquid glue. Once that was done, I used a Post-It Note to cover up the sentiment at the bottom and the chalkboard sentiment and added some black ink splatter; just a light splatter for added detail and interest.

Continuing with the theme is the last card for today. This sentiment is probably my favorite in the set and was the inspiration for the entire card. I didn't want to use the tree image included in the set, but I remembered I have quite a few different acorn dies in my collection and I got to  work!


To begin, I used the Just Notes Die and cut the torn notebook paper piece from Vintage Cream cardstock. I stamped the sentiment using Vintage Photo distress ink. I added some Antique Linen distress oxide ink and a touch of vintage photo ink as well. The paper clip is also from the same die set and I cut it from silver cardstock.

I created another vintage chalkboard, but added some white paint splatter to the Stormy Sea cardstock before I added the frame. My daughter is just the cutest; she said, you should have used black cardstock to make it look like a chalkboard. I kindly explained to her that it WAS supposed to be a chalkboard, just one from the olden days! She said, "I've never seen a chalkboard like that except for at our old church building." I replied with, you mean the one that was built forever ago? LOL! So, hopefully those of you who are of my same vintage will know it is SUPPOSED to be a chalkboard! ha ha!

All of the foliage and acorns are from the Curio: Autumn Findings Die and are cut from white cardstock and then colored with blender brushes and dye ink.

The cute little bee is leftover from another project and then I just had fun adding in the stamped images. I was sure glad I made so many of each thing so I could pick and choose!

I had so much fun working on all three of these cards! I still have quite a few back-t0-school ideas I want to try, but I'm not sure if I'll have time! fingers crossed.....thanks for fluttering by!


Monday, July 29, 2024

The Greetery These are the Days Collection

Hello and welcome, friends! I've been busy as a little bee working on all kinds of fun projects and I'm so happy to finally be able to share them with you! Today I have 3 projects to share with you using all of the beautiful new products from the These are the Days Collection from The Greetery! Don't forget to head to The Greetery Blog for the official "Meet and Greet" for all of the new products! Also, don't forget to leave a comment here, and on each of the designers' blogs, for a chance to win one of two $50 gift certificates to the shop!

As you've probably gathered, this collection is calendar-themed which is so fun and unique! They are being released just in time to get started on all of those handmade Christmas gifts we all love to create!

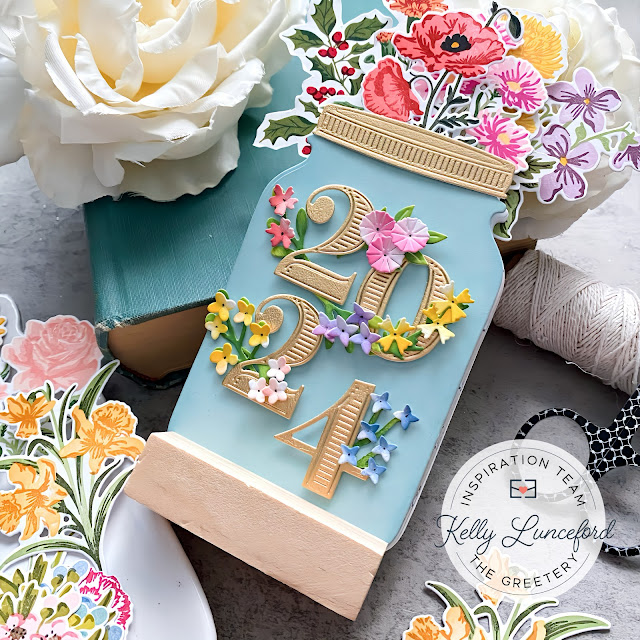
My first project is a 2024 floral desk calendar for my upcoming 5th grader to give to his teacher. It begins at August and ends with December. I will make her a new one for 2025 and have my son give it to her as part of her Christmas gift!

I used the new Calendar Basics stamp set to create each of the calendars for the month. As you can see here, I used the circle image and "Big Day" sentiment to highlight the first of school that is approaching WAY too quickly! eek! 

This project is easy to put together in assembly line fashion! To begin, I stamped the grid image using the Calendar Basics stamp set and Hickory Smoke distress oxide ink on white A2 panels. I used my MISTI to make quick work of this part. Once the panels were stamped, I used the Jumbo Jar Die to cut each of the calendar months. I used the Calendar Grid stencil to add color to each of the months. I had previously stamped ALL of the Birth Month Blooms flowers so I was able to decide which color stenciling I wanted to do based on which flower would coincide with that month. Hopefully that makes sense!
I tucked the flowers into the jars and secured them with liquid glue. I alternated them from one side to the other so that when they are stacked up the display would be full and beautiful. If you look at the full calendar all put together, you will see some violets popping out on the right-hand side; I added those to a blank jar panel to the back to give the calendar more symmetry and additional color .


I was pleased to find some wood blocks to use as the calendar stand and you can find them HERE. They are a good price and I will be able to give calendars as gifts as needed! The cover was created using the previously released Bold Numbers Die to make the 2024. I added some flowers using the BotaniCuts: Wildflower Mix dies and the Winter Medley Die. The Greetery is also offering some pre-printed 2025 calendar pages and I used the cover as inspiration for this cover.

My next project is a birthday card I just made for my daughter who celebrated her birthday on the 22nd! I just love how you can make your projects so personalized with these new products! This card features the Calendar Grid Die paired with the Spiral Bound die, (this gives you the option of creating faux spirals like I did here, or to make the holes to add the real spiral binding on an actual calendar) Birth Month Blooms, and the new One Fine Day stamp/die set.

One of my favorite flowers in the collection is the Larkspur and I was pleasantly delighted to find out it is July's flower! Yay! I had already told myself I would use it no matter which month it was for! ha ha! I added in a few other month's flowers to give it variety and additional color!

To give the calendar personalization, I added the 22 that was stamped using the Calendar Basics stamp set on a rectangle that was cut when I die cut the grid. I popped it into the proper space using a min foam square.

I used metallic cardstock for both the spiral binding and the cute hanger at the top.

My cute daughter kept leaving comments on my Instagram posts (if it was a birthday card) saying, "Can this be my birthday card?" so I was worried she would be disappointed she didn't get one that she commented on, but she LOVED this one and said she liked it best!

My final project for today is a fun notecard set using the different Birth Month Blooms. I haven't mentioned before, but each of the Birth Month Blooms are compiled in quarters. There is a Q1, Q2, Q3, and Q4 stamp/die set so you can buy them as you need them or for those months where loved ones have special days. 

I had set out at the beginning of my creative sessions by stamping all of the flowers multiple times so I would have a good variety of images to pick from as I was creating! Doing that made this project go much quicker than if I stamped them all out one by one.

Here you can see a few of the different varieties with their coordinating envelopes.

 I have made and shown this stationery box a few times over the years, but for those who may be new, I will share the dimensions. The bottom of the box is made using a piece of cardstock measuring 8 1/2 by 10 and then score at two inches in from each side. The top is made using a piece of cardstock measuring 7 1/8 by 8 5/8 and score on each side 1 1/4 inches from the edges.  Use a bone folder and cut tabs on the four sides and secure with ScorTape.

As I mentioned before, this box holds nine cards, so I wasn't able to get a full year of cards. I used foam squares for each of the cards so if you made them flat, you could possibly get 12 in there. I also want to mention that the shop will also be offering some Birth Month Blooms Cutables so you can save some time using those as well. They would be perfect if you're planning on making a bunch of gifts for Christmas and you find yourself in a pinch! 
Just a reminder that the collection will be available for purchase tomorrow at 10 am EDT. Thanks for fluttering by!


Kelly (you are here)


Thursday, February 8, 2024

Happy Heart Boxes

I've been busy as a little bee the last few days working on some "just for fun" projects, including these two heart boxes. My 4th grader has two teachers this year: one in the morning and one in the afternoon. He is my last child in elementary school so I was shamefully looking forward to only having one teacher to spoil, but that isn't the case, AND, it's not like I'm not used to making multiples of things, so it's been fine! ha ha! I've been having fun putting together their gifts for Valentine's Day, and wanted to make something to hold some chocolates and a lip-balm that is small and I don't want it to get lost with the rest of the items. Cue the amazing Happy Heart Box Dies from Concord & 9th! I made a few of these in 2022 and haven't revisited them since!

They are really easy to make; I simply followed the video that you can find underneath the product photo. I just fast-forwarded until I got to the part where she begins making the box, but she does show some ideas for the other dies included in the collection. I die cut all of the pieces for each box from Pale Peony cardstock and then assembled them using the video.

I used some cute pattern paper called Hello, Darling from The Paper Studio...this is a 4 by 6 pad I believe...something smaller in scale. I used the heart die included in the collection: once from the pattern paper and once from Pale Peony. This pattern paper is very thin so I wanted to glue the two hearts together for a more sturdy piece.

I heat embossed the sentiment, which is from the retired Be Mine, Valentine stamp set from PTI in gold powder onto a black strip of cardstock. I notched the end for added detail and then used black foam squares to pop it up on the box.

The flowers are from the Into the Blooms: Wreath dies and I colored them using SU! ink and small blender brushes. I added them to the boxes using mini foam squares. These boxes match the style of the  cute notebooks I found on Amazon and some cute pens. I will share the links here if you are interested. I am not an affiliate with Amazon, I just find quite a bit of cute stuff there! ha ha!
Thanks for fluttering by!

P.S. I feel really bad when people leave me comments and questions that I can't reply to. I'm not sure what's going on, but SUE asked a question about THESE cards and what color the pink is....it is Rose Red from Stampin' Up! I hope you see this....I feel bad that it's been so long! If you see this, will you please leave a comment so that I know that you have seen it?


Sunday, August 14, 2022

Papertrey Ink August Release Countdown Day 1

Did you think I dropped off the face of the earth? ha ha! It sure feels that way, I bet! I'm here, don't worry, but things have sure been hectic around here! My three youngest boys started their football season two weeks ago and my car decided it would be super fun to die! Ugh! Anyway, we've somehow made it through and my car should be fixed by Monday (fingers crossed) I also hosted the ladies church group at my home on Wednesday so I was a busy little bee getting ready for that. whew! Anyway, I'm thrilled to be here today for day one of the August Papertrey Ink release countdown! 

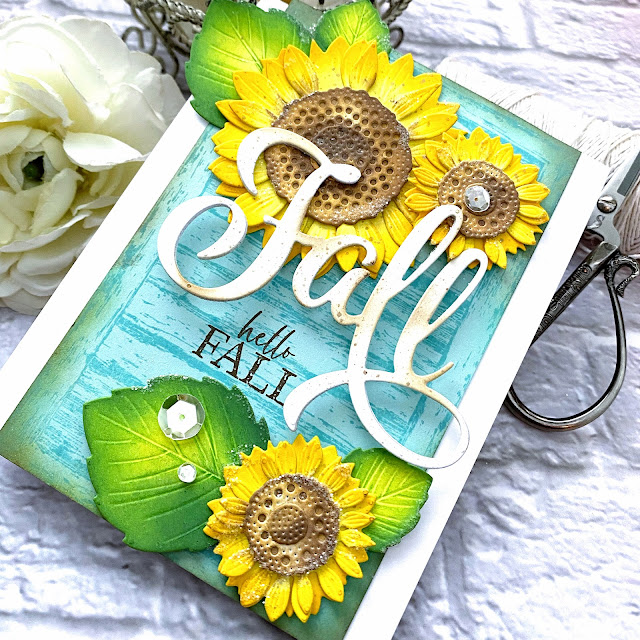
My first card uses the fabulous new Into the Blooms: Sunflower dies and the new Larger Thank Life: Fall die! I absolutely adore both of these products and love how nicely they work together!

I die cut all of the pieces I would need to create 4 sunflowers out of white cardstock. I used an assortment of Distress Oxide inks to bring them to life! I opted to use liquid glue to put them together; I have a tendency of making rather thick cards and I'm trying to get better, without skimping on dimension. The fun thing about these sunflowers is that you can "fluff" the petals up to create realistic looking blooms! I had so much fun fluffing while I was  making them, but do you think I remembered to "fluff" them for the picture? 

I stamped the Wood Plank Background Stamp onto a panel of Aqua Mist cardstock using Vintage Patina Distress Oxide ink. I also used a bit of brown ink to age the edges a bit as well. I stamped the "hello fall" sentiment, which is from the Just Sentiments: Happy Fall mini stamp set, using brown ink onto the wood background.

From there, I arranged the sunflowers and leaves using foam squares and liquid glue. The Larger than Life: Fall word was die cut three times from white cardstock and glued together and then grunged up a bit using brown ink and splatter. I simply glued the top fo the F, A, and the Ls to the flowers using liquid glue. I added some glitter and sequins for some sparkle and shine. The entire focal panel is glued onto a top folding A2 card base!

This is one of those "squeal-worthy" new products that you're sure to fall in love with, just like I have! My kiddos are heading back to school soon and this Go-To Gift Card Holder: Backpack and the coordinating Go-To Gift Card Holder: Backpack Accessories stamp set are just the cutest thing ever!

I chose to use double sided pattern paper for my cute and feminine backpack; it's actually the perfect thing because of the coordinating patterns and scale! I ended up pulling in a few different prints from the same paper pack: Recollections Floral Fantasy purchased at Michaels!

I didn't have a gift card to tuck inside and with my car being in the shop, I couldn't run to the store to get one, so I had to do without. The gift card tucks down inside the main, big flap where the cup, ruler, and notepad are sticking out from. I adhered everything in such a way that the gift card will still be able to slide in easily!

I was planning on giving this to one of my boys' teachers, but my cute friend text me later in the day that I made this to tell me that she just accepted a 6th grade teaching position and is starting on the 22nd! Wow! I thought just how perfect this will be for her and I can give her a gift card to get her classroom set up!
Join me again tomorrow for day 2 of the countdown where things will take a spooky turn! ha ha! Thanks for fluttering by!


Sunday, April 24, 2022

Papertrey Ink April Release Day 1

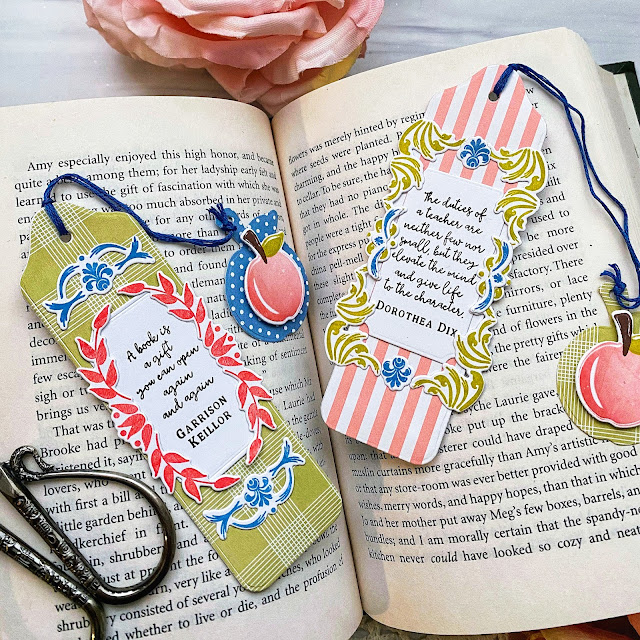
Hello and welcome to day 1 of the Papertrey Ink April release countdown! FYI: This is a quick post as I am sitting April out, but I am sharing a trio of bookmarks that I made using a few of the new products! I was always a bookmark fanatic as a child and loved getting new ones any chance I got; now I simply grab an old receipt or piece of junk mail! ha ha! The new Bookmark dies will allow me to create any type of bookmark I can imagine!

For the three bookmarks, I die cut a sturdy base using white cardstock and then die cut another bookmark using the Bitty Big: Blueberry Sky, Spring Moss, and Pale Peony pattern papers. I used ScorTape and a bit of liquid glue at the top to secure the two layers together.

I used the new Go-To Gift Card Holder: Book and Book Scrolls to decorate each of the three bookmarks. The book mark die set comes with an apple, star, and heart shape with a hole at the top so you can add them to the top of the bookmark, or use them at the end of the string like I have here.

Teacher Appreciation week is coming up quickly, so I thought it would be fun to make a bookmark for each of my little boys' teachers.


I barely scratched the surface of the beautiful possibilities of the new Book Scrolls stamp set. These are so pretty and will be perfect to accent all sorts of cards and projects!


I used DMC floss to loop around the top of the bookmark and then tied the apple piece with a knot. The apple stamp is from the new Go-To Gift Card Holder: Book stamp set. There are so many fun options with this new suite of products! I can't wait until I have some time to put them to good use! Thanks for fluttering by!
P.S. Bonus points for guessing which book this is! ha ha! If you know it, you know it! :)