Showing posts with label patriotic cards. Show all posts

Friday, July 4, 2025

The Greetery {Sweet Land of Liberty}

Happy Independence Day! I hope you all have a wonderful day today! I wasn't quite ready to put the red, white, and blue away, so I'm back with one last patriotic card! We're headed to the parade this morning, my son wants to go bowling, we'll have a barbecue, and then watch fireworks! I hope you all have some fun plans with those you love!

To begin this card, I cut an A2 panel of white cardstock and then used the Big Yay Stencil. I also added some blue and red ink splatter to make it appear even more festive! Next, I die cut it using the Sweetest Frames Die and then stamped the border using the Sweetest Frames Stamp Set

I stamped the sentiment using the Land of Liberty Stamp Set and then cut it using the Land of Liberty Die. I attached it in the center using foam squares for dimension. I also added a bow that is also included in the Sweetest Frames Stamp Set (linked above).

The background was created by stamping the Spring Meadow Background using Pacific Point ink from SU! on an A2 panel of Spring Rain cardstock. I layered the sentiment panel using foam squares.

I had a few flowers left over from the tags I made for THIS post and I thought they looked so cute tucked around the sentiment.

The finishing touch is a few stars that are die cut from silver glitter cardstock using the Star Struck Die. I added the larger ones with foam squares and the smaller ones are adhered with liquid glue. I gave the entire panel a spritz of shimmer spray and then glued it to a top-folding A2 card base using liquid glue. I'm feeling a little sad to be putting away the patriotic stamps/dies, but I've sure had fun with them this year. I was quite proud of myself for sending ALL of the patriotic cards I made over the last few years to friends this year. Thanks for fluttering by!


Friday, May 30, 2025

The Greetery {Star Spangled Summer Collection} Release Day

I'm so excited to be here sharing a bonus card using the Star Spangled Summer Collection from The Greetery! This is such a beautiful new release and I don't want to put it away just yet! I made a pair of cards a few days ago using the collection paired with some previously released products to show you some different options; I will be sharing those sometime next month, so stay tuned! The Star Spangled Summer Collection will be available for purchase TODAY beginning at 10 am EDT.
My card for today features some of my favorites from the Star Spangled Summer Collection paired with older favorites from the These are the Days Collection. I was inspired by this particular 4th of July sentiment included in the Land of Liberty Stamp Set to bring in the calendar pieces for something unexpected. Since the These are the Days Collection was released last year, I have been having fun using it for autumn./thanksgiving cards, baby cards, and now this patriotic design.

To begin this card, I gathered all of the stamps/dies/etc. from the These are the Days collection that I planned/envisioned using. I have been organizing my stamps and dies by collection for the past few years and it makes it so much easier to find what I'm looking for! I just looked through that section and pulled the things I would need. Once that was done, I die cut the pieces using the new Wave the Flag Border from white cardstock. I colored them using faded jeans, prize ribbon, lumberjack plaid, and aged mahogany distress oxide ink and finger sponge daubers. I gave all of the pieces a spritz or two of shimmer spray and set them aside to dry.


Next, I die cut the flower cluster using the Birth Month Blooms Q3 Die and the Birth Month Blooms Cuttables. These are the pre-printed flowers, but you could definitely stamp them out as well. I love that the Larkspur is the flower for July and it just happens to be so beautiful with the red, white, and blue! Once that was done, I got to work on the calendar.

I cut the top portion using the Spiral Bound Die; Vintage Cream for the scalloped piece and gold metallic cardstock for the coils and hanger. I used the Calendar Grid Die and Vintage Cream cardstock to complete the calendar. I glued everything together using liquid glue. I stamped "July" and the little 4 on the blue rectangle using the Calendar Basics Stamp Set. I totally forgot to leave space for the MTWTHFS image, but I think it looks fine without it! I kept a few of the rectangle pieces from the center of the grid and then just used the same sponge dauber to color it and then I stamped the 4 with pigment white ink. It was a good thing I saved a few of the little pieces because this was my 3rd attempt! Ha ha! The little gold oval around the date was die cut from gold cardstock using the Calendar Basics Die

I stamped the 4th of July sentiment, which is from the Land of Liberty Stamp/Die set, is stamped with both lumberjack plaid and aged mahogany distress oxide ink for an ombre look. I had a few pinwheels leftover from my Grand Finale card that was shared yesterday. I also had some stars leftover from the project I was talking about earlier, so I put them in the center of the pinwheels and I love the look!

I added some antique linen distress oxide ink around the edges of an A2 panel of white cardstock and the edges of the calendar. Once that was done, I glued the Wave the Flag Border pieces to the panel using liquid glue. The calendar is attached using foam squares as well as the 4th of July sentiment. I placed the Larkspur flower on the side and then attached the pinwheels. The entire panel is glued to an A2 white card base. I had so much fun making this card! Everything will be available for purchase TODAY at 10 am EDT in The Greetery Shop! Thanks for fluttering by!


Thursday, May 29, 2025

The Greetery {Star Spangled Summer}

Hello and welcome, friends! Today I'm sharing some projects created with fun new products from the new Star Spangled Summer release from The Greetery! This is the perfect collection for patriotic projects and beyond! As you can see, my first two projects are for other occasions, which makes this collection so versatile! The official "meet and greet" for all of the new products will be over on The Greetery Blog. And, as always, make sure to leave a comment here, and on each of the designers' blogs, for a chance to win one of two $50 digital gift cards to the shop!

Up first is a celebratory card for all kinds of occasions; this could definitely be used for graduation, accomplishments, new job, etc. The next two projects feature products in the Star Stream Suite of products; this one using the Star Stream 3D embossing folder and the new Star Stream sentiments and Star Stream Hot Foil.

To begin, I used the Star Stream Hot Foil on a pale blue cardstock with champagne foil. Once that was done, I carefully lined it up inside the Star Stream embossing folder and ran it through my machine, setting it up the sandwich for the correct type of folder. Once that was done, I trimmed it down to 4 by 5 1/4 inches and mounted it on a top-folding A2 card base using foam squares.

The sentiments, which are both from the Star Stream Sentiments Stamp/Die set, are heat embossed in gold and then added using foam squares. I gave it a spritz of shimmer spray and added a trio of sparkling clear sequins.  I used the Star Stream Stencil to decorate the flap of the envelop and then stamped the sentiment using gold ink.

My next card uses the Star Stream stencil and the Star Stream Die. I can't wait to try using the stencil with the 3d embossing folder. I have an idea for how I want to use it, so stay tuned!

These sentiments are also included in the Star Stream Sentiment Stamp Set. I used the gold ink for these.

To begin, I die cut an A2 panel with the Star Stream Die and then used the Star Stream stencil over the top. I chose some warm pink tones for a baby card.

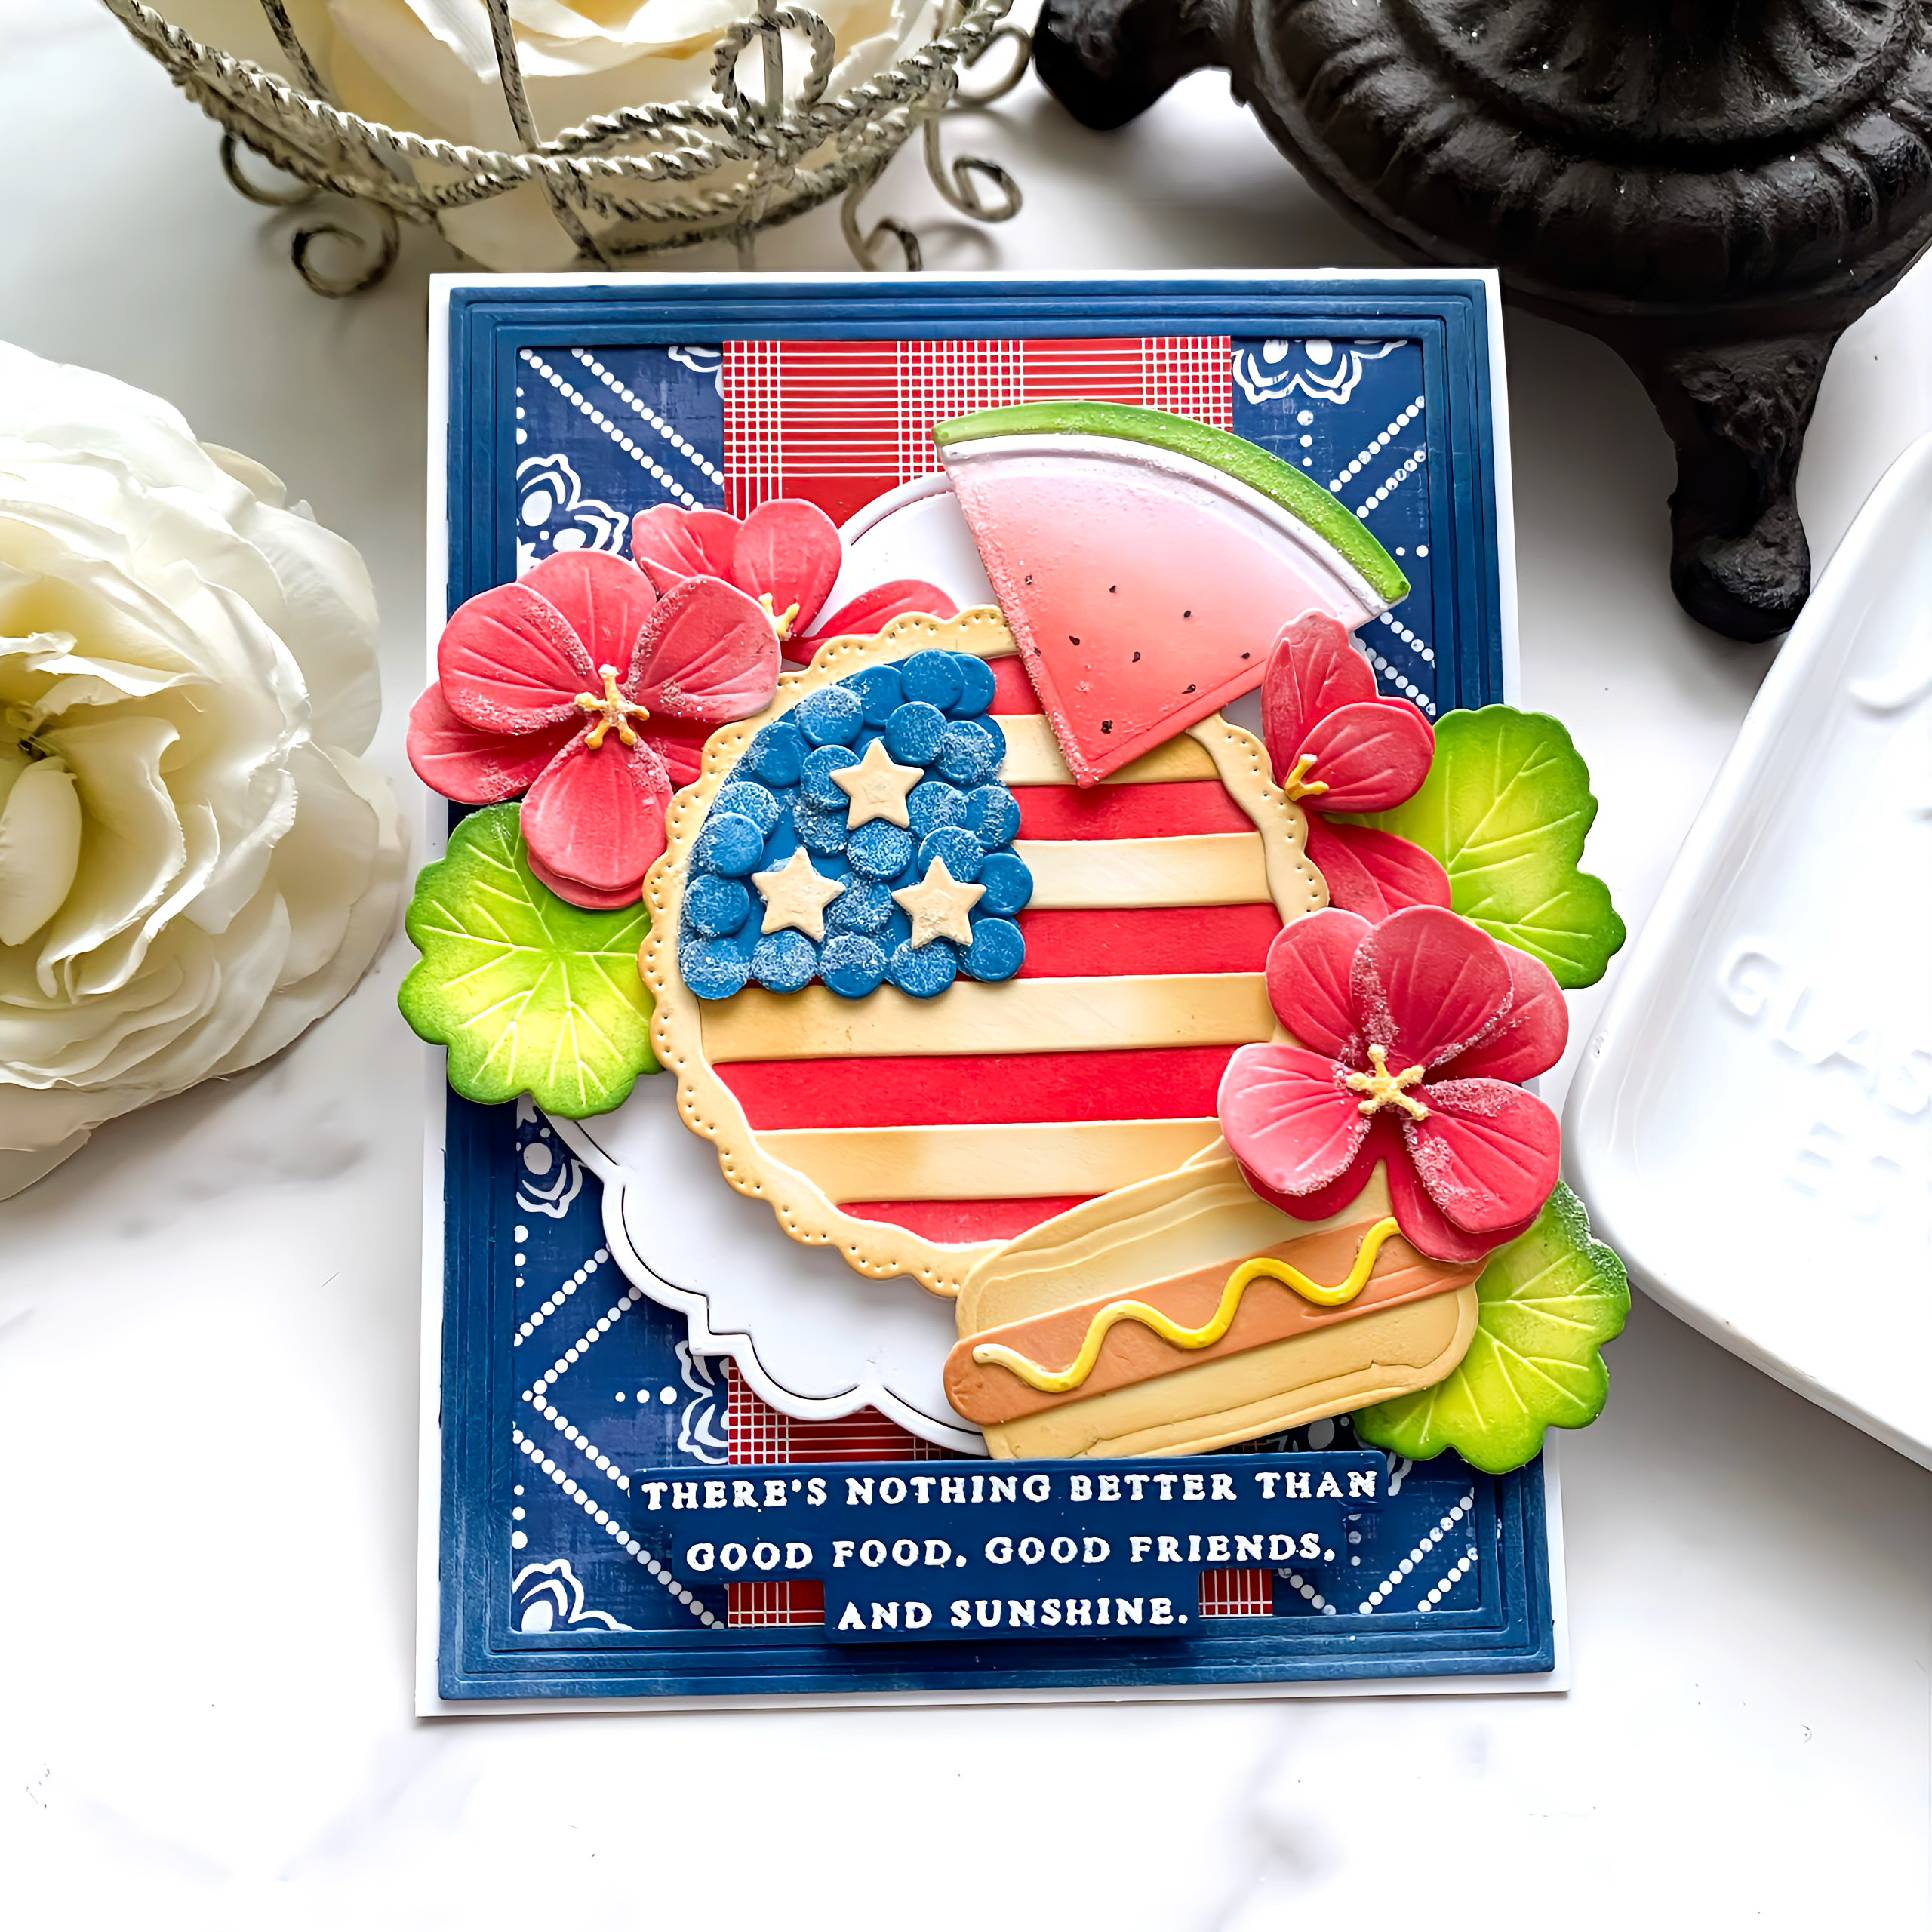
Which, I was thinking how cute this sentiment would be using the These are the Days Collection! I created a coordinating envelope for this card as well!

My next two cards feature the new Land of Liberty Suite of products and I couldn't resist pulling in the flowers using the Best Bouquet Details Die! I'm personally obsessed with this suite of products; they are SO user-friendly with amazing results!

To begin both cards, I die cut all of the pieces I would need for two bouquets from white cardstock. I colored them using distress oxide inks and finger sponge daubers. Once everything was colored and assembled, I set them aside to dry.

The background is created using the Star Stream Hot Foil and champagne foil on a 4 by 5 1/4 inch panel of blue cardstock. I added faded jeans distress oxide ink around the edges for added dimension.

I die cut all of the pieces for the bow from white cardstock and colored it the same as the bouquet. 

The sentiments/fonts for the Land of Liberty Stamp Set AND Star Stream Sentiments are absolutely gorgeous! I stamped it in black and then die cut it using the Land of Liberty Die.

My next card uses the new Flag border; I'm so excited for this border because it easily creates a patriotic border with minimal effort and I just love how it looks!

I gave the edges a vintage look by adding some antique linen distress oxide ink. I layered the bouquet using foam squares for added dimension.

Another gorgeous sentiment and shimmer spray finish off this patriotic design!

My last card for today is very straight-forward and would be perfect for mass-producing or invitations to a 4th of July party!

I used the Grand Finale Die for the background and then did the stenciling using the Grand Finale stencil. The red portion is from the stencil and the blue is from the cardstock panel underneath.

The Grand Finale Die also includes the dies to create the pimwheels and rockets.

I added small gems to the centers of the pinwheels  and fireworks.

The white portion is an A2 size, but I chose to make my card bigger by creating a red base and adding it using foam squares. Don't forget to head to the other designers' blogs to leave a comment! Thanks for fluttering by!


Kelly Lunceford (you are here)


Sunday, June 9, 2024

Our Hero

Hello friends! I'm back today with yet another 'delinquent' post! ha ha! This card was created for the Papertrey Ink Flash Sale the week before Memorial Day, so it was very fitting for the time, but I still wanted to share it here as well. 


The Our Hero Stamp Set was the stamp set that was featured for the sale, but I had so much fun pulling in all kinds of other dies to bring this card to life! To begin, I die cut the flower pieces using the  Into the Blooms: Poppies die. I colored them with Berry Sorbet, Pure Poppy, and True Black ink. I glued them together using liquid glue and foam squares for dimension. I set them aside and got to work on the background.

If you haven't noticed, I'm slightly obsessed with Hot Foil plates at the moment, so for this card, I used the Stargazing Hot Foil Plate and silver foil on Spring Rain cardstock.

I used the Love to Layer: American Flag die as the anchor for the rest of the design elements. I added the poppies to the bottom and then placed the "Our Hero" portion above the flowers. I added some greenery (that's really blue, ha ha!) that was die cut using the Into the Blooms: Christmas Sprigs die and colored with Spring Rain ink.

The star images are also from the Our Hero stamp set and I added them using foam squares. A few sparkling clear sequins finish off this patriotic card! Thanks for fluttering by!


Saturday, May 25, 2024

Papertrey Ink May Release Countdown Day 2

Hello and welcome to day 2 of the Papertrey Ink May release countdown! I think we're all looking forward to summer picnics and barbecues this summer; I know I am! There's something so wonderful about summer cuisine and being together with family and friends! I'm so thrilled with this adorable new Picnic Time die collection and the darling Life's a Picnic sentiment stamp set!

Isn't this patriotic pie just the cutest thing ever? I had so much fun creating this card! I die cut all of the 'food' and flower pieces using white cardstock and then colored them using an assortment of Distress Oxide inks. You could definitely die cut all of the pieces from colored cardstock, but I find that more time consuming in the long-run, but it could be equal! ha ha! I just prefer to do the coloring and some people might prefer to the diecutting!

 For my card, I chose to use the pie, the hotdog and mustard, and the watermelon wedge. There is also a hamburger with ALL the fixings that is SO super adorable! I can't wait to give it a try! 

The background is created by adding the Border Bling: Skinny Embossed Frame cut from Enchanted Evening cardstock over the top of a piece of pattern paper. I added a little bit of Fresh Snow ink around the edges to give it a similar feeling to the pattern paper.

I also added a strip of Bitty Big: Pure Poppy pattern paper to the middle. The focal panel is die cut from the new Reflections: May die set that will be showcased tomorrow. I added it to the middle using foam squares and then layered the picnic pieces and the geraniums

The sentiment is from the new Life's a Picnic stamp set and is heat embossed using detail white embossing powder on Enchanted Evening cardstock and then cut using the coordinating dies. ALL of the sentiments in the set are so super cute; there's even one you can use at thanksgiving time with the pie. I should have mentioned earlier that the patriotic look is just one of the options with the pie so you can use it in a variety of different ways!
My second card for today uses the new Cornered: Summer Sun! I've paired it with the new Frozen Delights stamp/die set that was featured yesterday!

To begin, I used the Pleasing Pineapple Hot Foil Plate on a panel of Orange Zest cardstock using gold foil. I cut a 4 by 5 1/4 inch panel of Aqua Mist cardstock and used the Cornered: Summer Sun die on the top. I added some Summer Sunrise ink to the top portion of an A2 white card base using a blender brush (the area where it will show through at the top). I gave that blended portion a spritz of shimmer spray.

I glued the aqua panel to the card base using liquid glue and then added the foiled panel using foam squares. 

I used the darling Frozen Delights stamp/die set for the focal image. The sentiment is from the Just Sentiments: Summer stamp set and is heat embossed in gold on a strip of Aqua Mist cardstock. I layered it over the top using foam squares. I added sequins and glitter for sparkle and shine! I also decided to give the entire thing another spritz (or two) of shimmer spray! Thanks for fluttering by!