Showing posts with label watercoloring. Show all posts

Wednesday, December 11, 2024

All is Calm, All is Bright

I hope you're all having a wonderful holiday season so far! I'm behind, but that's okay.....the true spirit of Christmas burns deep and bright in my heart despite not having all of the secular things in place! I wanted to pop by to share this card that was featured in the Papertrey Ink Newsletter this week for this Project Inspiration feature.

This card was made up almost entirely from leftover pieces from a few different projects over the last few months. If you stop by regularly, you might notice which card projects they may have been leftover from! ha ha!
 I will share step-by-step photos and extra details on how I created this card.

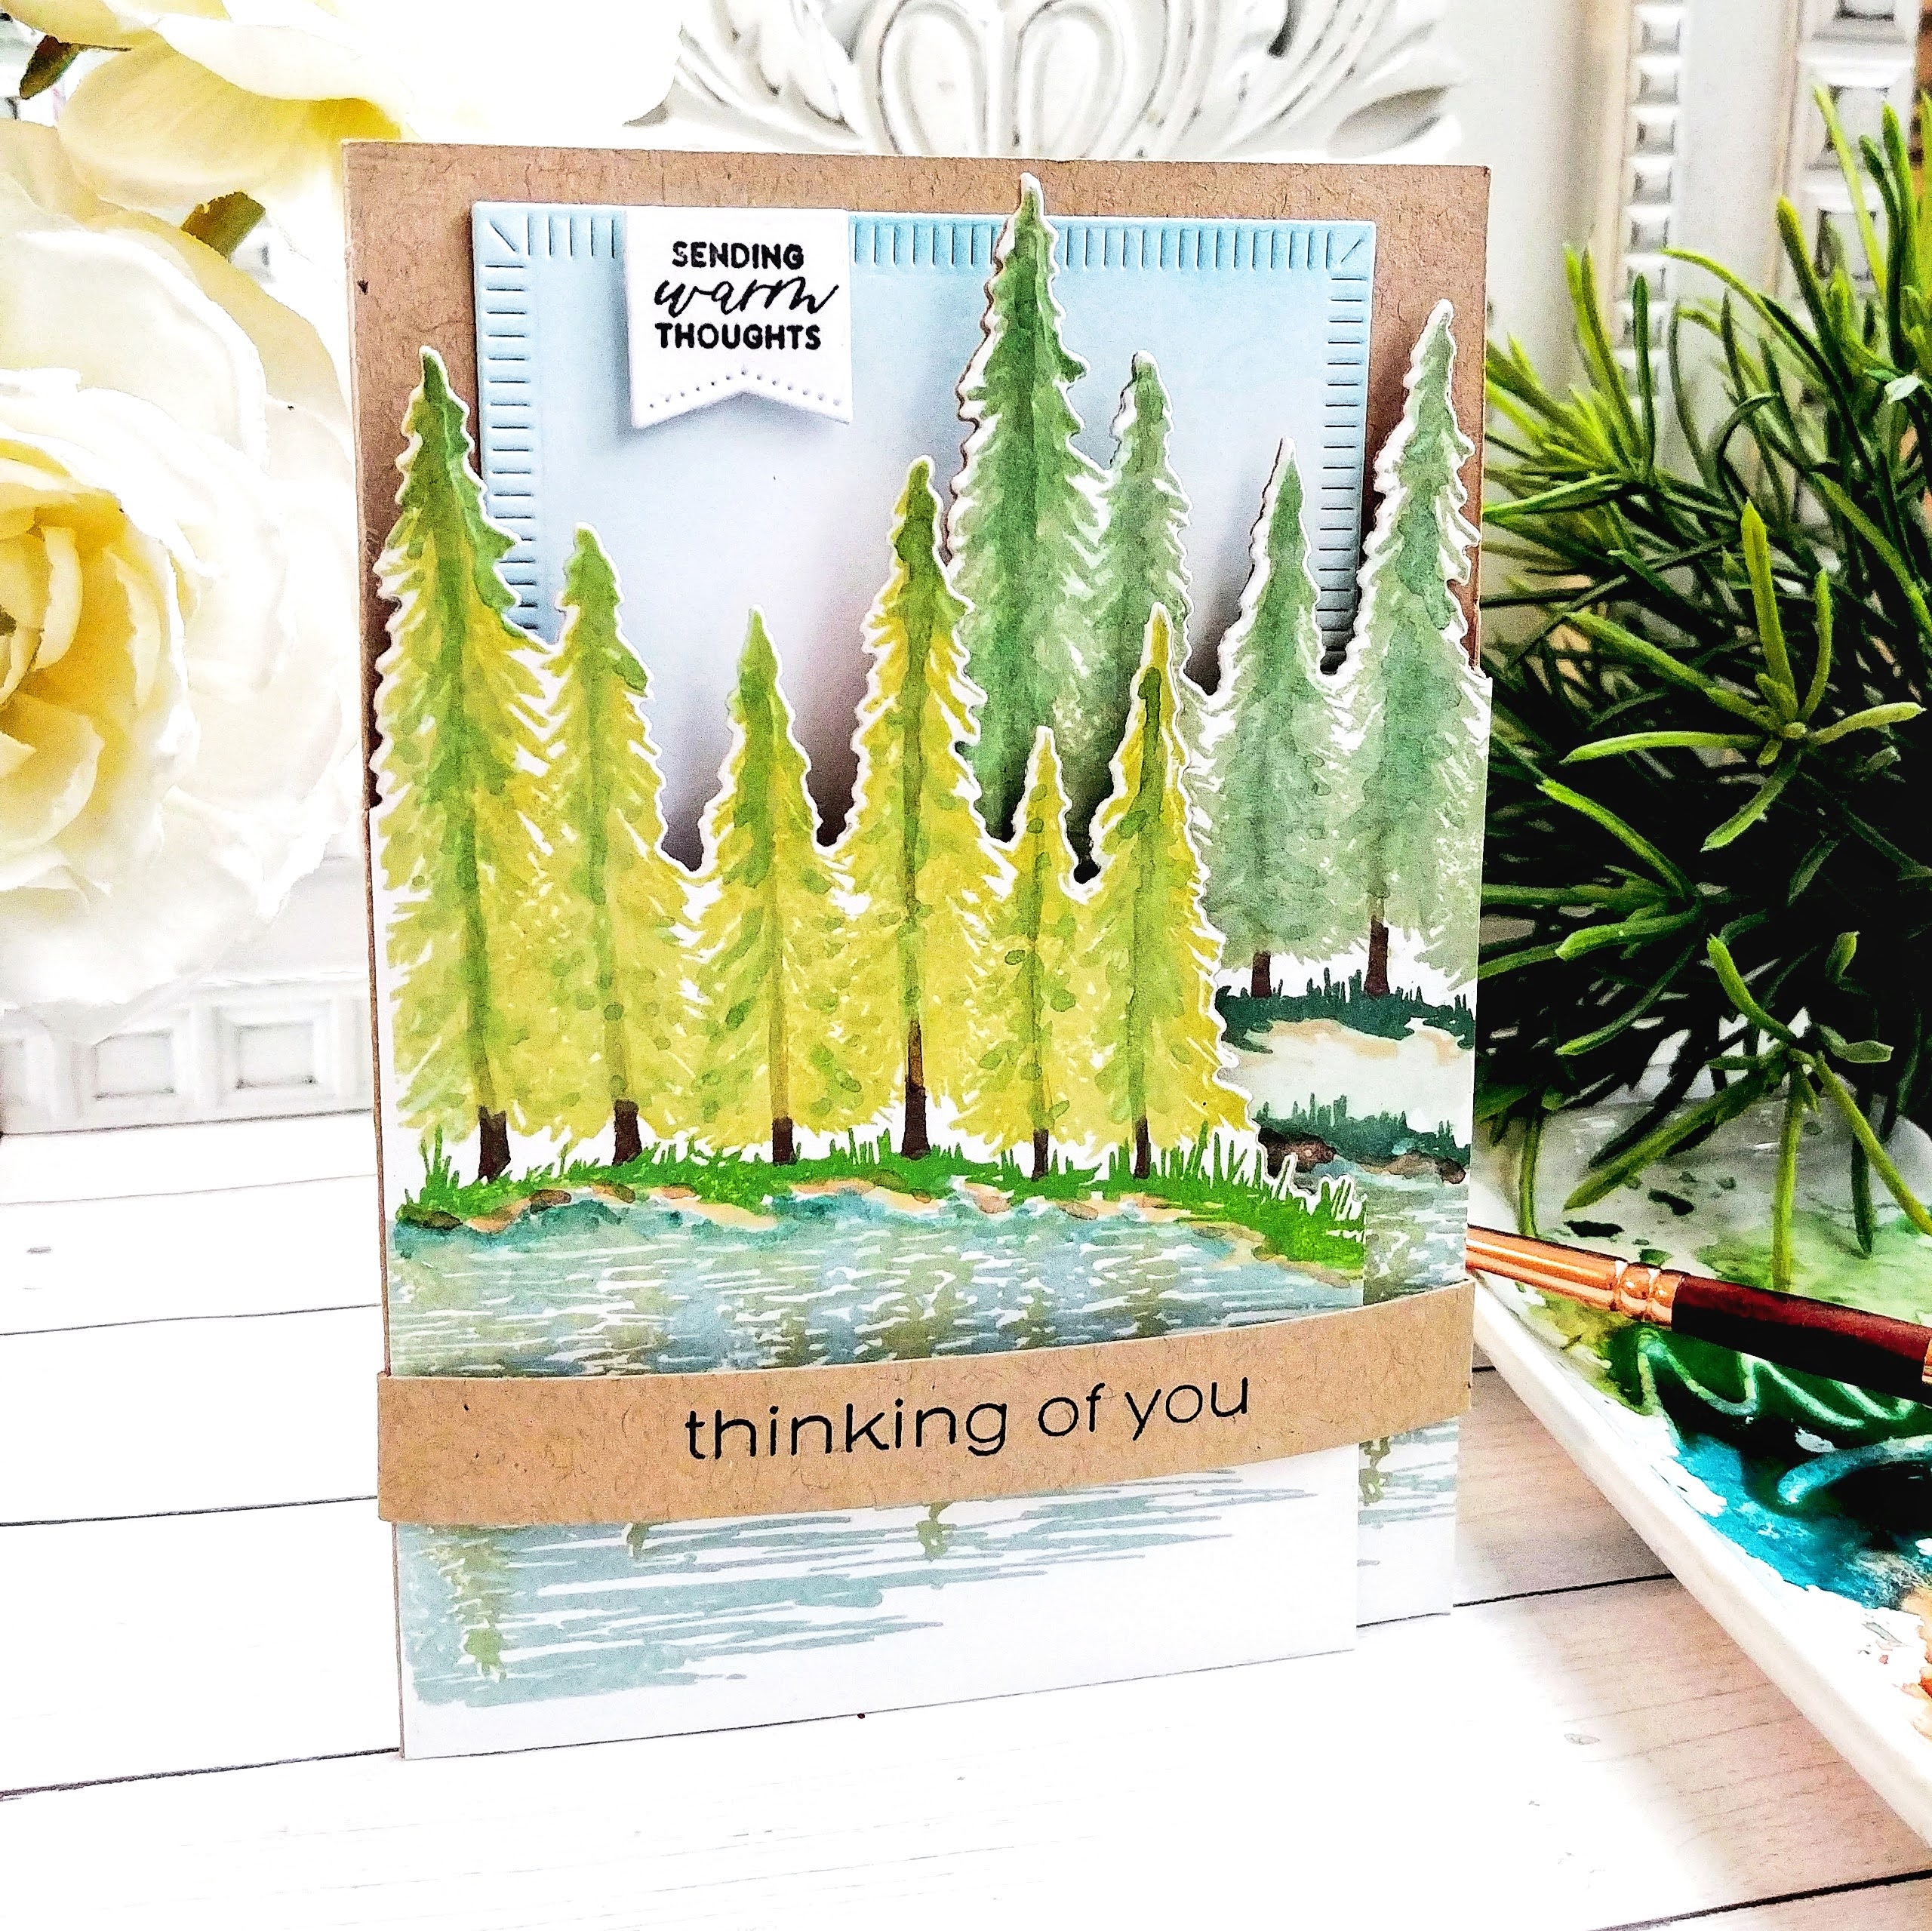
The background wasn't leftover, so I got to work creating a stenciled background using the Seeing Stars Stencil Collection with Blueberry Sky and Spring Rain ink.

I added some ink splatters for extra detail, depth, and contrast.

I added Blueberry Sky ink around the edges and cut the harsh lines off by trimming the panel to 4 by 5 1/4 inches.

The poinsettia was leftover from the second card features in THIS post. You might remember the frame of the Stained Glass Window came from THIS card. I did inlaid die cutting for the first card, but was left with this beautiful watercolor frame! I actually had two, which you can see in the finished card. I had a few snowflakes leftover and they are die cut from the Border Bling: Snow Flakes Die. These are my go-to snowflakes when I need different shapes and sizes to use as fillers on cards!

I layered the stenciled panel on a top-folding A2 Dark Indigo card base and then glued the window frames over the top. Please note, I did cut four extra frames from white cardstock and then glued each window with stack of three; the watercolor piece and two white frames. I wanted dimension and it would be almost impossible to use foam tape or squares on those tiny lines.

I placed the poinsettia over the top using foam squares, added the snowflakes and gave it a good spritz of Shimmer Spray. The sentiment, which is from the Deerest Blessings stamp set, is heat embossed in silver on a strip of Dark Indigo cardstock and added using strategically placed foam squares on the poinsettia. I added glitter as well!

I was so thrilled to finally put those leftover pieces to good use!

I hope you have a blessed day and thanks for fluttering by!


Friday, July 14, 2023

The Greetery {Easy Watercolor Hibiscus}


Hello everyone! I'm here today sharing a pair of easy watercolor cards using some of my favorite new products from The Greetery! Creating summer cards is my favorite; the colors, the textures…maybe because summer seems so fleeting no matter how hard I try to hold on! There is one thing that isn’t my favorite….and that is the heat that comes with summer! Ha ha! I decided to create these cards using blue/blue-green tones for something cool and refreshing!


To begin, I simply created a wash of watercolor onto three panels of watercolor paper. I know Betsy has mentioned this before, but the cheap watercolor pad they sell at Hobby Lobby (Master’s Touch brand) is the best for this type of project; it is inexpensive and the texture can’t be beat. It is not ideal for serious water coloring, so I just keep it with my paper crafting supplies so I can grab it easily for these types of projects. I chose to create one panel with green hues, one with blue green hues, and one with lighter blue hues. In hindsight, I should have kept the panels a little more “loose” with more open spaces of white. It is hard to add white space back in once it’s gone! Ha ha!

Once the panels were dry (I sped up the process by using my heat tool) I die cut the big Monstera Leaves; one from the green panel with the veins from the blue-green panel, and one from the blue-green panel with veins from the lighter blue panel. The Palm leaves were die cut both from the same blue-green panel; I had originally planned on layering them, but in the end, I used them separately. The hibiscus leaves were selectively die cut from the green panel and then I ran ALL of the BotaniCuts Hibiscus dies (I have them all connected) through the light blue panel. I had so much fun assembling the flowers and leaves. I added some additional detail to the die cut detail lines on the hibiscus flowers using the same paint and a small detail watercolor brush. I also added some black ink splatter to ALL of the die cut pieces for contrast.

I stenciled two panels of the same textured watercolor paper using the new Wicker Weave Stencil collection using Tea Dye, Brushed Corduroy, and Walnut Stain Distress Oxide inks. I used a light hand and selective stenciling for a loose look. Once that was done, I added the flowers and leaves using foam squares and liquid glue. I had originally planned to use all of these details on one card, but I just couldn’t get the composition right, so I omitted the two Monstera leaves and created a second simple card to share with you today.

For the sentiments, I used the older, but well-loved Birthday Blooms Stamp Set. I stamped the large, focal sentiment in black ink and then die cut them using the Birthday Blooms Die. I heat embossed the accent portion of the sentiment in white onto black strips of cardstock. I layered them using foam squares and then mounted the panels onto A2 card bases using liquid glue. I gave both cards a spritz of Shimmer Spray for sparkle and shine! As I mentioned earlier, I had envisioned this project a little bit differently, but it’s ok to switch things up if it’s just not working! Sometimes I find myself holding onto an “idea” too tightly rather than letting my creativity flow! It’s always more fun just to let yourself experiment and enjoy the process rather than the outcome. I actually usually end up loving the result way better if I just allow myself time and space to enjoy the creative journey…I hope you do, too! It’s also okay just to step back and take a break and come back to your project with “fresh eyes”! Sometimes that’s when the lightbulb moments will happen, which I just love! Well, enough rambling from me….thanks for fluttering by!

Friday, May 28, 2021

T.G.I.F {Thinking of You} Shaped Tri-fold with a belly band

Hello friends! It's my turn for this week's T.G.I.F {The Greetery Inspiration Friday} over on The Greetery Blog but I wanted to share my project here as well! My card for today is a shaped tri-fold design with a belly band! I’m enamored with the newReflections stamp set/die set and couldn’t wait to try using it for this tri-fold design! It was easy to put together, but DID require a little planning. I’m hoping that I can walk you through step-by-step easily so you can try your own!

To begin, I cut two panels from white cardstock measuring 4 ¼ by 5 ½ inches and then die cut the outline using the new Reflections die. I die cut one a little further down on the panel and one up a little bit higher so that when the card is assembled, it gives the realistic illusion of a forest. Once the two panels were cut, I went ahead and stamped both panels using assorted Distress Oxide inks. As you can see on the panel on the right, I varied the shore line to keep it visually interesting.


Once that was done, I was able to get the base for my tri-fold design put together. I cut a piece of Kraft cardstock measuring 5 ½ by 11. The two panels that fold in measure 3 ½ inches, but I ended up cutting them as I will explain in the next steps, but you’ll want to begin with these measurements. I placed the first panel on the left fold butted right up against the bottom and corner and then carefully placed the die directly around the trees, and secured it with washi tape. Once it was secure, I removed the stamped portion and ran it through my die cut machine. You’ll repeat this for the second flap, but you’ll need to leave it hanging off the edge of your die cut machine so it doesn’t cut through the back of the card. It might seem confusing reading it, but when you go to make your card, you’ll understand!


I used an Exacto Knife and a ruler to remove the pieces that I didn’t need along the fold. From there, I went ahead and glued the two stamped panels in place, using the die cut portion of the Kraft base as my guide. From there, you will see that you have pieces hanging over the edge that will need to be cut straight with your paper trimmer. Once I had it all squared up, I got to work on the inside!

I die cut the middle size of the Crimped Frame and added some blue ink blending around the edges for a sky. I stamped the sentiment, which is from theSentiment Suite: Thinking of You stamp set, directly onto the panel.  The smaller sentiment at the top AND the sentiment for the belly band are from the same set. I used theSentiment Suite: Basics Die for the little banner piece at the top. The belly band is just a strip of the same Kraft cardstock with the sentiment stamped in the middle and then scored slightly larger than the width of the card so it can easily slide off and on.


I finished off the card by adding some watercolor details to the trees, sand, and water. While I don’t enjoy needing Sympathy cards, I do like having a few on hand. I really like this particular stamp set for a sympathy card because flowers, etc. aren’t always the perfect choice, even if we want them to be (wink!).  I hope you get a chance to try your own shaped tri-fold design! Thanks for fluttering by!

Wednesday, June 3, 2020

Life is better in flip flops!

I'm needing some distractions in my life right now, how about you? Who knew the world could get crazier than it already was?!? My heart is feeling so sad and I'm truly looking for the good when there seems to be so much ugliness all around! I always feel happy when I'm creating and doing! I thought I'd give you all some more summer cheer with two cards that I worked on today!

My inspiration for today comes from the water park, which it so often does with my summer designs! Our county has moved to yellow, which means more things are opening up. We got season passes for Christmas to the local amusement park which also includes a water park. I honestly didn't know if we would get a chance to use them at all this year, so the fact that it has opened with safety precautions is awesome! We headed out on Monday not knowing quite what to expect, but it was fabulous. Sun, water, Vitamin D, people, laughter, happy kids...it was all worth it. The few hours that we were there made life seem normal, except the  large crowds were non-existent, which is a plus in my book! LOL! It's still crazy seeing everyone with masks on and dots on the ground keeping us all 6 feet away, but I'm grateful for these precautions so we can enjoy ourselves a little bit more! We didn't have to wear our masks in the water, thank heavens! Anyway, I know you didn't come here to listen to me ramble on! My cards were inspired by a woman's swim suit with blue palm fronds on it, but the rest just evolved from there! I was excited to try some unconventional leaves to get a fresh look!
Since the leaves were the inspiration, that is what I worked on first. I die cut the palm fronds, which are from the Botanicuts Palm dies from The Greetery. They are cut from watercolor paper and then I colored them using my Zig Kuretake Gansai Tambi watercolor set and a water brush pen. I also spritzed them with Shimmer Spray and set them aside to dry.

While they were drying, I cut two 4 by 5 1/ 4 inch panels from Bitty Big: Harvest Gold pattern paper and stamped the two different sentiments. They are both from the Flipping Out stamp set. I don't have a lot of summer sentiments, but I knew these could be fun. I wasn't planning on adding any of the actual flip flop images to the cards, but once I had it out, I decided to give it a try! I ended up really liking it, so each card got a pair of flip flops as well. I die cut them using the Flipping Out die collection and then stamped them using my mini MISTI.
I die cut the flowers using the Some Like it Hot die collection and then stamped those using my mini MISTI as well. Once all of the elements were created, I was able to start working on an arrangement that looked nice. I used the Press'n Seal technique to arrange both the leaves and the flowers/flip flops. I really should use this technique more because it makes things so easy!
When I was fiddling with the palm leaves, I accidentally got some blue paint on one of the striped panels, so rather than get irritated, I used it to my advantage and just added some additional blue splatter using my color spritzing tool and a blue marker! Problem solved! I actually ended up by doing that on both cards even though only one got the paint on it! I added some white Nuvo drops here and there and a few sparkling clear sequins to finish off these tropical designs!
And last but not least, here is today's "left over" tag creation. I had toyed around with adding a pineapple to the cards, but opted not to. It was the perfect thing to add to this tag. I die cut the tag using the Made with Love Tags 3 die out of the same striped paper. I stamped the "happy summer" sentiment, which is also from the Flipping Out stamp set in black and then arranged the die cuts. I went a little crazy with the Nuvo drops, but since it's just a simple tag, I'm just going with it! LOL! I added some of the same blue ink splatter on the tag as well and tied it up with some True Black Baker's Twine.  I love making tropical cookies this time of year and this tag will be the perfect accent to add to some simple packaging! Thanks for fluttering by!


Monday, June 1, 2020

Salt Air Summer {You are so Loved}


I can't believe we've made it to June! This has been a long year so far and I'm ready for some summer vibes! Our temperatures are heating up, which I don't love, but I'm going to enjoy all of the other delights of the season! I love making summer cards but I feel like it doesn't last long and we're diving into Back to School, autumn and Halloween before we know it! Anyone else feel that way? I decided that I'm going to soak it up and make as many as I can!
I was 100 % inspired by one of the Bath and Body Works soaps that I have in my powder room right now! Every time I wash my hands in there, I make a mental note that I want to make a card just like it! ha ha! Today was the day, and I got to work using my underused and neglected Salt Air: Fauna Stamp Set. It is one of my favorites, but I haven't done much with it! I'll share a photo of the soap at the bottom of the post and you will see I took a VERY literal approach in my execution, but it was so much fun to watercolor the underwater plant life and small fish using the Reef Builder Die . 
To begin both cards, I stamped the seahorses and the seashells and then die cut them using the Salt Air: Fauna die collection. I also added some extra details to the seahorses using colored pencils. I die cut all of the pieces from the Reef Builder die collection out of watercolor paper and then colored them using watercolors using the soap bottle as my color guide. 
I set the watercolored pieces aside to dry and got to work on the heat embossed sentiments. While I LOVE the whimsical sentiments that are part of the Salt Air Sentiments stamp set, I wanted something a little more traditional and classic to keep in line with the look and feel of the soap label. For one card, I used the "thanks" sentiment from the Never Enough: Thanks stamp set heat embossed in gold onto a strip of vellum. For the second card, I used the "You are so loved" sentiment from the Expressions of Empathy stamp set.

I die cut two panels using the Love to Layer: Notched Die using Fresh Snow Linen Cardstock. For the "thanks" card, I added some watercolor spatter AFTER I had everything assembled, but for this one, I added the splatter ahead of time so I didn't have to cover up the sentiment and the seahorses. I also added some Essentials: Jewels to this card and some dew drops to the other design. I also gave them a spritz, or two, or three of Shimmer Spray for added sparkle and shine!
I layered the panels onto two card bases; one is Tropical Teal and the other is Mint Julep. I added some pierced detail around the edges of the card bases using the largest die in the Nesting Basics Pierced Rectangles. I was hoping it would show a little bit more, but I like the little detail it gives to the corners. 
I had some die cut pieces left over so I decided to make a few tags with the extras. I used the sentiments from the Frame It Out: Wishes stamp set to keep with the classic look I was going for.


I punched a hole at the top of each hole using my Crop-a-dile and then added a gold eyelet to the hole for some extra detail.  I'll add these to my "everyday" tag collection that I have been starting. You can see the first tag in THIS post. I'm planning on making tags with any extra pieces I have leftover from my card making sessions! I hope you've enjoyed today's summer inspiration. Thanks for fluttering by!
P.S. As promised, here is the inspiration for today's designs! 


Monday, February 17, 2020

Pinkfresh Studio February 2020 Background Stamp Release Blog Hop


Hello! There's some fun things going on today and I'm so glad you've stopped by! Today is the Pinkfresh Studio February 2020 Background Stamp Release Blog Hop! There are some absolutely gorgeous background stamps that you're sure to fall in love with! I'm sharing 3 cards with you today using 4 of the new backgrounds! I'm sure I'll be creating with some of the others soon as well because they're so beautiful! There is an amazing line up of designers, so make sure to head to each of their blogs! 
There will be a giveaway of the ENTIRE release both on the Pinkfresh Studio Blog as well as their Instagram #pinkfreshstudio. 
Also, leave a comment here for a chance to win a $25 dollar gift card to the Pinkfresh Studio shop!


My first card for today uses the beautiful new Floral Shadow Background Stamp paired with the newly released Leafy Decor stamp set to create this bright and vibrant design! To begin, I stamped the background using Sparkling Rose ink on a slightly lighter panel of cardstock. I used my MISTI to get a nice, crisp impression. I cut my panel a little bit larger than a card front so that I could use the Essentials: Diagonal Stitched Rectangles dies to give it the detailed edge!
I also die cut the Ornate Oval Frame using the same cardstock as I did for the background panel. I adhered it using foam squares around the scallops. This set the stage for me to add the rest of the design elements!
I stamped the Leafy Decor image in black ink onto white cardstock. I colored it using an assortment of alcohol markers and then used the coordinating Leafy Decor die to cut it out. I layered it over the frame with additional foam squares.  I die cut the "hugs" word using the Phrase Builder Sending die collection and added it to the leafy image.

The "you can always count on me" sentiment is heat embossed in silver onto a strip of vellum. I wrapped it around the entire panel and secured it on the back using clear tape.

I love all of the beautiful colors that the Essentials: Jewels come in and they are always the perfect accent for my cards! For this design, I chose to use both the emerald green and hte light pink jewels to accent my card!

I layered the entire focal panel onto a white A2 card base using foam squares for added dimension! 
My second card for today uses the same color palette because I like to keep things cohesive if I have the freedom, and today I do! ha ha! I used the AMAZING new Do What You Love Background stamp paired with the newly released Just because stamp set. I have been itching to use this one since it was released and today was the perfect excuse!

I stamped the background in black onto white cardstock and then used the same die as the first card for the border detail. I added some ink blending around the edges using the same pink as well. I also die cut a black label using the versatile Fancy Label Frames. I added it to the background using foam squares.

I heat embossed the different sentiments which are included in the Just because stamp set in white onto black cardstock.

I stamped the image and colored it with assorted Copic markers. I used the coordinating Just because die to cut it out. Once that was done, I added it over the black die cut using foam squares.

I was also able to add the sentiment as well. My SU! demonstrator introduced me to black Stampin' dimensionals and I LOVE them!

For this card, I chose to use a combination of Jewels AND sequins for a combination of shine!
My third and final card of the release uses both the Diamond Tiles background stamp and the Enchanted Blooms background. I decided this would be a fun combination since I am using the Enchanted Blooms image as more of a focal point and then the Diamond Tiles serve as the background. My cute sister gave me black watercolor paper and metallic watercolors for Christmas and while I've been having a lot of fun with the watercolors, I haven't had a chance to pull out the black paper. I decided I'd give it a try using this new background.

I heat embossed the background using gold powder and then got to work painting the images. I also added some gold paint splatter for added detail. Once it was dry, I die cut it using the largest die in the  Ornate Banner die set. It cut off just enough to be able to see the diamond tiles peeking out from underneath, but didn't cut too much of my hard work off! LOL!

 I used the fun Sentiment Suite Hello die for the word using specialty gold paper and vellum. The "I wish I was there with you" sentiment is heat embossed in gold and adhered using foam squares. A trio of sparkling clear sequins finish off this bold design. That wraps up my projects for today's hop! Don't forget to leave a comment to be eligible to win the gift certificate! Thanks for fluttering by!