Showing posts with label Stitching. Show all posts

Tuesday, September 24, 2024

Papertrey Ink September Release Day 1

Hello friends! It's day 1 of the Papertrey Ink September release countdown! I have a fun Christmas project to share with you today, but please note, I will not be back for the rest of the countdown, but I will be sharing projects made with this release a bit later! My cute felt gingerbread gal was made using the new In Stitches: Gingerbread die. The die collection includes everything you need to make this girl version, but there is also some accessories to make a cute Santa or just a regular gingerbread boy!

To begin, I die cut the basic gingerbread shape twice from Classic Kraft Felt and then used DMC floss to stitch the two pieces together. I left an opening to add the stuffing, but if you want to stitch any of the additional pieces TO the gingerbread person, you will need to do that before you stitch the two pieces together. All of the accessories on my cute gingerbread gal are just glued down using liquid glue.

The ric rac icing trim and her smile were cut using Vintage Cream Felt. Please note, this trim does have holes that you can actually stitch it down, but I found that the felt was too delicate and would tear if I tried to remove the holes, so I just left them intact and just glued them down.

Her cute apron and bow were cut using Pure Poppy Felt. The heart, cheek blush, and peppermint swirl piece are all die cut from Sweet Blush Felt and the eyes from True Black Felt. When I was getting near the top, I was running out of floss, so it was the perfect time to create a loop to make her into an ornament or to attach to a package. I would definitely decide ahead of time what materials and strategy you will use to create a hanger if you are going to! I love how she turned out and I can't decide if she will be added to a package for someone else or if I will keep her to add to my kitchen tree with all of the other felt ornaments my mom made me a few years ago. She was so much fun to make and I hope to get some time before the holidays come roaring in to make a few more! Thanks for fluttering by!


Saturday, November 14, 2020

Ink to Paper November Release Countdown Day 4


Hello and welcome to the 4th and final day of the Ink to Paper November Release Countdown! I've got two projects to share with you today, one using this fabulous new Abundant Blooms stamp set! I paired it with the new Just Sentiments: Get Well, which is perfect for this time of year AND with the current Pandemic! 

I chose to use the "sending a little sunshine your way" sentiment, heat embossed in gold, to create more of an "everyday" card, rather than just "get well". I like having cards on hand that could fit any number of occasions and this one definitely fits the bill!

I stamped this fabulous pitcher in Mint Julep and Vintage Jadeite inks, the stems and flowers are stamped using Distress Oxide inks. I die cut a frame using the classic Pierced Feature Frames: Ovals (which are back in stock) out of Lemon Tart cardstock and added it to the background that is die cut using the new Cover Plate: Ornate die.

I used liquid glue to add the blooms to the stems so I could wiggle it around to get them in just the right spot. All of this is added to the middle of the frame using foam squares. I made certain to add the vellum sentiment under the pitcher so that it wouldn't cover up the fun detail of the pitcher!

I added some Walnut Stain Distress Oxide ink splatter to the top of the card for some added vintage-esque detail! A few sparkling clear sequins and some glitter finish off this cheery design! 

And finally, last but not least, is this cute little tag/ornament using the latest in the "In Stitches" collection! This one is called Candy Swirl and it is so much fun! This is right up my alley and I had so much fun stitching this up!

The thing I like about this particular die collection is that you could make all kinds of different candy for birthdays, Halloween, and more....it doesn't JUST have to be for Christmas!

I die cut 2 of the circular base using Vintage Cream Felt and then die cut the holes to add the pink stitching on one of the circles. I wasn't planning on making it double sided, so I just did this on one.

I also die cut the "swirl" portion out of Pure Poppy Felt and added the red stitching. Once that was done, I stitched around both circles, leaving a hole at the top to add the polyfiberfill. Once it was full, I finished it up to close the hole.
I added a tag that is heat embossed using the Just Sentiments: Be Merry stamp set with a holly sprig attached. I tied a loop of Pure Poppy Baker's Twine that the recipient can use to hand it as an ornament, but it also doubles to add it to a gift! I'm now debating whether or not to give it away because it would be PERFECT on my kitchen Christmas tree! LOL! Thanks for joining me today and remember that the new release goes on sale tomorrow night at 10 PM ET! Thanks for fluttering by!


Monday, October 12, 2020

Ink to Paper October Release Countdown Day 2

Hello and welcome to day 2 of the Ink to Paper October release countdown! I have a couple of projects to share with you today, but first up is a fun project created using some fun and clever new products! Christmas is definitely the time for homemade sweets and treats but finding the appropriate packaging can sometimes be a challenge!

If you're anything like me, once the goodies are baked or made, I want to get them off to their destination in a timely manner so they can arrive as fresh as possible! This new "Bag-It Holiday stamp set" works perfectly to decorate these windowed treat bags! The  frame image stamp fits perfectly around the window and then the berries and sentiments work nicely to accent the border.

You could whip these up over the long Thanksgiving weekend and be ready for your holiday baking as soon as the season begins! I used my MISTI to do the stamping on both bags, but if you were making a lot, they would be ready lickety split!

I decided to add a little tag using another fun new stamp/die set! The ornament, sentiment and label are all from the new Ornament Greetings stamp set. I also used some added foliage and a bow (of course) from the Home Door Decor set I showcased yesterday.

This is the perfect way to add a little more holiday cheer as well as a place to write to: from: so the recipient knows who baked the delicious treats!

My second project for today uses some new stitching dies called In Stitches: Noel. I chose to use these paired with the new Joyous Holiday stamp set to add some extra holiday touches. Aren't those birds so sweet? I colored them with Copic markers.

I die cut the N, E, L onto a panel of Pure Poppy cardstock and then stitched them using 6 strands of floss since the holes are quite large. Once that was done, I added the circle for the O and had fun embellishing it with sprigs and greenery and of course, those sweet birds!

I added some white paint splatter to the top for just a touch of added detail. I didn't want to cover up the stitched letters and this gave the card that little something extra without hiding the letters.

The sentiment, which is also from the Joyous Holiday set, is die cut and them stamped and added to the front of the card using foam squares. I added some red Nuvo drops here and there as well as a few sparkling clear sequins. Join me tomorrow for Day 3! Thanks for fluttering by!


Wednesday, July 25, 2018

Keeping Christmas {Just for you: Homemade sweets}


 It's the 25th and that means it is time for this month's Keeping Christmas Blog Hop! I always love this time of the month and I had so much fun creating my projects that I am sharing with you today! Before I dive into the details, don't forget to stop by the rest of the ladies' blogs to see what fabulous inspiration they have for you!
Kelly Lunceford (you are here)


 Like I mentioned earlier, I had so much fun creating everything for this month! It's amazing how different it is when you're not doing it last minute! LOL! Even though I'm happy when the project is DONE, it is much more rewarding when you're enjoying the process and not stressed! I had so much fun making THIS project so I decided to make some Christmas ones as well. I host a Christmas brunch every year for a few ladies in my neighborhood and thought these would be cute to put at each place setting....OR, they may also be used for other little gifts depending on my needs when the holiday rolls around!  I'm just grateful to have them done!  I used the Favor It: Box 1 die for the boxes and die cut them using Pure Poppy and New Leaf cardstock. 

I used Mat Stack 1 die which coordinates with this treat set that is sadly discontinued.  I just love it and have used it for so many projects. In fact, I specifically bought this particular favor box because it coordinates with this set. However, there are other great sets that still work with it, too, which you can see HERE

 I just love how easy it is to layer everything up for a professional look! I stamped the base of the Mat stack in red, then I stamped the circle portion in white and used a punch to punch them out. Then, I stamped the "sweets" portion in black onto a white strip and used foam squares to pop everything up!
 I've used this cute little holly berry embellishments on a few projects and I had just enough to add to these boxes. I've been able to find them at Hobby Lobby the last 2 years, so I am hoping they have them again this year. They are the perfect addition to so many projects!


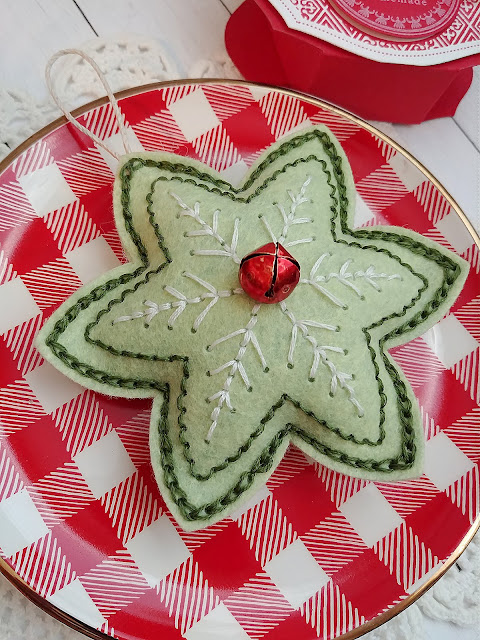
I was so thrilled when I opened my Papertrey Ink design team package to find these incredible new stitching dies. They are called Heirloom Ornaments 1 die and I am in love! I decided to whip up a few for this month's project as well. These two are both "experiments" in a sense because I am getting a feel for which stitches I want to use, etc. For this first one, I used green felt and green and white floss. I forgot that I wanted to do the chain stitch around the inside edge, so I did it around the perimeter instead. I actually love how it turned out, BUT I still want to try the chain stitch on the inside on my next one.

I'm hoping to stitch up quite a few to use as package adornments or to just tuck inside of a gift. I also think they would make cute gifts on their own with some candy or something. I added a red jingle bell to the center of this one using glue for some extra detail.


 This blue one was actually my first attempt and I had so much fun adding all of the beads to the snowflake. This particular one also uses the ombre type floss which is always so much fun to use. Once they were all stitched up, I stuffed them with batting and finished sewing them closed. I also added a twine loop for hanging on the tree. It's been fun to sneak out to a shady place in my yard and stitch away! It is very relaxing and I like doing something crafty that I can do outside! I hope you had fun on the hop today! Thanks for fluttering by!