Showing posts with label Tutorials. Show all posts

Friday, June 14, 2024

The Greetery Garden Party Release Day plus tutorial

It's release day! Yay! The Garden Party Collection from The Greetery will be available for purchase today beginning at 10 am EDT! I have a bonus project for you today, PLUS a little tutorial on how I made the tea box favor a few of you asked about! You can find the new collection HERE!

Tea for two in the atrium, please! ha ha! My card for today features quite a few of the new products, but shaken up a bit to see them in a new way or with different possibilities! To begin, I used the new Atrium Hot Foil using silver foil on Kraft Gray cardstock. I also had a leftover wisteria branch from yesterday, so I added it to the top of the card using foam squares.

I used the pigment powder method on the two teacups that Betsy shared in her video on day 1.  I added some Aqua Mist ink over the top to color the two teacups.

I just HAD to add another sandwich from the Fancy Finger Foods die collection; they are seriously so much fun....much more fun than making real sandwiches! ha ha!

I added some lemons from the lemonade stamp set; just perfect to tuck inside the tea cups! The sentiment is die cut and then stamped using the Brew-Tea-Ful stamp set. 

You can see some of the details a little bit better with this close-up photo!

I had a few of you ask how I made the little tea favor box from day 1. It's SO easy and one of my go-to box styles for quick and easy packaging. Here are a few different shots to give you an  diea of what the sides look like. This box holds 4-5 tea packets....there is 5 inside the box when I took the photos. 

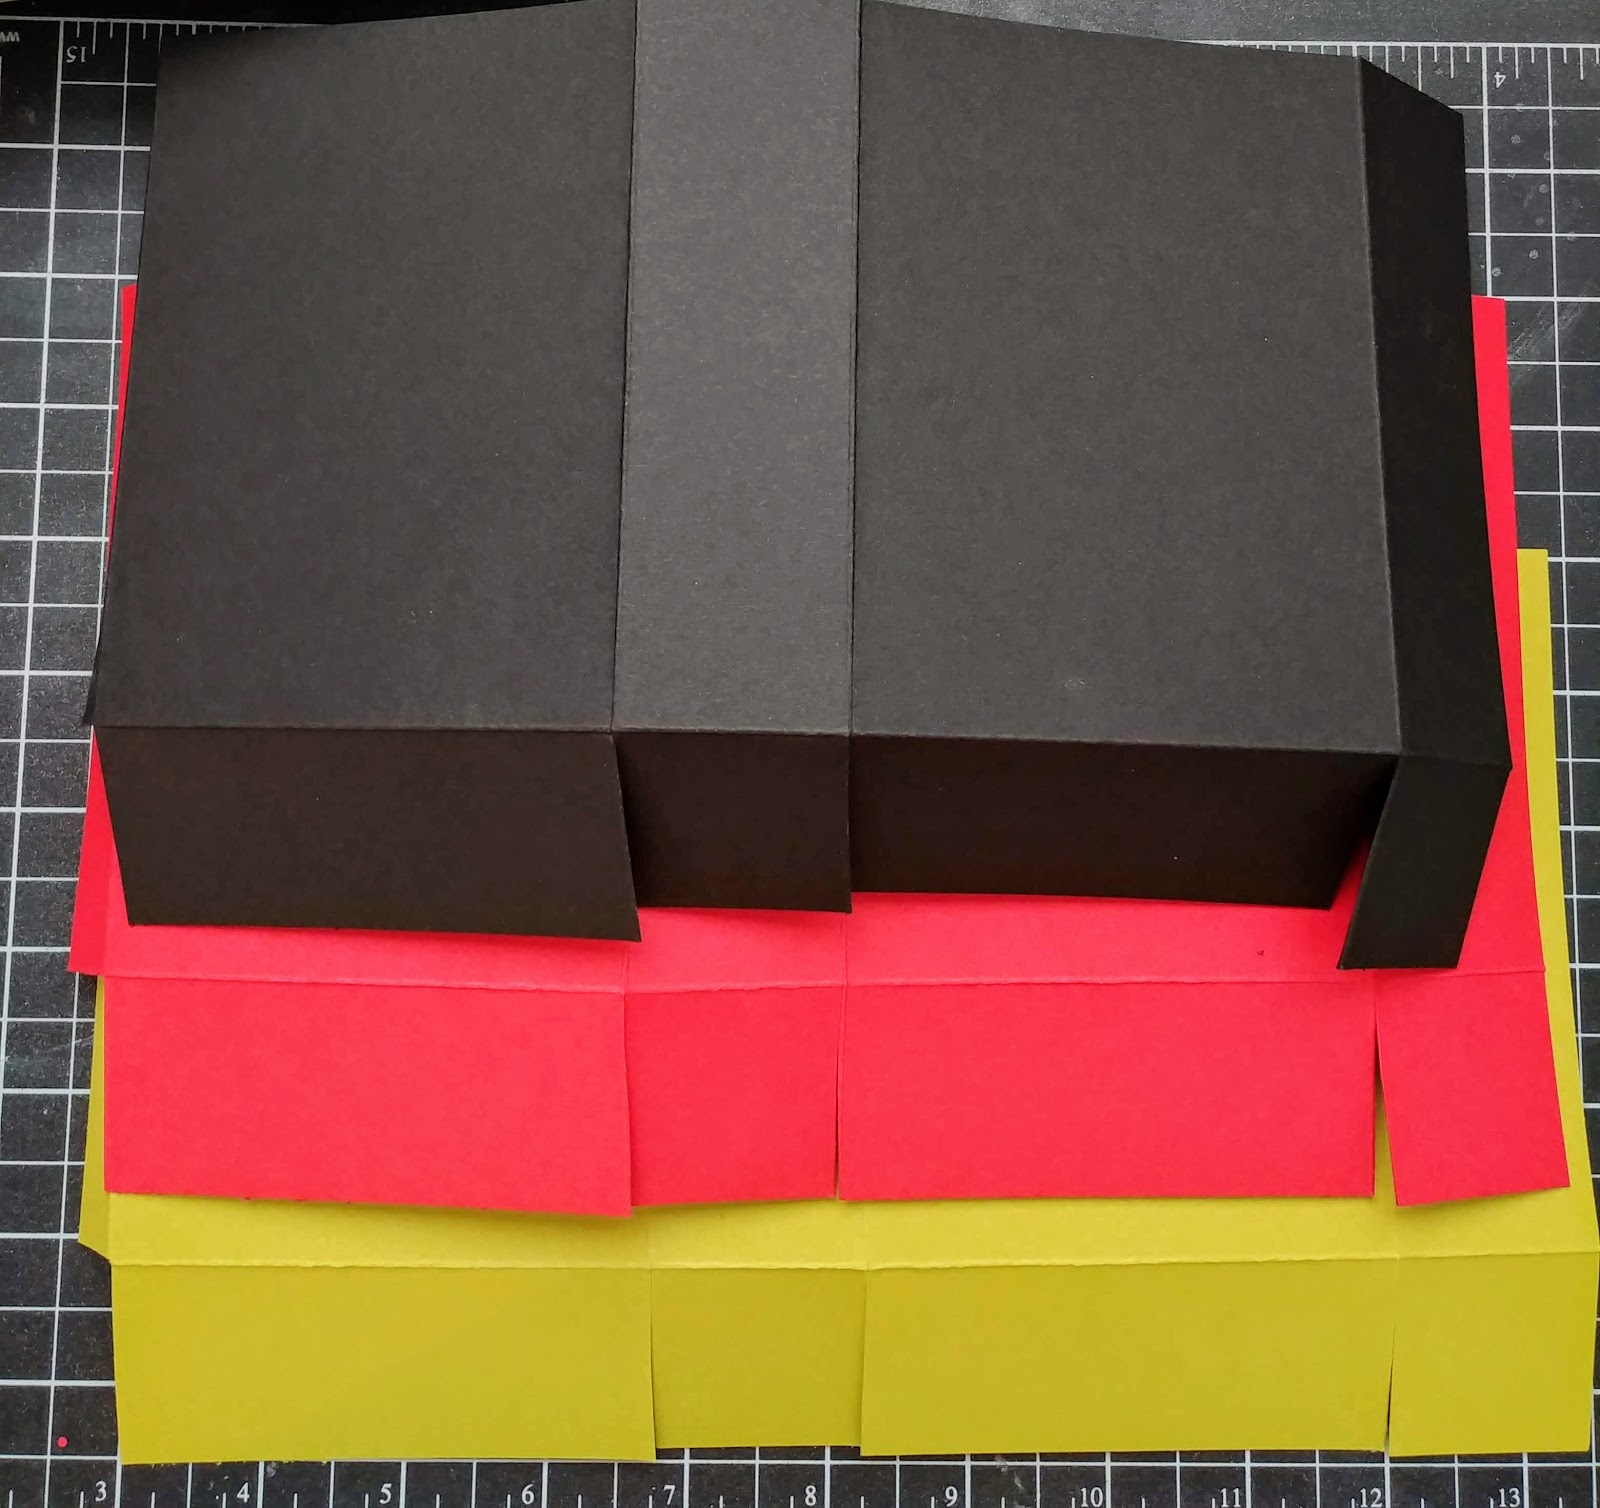
I cut a piece of Gray Kraft cardstock measuring 8 1/2 by 3. Score it at the intervals I've shown. The front and back are 3 inches and the sides and bottom are 1 inch. You will be left with a 1/2 inch 'tab' that you will use to add adhesive.

Use your bone folder and make all of the score lines crisp. Cut from the bottom up to the solid horizontal score line on each of the vertical score lines. Remove the portion that is shown in the bottom left corner.

You can see it a little bit better in this photo.

Add a piece of ScorTape to the  1/2 inch tab.

Add another strip to the INSIDE bottom flap.

Adhere the 1/2 inch tab first and then fold up the bottom and secure with the ScorTape. I found THIS old tutorial that you could use as well for something different, but using all of these fun new tea stamps/dies!

I gussied up the outside with another tea cup that was made using the exact same technique as the two on today's card.  I tucked in some extra lemons for some added detail!

Here is the link for the new collection: Garden Party Collection! Thanks for fluttering by!


Thursday, July 30, 2020

Pocket Journal Step-by-Step Visual Instructions


Hello and welcome to friends old and new!! I'm doing things a little bit differently today for a special purpose! I was asked to help create journal kits for the youth group of our church for day camp on Saturday.  I am using this platform to facilitate a visual look and step by step instructions on how the journals are assembled! I so wish I could be with each of you for camp, but please know that I am there in spirit and I hope you have a fabulous day despite things being "different than usual"!  Always remember, you are loved NO MATTER WHAT! 

Each of you will be given a kit with everything you will need to compete your journal! I do need to add, however,that this journal is NOT my design, but was created by my friend and SU! demonstrator Melissa Colledge! I have just used her darling journal as an example to create mine, as well as your kits, so let's get started!!!

The first step is to carefully trim around the laminated journal cover leaving about a 1/16 inch border. You can trim a little closer if you feel like you have a steady hand! The lamination is slippery, so you can actually just slide the scissors carefully down each side, but be careful to be steady! Take extra time to trim evenly around the rounded corners. If you look closely at this photo, you can see there are three score lines; one going directly down the center and two on either side of the center line. You will need to fold these sharply. You can use the edge of a credit card or a bone folder if you have one!

Once it is folded, you will have created a spine, which will be where the actual journal notebooks are attached. I will show how to do that in a bit!


This is how it should look on the side. You will notice that there is a hole right in the center of the spine. Locate that on your journal for the next step.

In your kit, you have two different pieces of elastic cord. For this next step, you will need the SHORTER piece. Thread the two ends through the outside of the journal spine leaving a loop that is long enough to secure your journal. You may want to scroll up to the first two photos for a visual of what I mean. You don't want this loop to be too tight or too loose! 

Tie a single or double knot with the two ends on the inside. You want to make sure that the knots are large enough so that it won't pull back through the hole! Go ahead and trim the ends when you feel like it is the correct length!

Each of your kits contain 15 pieces of white copy paper. You will need to put these together in stacks of 5 and then fold them crisply down the center. These will be the pages for your journal.

There are also 3 different pieces of coordinating pattern paper. Go ahead and fold those in half as well! These are the covers to create the notebooks for the journals. Once that is done, place the folded typing paper into each of the three covers.

Using a long arm stapler, staple the center crease of the covers and typing paper to secure them together. Staple one near the top and one near the bottom.

Next, you will want to open the journal cover and place one of the notebooks equidistant from the top and the bottom to give you an idea of where the holes need to be punched. You can see that I have made dots with a Sharpie pen to give you a visual look of where they need to be. Make sure the holes are just slightly below the top and bottom of the notebook.

I have included a hole punch for each of your groups so check with your leader to get the 1/8 inch hole punch. You don't want to use anything larger! Punch the three holes at the bottom and three holes at the top.

You can see how the holes should look in this photo.

This part might look tricky, but it's really simple. You will need to cut the larger piece of elastic in half. Starting with one piece, thread it through the TOP middle hole starting on the inside. Move it directly to the left and back through the top left hole. Stretch it down the left side and out the bottom left hole and back into the center. Knot the two end together tightly. Repeat this step, but move to the right.

These three lines of elastic are to secure your notebooks in place. It also allows you to add a new notebook if one gets filled up! You will need to open up the stapled notebook at the center and slide it under the elastic until it rests in the center (where the staples are).

Repeat this step with each of the three notebooks!

Each of your kits includes a binder clip that you can use to secure any of the three notebooks. It's just a fun touch, as well!

Each of your kits include a charm, a lobster clasp, and a spiral jump ring. You will need to put the lobster clasp onto the jump ring and then add the charm to the jump ring as well. It is just like putting a key on a key ring! You shouldn't need any tools or pliers to get this done.

Wrap the elastic around the journal and then add your charm! 

That's it! You're done! I hope you've enjoyed making these journals and I hope you'll take the time to use it! You also have a pen in your kit so you can get going right away! Thanks for joining me today and thanks for fluttering by! 

Monday, March 25, 2019

Keeping Christmas {Have Yourself a Merry Little Christmas}

Hello and welcome to the March installment of the Keeping Christmas Blog Hop! I'm so glad you've stopped by today! I've got a fun project to share with you today, but before I get started, don't forget to head to the other designer's blogs that are on the hop for even more Christmas inspiration! Honestly, I don't know what I would do at Christmas time if I didn't give myself this head start! 
Kelly Lunceford (you are here)

Today I'm sharing 3 gift box/ bags that were inspired by some wrapping paper that I bought last year. It ended up by being one of my favorites to use and I was really inspired by it. I should have taken a picture {maybe I will add it here later}. It has a black backround with red cardinals and lots of holiday foliage. It is just very woodsy, yet striking and elegant. Anyway, as I was getting things prepped and wrapped for Christmas last year, I made a list of projects I really wanted to do but didn't get a chance to, and this is one of them.

 When I made THIS project, I promised a tutorial, so here it is! LOL! I didn't realize it would take me this long!  These bag/ boxes are created by using the Stitched Gift Bag Die but die cut out of paper rather than felt and I just use the front and back pieces and the handle portion. They are so cute and are perfect little packages for all kinds of gifts!


This photo gives you a little bit better view of the size and shape of the finished piece. Since I don't own any cardinal Christmas sets that I wanted to use, I chose to use the Songbirds Stamp set which gave my project the look I was going for.
To begin my project, I cut a front and back from 3 different colors of cardstock: True Black, Pure Poppy, and Simply Chartreuse. I also die cut the handle portion as well, but didn't show it in the photos. This really gives the handles some stability since they are made from paper. Also, there is a bottom and a top to the handles, so make sure you line up the holes before you glue it in place. {Ask me how I know this} 
I made the boxes that are sandwiched between the front and back pieces out of the same cardstock. Start with a piece of 6 1/2 by 11 inch cardstock. The sides and bottom measure 1 1/2 and the front and back measure 3 3/4 inches. This will leave you with just enough of a tab to secure it, which you can see on the left hand side. I use Scor Tape to secure my boxes like this.
I die cut all of the pieces that I would need to decorate the boxes using the Songbirds Dies . The red and black boxes have Simply Chartreuse foliage and the Simply Chartreuse box has Spring Moss foliage. I added some ink blending to the tips of each leaf for some contrast. It really helps make the images pop a bit more!

The green and red boxes have red birds and the red box has black birds for contrast and cohesiveness.

I just love how folksy these turned out!

Once I had them all decorated, I glued the front and back panels onto the box portion. Make sure you don't put the glue near the holes so that it seeps out or that you can see it! {Ask me how I know this} I had three birds left over so I ended up making a trio of tags that I can either use with these or add to my gifts when it is wrapping time.

I added some gold nuvo drops on the red box here and there to mimic berries.

I added red Nuvo drops on the green and black boxes.

These were so much fun to make and now I'm kicking myself that I only made 3. Since the songbirds set has so many different sentiments and song images, I might make a few more of these that aren't Christmas themed as well! Thanks for fluttering by!


Tuesday, November 7, 2017

Mugs and Kisses {Hot Cocoa/Cider Box Tutorial}

Hello Friends! As promised, I am here today sharing my "Hot Chocolate/Cider Box" tutorial. I realized that I made a similar tutorial back in 2010 which you can see HERE. I called that a "Tea Box" because it is smaller in size, so use the dimensions I am sharing today if you'd like it to fit Cider or Hot Cocoa packets. You can see the Cider Box project that I made HERE. It is one of my favorite little boxes for holiday and seasonal projects. You can also use it for more than just hot drink packets, of course! I do want to mention that I did have to fold down the top of the cocoa packets to get them to fit, so you'll want to measure your packets before using my measurements and make any adjustments.


I started out by using the new SugarPea Designs stamp set from their latest release called Mugs and Kisses. I knew that I would be using it quite a bit for lots of Holiday projects and today is just the beginning! I am smitten with it! The sayings and images are PERFECT for my project!

I stamped all of the images in black ink, with the exception of the mug image. I stamped it in black first, but then wiped off the ink from the swirly cocoa portion of the image so that I could color that with a brown marker so it would look like cocoa was inside. There are lots of ways to achieve this same look, this just happens to be how I colored mine. After they were stamped and dry, I colored them with Copic and Prismacolor markers.


I used the coordinating Mugs and Kisses Sugar Cuts for all of the images. I assembled the little scenes onto a circle of blue cardstock for each assortment of images. I chose the sentiments for each box based on what images I used. I ended up making 6 boxes total, 3 of each design.


The sentiments are heat embossed in white onto red strips of cardstock. I really liked how the embossing powder stuck here and there so I didn't wipe it away before I used my heat tool. It gave that marshmallow-y, whip-cream-y look I was aiming for! I also added some liquid applique to the mallow's hats as well as the whip cream on the to-go cocoa cups. I used the same technique HERE

I had to add some corregated paper because I am just really into it right now. I corregated the Kraft paper using my paper crimper and then spritzed it with Shimmer Spray because c'mon, who are we kidding???..I'm addicted to the stuff! LOL! 


The boxes are assembled using some Scor Tape on the side and on the bottom. I also add some self adhesive velcro dots to hold it shut. The ribbon is only decorative and is just looped under the top flap and then tied in a bow at the top. I made handles on the Cider Boxes I linked up earlier in the post. In the past, I've punched holes on the side and knotted them, punched holes and added grommets, etc. Lots of different ways to embellish these boxes.
I hope you found this informative and useful! I'd love to see your creations! If you create some of these, leave me a comment so I can come and see your projects!!! Thanks for fluttering by!