Saturday, February 28, 2009

You're Late-SFYTT


I am thrilled...two challenges, one card! I made this for this week's "Sketch for you to Try" and for last week's Cinema Saturday Creative Challenge. I really need to get better about making my Cinema card *before* the new movie is announced. Ugh! I really wanted to participate in it because the movie was " The Curious Case of Benjamin Button". We were asked to incorporate *time* into our design as well as making it *vintage*. Do you think I succeeded? LOL!

Before I get away from myself, I wanted to let you know that Jen, the fabulous host of the SFYTT is offering *BLOG CANDY* for participants of this week's sketch. You will want to head over there to find out the deets! I still feel so lucky that she picked me to be one of her SFYTT girls! It has been so much fun!

For my card, I stamped the Rabbit image from "The Mad Hatter's Tea Party" stamp set from TJ Designs! If any of you attended Stampfest you may have come across their booth. It would have been fun to be there. Anyway, back to the card. I colored him with Copic and Prismacolor markers and distressed all of the edges with Vintage Photo Distress Ink (shocker). The Mad Hatter circle image was stamped and colored the same way and then mounted onto an accordian flower. I also used the vintage alphabet image at the top of the rabbit from the "Vintage Collage" stamp set from TJ Designs. You can find it if you follow the link from above. The glitter and clock were all purchased from starlitstudio . I am in love with all of the great products Cindy carries. It definitely caters to the vintage crafter. I love all of the charms, glitters, etc. that she carries.

The paper is from a scrumptious slab of K& Company paper I picked up at Hobby Lobby the other day. I am in serious paper heaven. You will probably be seeing it on quite a few designs for the next little bit. I added some buttons from my stash, threaded some and leaving some naked. I hope I didn't veer too far off of Jen's great sketch. You can check out the other fab creations from the rest of the gals:


Jen and JodyAmy
Susan and Amy

I really love to see what they have come up with! It is fun seeing how each of us interprets the sketch! I hope that you will all get a chance to play this week and get involved with Jen's blog candy give-away! Thanks for fluttering by!
Stamps: Vintage Collage and The Mad Hatter's Tea Party Stamp Set by TJ Designs

Ink: Palette Noir, Basic Black, Copic and Prismacolor Markers, Vintage Photo Distress Ink by Ranger

Paper: PTI Vintage Cream, K & Co.

Accessories: Liquid Glue by Martha Stewart, Barbara Trombley's Vintage Glass Glitter (sea sprite), Clock piece, buttons from my stash, linen thread by SU!, Sponge

Thursday, February 26, 2009

Dazzling Citrus

I am seriously behind on this week's SCS challenges. Normally I would just forgo them, but I really wanted to try and get them done this week. I decided to combine yesterday's sketch challenge and Tuesday's Color Challenge. I haven't used Tart and Tangy for some time and I thought it would work well for both challenges. I couldn't find a way to make this fit into today's WT challenge or I would have! LOL! This card is clean and crisp...I was in the mood. I have been doing a lot of vintage lately.

I started out by stamping the fruit images onto white cardstock and then punching them out with my 1 1/4 inch square punch. I then mounted them onto a piece of "Good Morning Sunshine" DSP. I added crystal effects to the center of the lemon and orange and the peel of the apple and then poured dazzling diamonds glitter over the top.


I also used my texture plates from SU!. If anyone has any tips for getting them to work in a Cuttlebug I would love to hear them. This is what I did: A plate, texture plate face up, cardstock, two tan rubber mats from Spellbinders, B plate and then I ran it through my cuttlebug. You can hardly see it, but I used it on the back Pumpkin Pie layer. It is super subtle, but in real life you can see it better. Everything else is pretty self-explanatory, but I did add a corduroy button that I love. I really need to get a few more colors.
I really liked making this card because I used a set I haven't used in a while as well as the pumpkin pie cardstock. The top pieces were completely faded. Hmmmm....that is not so good! LOL!
Thanks for fluttering by!
Supplies:
Stamps: Tart and Tangy, Best Yet
Ink: Pumpkin Pie, Chocolate Chip, Kiwi Kiss, Summer Sun
Paper: White, Pumpkin Pie, Good Morning Sunshine DSP
Accessories: Pumpkin Pie striped grosgrain ribbon, corduroy button, linen thread, dimensionals, dazzling diamonds glitter, crystal effects, 1 1/4 inch square punch, SU! Texture Plates

Wednesday, February 25, 2009

Mojo Celebrations

I hope you are enjoying the matchbox tutorial. I have stayed away so that those of you who were interested would have a chance to see it. If you are still interested, you can check it out here. For today's card, I used the Mojo Monday sketch. I love it! Yesterday I needed to head to Staples to get some ink cartridges for my printer and Hobby Lobby is on the way so of course I needed to make a stop. I came home with some fun goodies, including this yummy paper from My Mind's Eye. I also picked up a few copic markers so that I could finally color this darling Hydrangea image from Lockhart Stamp Co. that I picked up at Ellen Hutson's store. I went to color it the other day and had really horrible purple choices, so I needed to fix that! LOL!

The focal image was stamped with Palette Noir ink and then colored with copic and prismacolor markers. I added a bit of Lavender glitter to give it some shine and dimension. I created the label with my Nestabilities Label 1 dies. I added some machine stitching, sponging, ribbon, buttons and ribbon! Of course I *had* to add the lace border using the Doily Lace Edge Punch from Martha Stewart.
Thanks, Julee, for anther fantastic sketch! It is one of my favorite challenges of the week! In fact, this is the only challenge I have done this week and we are already half way through! Let's see if I can get my act together and get some more done!


I got all of my cards packaged up that I will be giving to a friend in my neighborhood. The stash included nearly 20 cards. Some of them were hard to add to the stash because they are some of my recent favorites. She will be getting most everything that I have posted since this post. So...that means that all of my cards from this post on, will be going in another stash for a lucky recipient. Today's card is for my friend's birthday on March 2nd. She loves purple, so I hope she will like it! Thanks for fluttering by!

Stamps: Hydrangea from Lockhart Stamp Co., Circle of Friends by Stampin' Up!, Mixed Messages by Papertrey, Ink.

Ink: Palette Noir, Vintage Photo Distress Ink by Ranger, Copic and Prismacolor markers
Paper: PTI Vintage Cream, My Mind's Eye, Ultrasmooth Vanilla by Stampin' Up!
Accessories: Buttons, 1 inch circle punch, ribbon, fern punch and doily lace punch by Martha Stewart, Sewing Machine and Thread, glue dots, lavendar glitter, sponge

Monday, February 23, 2009

Matchbook box Tutorial


Hello! I hope you all had a great weekend. I took yesterday off from any stamping and spent the day with my family. I promised the matchbook box tutorial this week, so I thought I may as well get it done first thing. I used the textured pattern paper from SU! . Before beginning, there are a few things to note; I made the length of the box 6 inches, because I thought it would be nice to get two sliders from one piece of paper, however, this particular SU! paper is not true 12 by 12. Also, make sure that all of your measurements are precise, or the slider won't slide and may not even fit inside at all! Have fun!

Step 1: Cut a piece of paper 6 by 10 1/2 inches. Score at 3 inches, 5 inches, 8 inches and 10 inches. You should have a little bit left over to adhere it together. This piece will be for the outside of the box. As you can see, I scored it on the backside of the paper. This polka dot side will be on the inside.


Step 2: Use a bone folder to crease all of the score marks for a crisp box.

Add adhesive to the small piece as shown in the photo.

Step 3: Step 4: Cut tabs as shown and add adhesive. Remember to use your bone folder to crease all score marks before adding glue.

Step 5: If you would like to add another pattern paper to the outside, follow the step indicated in the next photo. Look on the bottom and the top for score marks, I put one on the bottom, but it still need to run the same way as the others.


This is mine. I Hope everything is clear and easy to understand. Remember, correct measurements are a must for this project, or things won't fit together nicely. Thanks for fluttering by!

Saturday, February 21, 2009

My Heart Is With You-SFYTT

It is that time again! I must admit that sitting down each Friday evening to complete my weekly SFYTT card is quickly becoming my favorite stamping time. I usually stamp in the morning once I have gotten my kids off to school, but I feel rushed, thinking of all the other things I need/want to get done before my Kindergartener arrives home. My creativity comes easier in the evening when all the cares and duties of the day are done and I am free to relax.

Of course this week's sketch is amazing. I was thrilled that the sketch called for a sideways oval because I was in the mood to use my oval Nestabilities. There is something so classy about the embossed edge paired with a hint of a scalloped edge; and of course I had to age the edges using Vintage Photo Distress Ink. This card came together so effortlessly and was a pure joy to create. I think a lot of it has to do with the great sketches that Jen comes up with each week! This entire design came about because of this scrumptious ribbon I found in the dollar bin at Michael's tonight. I needed to go there to replace my poor cutting blade on my paper trimmer. It was shot as I am sure you all have noticed for the last month with all of my feathered edges. So unclassy! I can't believe I let it go so long! Anyway...I picked up more than just a cutting blade; some ribbon, embellishment jars, and a super sweet baby box to hold the baby gift I need to get delivered.
I stamped the image using Palette Noir ink and then colored the image using re-inkers and a blender pen. I really like this method of coloring, especially if I'm not using Watercolor paper. I did add a little glitter to the image once I was finished.
I love pulling out an old set like "Garden Collage" because I haven't used it in so long, it feels new again! I think the late night stamping is making me ramble so I will go, but before I do, I just need to give a shout out to the other SFYTT gals Jen and Jody Amy ,Carole Susan and Amy . They always blow me away with their creations so you will want to make a stop at each of their blogs! Thanks for fluttering by!

Stamps: Small Sayings, Garden Collage
Ink: Palette Noir, Vintage Photo Distress Ink, Barely Banana, So Saffron, More Mustard, Sage Shadow
Paper: Sage Shadow, PTI Vintage Cream, My Mind's Eye
Accessories: Sewing Machine and Thread, Buttons from my stash, Oval Nestabilities, Sponge, Blender Pen, Fern Punch, ribbon style tags and Aquamarine crystal glitter from Martha Stewart, foam squares, 2 way glue, liquid glue, ribbon from Michael's dollar bin, Kaiser Blossoms , glue dots, corner rounder, Textile embossing folder and cuttlebug
P.S. Look for the matchbox tutorial next week!

Friday, February 20, 2009

Lucky in Love

I haven't participated in the monthly Dirty Dozen Alumni Challenge in ages. I was able to combine challenges, so I thought I would play along. I have wanted to make a card for the CinemaSaturdayCreativeChallenge all week and haven't got a chance. This week's movie is "Emma"; one of my all-time favorites. I love everything about it from the clothes, hair, actress/actors, story, so on and so on. I thought the sentiment "Lucky in Love" worked well for this movie also, because although there are many set backs, everyone ends up "Lucky In Love". So....this is my Emma/DDA challenge card. The challenge for the DDA was to use "Luck" and fancy folds. I chose not to fold my card fancy, but instead added an accordian folded flower to my card.

I printed the xoxo and Lucky in Love from my computer. I then stamped around the images using my beloved DesignElements stamp set from TJ Designs. This is one of those "must have/go to" sets that should be on every stampers shelf, especially if you love vintage creations as much as I do. I knew I wanted to keep the card black and cream and then add a pop of color with the ribbon. I used some great paper I picked up at Hobby Lobby a while ago from The Paper Studio. One of the patterns is a Toile pattern which I love and reminded me of the picnic that Emma and her friends attend when she is really mean to Miss Bates! Poor Miss Bates!
In keeping with the "luck" theme, I added a few of my Vintage Playing cards that I picked up a few years ago. You can't see the fabulous Vintage images on them, but I have used them in other designs and they are a delight. I purchased the bird punch from Wal-Mart the other day and thought that a pair of them would be perfect for this design. Of course I added a sugar coating of black chunky glitter. I had fun with this design. I think this one will adorn one of the shelves in my stamp area. Thanks for fluttering by!


Stamps: Design Elements from TJ Designs
Ink: Palette Noir, Vintage Photo Distress Ink by Ranger
Paper: PTI Vintage Cream, Pattern Paper by The Paper Studio
Accessories: Ribbon (unknown), Buttons from my stash, Chunky Essentials Glitter, Martha Stewart gem stickers, liquid glue and bird punch, Vintage Playing Cards, Sewing Machine and Thread, sponge, foam squares

Thursday, February 19, 2009

Mojo Cupcakes

Thank you so much for all of your positive response to yesterday's post. I will *definitely* be posting a tutorial! I decided that since it was already Thursday and I haven't even done this week's Mojo Monday Sketch, that I had better get on it! I also combined it with today's WT challenge over at SCS. That one was easy peasy; use stripes! It seems like I always use stripes so it wasn't hard at all! It also worked nicely with the cupcake wrapper on the cupcake image. Also, the cupcake frosting looks like it is floating above the base because of the angle I took the photo. In real life it looks just right! LOL!

I fell in love with this set called "Cupcake Affair" from Verve. As I popped over to get the link, I noticed that they are having a sale! Woohoo! The thing I love about this set is that the cupcakes have line art and bold images, so if you feel like coloring you can, but if not you can just use the solid image! Very cute set! I also really like the sentiment. You can use if for a birthday or just to cheer someone up!


I paired the image with some paper from My Mind's Eye. I thought the colors were perfect for a cupcake card. I also added some Diamond Stickles to the cupcake frosting, flowers and edges of the card. I thought the card needed a little something more, so I added a button duo threaded with linen thread and attached with glue dots! The sentiment was punched using the large oval punch from SU! I sponged all of the edges of the white cardstock with Antique Linen Distress Ink for a soft look. Thanks for fluttering by!


Stamps: Cupcake Affair by Verve Stamps

Ink: Palette Noir, Antique Linen distress ink by Ranger, Copic and Prismacolor markers

Paper: My Mind's Eye, PTI White

Accessories: Linen Thread, Buttons from my stash, nestabilities dies, large oval punch, sponge, diamond stickles, ribbon by offray

Wednesday, February 18, 2009

Bird Box

As I mentioned yesterday, I threw together a last minute stamp club. I had made this box last week, so I decided to use this as one of the projects. It is similar to my Valentine Boxes I made for my kid's teachers, but this one is a bit larger. One of the reasons I love the thicker, textured Designer Series Paper is that it is perfect for making boxes. I used the new "parisian breeze" DSP for the entire project, except for the accordian flower. I used Bella Bleu for that because it is thinner and works better for those types of flowers.
I did add a few Non-SU! items on the box, which I have never done at a stamp club before. Shame on me! I precut the nestablitlies label 1 die cuts for the bird images. I had them use brads from the pretties kit to replace the Martha Stewart gem. They actually turned out cuter. Once the box was put together, we added some excelsior to the inside. I think it is perfect for these boxes. I provided some Easter Candy to put inside the boxes!
The accordian flower is dusted with the new Chocolate glitter from SU! and a Baja Breeze button for the center that has been threaded with Linen Thread. The accordian flowers can be tricky, but I hope the ladies had fun putting them together.

You have no idea how long I have been waiting to be able to put a project together like this using SU! supplies. I am thrilled with so many of the new stamp sets, papers and accessories!

If you would like to see a tutorial for this box, leave a comment letting me know and I will get one put together! Thanks for fluttering by!

P.S. My stamping wish-list for this week includes the Mojo Monday sketch, the Cinema Saturday Challenge and the rest of the SCS challenges. Stay tuned for these projects this week!


Stamps: Friends {24-7}
Ink: Chocolate Chip, Creamy Caramel
Cardstock: Naturals White, Parisian Breeze DSP
Accessories: Pretties Kit, Nestabilities Label 1 die, Sponge, Excelsior, Scoring Blade and paper trimmer, liquid glue, chocolate glitter, Valet ribbon originals, Linen Thread, Baja Breeze button from Button Bouquet, Scallop Edge Punch

Tuesday, February 17, 2009

Get Well Soon


Today's Color Challenge over at SCS was to use More Mustard, Kiwi Kiss and Rose Red. I decided to use the new Thoughts and Prayers set from SU! hoping that it would be a good fit with these colors. I love this set, but didn't want to use any of the Sympathy sentiments, so I opted for the "Get Well Soon" greeting instead. It is not uncommon to find one or more people sick this time of year, so I thought it would be a good one to have on hand or add to my *give-away* stash. These colors actually reminded me of the Disney version of "Sleeping Beauty", especially adding black into the mix. I was really wishing I had some type of Renaissance set or something that I could recreate that same feel. Oh well...!

I am seriously in love with the tree from this set and I am hoping to get the Decor Elements with this same image for my living room. This card is pretty straightforward. I did add a little piercing and I used my Textile Embossing Folder for the background. It is one of my favorites, yet I haven't used it in a while. I also used my color spritzer tool to add some black ink flecks. I am throwing together a last minute stamp club for tonight, so I better run and figure out some projects! Thanks for fluttering by!


Stamps: Thoughts and Prayers
Ink: Kiwi Kiss, Palette Noir
Paper: PTI White, Rose Red, Kiwi Kiss, More Mustard, Rose Red DSP (retired)
Accessories: Slot Punch, Kiwi Kiss satin ribbon, Vintage Brads, Mini Library Clips, Foam Squares, Mat Pack and Paper Piercer, Cuttlebug and Textile Embossing Folder

Saturday, February 14, 2009

Little One-SFYTT


I was telling my sister this afternoon, as I was rushing to make a wedding card, that I really need to have more special occasion cards on hand. You all know that I make *alot* of cards, but they never seem to be the ones that I need. Go figure! So...with that in mind, I decided to add a baby girl card to my stash. I mentioned before that most of the cards that I make have been going into a special pile that will be given away. This one will not, however. This one will stay with me for the next baby girl that comes along!

I used the retired, yet beloved "Buggies and Booties" stamp set from SU! along with the "Mixed Messages" stamp set from Papertrey, Ink. I really love the sentiment that comes with the Buggies and Booties stamp set, but it was too large for this layout and so I stamped it on the inside of the card and opted for a smaller sentiment for the front.


The other day, my Mom stopped by with a fabulous surprise. She had made me an assortment of crocheted flowers. I hope she will find that this card is worthy of her handmade treasure.

I added a few more special touches that I thought reflected the style of the card and the look I was trying to achieve. I used my Ornare piercing template that I bought from Ellen Hutson's store last week. I also used my sewing machine to add a zig-zag stitch. I punched the lace border out using Vellum Cardstock from SU! and my Martha Stewart Doily Lace Edge Punch.


It seems like I have been running a million miles a minute the last few days, so it felt good to sit down and make a creation that I could spend longer than 2 seconds on! LOL! I think next week should be calmer. I won't keep m fingers crossed, though!

You can check out the other fab creations from the rest of the gals:Jen and Jody Amy ,Carole Susan Amy . They always blow me away with their creations so you will want to make a stop at each of their blogs! Thanks for fluttering by and Have a Happy Valentine's Day!!!!


Stamps: Buggies and Booties, Mixed Messages
Ink: Walnut stain and Vintage Photo by Ranger, Blush Blossom Marker
Paper: Pattern Paper by Anna Griffin, PTI Vintage Cream
Accessories: Kaiser pearls, buttons from my stash, linen thread, sponge, sewing machine and thread, pin, Ornare piercing template and mat, pink ribbon by Club Wed, glue dots and foam squares, crocheted flower

Friday, February 13, 2009

Be Mine, Valentine!


I am off to my cousin's wedding this morning, but I wanted to share a quick project with you since I was M.I.A. yesterday. I was volunteering at school for both of my kid's teachers, cleaning house, etc. I made two of these matchbox Valentine's for my kids to give to their teachers. I started off using the yummy "Slumber Party" DSP from SU! I absolutely love that stuff! I have almost used the whole pack! I paired it with my go-to Valentine's set this year; Heart Prints from Papertrey, Ink. It was still out on my desk, so I used it! LOL!

I filled the boxes with some paper shred and then added some Dove hearts! Yummy! It was a fun, quick Valentine treat! I created the boxes by using the super fun Slumber Party DSP...this is one of the heavy weight selections, so it worked perfectly for this project. The length of the box is 6 inches, the width across is 2 1/2 inches and the side width is 1 1/2 inches. I just scored the paper, left enough room for a tab and used some adhesive to put it together. The box is simply 1/16 of an inch smaller to allow room to slide.


I also made the world' tiniest valentine card to fit inside. Just enough space to write To and From. I know teachers get so much stuff so I am sure it is hard to remember who gave what.


Supplies: Heart Prints Stamp Set by PTI
INk: Riding Hood Red, Palette Noir, Vintage Photo
Paper: PTI White, Slumber party DSP
Accessories: Scallop Edge PUnch, sponge, amuse twinkle sticker, SU! striped ribbon, paper shred and chocolate! YUMMY!
Thanks for fluttering by!

Wednesday, February 11, 2009

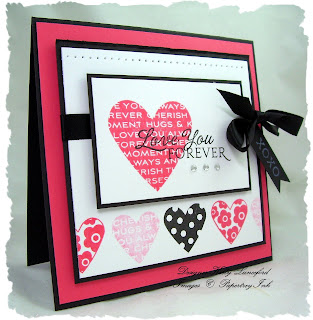
Love You Forever


One of my favorite books is Love You Forever. I used to read it to my son all the time when he was young and every time it makes me cry. I am a sap, though! I still tell my kids, "I'll love you forever, I'll like you for always, as long as I'm living my baby you'll be." So...when I saw that the "Heart Prints" stamp set from Papertrye Ink had "Love You Forever" as one of the included sentiments, I had to get it. It is so cute anyway, but that sentiment was the cherry on top! I decided to use it for a few of my Valentine's Day cards that I have been busily making since yesterday. I was on a roll, so I actually made two last night and one today using the SCS Sketch Challenge. It worked perfectly with the designs I had already made and with all of the supplies that were still out.

I used Berry Sorbet cardstock and ink from PTI and the coordinating pattern paper called Pink Patterns. I am ashamed to say that I purchased all of these supplies when they first came out and this is the first time I have cut into the paper. The ribbon is still wrapped in cellophane. Sometimes I have such a hard time making that first cut! LOL! Actually, the black satin ribbon ended up looking better with this design anyway, otherwise it would have been cut.


I used Berry Sorbet ink and Palette Noir for all of the stamping. Everything was stamped onto PTI White cardstock and then matted onto black. I used a lot of foam squares to raise up the layers.

I am planning on taking some cute photos of my kids today after school (if they cooperate) and having them printed at the one hour photo at Wal-mart and then tucked into each Valentine that they will be giving to my Mom, Sister, etc.

I have also been working on a fun project that will be going to a fellow stamper, so I will show it when it is safely in the mail so I don't spoil the surprise!


I still need to go shopping for my kid's Valentine's Day presents, but I did find the *cutest* Strawberry Shortcake gumball machine when I was at the grocery store this morning, so I will be giving that to my daughter. I am a sucker for anything Strawberry Shortcake related! Thanks for fluttering by!


Stamps: Heart Prints by Papertrey Ink.

Ink: Berry Sorbet by PTI and Palette Noir, Craft White

Paper: Basic Black, PTI White, Berry Sorbet

Accessories: Black Satin Ribbon by Club Wed (Target), Gem Stickers from Martha Stewart, Paper piercer and mat pack for one card, foam squares