Showing posts with label Essentials by Ellen. Show all posts

Tuesday, August 1, 2017

No grit, no pearl


 Happy Tuesday everyone! Today is my birthday! Yay! ha ha! I thought I would quickly pop in today to share a card I made a few weeks ago. I made this one before I created THIS one. I had so much fun creating the background so I thought I would share how simply it can be done!
 To begin, I cut a piece of Cool Caribbean cardstock to 4 by 5 1/4. I then blended some Broken China distress oxide ink leaving a little bit of clean space for the sentiment. 
 Once that was blended, I used the shimmer spray/stencil technique that I saw on Jennifer McQuire's blog. I simply spritzed the shimmer spray onto the polka dot stencil and then placed it over my inked cardstock panel. I let it sit with a heavy bottle on top for a few minutes. The result was this shimmering, bubbly background that is perfect for a sea inspired card.
 As soon as I saw the "no grit, no pearl" sentiment, I knew it would be awesome to use Heat and Stick powder to heat emboss it with sand. I had some shimmery sand left over from a baby shower I helped with a few years ago, so I used that for the sentiment. I used the Mermaid's Tail stamp set as well as the coordinating dies for the fun seashell wreath. 


 The seashell wreath was created using the dies as I mentioned above. I created a watercolor panel using the same supplies and techniques that I used for THIS card if you are interested in the links. Once they were all cut, I traced a circle onto my panel using a pencil. I glued the seashells on in a gradiant pattern for optimum effect. 
The finishing touch was a half back pearl glued onto the wreath as well as just a few clear Nuvo drops for some added shine. I left it very simple so that the sentiment and pearl could be the shining star. I think my 3 year old's bracelet was the inspiration behind this seashell wreath. LOL! He got it last year as a trick-or-treat prize and he calls it his "magic bracelet". It's so cute! Thanks for fluttering by!

Wednesday, July 26, 2017

The ocean in a drop!

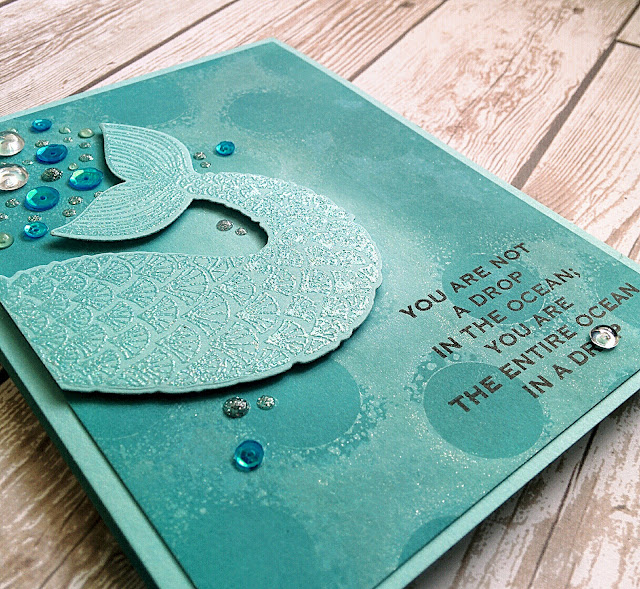
It's been a while since I've shared a mermaid card and I have just been DYING to post this one! LOL! I made this last week but I resisted posting it so I didn't "over-mermaid"! I want all the cards to be mermaid cards! Ha ha! I am absolutely smitten with the Mermaid's Tail stamp set and coordinating dies.
Actually, it all started when I found my missing polka dot stencil from American Crafts. I've not used it in over a year, so I decided to get to work creating a polka dot background using Broken China Distress Oxide Ink and a spritz or two of Shimmer Spray on the backside of the stencil. Wow! What a bubbly, shimmery background it made! It was perfect to add this fabulous Mermaid's tail! 
I heat embossed the tail image onto a piece of Cool Caribbean cardstock using Nuvo Shimmering Pearl embossing powder. It was the perfect amount of shine for this card! I die cut it and then added it to the bubbly background using foam squares. I saw a fabulous card on Instagram from Jessica at All the Sparkle and I LOVED how she created the bubbles using sequins. While mine don't look like hers, she definitely inspired me so I wanted to give her a shout out! I used the Mermaid Mix Sequins as well as a few rain drop embellishments. I just couldn't resist and added a few more Nuvo drops here and there! The sentiment was stamped in black and then I added one rain drop to the center of the "o" in drop! It actually magnifies the "o" in a cool way! I'll be sharing a new card for The Challenge tomorrow so stay tuned! Thanks for fluttering by!


Sunday, July 16, 2017

Just keep swimming!

 I might be *slightly* addicted to this Mermaid's Tail stamp set, but...I made this card for my daughter's Hope Squad group at school. so it's going to a good cause. I just love all of the cute, fun and silly sentiments that are included in the set. Once again, I was dreaming up this card while floating on a tube down the lazy river with my 3 year old on my lap as we soaked up the sun! The best part is when he falls asleep on me, even when we get splashed, and he just snoozes away! 

 It's no secret how much I LOVE my Zig Kuretake Gansai Tambi Pearl watercolors! They have brought me so much joy! LOL! They really are so much fun to work with and provide amazing results. To begin, I diecut the mermaid's tail using the designer dies out of 140 lb watercolor paper and painted the entire piece with the blue pearl watercolor. I also embossed just the very end of the flipper using silver embossing powder because I knew the rest of the tail would be covered up with all of the fabulous seashells. 
 I created a beautiful panel of watercolor so that I could die cut the seashells. I didn't want all of the seashells to just be one color, so I made a point to overlap the dies onto two conjoining colors as I ran them through my Cuttlebug. I had a lot of fun adhering them to the watercolored tail diecut. After they were all on, I added some Rainbow Sparkle Jewels here and there as I have done in previous projects which you can see HEREHERE and HERE. They are so fun to add to my projects!!!! I also added a little bit of glossy accents to a few of the shells as well. I didn't want to overwhelm the piece, but just give it some fun details. Since it is the main focus of the card, it does have more gems and embellishments than I would if it were mixed with other images.


I created a fun background that reminds me so much of bubbles. I have used this particular Cuttlebug embossing folder for so many projects, mostly sports related. I actually experimented a few days ago with dry embossing acetate. I kept the panel that I am hoping to incorporate into a design, but for today, I did the dry embossing with vellum! Absolutely delightful!
 I really liked how it looked over the top of the Aqua Mist card stock but knew that I could create even more dimension with some ink. I sponged some Broken China Distress Oxide Ink onto the BACK of the vellum piece. The result is fabulous! I think I will be revisiting this idea in the future. I was hesitant to have the oxide ink on the front of the vellum, but I will experiment and see if it dries well. I turned it over and adhered it to the base I created using the Aqua Mist card stock. 
 You can see the depth that it gives that panel! So beautiful!I used Scor Tape along the edges, which is a fabulous adhesive to adhere vellum. I attached it slightly crooked and was pleased to see that I was able to lift it and reposition it, which came in handy later, too!

 I hadn't given enough thought to the sentiment before I added the vellum piece to the card front, but I was happy that the vellum was easily lifted so that I could adhere the sentiment. I chose to stamp the sentiment onto a strip of acetate using black StazOn ink. I wanted it to have a floating quality and not have any bulky sentiment strips! I just love how it turned out. 
I added a few more rainbow sparkle jewels, some Morning Dew Nuvo Drops, and a few Sparkling clear sequins here and there! I was pleased with the simplicity but awesome sparkle! 
I couldn't ignore the inside and I just HAD to add a shrinky dink sentiment. I thought the "Seas the Day" sentiment coordinated nicely with the sentiment on the front. It warped a little bit but I liked the wavy look that it added to the card. I may have gone a *little* wild with the embellishments on the inside, but these are for Jr. High kids so I am sure it will be fine! (wink) Thanks for fluttering by!

Friday, July 14, 2017

Let's be Mermaids!!!


 How fabulous is this new Mermaid's Tail stamp set?!?! I am completely IN LOVE! I have been absolutely enjoying making bright, fun, and summery cards! As soon as the mailman rang my doorbell with my package from Ellen Hutson I had to play... immediately! Like it says; I'm done adulting...especially with new stamps to play with! ha ha! I shared a sneak peek of this card on Instagram yesterday and I mentioned that it was proving difficult to photograph.
I FINALLY ended up with the best pictures I could get around 6:40 in the evening, which seemed late to get the best light, but it was the best I had all day. I have taken a boat load of pictures of this card!

 To begin, I stamped the mermaid's tail in Versamark ink onto Hawaiian Shores cardstock and heat embossed it using gold powder. After that was done, I used the coordinating designer dies to cut it out. I set that aside so that I could work on a few more elements that I had in mind for this design. I realized after I placed my order, that the stamp set didn't come with any aquatic sea plant images. I don't have anything that would work very well either. I decided to create my own seaweed-esque plants myself. 
 I used a piece of 140 lb cold pressed watercolor paper and painted both sides of it green using the fabulous (and addicting) Zig Kuretake Gansai Tambi pearl watercolors. I painted enough of the paper so that I could cut strips in varying sizes to create the seaweed. I twisted the strips while the paper was still wet from the watercolors so that I could manipulate it into the desired shape. Once they were the right size, I snipped the tips at a sharp angle to make them look a little more realistic.
 I set those aside to dry and got to work on the background. I had watched a video on Jennifer McGuire's blog on water stamping with distress oxide inks and since I just got some, I was dying to try. I used the Glorious Petals stencil from Hero Arts for the actual "water stenciling". I made a card a few days ago using the same technique and the image came out much crisper. I actually didn't mind in this particular case because I didn't want it to compete with the fabulous design on the Mermaid's tail. After that had dried a bit, I added a spritz of shimmer spray like Jennifer had done in her video. The result is spectacular!


 I ended up adding a few more colors of pearl watercolors to the piece of watercolor paper I had been using for the seaweed. I used the seashell die cuts to make an assortment of shells. Because they had the pearl shine, I decided to add some Glossy Accents like I did on THIS card because I liked the effect so well. Once all of my bits and bobs had been created, it was time for the fun part; assembling it all.
 Originally, I had planned on having the mermaid's tail splashing off of the card horizontally, so I heat embossed the sentiment accordingly. I then changed my mind and decided I liked it vertically; as though the mermaid was taking a dive into that glorious ocean. I really liked how the rainbow background ended up looking like a sunset with a deep ocean underneath. I love surprises like that! So...the sentiment is a little off, but I like it anyway!
 I used Tombow Mono Multi to glue the paper seaweed down as well as a few mini glue dots as it would allow. I used a few heavy things around my desk to place on the seaweed so that the glue would dry without is springing back off of the card. The funnest part was adding in all of the seashells, sequins and dew drops. I just HAD to get the mermaid mix sequins! They are INCREDIBLE and they are limited edition, so grab 'em while you can! I also added a light layer of wink of stella to the tail as well! I "may" have been singing "I'm so shiny" from Moana while I was putting this all together! LOL!

To finish it off, I just COULD NOT resist making a little shrinky dink tail! Can you blame me? I mean, look at this cute little thing! LOL! I stamped it in black Palette ink onto the shrinky dink sheet, colored it in a rainbow pattern using Copic markers and then let the heat tool work it's magic! I glued it to the inside of the card with the "just keep swimming" sentiment as well as a few sequins (of course). I also gave the inside a generous spritz of shimmer spray as well. (that's why it appears like the sentiment is grainy, but it's not) I created this card for a friend who has had a particularly bad week and I am certain this will cheer her up! That's what I love about this crazy business!!! Thanks for fluttering by!