Tuesday, October 31, 2017

Color Throwdown #467

I'm so excited to be helping out for this week's Color Throwdown Challenge! It's one of my favorites and I love participating when I get the chance! You can check out the challenge HERE. I have two cards to share with you today;same colors, different feeling!  Scroll down to see the second card.

For my first card, I sponged some Peacock Feathers distress ink onto a piece of Bristol paper and then spritzed it with shimmer spray.  While that was drying, I die cut the So Thankful for You out of white paper. I die cut some additional pieces to stamp using the So thankful for You stamp set in the colors used in the challenge.
After that was done, I added it to the sponged base and added a few sparkling clear sequins. 


For my second card, I went for a bright, summery combination. I absolutely love these flowers stamped in red! The sentiment is heat embossed in gold ink onto a piece of white cardstock. The Hawaiian shores cardstock has a circle die cut from the middle using a nestibilites die. I also used the Wood Grain Impression Plate for some added texture.
 I added some bright gold Nuvo drops here and there for some detail and shine! I hope you get a chance to play along using these fabulous colors! Thanks for fluttering by!



Halloween Treats

Happy Halloween! The big day has arrived and I am all set with my Halloween goodies I have been working on! It took me a while to get into the Halloween "feeling" this year and now that it is here, I realize that I didn't get my fill! Oh well! I had so much fun putting these projects together and I hope you find some inspiration!

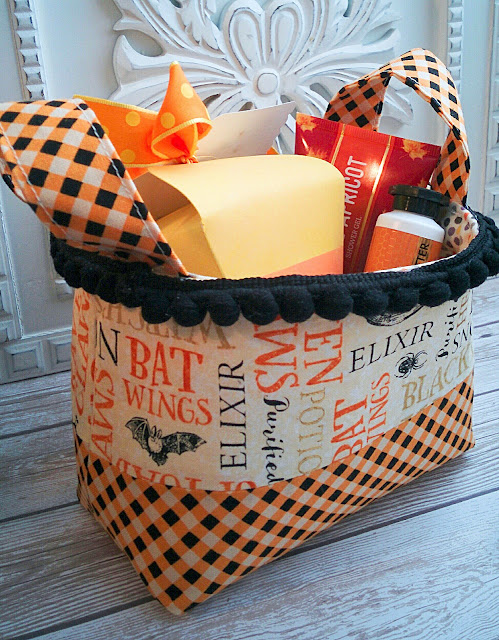
I've shared these {Flutterby} Baskets before that you can see HERE and my Halloween post is HERE. For those of you who visit regularly, you may have seen my "Vintage Cherries" card collection last Spring and may remember THESE. They are seriously so much to make! I have plans to make some new card sets and baskets as gifts. You can see the cute little Candy Corn Treat Boxes that I shared yesterday peeking out. I made them for these baskets because I knew they would be perfect!

I wanted some quick cards to add to the baskets as well. These are 4 1/4 by 3 1/2 inches. I added some pattern paper that I picked up at Hobby Lobby and attached it to the front.

The black circles are die cut out of black paper and then stamped with and image from and old PTI set called Spooky Sweets II. I can only find the die cuts on their site now, which I don't own, so I am glad I just stumbled upon them. I guess the stamp set has been retired. I was thrilled to use some old Martha Stewart crafts dimensional stickers that my sweet sister gave to me a few years ago. They are the perfect quick accent to spice up my gifts.

The "Halloween Wishes" sentiment is also from the "Spooky Sweets II" set. I stamped it in black on a strip of orange paper.

These baskets are just as fun as paper projects because the fabric is SO cute!

I just love how cute the card look peeking out of the baskets.

I added some pom-poms to a few of the baskets and I have some left over to add to a few projects next year!

You can see a few of the things that I have tucked inside. I added more, but I wanted to show you all how cute the lining fabric looks inside! I will be taking these to school this afternoon as well as some caramel apples when I help with my 6 year old's party! Thanks for fluttering by!


Monday, October 30, 2017

Candy Corn Treat Boxes


The second I saw the Carrot Treat Box Die, I knew that I would #1 be buying it and #2 be making candy corn treat boxes. Some of you may remember the Watermelon Treat Boxes that I made in the Summer and of course I have made a few carrots which you can see HERE and HERE. But...I have been so excited to make CANDY CORN BOXES!!! Of course the die came out in the Spring, so you can imagine how hard it has been to resist making them and here I am a day before Halloween finally sharing them with you! LOL!

To begin, I die cut enough to make 4 boxes and got to work assembling them on one side. Once the two sides were attached, I got to work coloring the cardstock using Distress Oxide Ink. I just used washi tape as a mask and a guide to make the lines straight (well, straight-ish LOL!) They took some time, but it was quite fun getting them all blended. Once the inking was done, I assembled them on the final side to create the 3D shape.

I've had this orange and yellow polka dot ribbon for YEARS...like, I don't even know how many...and it just hasn't ever been the RIGHT thing on a project, until TODAY!! I was so thrilled to use it!

The tags are die cut using one of the included tags that come with the Carrot Treat Box Die. Once they were cut, I stamped them using a candy corn image from the Tiny Treats: Halloween stamp set and a sentiment from Spooky Smiles stamped in black. The candy corn images are colored using Copic and Prismacolor markers and then I added some Nuvo Glaze over the top. Very simple! I didn't want anything to detract from the "candy corn" vibe on this first attempt, but maybe next time I will add a few more colors and things to see if I like it! It's crunch time and I can't make any mistakes if I am going to get everything made before Halloween! LOL! Thanks for fluttering by!

Merry Monday #263 "Have a Holly Jolly Christmas"

Welcome to this week's Merry Monday Christmas Challenge! I LOVE this week's inspiration photo, in fact, I think I have it pinned somewhere on one of my Pinterest boards somewhere! LOL! Isn't it just lovely and inspiring? You can check out all of the rules and guidelines for the challenge HERE as well as see the gorgeous creations by the rest of the designers!

I had already been working on a hot cocoa project, which I will be sharing soon, and had pulled out Cup of Cheer as a possibility for that, but ended up not using it. I thought it would be perfect for today's card! All of my color cues came from the piece of plaid paper that I chose to use as the background which reminded me of the inspiration photo.


To begin, I cut a card base from Kraft cardstock and then layered the plaid patter paper over the top. I also added a strip of whitewashed wood that I thought worked nicely with the challenge. 


After that was done, I heat embossed the "Holly Jolly" sentiment in white onto a rectangle of True Black cardstock. After that was done, I smudged some Fresh Snow ink over the top using my fingertip. I just love chalkboard designs and follow quite a few chalkboard artists on Instagram. I love being able to recreate this look using stamps and ink! I also rubbed a little bit of ink around the edges as well. 

Once that was done, I die cut all of the cups, flowers and teapot out of Stamper's Select White Cardstock and stamped them in coordinating inks. It was so much fun arranging all of the bits and pieces here and there! Once everything was adhered to the card, I gave it a good spritz of Shimmer Spray for some sparkle. I added some Nuvo Crystal Glaze over the top of the flowers and the red cup and saucer. The finishing touches are a bow of black baker's twine and a few Sparkling Clear Sequins to frame the sentiment. I had a lot of fun putting this card together. I have been listening to Christmas music pretty much nonstop the last little while as I was preparing THIS and THIS project. I can't believe Halloween is tomorrow! It's one of my favorites! Thanks for fluttering by!

Sunday, October 29, 2017

Give me something good to eat!


It's the final countdown to Halloween and I still have so many things I need to make! I snuck snippets of time here and there to get these finished! I haven't made treat bags like this for a few years now, so I was excited to revisit them. I don't even remember the technical name for them but I'm 100 % certain I saw them on Splitcoast Stampers IONS ago...or maybe SU!?!? 

Anyway, they are always a fun way to showcase pattern paper. I ran to Hobby Lobby to replenish some ribbon I ran out of for another current project I am working on, and spotted this paper and I knew it would be PERFECT for bags like this!

 These will most likely be heading to the secretaries at my boys' school. I have plans for what I will be giving to the teachers, which I will be sharing before Halloween as well. The green tags were created using a few retired PTI stamps...some of my favorites. The spider web is stamped in black and then the creepy spider is heat embossed in silver. I sponged some Simply Chartreuse Ink around the edges for some definition.

The "trick of treat" sentiment is heat embossed in silver onto True Black cardstock. I really love how professional and polished a heat embossed sentiment looks.

The accordion medallions are created from some black and silver glitter specialty paper that I found at Hobby Lobby as well. It was hard to cut, because it had handmade qualities to it, but in the end it actually worked well for the medallions so it didn't tear at the score lines. I often have a hard time with paper tearing when I make these medallions.


Saturday, October 28, 2017

Inspired by All the little Things #70 {Blessed}


I am completely honored to be the Guest Designer over at Inpired by all the little things this week! It is one of my favorite challenges and totally represents me as a designer...I'm always inspired by all of the little things in life! I was blown away by the gorgeous inspiration photo and couldn't wait to get started! Autumn has nearly taken us to November -the season of Thanks-so I decided to create a couple of Thanksgiving cards to mail out next month!

Before I get started on the details of the card, I couldn't resist sharing this photo of my now 4 year old! When I saw the inspiration photo, it totally reminded me of this photo shoot I did with him when he was about a month old! Ok...now on to the card!


To begin, I sponged Peacock Feathers distress ink onto a 4 by 5 1/4 inch panel of Bristol paper and blended it, concentrating on the center for a more saturated look, and worked my way out to the edges. I love that gorgeous turquoise blue represented in the photo. I had just ordered the Mix and Mat; PInked Edge Die and knew it would be perfect for today's card.


I die cut the entire piece from my favorite Kraft cardstock and then used Copic markers to color in the leaves. I love using color on Kraft cardstock...it creates new tones that are just lovely! Each leaf was brushed with some Wink of Stella for some shine. I adhered the leaf panel onto the sponged card front using foam squares. After that was done, I added a few Bright Gold Nuvo Drops here and there between the leaves for some added interest. I really liked how the bubbles in the cocoa on the inspiration photo looked, so I added them in my own way.

The sentiment is die cut twice out of "Gilver" glitter paper using the Inspired: Blessed die cut and then glued on top of each other. The other portion of both sentiments (I made two different cards) is heat embossed using gold powder onto a strip of mustard cardstock using the Inspired:Blessed Mini Stamp Set. It is such a perfect little set for so many occasions, but especially around this time of year.

The "Blessed" portion is glued into place using Tombow Mono Liquid Glue directly onto the mustard sentiment strip. The sentiment strip is added to the top of the leaf portion using foam squares for added dimension. The entire focal panel is adhered to a mustard A2 card base for some added definition. I hope you get a chance to play along this week! With such a beautiful photo, it's hard not to! Thanks for fluttering by!


Friday, October 27, 2017

Birthday Celebration Blog Hop for Wendy Ramlakhan

Surprise! Happy Birthday, Wendy! I hope you are having a fabulous day! For those of you who are joining me today, WELCOME to the Birthday Celebration Blog Hop for Wendy! I had so much fun creating my card for her and I'll share with you how I made it, but first, I just want to take a moment to thank Wendy for allowing me to be a part of her fabulous company, SugarPea Designs, as a Design Team Member! I have already had SO much fun!

Image may contain: 1 person, smiling, text
Here is the list of the designers participating in the hop! You won't want to miss checking out what they have created! If you came here from Kaja's blog, then you'll want to go to Kerin's next!


For my card, I started by heat embossing the Mandala image onto a 4 by 5 1/4 inch sheet of cold pressed watercolor paper using clear embossing powder. Once that was done, I added dye ink using a sponge, starting with red in the middle and working my way out in rainbow order.


Once that was done, I tape the piece to a mat board and spritzed it with water to get the colors moving. I just love how this looks! After it was dry, I spritzed it with Shimmer Spray for some shine.

While that was drying, I die cut the "You" sentiment using the You Sugar Cut 4 times and glued them together. I added some Wink of Stella over the top and then added a coating of Nuvo Crystal Glaze for some shine. I just love it turned out.

The "Happy Birthday to" portion of the sentiment is heat embossed using white powder onto a strip of black cardstock for some dimension.

The sentiment strip and "you" die cut are added to the card using foam squares for some depth. The  watercolor panel is added to a white piece of cardstock  for a nice clean border. The whole thing is adhered to a black A2 card base for some added definition! A few jewels added here and there finish the design off. Thanks for fluttering by!

Wednesday, October 25, 2017

Keeping Christmas {Let it Snow, Let it Snow, Let it Snow}

"I will honor Christmas in my heart and try to keep it all the year long!" ~Charles Dickens

Welcome to November's installment of my Keeping Christmas 2017 series! I have been having all sorts of fun putting this post together! There is something very therapeutic about sewing for me!


For today's project, I sewed up 6 rice warmer bags using some left over flannel from last year. This is actually the third year in a row that I have used these three patterns because I love them so much and the fabric store was still carrying them last year. I love making the rice warmer bags because they are gender neutral and a useful gift. If you want to read more about the actual rice warmers, you can visit Thimbles and Thread My paper tags that I made to use to package them up were directly inspired by the fabric, as you can see!


To begin, I cut 6 tags to 3 1/2 by 4 1/4 inches and used my corner tag punch to make them into tags. My MISTI came in very handy for this project; I added all of the stamps on the door and then inked them all up at once! I just love this tool for mass producing a particular design. I used Fair Isle Motifs to recreate the look of the flannel. I love when I have the "perfect" stamp set!
 
The "let it snow" die cut was cut using silver glitter paper and the Christmas Cheer Die.I applied it directly over the fair isle image. The glitter made it really hard to photograph, unfortunately. 
The "let it snow" stamped portion is heat embossed in silver onto black strips using the Christmas Cheer stamp set.  I wanted to incorporate the black of the other two flannel prints so that it would make sense when they get packaged up. I always package my rice warmers with a canister of hot chocolate in a cellophane wrapper. 


I'm so excited to have 6 more Christmas gifts ready to go! November will be my last Keeping Christmas post for 2017, but I will still be sharing holiday projects throughout December! I still haven't decided if I will do it again in 2018, but knowing me, I won't be able to resist! I have some fun things happening the rest of the week so stay tuned!  Thanks for fluttering by!


Sugar Pea Designs Mix it Up Challenge #36 {sending you a flurry of warm wishes}


I'm super excited to be over on the SugarPea Designs Blog participating in this month's fabulous "Mix it Up Challenge"! I decided to use both sides of the challenge! I thought that the newly released Flurry of Warm Wishes would be the perfect starting point for today's design! The portion with the smaller snowflakes has been heat embossed using white ink onto Bristol paper and then sponged using an assortment of purple inks to try and capture all of the hues represented in the inspiration piece.
The larger snowflake is heat embossed using some "Magic Dust" embossing powder that includes some shimmery purple that was the perfect touch for this design. 
As you can see, I took a few liberties with the sketch and decided to add a strip of Spots and Stripes Pastel paper on the edge. To add even more dimension, I cut an edge using the "Sweet Incentive" this month called Stitched Border I die. I think it gives it a nice touch! I hope you get a chance to play along this month! It's still not too late to get some Halloween projects finished and this challenge is PERFECT!!!

Monday, October 23, 2017

Merry Monday #262 Thank you for the gift!

Happy Monday! I hope you all had a fabulous weekend! We had Fall Break so the kids were home from school which meant we had some fun and rested some as well! Days off are always welcome here and there to recharge our batteries! I have a very simple card this week for the Merry Monday Christmas Challenge! You can check it out HERE as well as see the other designer's cards!
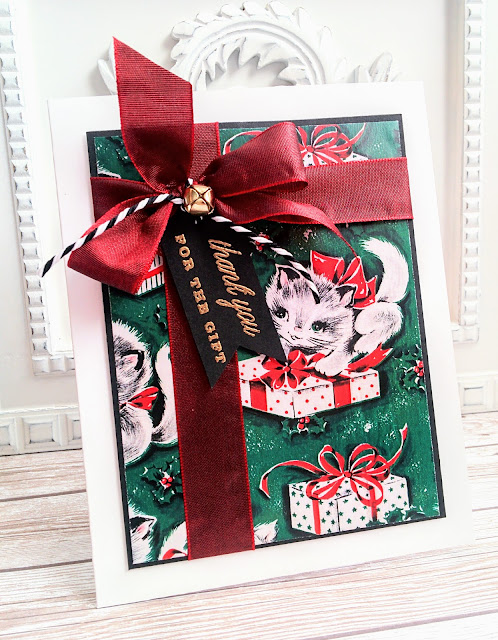
Linda is asking us to add a gift to our Christmas cards this week! This photo actually inspired me to make my entire card front as my "gift". I was also thrilled to use this vintage Christmas wrap pattern paper that my sister gave to me last year. I thought the kittens with the gifts were absolutely perfect as well!

For being a simple card, I really did struggle with it. I wanted that cat to be front and center, but then it meant the tag would be in front of the cat. I messed with the ribbon more times than I wanted to admit, but in the end, put it back where I had it originally and just let the tag hang down a bit more.


I thought it would be fitting to use the "thank you for the gift" sentiment on my "gift wrap" card. It is from the Painted Poinsettia stamp set, which I have yet to use the actual poinsettia image. I have made a lot of Christmas cards this year, so I thought it would be nice to make a few thank you cards as well. I actually don't want to make too many of those either, because that is what I do AFTER Christmas when I'm feeling sad about putting everything away! LOL!