As promised, I'm back today to share the first of my end of year teacher gifts. I made three of these sets and they were so fun to put together.
I've reworked the Carrot Treat Box Die as a strawberry. When I was making my Easter Treats I had the fun idea to make strawberries, too. I told my mom and she got to work right away and made some for her friends, my sister saw my mom making some and decided to make some to say thank you. So, here I am, FINALLY making my own strawberries. I knew it was a good idea! LOL!
I used theStrawberry Patch and Strawberry Patch Sentiments to create the cards and tags as well as the embellishments on the Berry Basket. Since I was making three of everything, I kept the details and embellishments simple.
I die cut the strawberry boxes using some old SU! paper that I've had for YEARS, but I thought it looked like strawberries. I threaded some ribbon and tied a sprig of this cute leaf trim onto the tags. Isn't it so cute? It's perfect for this project. My mom found it at Hobby Lobby when she was putting hers together and my sister gave me some for Mother's Day. It's just so perfect!
You can see the leaves spilling over the edge of the treat box here. I have strawberries in my fruit garden and they do send out long shoots everywhere!
I also maximized my time by only stamping the solid images for the leaves, flowers and berries. This is a good tip to remember so you don't have to color in a whole bunch of images when you're in a hurry.
I wasn't able to get the teachers the gift cards to the restaurants and stores they mentioned that they liked during Teacher Appreciation week, but I made some Pillow Boxes so I could give them now. I stamped the sentiments directly onto the pillow box and then added the embellished piece using foam squares.
I made some quick cards using all of the same elements to keep the gift set cohesive. I did add some crystal clear sequins for some added shine. Thanks for fluttering by! P.S. join me tomorrow for a fun surprise as well as the rest of the week as I finish my teacher gifts.
I'm sharing a quick shaker card today for a friend who was having a rough day. I'd just made some cookies so I thought I'd create a quick card to brighten her day.
I don't know about you, but some sparkle, shine, and chocolate are sure to lift anyone's spirits!
I was in quite a hurry because I had another appointment but I was happy I could sneak in a quick card. I had so much fun in the short time I had and now I have all kinds of ideas with this set running through my head.
The sequins lay just below the sentiment which worked out nicely so it didn't hide the entire sentiment.
To begin, I cut a circle from the upper portion of some Buttercup card stock. I made a white cardbase as well. I used my embossing buddy to reduce the static on the card base.
I stamped the sentiment using Versamark ink directly in the center of the circle. I hadn't glued anything down at this point, I just payed it there for placement. I used white embossing powder and heat set it with my heat tool.
Once that was done, I blended some Hawaiian Shores ink over the sentiment.
I stamped the sunburst images onto the front of the yellow piece and then attached the acetate window with scoretape. I then added the foam strips.
I chose a few different sequins from the Shakers and Sprinkles kit. I also added a few Crystal clear sequins as well.
I added a few more sequins to the front for some added shine and detail. I also added a strip of glitter card stock to add some visual interest and proportion. Thanks for fluttering by!
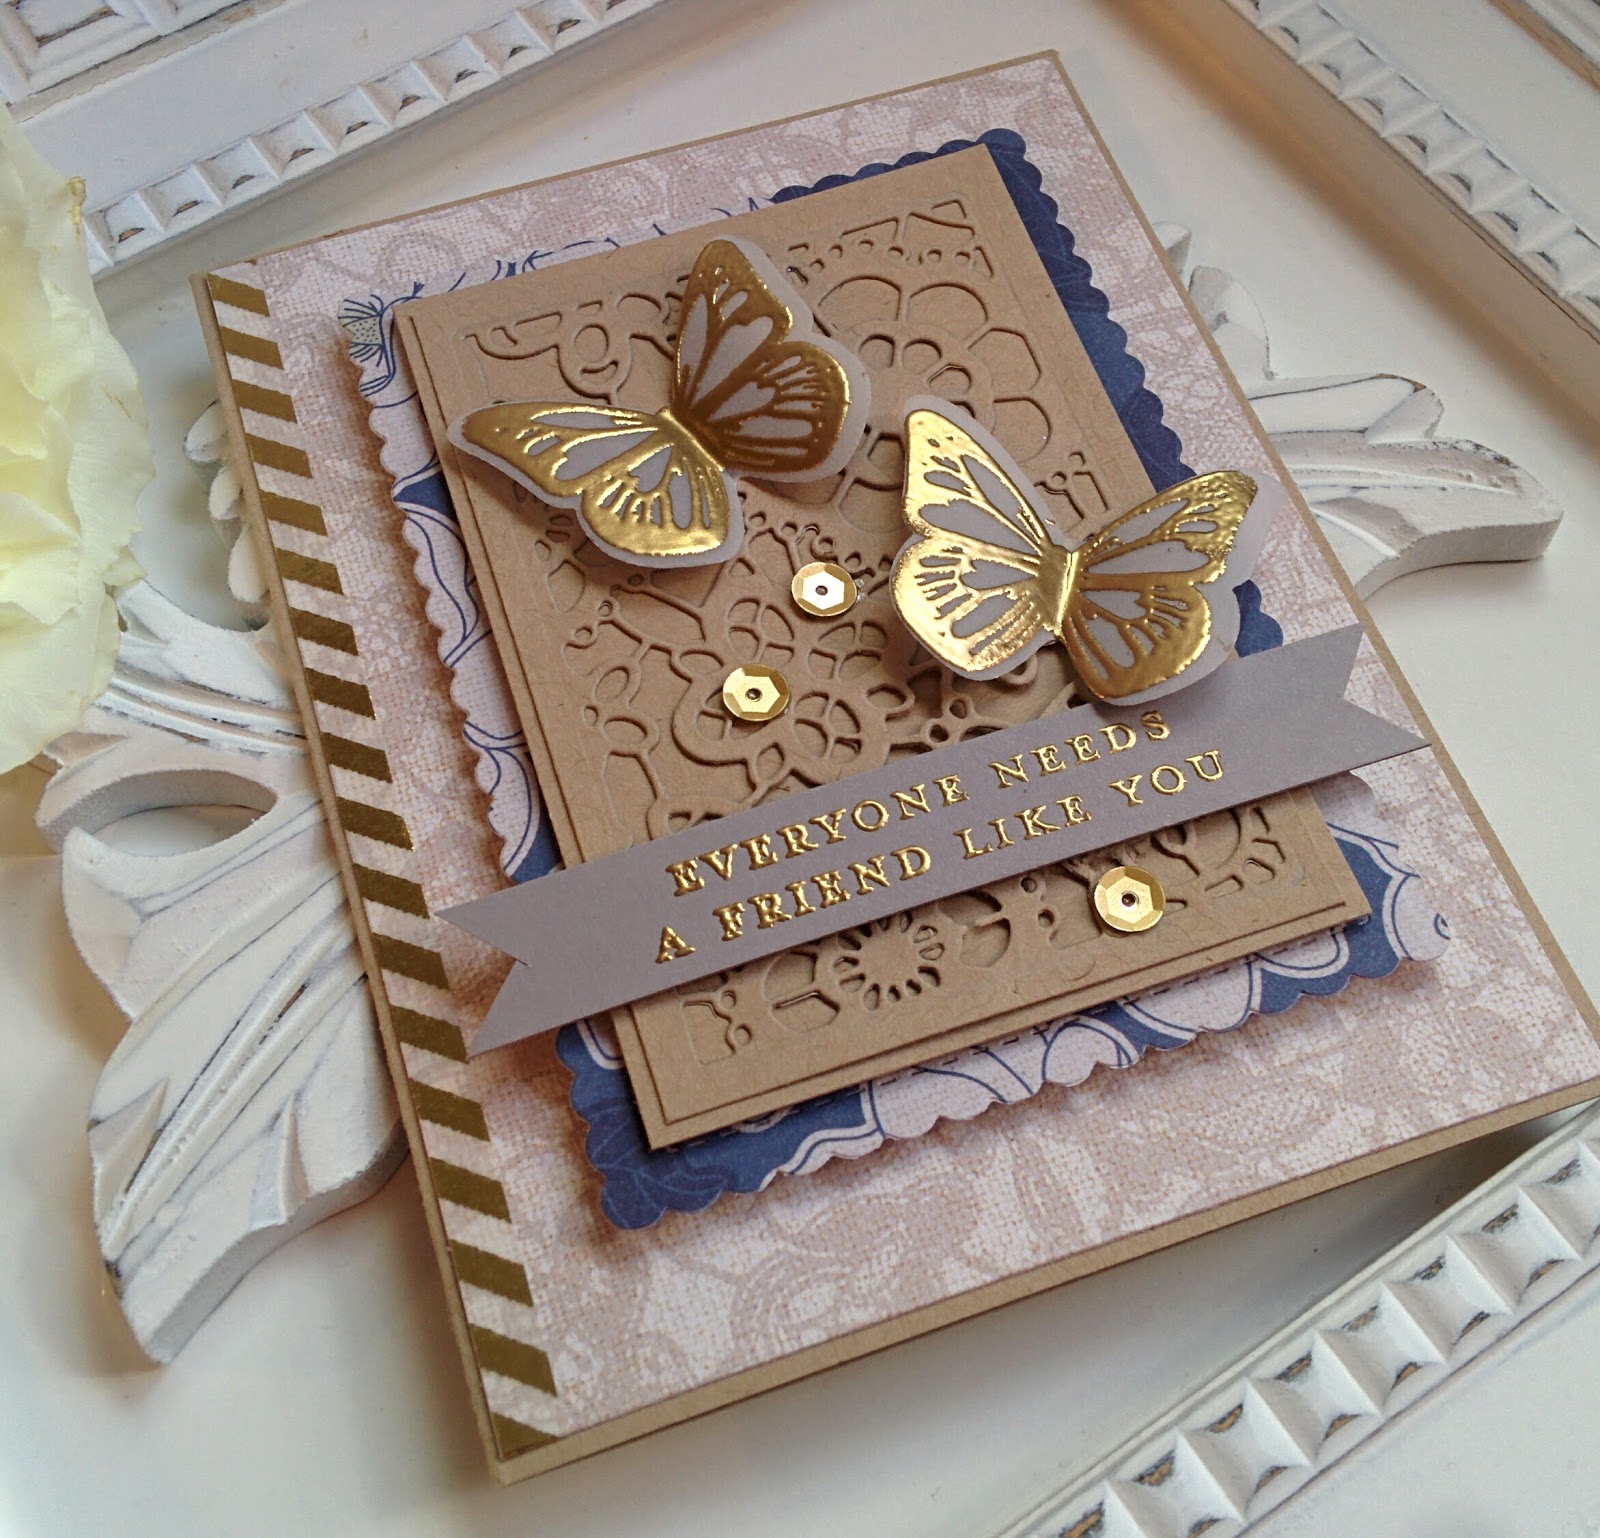
To say I have been having a ball creating cards this month would be an understatement. I have had so many ideas running through my mind and my hands can't catch up! I was happy to be able to sit down and make a birthday card for a dear friend's birthday this week. I was also happy that I FINALLY got the lace portion of the Mix and Mat: Scallops to cut! I was feeling super disappointed and even reached out to my amazing stamping friend Laurie to see if she had any ideas on what I should do. I did some rearranging of my cutting plates and used quite a stack of shims to finally get it to work. I'll apologize now for the amount of designs you will now be seeing with this! LOL!
The design is natural and easy, nothing fussy or complicated...just how it needs to be sometimes.
My sister gave me a fabulous paper pad from Michael's for Mother's Day that I can't seem to stop using. The lace looking background paper as well as the blue scalloped paper are both included in the collection.
The lace background piece is adhered to an A-2 Kraft card base. I added a length of gold striped washi tape to the side for some added gold accents.
The butterfly image was die cut using vellum and then heat embossed using gold powder. I contemplated layering them onto some die cut butterflies using the same lace background paper, but finally opted for the lighter, less fussy simplicity of just the vellum butterflies. The fabulous sentiment is from the newer Keep It Simple: Friendship stamp set from Papertrey Ink. I really love it and I can see me reaching for it often.
The lace piece was die cut and then layered onto another piece of Kraft card stock. As much as I love seeing the peek-a-boo of the lace, I really liked the look that I achieved with it layered as well.
I felt like the pattern from the blue piece would make the card feel a little too busy. I did leave a single layer of lace with this exact paper on some tags I made on Sunday, that I loved, but decided against it on this design.
A few burnished gold sequins finish the design off. I really like how this turned out. I hope that my friend likes it as well. I am putting together a "Scentsational" birthday gift for her that will include all kinds of smelly things that us crazy ladies like! LOL! Thanks for fluttering by!
"I will honor Christmas in my heart...and try to keep it all the year long." ~Charles Dickens
Welcome to May's installment of my Keeping Christmas series. I am just having way too much fun putting together these monthly holiday projects! If you're just joining me, my "Keeping Christmas" series is something I've started this year. I will be posting a new holiday project on the 25th of every month.
We had a cold snap last week, which even included snow, so I jumped on the opportunity to get my projects started!
I made up my mind about where the project this month would go, but it ended up in a completely different direction! I just love these neutral cards and tags (scroll down to see the tags). I really like the retro/modern juxtaposition.
To begin, I die cut A LOT of the "holiday" image. Each piece is stacked three times on the cards and twice on the tags. I wanted them to have a chipboard weight and durability. I just used Stamper's select white card stock for all of the layers that don't show and then I used glitter card stock for the top layer. It is one of my favorites; it's like a champagne color, not quite gold and not quite silver...I always call it "Gilver"! I picked that term up from Rachel Zoe and it has just stuck.
You can see the two tag designs that I created for this project. After I finished making the cards, I just wasn't ready to be done. I thought I'd make a quick tag and a more labor intensive tag. I don't think you can ever have too many tags at Christmas. I put up 6 trees at Christmas, so I really like having a good variety of beautiful tags to dress up my gifts. These particular ones will go perfectly on the gifts under the tree in my Great Room.
Okay...let's get on with the details of each project. To begin the cards, I cut 4 bases from Kraft card stock which measure 4 by 5 1/4. I stamped the pine bough image and the pinecone image using the old SU! set called "Peaceful Wishes". I've seen many similar sets come out since then, but it doesn't seem prudent to buy more of the same just because it is new.
The sentiment is from the Christmas Cheer set and coordinating dies. Instead of adding the tiny little dotted "i", I added a 5 mm jingle bell as the dot. I just love the extra detail it adds to the design. These are one of my favorite things to add to tags and cards on all of my holiday projects. The "greetings" portion of the sentiment was heat embossed using gold powder. I love the striking look against the black card stock.
My poor son has been having a hard time with me as I play my Christmas CDs while I am working on these "Keeping Christmas" projects. I told him that it helps me get into the Christmas mood. He told me that it will take all of the magic out of it once Christmas is finally here. I tried to tell him that there is a special Christmas spirit that you can't duplicate no matter how hard you try. That being said, I was listening to Michael Buble's rendition of "Silent Night" as I was working and the glitter was falling like snow and all of a sudden I felt the sweetest Christmas spirit. I quickly found this sheet music pattern paper with the words and music to Silent Night and added it to my design. I also decided it would be fitting to use the Silent Night sentiment on the simple tags as well as the inside of the cards.
I duplicated the layout and elements on this tag design. I didn't stamp the pine boughs or pine cones on the tags because I thought it would look too cluttered.
The silent night tag does have the pine boughs and they worked up so quickly. I can't wait to add them to my gifts. I always like to add some baker's twine to attach them to the bows. It is so fast and easy that way.
I added some gold sequins and a strip of metallic gold washi tape to each tag as well as the cards. I am almost all out of these burnished gold sequins...I hope I can still find them to replenish my stash.
I'm hoping that with all of this Christmas preparation that all will be calm and all will be bright come December! LOL! I am having so much fun with this series. I've gotten a few more emails from you sweet readers showing me your amazing projects! You have no idea how happy it makes me! Keep them coming! If you post on Instagram, use the hashtag #keepingchristmas2017 . So far...it's only me...I'd love to see your creations as well. Thanks for fluttering by!
P.S. I'll be sharing some end of year teacher gifts before school gets out on June 2, so stay tuned!
I made a *loose* promise to myself that I would keep clear of my creative space and only do housework and laundry today! Well, we can see how well that worked out!! I was perusing Instagram and saw today's Color Throwdown Challenge and I knew they would be perfect for a few graduation cards! The high school colors are green ,white and black, so these lighter hues are just as good! I'm excited to send these simple cards out to a few deserving graduates!
I wanted to make good use of my time so I inked up one sheet of 140 lb. cold-pressed watercolor paper with the green that matched the color in the challenges as best as I could. I spritzed it with water and let it dry.
While the paper was drying, I pulled together the few elements that I would be using for the rest of the design. My one and only graduation stamp comes from Mega Mixed Messages and it was the perfect size to accent these cards.
The background for this card was created using the Chevron Cover Plate die cut from gray paper and then layered onto a card base of gray as well. This one is for a boy, so I wanted it to be subtle. I am going to brag about the new Sand Eraser that I got last week. It helped me out again on this design. I adhered the die cut numbers too high, because the tassel was an unexpected, but happy, afterthought. I removed them, but it left bits of foam tape as well as pulled the gray paper up. I wasn't happy. I hate spending time on something just to have it ruined. The sand eraser removed the rough gray paper as well as the adhesive that was left. I have an adhesive eraser, but this worked better.
When I die cut the numbers, I knew that I would be creating two cards with one piece of watercolor paper, so I really had to be tricky to get it to fit. The negative space creates the background for this card and the die cut numbers are adhered to the other card.
The watercolor piece is layered onto gray and then onto a white base. The tassels for both cards are from Hobby Lobby! I bought them for book club MONTHS ago and never used them so I was happy to happen upon them yesterday when I was cleaning. I remembered them today and was so happy I did! They are tied to the cards with silver cord wrapped around the card twice for security since the tassels are so heavy.
The sun peeked out from the clouds just long enough for me to snap a few photos! Thankful for tiny mercies! Tomorrow is my Keeping Christmas post, so stay tuned. You can see a little sneak peek on Instagram @kellylunceford today! Thanks for fluttering by!
I received a fun box of goodies in the mail from Star Lit Studio and I couldn't wait to play with some of the things I bought. I am still working my way through my list of cards and today I'm sharing two designs that I created for some dear friends.
I've been telling myself that I DO NOT need the new peony set from PTI especially since I have Peonies on Parade that I have used today. I've only used this set ONCE anyway. Shameful! I'm just getting too many sets and there just isn't enough time to use them. I know I've lamented this fact to you many times! LOL!
I made two cards today, which you can see the second design further down the post. I did different sentiments and layouts with the flowers, but they are the same for the most part. The sentiment is stamped in palette black ink onto the bottom of the card, just below the embossing detail.
To begin, I cut two card fronts from Stamper's Select White cardstock measuring 4 by 5 1/4. I placed them both together on my piercing mat for ease and taped the stencil from the Garden Gate Make it Market kit, which unfortunately, has been discontinued. I adhered some embossing paste in a random, yet thought out way, if that makes sense. I set it aside to dry.
While the embossing paste was drying, I got to work die cutting and coloring all of the peony images and leaves. I looked up "peony images" on Google so that I could try and achieve more realistic looking blooms.
Once the flowers were all colored and the embossing paste was dry, I got to work assembling the card fronts. My new sand eraser came in handy multiple times working on this card. Does everybody know about this dreamy tool? What closet have I been hiding it? Run, don't walk and order one for yourself! It totally helped me remove some of the embossing paste that was in an unfortunate place and it removes ink! IT REMOVES INK!!!!!! Isn't that the greatest thing EVER?
I placed the peonies in a formation that is shown on the back of the stamp set package...I was lazy and my head was starting to hurt from staring at peony diecuts while coloring for so long. Ha Ha! I feel zero shame in this! LOL!
I adhered the card front to a Blush Blossom card base. Before I did that, I added a strip of black and white polka dot washi tape down the side. I also added some Stickles for shine and dimension. The crystal clear sequins were added using glossy accents for security.
The second card showcases a few of the other peony images included in the set. All of the other details are the same on this card for the most part. The sentiment and die cuts for this card are from the set Scripted with the accompanying die.
Don't forget to join me on the 25th as I share this month's Keeping Christmas project! Follow me on Instagram @kellylunceford. I'll have a sneak peek on the 24th.