Thursday, July 27, 2023

The Greetery Handiwork Collection Day #2

Hello and welcome back for day 2 of full reveals for the Handiwork Collection from The Greetery! I'm glad you're all loving this new release as much as I am...thank you for your sweet comments yesterday! The official "meet and greet" for today's featured products is HERE; you'll be able to see all of the details for each new product. Also, make sure to leave a comment here and on all of the designers' blogs for a chance to win one of two $50 gift certificates to the shop!
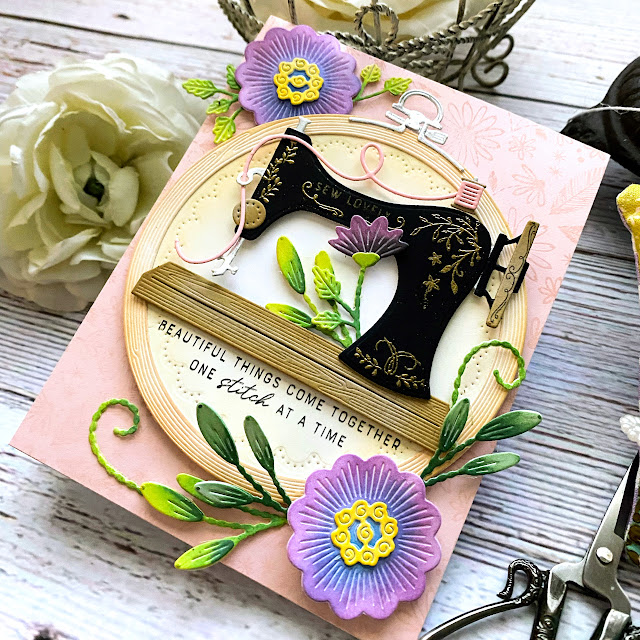
My first card for today uses the precious new "Sew Vintage" stamp/die set. I am absolutely smitten with it. It is easy to assemble and 'sew' much fun! 

It comes with a handy guide to ensure you will get great results. I was a little worried thinking I would have to stamp a bunch of these tiny filigree details on the machine, but it is all one stamp and then you can add the little word sentiments on the top. I chose the darling 'sew lovely' sentiment, but there are a few others for variety.

For this card, I used the Hoopla Round die and the Hoopla Round Inserts die. This provides that sweet stitched detail around the edge, just perfect for this card. 

The beautiful sentiment underneath the  machine is also from the 'Sew Vintage' stamp set.

I couldn't resist adding a few more of the Embroidered Blooms that were showcased yesterday; they give the perfect touch for this card.

I did a tone-on-tone effect with the Embroidered Background stamp; Sweet Blush cardstock and Tattered Rose Distress Oxide ink. You can see it a little bit better on the top right corner.

Eep! My second card for today uses the CUTEST new Notionable die....it is the cutest thing EVER!!! The scissors, the tomato pin cushion, the thimble and thread....EVERYTHING!!! I used a brad so the scissors are hinged and actually work! They are stuck down, but still....right????

I thought it would be fun to create a 'sewing box' type card using the beloved Curio: Cover Die and the Curio: Divider and Details die. For those of you who don't know, I also have a (much neglected) sewing blog called Thimbles and Thread and this whole release is calling me to get back to it! ha ha!

I used all of the elements included in the Notionable Die collection....you will find a set of four pins with toppers you can customize, a thimble, thread spools, thread, tomato pincushion, scissors, and a nedle. Everything is perfectly designed so that they almost look real, especially the adorable scissors!!!
 The sentiments are both from the Sew Vintage stamp set and I just love how they work so perfectly with all of these sweet dies. I also tucked a Hoopla Mini in the right hand corner; the heart one, of course, to tie in the "love" theme.


I used the Embroidered Background stamp for the base of the sewing box to give it some added detail and "sewing" charm.
Here's a little peek at the process I used to allow me to get the pins on the pin card. Since they are actually paper, it was a little tricky to get them down the slits. I used my paper piercer to open the slits up a bit and then I put the pins in. I secured them in the back of the pin card using scotch tape. This is the same technique I used to get the needle into the spool of thread.


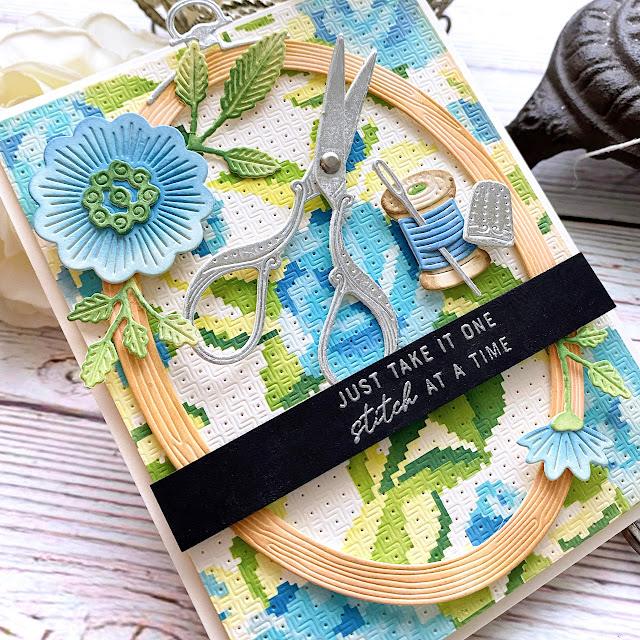
My final card for today uses the AMAZING new Rose Tapestry Stencil collection...I stenciled everything in blues and greens and then used the Aida Cloth texture plate over the top.  I was scared to try it for fear I would ruin the beautiful tapestry background, but I love the result.

For this card I wanted to create an 'in-progress' type look. I chose to use the scissors, thread, and thimble as focal points and then the sentiment to reinforce the theme. 

I also used another Embroidered Bloom on the corner over the hoop for added detail.


The sentiment is heat embossed in silver to accent the metallic paper used for the scissors, needle, and thimble.

I chose to use Vintage Cream cardstock to use with the Tapestry Stencils....I felt it would give it a nice vintage look.

I'm sure the other designers will showcase how these amazing stencils look without the Aida Cloth Texture Plate, but I just love the detail it give the card!

This release is so much fun....everything will be available for purchase starting tomorrow at 10 am ET. Thanks for fluttering by!


Kelly (you are here)


Wednesday, July 26, 2023

The Greetery Handiwork Collection Day #1

I'm so excited to be here today for day 1 of full reveals for the Handiwork Collection from The Greetery! It is SUCH fun collection and I hope you love it as much as I do. You can find the official "meet and greet" over on The Greetery Blog to introduce you to all of the fabulous new products! Make sure to leave a comment here and on the other designers' blogs for a chance to win one of two $50 gift certificates!
My first card for today features the AMAZING new  Hoopla Oval Dies, the Aida Cloth Texture Plate, the new Embroidered Blooms dies, and last, but not least, the new Stitched Sentiments. I'm also sneaking a peek at the new Embroidered Background stamp that will be featured tomorrow, but I just couldn't resist!

To begin this card, I die cut the beautiful Emroidered Blooms quite a few times (you will see JUST how many over the next two days...ha ha!) and then colored them using Distress Oxide inks. I absolutely adore using multi-colored thread when I stitch, so I love how these leaves and blooms turned out! Once the flowers were done, I got to work on the hoop.

There are two size of hoops included in the new Hoopla Oval dies; I chose to use the largest of the two for this card. I also die cut the Aida Cloth background onto a panel of Fine Linen cardstock and then cut it using the Hoopla Oval Inserts die. This is a fun companion set to be used with the Hoopla Oval dies, but could also be used on their own. I colored the hoop using Distress Oxide Inks and then I die cut the 'hardware' included in the Hoopla Oval die set using metallic cardstock for the silver pieces.

I had fun arranging the flowers to make it look like a real stitched piece (and made me want to pull out a stitching project, if I'm being perfectly honest) . The sentiment was created by die cutting the Thanks portion using the new Stitched Sentiments die and then stamping it in black (I die cut it using the same cardstock as the Aida cloth portion for a seamless look) The 'sew much" was stamped onto the same cardstock and added to the bottom. There is an option for it to just say 'so much' for versatility. I just couldn't resist the punn-y sentiment! They're my favorite! I stamped the Embroidered Background using Distress Oxide ink onto an A2 card base and then added the hoop using foam squares.

My second card also uses the Embroidered Blooms dies and the Aida Cloth Background die. This card was 100 % inspired by a new dress I bought for a Fiesta party I put on for the older kids at church! It is such a fun dress and I knew I could recreate it nicely with these beautiful dies.

This card is a mini-slimline size and is just perfect to showcase all of these fun pieces included in the die set. I layered the largest of the blooms together with the smaller flower for a bold focal image. The cute 'lazy daisy' stitched pieces are so fun, too! The little french knot accents just slay me! I love making french knots on my stitched projects and these ones look so real!

The sentiment is heat embossed in white and is from the New Day Sentiments Stamp set.

I didn't use the 'Press n' Seal' technique for my cards, but it would definitely be helpful with these new dies. Since I was using my dress as I guide, I roughly laid it out and then got the main placement idea and then I just had fun. If you're wanting to be more precise, then I would definitely suggest the Press n' seal technique. It will also allow you to get all of your glue on precisely and not have any smears if you are careful. (wink)

My final project for today uses THE cutest new Hoopla Mini dies, the FABULOUS new Stitched Scallops Notecard die AND the new Floral Sampler Stamp set. I created a set of 4 of these sweet little scalloped note cards just perfect for gift-giving or for your own stash. If you stopped by for the last release, these notecards fit perfectly into the burlap sacks I showed with my greenhouse card set. I didn't want to be a broken record so I didn't showcase them that way, but it would be perfect! I also toyed around with sewing up a cute little bag to put them in, so I'll share that if I end up doing that. 

I had so much fun stamping a BUNCH of the images from the Floral Sampler stamp/die set . I also prepared four of the different Hoopla Mini hoops to use as accents as well.

The Stitched Sentiments also got to shine again on these cute notecards.

You can see the entire set here. The Hoopla Mini dies come with lots of different shapes for verstatility.

This little heart hoop is just the cutest thing, don't you think?

I can't wait to use these cute scalloped note cards again...they are just so adorable! Thanks for fluttering by!


Kelly (you are here)


Monday, July 24, 2023

Papertrey Ink July Release Countdown Day 4

Lots of fun for the 4th and final day of the Papertrey Ink July release countdown! This is a special card for my one and only daughter's 20th birthday; she's no longer a teen! Where has the time gone???? This card features the new Birthday Wishes Background (which I somehow covered most of it up...woops!). Anyway, the rest of the team will showcase it nicely for you, and it really is fun! My daughter is headed to the new Barbie movie so I decided to make something pink and Barbie-inspired for her!

To begin, I heat embossed the background using white ink on a panel of white cardstock. Once it was set, I added some Lovely Lady and Hibiscus Burst ink over the top for an emboss/resist look. I really wanted to use the largest die included in the Alluring Brackets die collection, hence the background getting covered up....and then of course I needed to add flowers! ha ha!

I stamped the  Happy and Birthday sentiments directly onto the panel using black ink. I also stamped the numbers onto Lovely Lady cardstock and then die cut them using the Fancy Floral Numbers dies. I added some Hibiscus Burst ink around the edges for some added contrast and detail.

I layered those using foam squares. Can I tell you a secret? I'm super embarrassed, but underneath the little banner that says "th" is a "st". I seriously sat and thought about what it should be and rationally settled on it saying 20st! Clearly I didn't get enough sleep last night! LOL! Thank heavens I realized my mistake and remedied it with the cute little banner...it actually looks so much cuter like this anyway, so I'll take it as a win! ha ha!

I gussied up the numbers and flowers in the most Barbie-esque way....with some bling! I used the PTI Rainbow Gems in assorted sizes to give it that Barbie sparkle and shine!

I used the clover dies again as flowers (like I showed yesterday) and added the bling to the center.

I layered the entire embossed panel onto the Border Bling: Twinkle  background using foam squares. I spritzed it all with Shimmer Spray and added some glitter!
My next card uses the cutest new Balloon Bouquet die set! I always love a good bunch of balloons like this, but always find it hard to "arrange" them so they look nice! Problem solved with this easy to use die set. There is a base bouquet and then all of the different balloons cut separately and you just put it back together like a puzzle!

It also comes with the balloon strings and the cute bow. I cut quite a bit off of the ends of the balloon strings, but if you left them, it would be perfect on a slimline card. Mine is a mini-slimline.

I used the other stencil that is included in the June Surprise Box and it's just perfect for this birthday balloon scene.

I added Nuvo Crystal Glaze and chunky glitter over the top of the two heart balloons. The die collection also comes with these small dots to use as confetti. They stayed "stuck" in the paper once it was die cut so all I did was color them with alcohol markers and pop them out so I could glue them to the balloons...easy peasy!  The sentiment is from the new Hooray It's Your Birthday stamp set that was showcased on day 2. It was perfect for this card! Thanks for fluttering by!


Sunday, July 23, 2023

Papertrey Ink July Release Day 3

I mentioned on day 1 that I would be sharing quite a few new cards using the Garden Blessings stamp set that I shared a sneak peek of on my Window Garden cards. Well, today is the day; all of the cards I'm sharing today use this beautiful new stamp set. 

My first card uses a potpourri of products, but I really like how it turned out. If you can't tell, I'm obsessed with the new June Surprise Box stencils and I used them again on this card.

The sentiment is stamped on the smallest sized die included in the new Love to Layer: Alluring Brackets die collection; it's the perfect size to add many of the sentiments included in the Garden Blessings stamp set.

I used the Into the Blooms: Geraniums die set to bloom all over the Picket Fence. I adore these beautiful flowers and they are so much fun to ink up.

There is another sentiment that I was toying around with using talking about friends overlooking broken fences and admiring the flowers in your garden. It was hard to pick, but in the end,  I chose this sweet sentiment instead.

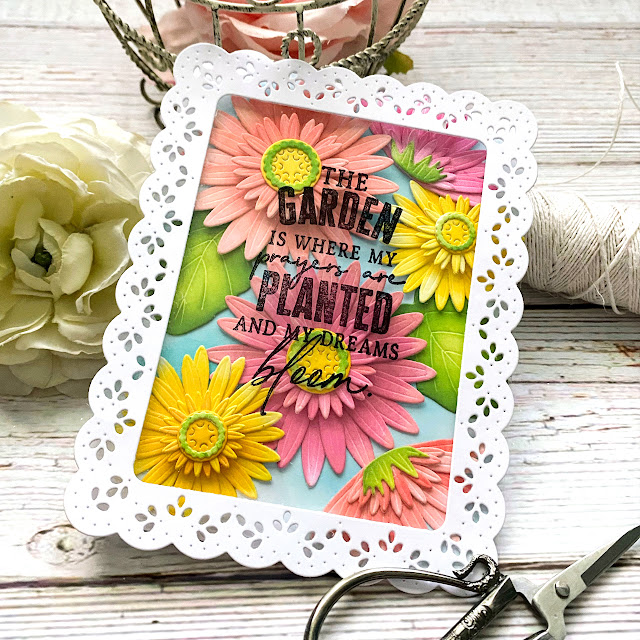
My next card is a shadow box type card; I really love these large, bold sentiments, but I don't always want them to overpower the card. I decided to stamp the sentiment using StazOn ink on a sheet of acetate and sandwiching the flowers inbetween.

I die cut all of the pieces for the flowers using the Into the Blooms: Gerber Daisy dies (so many blooms got used for this release ha ha!) and inked them up using finger daubers and Distress Oxide inks. I glued them together and then arranged them on the card base until I was happy with the arrangement.

I glued the acetate directly to the scalloped frame and then layered it over the top using foam squares.

You could also try this same technique with white StazOn or even trying it with vellum for a softer look.

This would also be really fun to try as a shaker card. I was SO tempted, but the scallop frame would have made it a little tricky, so if I want to try it, I will definitely use a more solid frame.

My third card for today features another one of the largest sentiments in the set. I thought it would be fun to try and create a garden-sign type look. I also chose colors that fit with the wildflower theme.

I stamped two identical panels using the Weathered Wood Background stamp. I die cut one panel using the Psalm Reflections: February die. I popped the die cut piece directly over the first panel making certain to line it up precisely for a seamless look.

I used the Into the Blooms: Clover dies for the flowers and leaves; I used the clover diecuts to make some flowers rather than leaving them as clover,

It is really easy to create dimensional flowers from your die cuts; simply press a stylus into the center of your flower on a foam mat and it perfectly forms a dimensional bloom.

I added glitter to the flowers and leaves for sparkle and shine.

The focal panel is layered onto a top folding Pure Poppy card base that also has some texture and design by die cutting the background using the Border Bling: Lattice die.

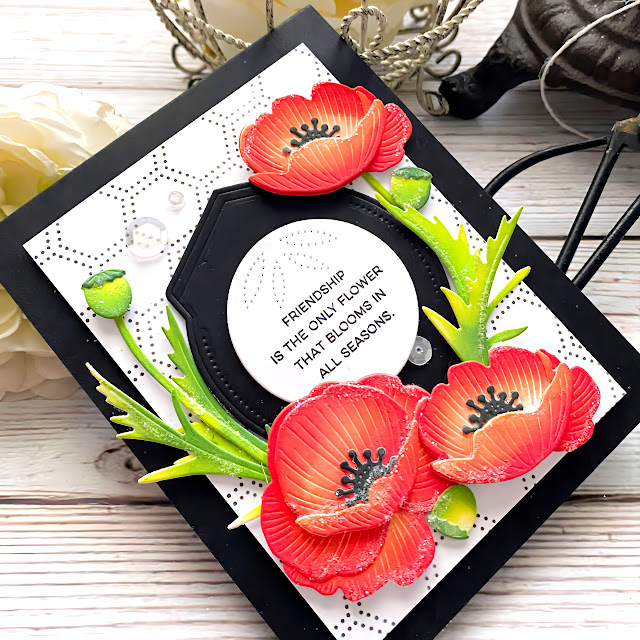
My final card for today uses the new Into the Blooms: Poppies die collection. This is such a fun and easy to use die set. I love poppies so this was a fun card to make.

I used another one of the sentiments from the Garden Blessings stamp set; this time I used the smallest and middle sized Alluring Brackets.

The background was created using the Dotted Hexagon stencil collection; I really like how it accents the detail in the circle piece.

Join me tomorrow for the fourth and final day of the countdown! Thanks for fluttering by!