Tuesday, November 28, 2017

Color Throwdown Challenge #471 Merry Christmas and Happy New Year!


I've had SO much fun being November's Guest Designer for the Color Throwdown Challenge! It has inspired me so much! Today's card is one that I probably would NEVER have made if it wasn't for this challenge! That's why I love it so much! It really stretches me as a designer and gets my mind working in all kinds of new ways! I'm sad to be saying goodbye!

Since I am in a Christmas card making mood, I decided to make something modern with lots of texture and shine! I had a lot of fun executing my design! This is what I had in mind as soon as I saw the colors, but decided to try something different. Well, that card is now in the bin and I decided to just stick with what my mind kept seeing! It really did turn out pretty much exactly how I had envisioned it, which is always nice!


To begin, I heat embossed the Woodgrain Background all over a 5 by 4 1/4 inch piece of Kraft cardstock using gold powder. I am almost completely out of gold powder, so I took the opportunity to order a bunch of new varieties. I can't wait to test them out when they arrive! I'm smitten with how this gold woodgrain looks! I'm pretty sure this isn't the last time this will make an appearance, so brace yourselves! LOL! 

After that was done, I die cut the Snowflake Medley snowflakes using black cardstock. I never imagined that I would be diecutting black snowflakes, but never say never! I heat embossed half in silver powder and half in gold powder. I really like how they look on the black paper! Unfortunately, the coordinating stamp set is retired, but Heather has come out with a beautiful new snowflake stamp set that would be perfect for this type of look as well!
After they were all stamped and embossed, I arranged them onto the woodgrain panel. I had some hang over, but I trimmed them off after I had them placed where I wanted them. After they were in position, I really wanted to add in some extra white so I got to work adding LOTS and LOTS of Nuvo Drops here and there where they looked good.


I added some silver and gold sequins here and there as well as a few in the centers of a couple of the snowflakes. I just love the added sparkle and shine it creates! The finishing touch is the silver embossed sentiment on a black strip of cardstock. I chose this particular sentiment because it included "Happy New Year" and this card has a "new year" type vibe to it! Thanks for fluttering by!


Monday, November 27, 2017

Merry Monday #267 {Happy Holidays}

It's now official... Christmastime is here! It's down to the wire so if you haven't played along with us yet, now is the time! Colleen has a fun challenge for us this week; create a Christmas card in green, blue, white/silver/vellum! I adore these colors so my card was so fun to make! You can check out the challenge HERE as well as see what the other designers have come up with! ETA: I have a Christmas giveaway I'm doing if you'd like a chance to win. It's on my post from the Simply Sweet Christmas Inspiration blog hop! Just leave a comment on that post telling me about your favorite Christmas tradition and be a follower of mine on Instagram @kellylunceford.
Isn't this inspiration photo dreamy? I hope it inspires you to pull out your Christmas stamps and get creating!

I'd already decided to use these cute stockings for my card, and took the opportunity to test the colors out when I made THESE tags {you'll need to scroll down to see the stocking tag} and so I knew they would look fabulous in Hawaiian Shores and for the green, I chose New Leaf! I love this particular combination, but I think I already mentioned that! LOL!

The stockings are die cut using the Stocking Prints Die. I really like this particular die because it cuts the larger and the smaller stocking at the same time. Unfortunately, it appears that the coordinating stamp set has been retired. I stamped the "hook" image onto a strip of Stamper's Select White Cardstock and then embossed it in silver. I added some silver brads to mimic the look of nails or knobs to hang the stockings. I just love special little details like that because they give the eye some added interest and make the scene a little more realistic.

The background is dry embossed using the "Knitted" background from Richard Garay. It is such a wonderful embossing folder. I have used it for many different styles of cards. You can see them HEREHERE and another one HERE. I have used it quite a bit, but those are just a few.

The white strip with the brads is adhered to the embossed panel using foam squares for dimension. The stockings are attached with foam squares as well and just tucked underneath the brads slightly to give the illusion that they are hanging. The entire focal panel is adhered to an A2 Hawaiian Shores card base for some added color. I decided on the blue since I only used two blue stockings. I felt like it gave the card some nice balance!

I placed the strip and stockings low enough because I planned on having the sentiment strip up above. Once it was done, I really liked the way the vellum strip looked stretched across the stockings so I added it there instead. That left quite a large space at the top that I wasn't anticipating, but I jumped at the chance to add a beautiful celery silk bow! I really like the contrast between the two greens! I also added a silver jingle bell and some silver cord. The jingle bell was just plain silver, so I added some white powder and some chunky glitter. I just rolled the tip of the jingle bell in Versamark ink and then dipped it into the white powder and heat set it! Warning: the jingle bell became EXTREMELY hot and was too hot to handle, so be careful it you try it! I would have normally just used tweezers to hold the end of the bell, but this particular bell had an interesting top so I couldn't do that. I had so much fun with this card. To be perfectly honest, it almost made it into the circular file, but I just kept at it and really ended up liking the result. Thanks for fluttering by!

Saturday, November 25, 2017

25 Days of Tags {Days 18-25} + Bonus 26

Happy Day! I finished up Tracey McNeely's entire 25 Days of Christmas Tags! I was doubting whether I would get a chance to play at all and here I am, all done! This photo shows only until day 24, but day 25 is at the bottom of the post.ETA: I've included the bonus day at the bottom as well!  I'm so happy to have all of these tags ready to add to my Christmas packages! I don't think I will need to add a single store bought tag this year! I am set in the tag department! Part of me wants to give them away to someone so that I don't have to see them being thrown in the trash on Christmas day! LOL! That being said, paper crafting is very therapeutic for me, so it's not always about the final product, but in the creative journey. I guess I'll have to remind myself of that come Chrismtas Eve/Day! Ha Ha!


Day 18- This tag was inspired by Tracey's Wreath Tag. My tag was created using Deck the Halls and the coordinating Die Cut. I also added some Bright Gold Nuvo Drops. The tag was die cut using the Tag Sale #4 die cut.


Day 19- This tag was inspired by Jill's Pink and Green Tag. I just love the color combo for the holidays! I have used it quite a bit this season so I was happy to use it again on this tag. I used Painted Poinsettias and the coordinating Dies to create this tag. I also used the Tag Sale #5.


Day 20- This card was inspired by Channin's Tags! They are seriously adorable! I didn't make mine 3 D but I wanted the same idea. I chose to use the Tiny Town Church Die and the Year of Psalms October Mini Stamp set for my tag. I die cut the church twice so that I could sponge some distress ink behind the windows for a realistic glow. The sentiment is embossed in gold onto a strip of vellum.


 Day 21- My tag was inspired by Rahmat's Tag. I loved how she used the acetate overlay. I used O'Tannenbaum stamp set and the Tag Sale #6 die cuts. The sentiment is stamped repeatedly on acetate using White Staz On. 
Day 22- This tag is inspired by Linda's Tag. I just love her splattered snow look. I chose to achieve a similar feel by using White  Nuvo Drops. I die cut the Tag Sale #7 tag out of Kraft cardstock. I stamped the tree using the O' Tannenbaum stamp set (linked earlier).

Day 23- This tag is inspired by Thi's Tag. I love the pink snowy scene she created! I die cut some old nestabilities dies to create my base and then I used the Eskimo Kisses stamp set to create my little scene.


Day 24- This tag is inspired by Lisa's Tag. I really wanted to use the only set I have from Right at Home because they are the sponsor for today. This set is for Easter, but I thought I could rework it for Christmas. It is called His Love. I die cut the hearts twice out of glittery felt and then glued the holly berries on top of the sentiment that is embossed in silver. 
Day 25-My last tag was inspired by Mitsyana's Tag. I just love her pastel colors and gorgeous coloring! This darling little bird from Tremendous Treats was the perfect fit. I die cut and stamped the image and then colored it with Copic Markers. The "Noel" sentiment is from the Tree Trimming Trio and is embossed in silver! I had so much fun! Thanks for fluttering by!P.S. Tracey added a bonus day, so I'm including it here as well!


Simply Sweet Christmas Inspiration Hop


Welcome to the first EVER Simply Sweet Christmas Inspiration Hop! Lesley has put together a fabulous hop dedicated to LAST MINUTE SIMPLE BUT SWEET Christmas cards! I have lots of tips and tricks to share with you today as I share my design for the hop! I had so much fun putting these together! You'll want to head to Lesley's Blog Always Playing With Paper to read about her giveaway as well read all of the rules to qualify to win! This is also my "Keeping Christmas" project for the month! This will be the last one, but don't fret, I will be posting Christmas projects all month long, so stay tuned!


I am doing a giveaway of my own. I have put together a few of my favorite Christmas card supplies (mug not included ha ha) for one lucky winner! For my giveaway (US residents only), simply comment below what your favorite Christmas tradition is and be a follower of mine on Instagram. You can find me @kellylunceford. I share projects and ideas almost daily there! My giveaway will end on Dec 3rd 8:00 am MST and I will have my daughter randomly pick a winner. The winner will be announced that day as well.
Here is a list of the other participants in the hop! It is so good to be back together with the ladies from The Challenge! Make sure you head to their blogs and comment for a chance to win Lesley's giveaway. So....enough babbling...on to the cards! As I mentioned before, I have lots of tips and tricks to help you get your Christmas cards done lickety split! So, grab a cup of cocoa and enjoy the SIMPLY SWEET CHRISTMAS INSPIRATION HOP!


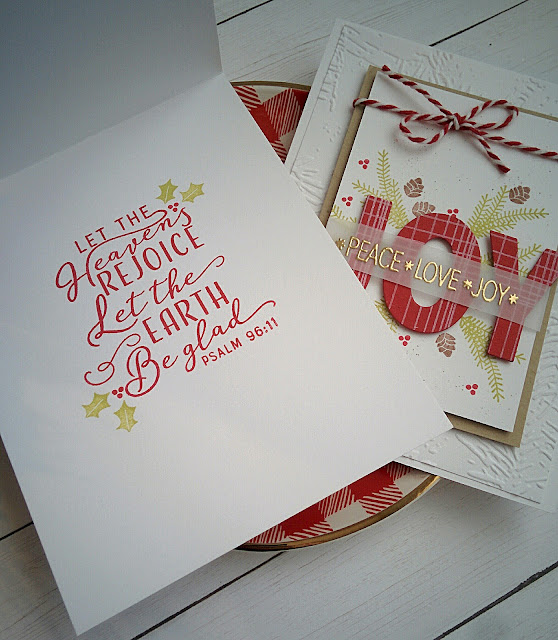
For my project, I decided to turn one of my tags I created for the 25 Days of Christmas Tags which you can see HERE into a focal point for my card! Tip #1 You don't need to reinvent the wheel! Try using a design for a tag or smaller project you have already done and use it on your card. Keep these things in mind when deciding on your design; does it have pattern, texture and shine? If you include these three things, you should come up with a winner! None of those elements need to be overly abundant to create something worthy of the fanciest of stationery Shops!

I made 8 cards in total and they didn't take much time at all! 4 of them have baker's twine around the top and 4 are plain. It's always good to think about what the mailing costs will be when you add a lot of layers and embellishments. I finally have some awesome people working at the Post Office that embrace my love of Snail Mail and are always willing to help me with my mailing needs!

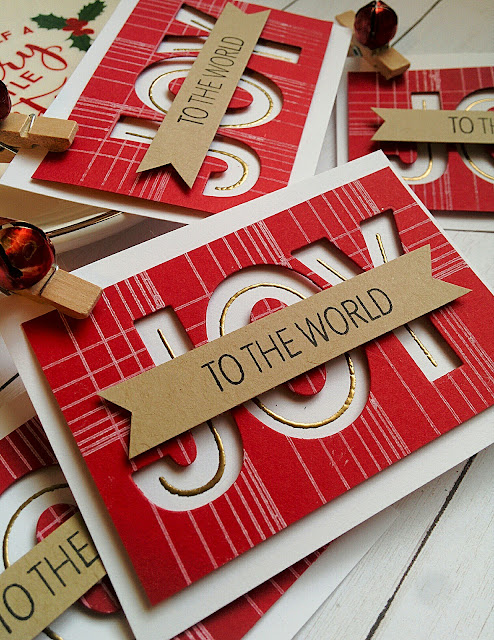
Tip #2 Try maximizing your time and supplies by getting a "2 for 1" deal out of your efforts. I did this by using the negative space that the letters created when I die cut the word "JOY" for my cards. I used the red part to create 8 tags, but you could also make 8 additional cards!

All I needed to do was emboss the skinny "JOY" in gold in the negative space and add another sentiment over the top! I glued some red jingle bells from the dollar store to some clothespins for an easy embellishment as well as a quick way to attach it to the ribbons on my Christmas presents.

I wanted to make sure I didn't neglect the inside of my cards. A large sentiment on the inside really makes them feel like a store bought Christmas card without too much effort. This particular sentiment is from the Year of Psalms: October Mini Stamp set with the addition of the holly leaves and berries from Concord and 9th's Joy Bundle. That is the stamp set that I used for the entire project.


Before I start on a mass produced project, I make sure my work surface is clean and tidy as well as making sure I know where all of my supplies are and that I have enough to finish the project. There is nothing worse than beginning a big project, only to find that it can't be finished because you don't have what you need. It is times like this, that could have you abandon the project all together because of frustration.
To begin, I cut all of the pieces that I would need: 
8-A2 card bases (white)
8-4 by 5 1/4 inch panels embossed with the Richard Garay Pine embossing folder spritzed with Shimmer Spray
8-2 3/4 by 4 inch white pieces for the focal greenery
8-4 1/4 by 3 inch Kraft cardstock to mat the focal panel
8- 3 1/2 by 2 1/4 inch red pieces for die cutting the letters
Tip #4 try and optimize your paper and supplies by using dimensions that will get you the most from one piece of paper.
After everything was cut, I stamped the inside of each card as well as a simple "homemade" image to the back. This really doesn't take any extra time at all, but really adds to the charm. 

For my design, I chose to use the striped image from the JOY stamp set to create plaid letters. I have used the stripes by themselves, but I think making plaid is the perfect way to use them and to maximize the uses for your stamp set. I stamped them in Fresh Snow ink and let them dry. It was important that I keep all of the letters together so that the plaids would line up properly. That meant  I would need to use a large portion of my desk to keep them together. I also needed to keep the centers of the "Os" with the correct die cut red rectangle so the plaids would line up on the tags as well.

After that was done, it was time to stamp the focal panel. I have found that it is good to get all of the stamps on their blocks and have the ink pads ready to go. I used the small images on one block and it is easy just to rotate the block when you need it. I only stamped the greenery in red once, on accident, but caught my mistake before it was too late! LOL!
The "Peace, Love, Joy" sentiment is embossed in gold onto strips of vellum. Tip #5 Do everything assembly line style so you can clean as you go. I like to emboss everything at the same time so my heat tool is nice and hot. I also like being able to clean as I go, so I just do everything using that particular tool at the same time so it can be put away. I hope you have found this information useful and informative! Thanks for fluttering by!


Thursday, November 23, 2017

Thanksgiving Treats

Happy Thanksgiving, my friends! I wish you all a blessed day filled with love, laughter, family and warmth! I'm sure thankful for all of you and I appreciate you stopping by! I had so much fun working on these little treats to pass out at my sons' school to the teachers, librarian, etc. I made THESE last year and I had such a positive response to them, I decided to make them again. When I made THIS card, I mentioned that I wasn't done with the Indian Summer because I knew that I would be using it for this project! I'm using this week's Color Throwdown Colors again because they are just too perfect for this project!

To begin, I got to work wrapping the Hershey's Toffee and Almond nuggets with pattern paper. They are packaged in a pretzel bag with a cardstock backer. These are one of my go-to gifts and you can see another example HERE. They are an inexpensive, festive way to celebrate any holiday! The top portion is a piece of cardstock folded in half with the sentiment embossed in copper powder! I just love the warmth it gives! I also stamped and Die Cut the little turkey image and colored him using Copic Markers. He is popped up on the pretzel bag using a foam square.


The tags for the apples and caramel dip bags use another one of the cute images included in the set. I did very simple coloring on these since I had so many to make and they will most likely be thrown away. The sentiment is also embossed in copper powder.

Here is a picture of the little 3 by 3 card I made to go with the gifts using yet another image. I liked that he is holding an arrow and the sentiment has an arrow through it! So cute! I like to have a place to write a little note to the recipient. Oftentimes I deliver all of my little treats and the recipient isn't there so I have to leave it. While, I don't need any credit, I think the person who gets it would like to know who it's from...especially if it's food and you're wary of such things! LOL! In this case, it was mostly because I wanted to leave a Happy Thanksgiving greeting and to say thank you as well.

Like I mentioned before, I had a lot of fun putting these together and it is always fun on delivery day to see the smiles when people receive their gifts. I am truly grateful for all of the people who work with my children at school. They truly are gifted and special people and I am so grateful!!!!! Thanks for fluttering by!

Tuesday, November 21, 2017

Color Throwdown Challenge #470 (Warm Winter Wishes)

Can you believe it's almost Thanksgiving? I keep asking myself where the year has gone! I'm not complaining though, because I am super excited for the Holidays!  For this week's Color Throwdown Challenge I chose to stray from the traditonal Fall theme that these colors seem to invoke, but instead, create a warm Christmas design!

I just love these colors together and these cupcakes are absolutely adorable, too! I'll be sharing something Thanksgiving-y with these same colors later this week, so stay tuned.


To begin, I chose three images from the Tremendous Treats: Christmas that would work nicely in these colors. I die cut them using the coordinating dies and then stamped and colored them using Copic Markers. The snowman got a treatment of Liquid Applique on his hat and body for a snowy look. The Reindeer's nose and star have a touch of Nuvo Glaze for some added shine.


Tis the Season for me to use the "Knitted" embossing folder on EVERYTHING! LOL! It really helped invoke that "warm" feeling that I was hoping for. After I embossed it, I die cut some circles using my circle Nestabilities die cut. I sponged a Orange-y/Yellow panel to place behind the circles using Distress Ink. I popped the red piece up over the top and then added it all to a Kraft card base.


I placed each of the 3 die cuts onto the circle cut outs using foam squares for some dimension. I don't use ribbon very much anymore, but I thought this stitched "Merry Christmas" ribbon was the perfect touch. I also added a red jingle bell threaded with Chocolate Baker's Twine around the bow.

The sentiment is from Stocking Prints, but it appears to have been retired. You can still get the coordinating die, though. I embossed it in Copper powder for additional warmth. I hope you get a chance to play along this week! Thanks for fluttering by!

Monday, November 20, 2017

Merry Monday #266 {Ho Ho Ho}

Welcome to this week's Merry Monday Challenge! Sue is challenging us to create a card with a Santa image! Confession: I kinda have a little thing for Santa! LOL! It's true, though! Definitely not in a creepy way, but in a way that I loved him as a child. If there was wrapping paper with Santa images on it, I WANTED THAT present, because obviously the BEST presents would be wrapped in Santa paper! Ha Ha! I especially love the vintage variety like the inspiration photo shows. If I have time this week, I'll try and share another card for the challenge, with a vintage Santa! I picked him up at Hobby Lobby last weekend and he's just too cute! Make sure to head over to the Merry Monday Blog to read all about the challenge and to see what everyone else has come up with!
For my card, I decided to use an alphabet that I got for my birthday back in August and haven't used yet. You know, I just HAD to have it and look at me, just barely getting around to it! (Hangs head in shame) It did work out nicely for the image I had in my head for the card I wanted to make, so I was glad I had it. It is the Simon Says Stitched Alphabet and I can't wait to use it again soon!


To begin, I sponged a 4 1/8 inch by 5 3/8 inch Bristol paper with Peacock Feathers Distress ink starting at the edges and working my way lightly to the center. After that was done, I mixed a little bit of the same ink with water and flecked it over the top for some added detail and interest. I spritzed it with Shimmer Spray and set it aside to dry. 
I die cut all of the Tremendous Treats: Christmas Santa shapes, stamped them in Palette Noir ink with the Coordinating Images. I colored them with Copic and Prismacolor markers. After they were done, I came back to the base panel and got to work stamping the "H" and "O" letters in Black ink. I think I stamped them to soon because one of them smeared (boo hoo), but I wasn't going to start over because I was loving the background. So...word of advice, make sure your ink and shimmer spray is properly dry!

I added the Santa images in the spaces left by each word using foam squares. I also felt like the background needed a little bit more attention, so I used a tiny little snowflake image from Eskimo Kisses here and there with Peacock Feathers distress ink stamped off once. I really like the extra detail it gave the card.

The letters are colored using Copic and Prismacolor markers. I was worried that they might turn purple with the red mixed with blue, but Copic Markers are Rockstars and proved it on this card! After they were colored, I added some Nuvo Glaze over the top as well as a sprinkling of gradiated chunky red glitter over the top. I have used the same technique HEREHERE and HERE. I just love how it looks with the red on red! It will definitely be used again this Holiday Season! I also stamped a sentiment from Christmas Critter Sentiments onto a strip of Pure Poppy cardstock and then embossed it in white. I really like how it added just a little something extra! I had so much fun on this card! I hope you all get a chance to play along! Thanks for fluttering by!