Sunday, July 30, 2017

Color Throwdown #453 Done in Love


I fell in love with this week's fabulous and bright colors for the Color Throwdown Challenge! I couldn't help but play along! I created a card yesterday using the same Done in Love die but for today's card, I didn't incorporate the coordinating stamped images. I really wanted the watercolor wash background to be the focus.
                                               

To begin, I washed a piece of watercolor paper with a clean, wet brush and then began laying down layers of Zig Kuretake Gansai Tambi Pearl watercolors using the colors in the challenge. I tried to blend them as best as I could without creating any new colors that aren't part of the challenge. This made it a little bit difficult as well because I didn't want any harsh lines, but I think it turned out beautifully. Of course, I just had to run it through my cuttlebug because the pearl paints mixed with dry embossing=LOVE! You can see a few more examples of this HERE and HERE. I chose to use this particular one because it has the perfect mix of hearts and flowers, just like this incredible die.


I adhered the paper clipping to the watercolor panel using liquid glue. I thought it needed a little bit more sparkle and shine and I also wanted to bring in the challenge colors a little bit more so I added a few Rainbow Sparkle Jewels. I also just couldn't resist adding a little bit of sparkle to the quote by using my wink of stella brush. Such a few simple details but create amazing results.
I also created a fun, heart shaped sentiment on the inside. Thanks for fluttering by!

Saturday, July 29, 2017

Done in Love

What do you do when you get brand new stamps in the mail? Reach for your old ones, of course!😂😂😂 I bought this paper clippings die when it was first released and had loads of fun with it, but then it just got pushed aside for newer things. Obviously this happens all the time, but I felt it needed a little love today!
August is nearly upon us and I'm wondering how that happened so quickly! I took the American flags out of my flower pots, I removed the buntings from the porch as well as the wooden flag on my front door. Everything got a quick refresh for August! I felt this was a good August card, too. 
I still kept everything bright and fresh, just like Summer should be! I diecut the quote out of white paper as well as the coordinating die accessories. I stamped the flowers and leaves in a coral/blush and blue combination; warm meets cool.I added them to the card using foam squares and liquid glue. 
The entire heart piece was adhered to a "Not Quite Navy" panel. I then added that to a white A2 card base. I placed a few white Nuvo drops here and there as well as a few rainbow sparkle jewels. Sweet and simple! Thanks for fluttering by!

Thursday, July 27, 2017

The Challenge #93 {Everyone needs a friend like you}

Just popping in with this week's new design for The Challenge! It's keywords again, which I just really love! I hope you got a chance to play last time and that you're excited to play again this week! I realized something this week...my last three cards for the challenge have been YELLOW! How crazy is that?! I guess I just really like yellow! I also decided to use it because one of the keywords is Friendship and yellow roses are a symbol of friendship so I guess that just stuck in my brain.
                                          No automatic alt text available.   
 Anyway, you can check out all of the details HERE. If you'd like even more inspiration, you can see what the other designers have come up with as well.
For my card, I chose to use the Glorious Petals Stencil as well as some embossing paste and clear embossing powder for a fun effect. It is the same technique that I used on THIS card and I included a little bit of a tutorial if you are interested. Since one of the keywords is "monochromatic", I only used two shades of yellow! After it was all done, I die cut it using the largest circle nestabilities die that I have. The sentiment was heat embossed using gold powder onto a strip of vellum cardstock. I didn't want to hide the fabulous background that I created so I thought vellum would be a nice choice. A strip of thin gold washi tape underneath the sentiment adds a little bit of shine and a few more circles.


I punched out quite a few butterflies using an old Martha Stewart Crafts punch in three shades of yellow for contrast and interest. I adhered them onto the circle portion using liquid glue. I bent them in the middle first so that they would have a little bit of dimension.


The finishing touch was a trio of yellow rainbow sparkle jewels around the sentiment. I also couldn't resist making a coordinating envelope since I had a template in the perfect size. This sweet little card measures 4 1/2 by 4 1/2 I also created a liner for it as well in another yellow pattern. Everything looks so sunny and happy! I hope you get a chance to play! Thanks for fluttering by!

Wednesday, July 26, 2017

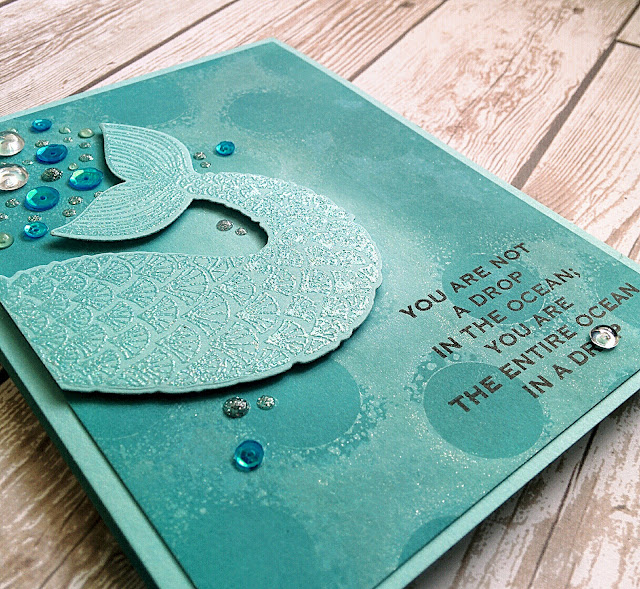
The ocean in a drop!

It's been a while since I've shared a mermaid card and I have just been DYING to post this one! LOL! I made this last week but I resisted posting it so I didn't "over-mermaid"! I want all the cards to be mermaid cards! Ha ha! I am absolutely smitten with the Mermaid's Tail stamp set and coordinating dies.
Actually, it all started when I found my missing polka dot stencil from American Crafts. I've not used it in over a year, so I decided to get to work creating a polka dot background using Broken China Distress Oxide Ink and a spritz or two of Shimmer Spray on the backside of the stencil. Wow! What a bubbly, shimmery background it made! It was perfect to add this fabulous Mermaid's tail! 
I heat embossed the tail image onto a piece of Cool Caribbean cardstock using Nuvo Shimmering Pearl embossing powder. It was the perfect amount of shine for this card! I die cut it and then added it to the bubbly background using foam squares. I saw a fabulous card on Instagram from Jessica at All the Sparkle and I LOVED how she created the bubbles using sequins. While mine don't look like hers, she definitely inspired me so I wanted to give her a shout out! I used the Mermaid Mix Sequins as well as a few rain drop embellishments. I just couldn't resist and added a few more Nuvo drops here and there! The sentiment was stamped in black and then I added one rain drop to the center of the "o" in drop! It actually magnifies the "o" in a cool way! I'll be sharing a new card for The Challenge tomorrow so stay tuned! Thanks for fluttering by!


Tuesday, July 25, 2017

Keeping Christmas {Merry and Bright}

"I will honor Christmas in my heart and try to keep it all the year long" ~Charles Dickens

Hello and welcome to July's installment of my Keeping Christmas series! Today I am sharing ways of putting the "gift" in gift tags! I thought it would be fun to show some fun and unique ways of creating gift tags that incorporate a "gift" as well. I have quite a few examples to share today and even more in my head that wouldn't quite work until seasonal candy and things start to hit the stores. So...in the meantime, I hope you will find some inspiration from the things I am sharing today!

 To begin, I decided to revisit the mittens that I made last year which you can see HERE. All of my projects that I am sharing today use the same sentiment and colors along with the "Merry and Bright" theme. I still wanted to keep things bright and summery here and what better way than to incorporate some of these fun vintage Christmas color combinations! 
Last year I just gave the mittens as a stand alone gift, but this year I thought I could make them as a tag, and gift holder, as well as the option to use it as an ornament later! They are just too cute to be thrown away. 

 To begin, I diecut quite a few mittens out of felt using the Mitten Die in an assortment of bright colors. They all look so cute together! I created the wristband embellishment using the eyelet lace die. I glued them down using some liquid glue and then sewed along the entire perimeter using my sewing machine. The snowflakes, that are  part of the Fancy Flakes Die collection, and leaves were die cut as well and the "berries" were left overs that came from the cut out circle portion from the wrist treatment. I love using up all of the scraps!
 I added some jingle bells to the centers of the snowflakes and added the tags. The tags were stamped and embossed with a sentiment from the O'Tannenbaum stamp set that I just LOVE! I used it on a few more projects which you will see today as well. 
I am planning on stuffing them with these fabulous hand creams from Bath and Body Works, but I will wait until they release their Holiday line. Last year I put lip gloss in them, so you could do that as well. 


 I used my crop-a-dile to punch a hole in the back of the mittens so that I can thread them with ribbon to attach to the gifts as well as a place to add an ornament hanger if the recipient would like to use it for that! I know I definitely would! LOL!
 My second project features the adorable Clever Barrette Dies as well as some more images from O'Tannenbaum! I can't wait to add these tags to my gifts this Christmas! These will look perfect under the tree in my formal living room!


 You can see that I used more of the berries on the barrettes as well. 


 I also was able to use the felt stars that were part of the center of the snowflakes on the mittens! It was awesome to have them already ready to go! I added some clear Nuvo drops to the ornaments on the tree for some dimension and shine.
 The next project was super quick and easy! I used the die cut that I got in the mail the other day that was part of the Post and Parcel Make it market kit. I decided to use the coordinating stamps as well. 
 I got the lipgloss from the Dollar Tree and I absolutely LOVE it. I have been using some for the last few months and it is as good as anything that you can get somewhere more expensive!


 I simply added them to the gift tags with glue dots so that they can be easily removed!

 The next project incorporates a sweet, simple gift that is easily added to a tag. I did some watercoloring using my ever favorite pearl watercolors. After I watercolored a piece of paper, I just ran the die cuts from the Vintage Ornaments II set. I also used the Vintage Ornaments II stamp set to add the embossed outline. Originally, I created a pocket to stick the chocolate down inside, but I made the tag BEFORE I bought the chocolate and it was just barely too big to fit. I just decided to add the chocolate to the outside with glue dots since the foil packaging matched so nicely!


 The final project for today is a simple gift card holder that doubles as a tag. I plan on doing an entire series devoted to gift card holders so today's design is very simple. 


 It uses the same details and stamps as some of the other projects to keep things cohesive. I actually went to the dollar store and bought (5) $5 gift cards to tuck inside. The dollar store actually has some great stuff and of course, this would be in addition to the gift that it will be attached to.


Here is a picture of all of the projects together! These actually took quite a bit of time, so I am glad that I was able to make them in July! I don't think I would have been able to devote this much time to creating gift tags during the holiday season. It was fun to think of different "gifts" to add to my gift tags. I still have lots more ideas that will be easy to execute once Christmas merchandise is actually in the stores! LOL! I hope you found this installment inspiring! I hope you get a chance to play! Use the hashtag #keeping christmas2017 on Instagram. You can find me there @kellylunceford. Thanks for fluttering by!

Sunday, July 23, 2017

Bonjour Birthday!


My darling, one and only daughter, turned 14 on Saturday! Where has the time gone?!? She's growing into such a lovely young woman! I made this card for her special day! I wanted to showcase these lovely pattern papers that I got for Mother's Day this year and it's been quite a while since I've done a card with paper medallions. They are so fun! I was also happy to pull out my super old "Paris gift tags" from Cavallini and Co. as well as the coordinating Paris stamp set. 

To begin, I cut a variety of different pattern papers into different widths. I used my Martha Stewart Score board to score each one along the entire length. I found that my scoring blade in my paper trimmer was scoring them too hard so they were tearing. Then I folded and glued them into medallions. I have a tutorial HERE if you're interested.


 I created a 5 1/4 inch card base and added some pattern paper on top. The medallions were glue into place using hot glue. I added the cute little "Paris" clock accent that I purchased HERE. They are always such a fun addition to cards like this. I added the aqua colored pre-printed tag as well, but I did stamp "Bonjour" using the coordinating stamp set to give it a little more interest. 


 I stamped the birthday sentiment onto a pre-made gold banner that I have had for years. They are always so nice to grab for a quick and easy embellishments. I chose to use a simple sentiment from the Stylish Sentiments: Birthday stamp set. I didn't want it to detract from the overall feel of the card. 


I stamped the crown image onto a piece of patter paper and then punched it out using a circle punch and adhered it to the card. I tied the bow on the pre-made tag for a little bit of polish and that was it! Such a fun card and my daughter LOVED it! Thanks for fluttering by!

Friday, July 21, 2017

Discover the Beach

I feel Autumn cards on the horizon, so I will be using every chance I get to keep making summer designs! I was reminded of this fabulous retro beach stamp set by Tweety Jill after the newest Papertrey Ink release. I'm trying to be good and not buy anything so I was happy to pull this out and create a fun beach-y card. Also, the other day I received an unexpected envelope in the mail from Papertrey Ink. I quickly opened it up to discover a sheet of random dies that I hadn't ordered. On closer inspection, I realized that they were from the Post and Parcel Make it Market kit. I ordered it during the sale so I knew it wouldn't be complete, but it was such a fun surprise to get a few more of the dies for me to work with. It came with the fabulous postage looking piece I used for the focal image, which is similar to one of the newly released dies from PTI as well. 
To begin, I blended a bright rainbow pattern onto the die cut piece. I then used the stamping/stenciling with water technique that I used on THIS card. I chose to use just the side of the stencil rather than place the center of the stencil onto the center of the cardstock. I knew that it would be too busy for the look I was hoping to achieve. It turned out beautifully, with just the right amount of oxidation. After that was dry, I stamped the station wagon and postage image using Palette black ink.

After that comes the fun part; the collage type stamping! I used to design for TweetyJill's Idea Books and I got to do a lot of this type of thing...only more collage-y! LOL! It is one of my favorite styles and I haven't done it in quite a while. I noticed that Simon Says Stamp has a challenge doing just this sort of thing; I think I might just participate one of these days. Anyway...that was an unexpected tangent! So...I stamped the postage stamp image in coral ink onto the white panel as well as the lifeguard image using black ink. I chose to use the "seaside" definition image at the top for some balance.


I heat embossed the fabulously retro "discover the beach" sentiment using gold powder onto black cardstock. I just love how it turned out. I adhered it to the white panel with foam squares and cut it at an angle for a retro look. 
I quickly found my ancient stash of seashells that I knew I'd been saving for a day such as today! I adhered them to the card with Tombow Mono Multi adhesive. I added the entire white piece onto an A2 black card base for some added contrast and definition. Now...I think you may die of shock, but I left it at this...no sparkling clear sequins! LOL!!!! I had A LOT of fun on this design! Thanks for fluttering by! P.S. I'm headed to the water park again today so who knows what inspiration I'll come home with!😂😂😂

Thursday, July 20, 2017

The Challenge #92 Just Bee You!

Image may contain: text


Just buzzing by for this week's new card for The Challenge! It's a fun one this week! You can check out all of the details and rules HERE. This week YOU get to choose the color to add to black and white! I wanted to make a Halloween card, but decided not to, since Summer won't be around forever and I love making Summer cards! You can also see some fabulous inspiration from the other designers!

I'm going to be completely honest with you...this actually was a CHALLENGE for me! LOL! My mind just kept overthinking everything and in the end I really just got back to basics with bees! You can't go wrong with black, white and yellow bees! These cute little guys are from Reverse Confetti's The Buzz and I colored them using Copic markers and a little Wink of Stella for some added shine. I REALLY wanted to add some blue highlights to the wings, but I resisted to stay true to the rules of the challenge.


After the bees had been colored, I used the coordinating Confetti Cuts to die cut them. I used some black and white striped paper from The Paper Studio on the right hand side for some added contrast. I just love how it looks! The yellow cardstock was die cut using the new-ish To The Point Edgers Dies. I have been enjoying using them on various projects which you can see HERE and HERE


I stamped the Bee "trails" using black ink directly onto the yellow panel and then added the bees using foam squares. I also added a black sentiment strip with the "just bee you" sentiment using white ink. A few Sparkling Clear Sequins finish it off! I hope you get a chance to play! I can't wait to see what you come up with! Thanks for buzzing by...I mean fluttering by!