Showing posts with label Throwback Thursday. Show all posts

Thursday, October 31, 2019

Papertrey Ink Throwback Thursday {Grateful}

Happy Halloween, friends! I hope you all have a safe and frightfully fun evening filled with Tricks and Treats! As the "spooky season" comes to a close, our thoughts turn to gratitude as Thanksgiving draws near. I chose to revisit the charming Fence Line: Autumn stamp set to create a seasonal card of thanks for this week's Papertrey Ink Throwback Thursday feature!

To begin this fun design, I die cut all of the pieces using the Fence Line: Autumn die collection and got to work inking them up. Once that was done, I set them aside to work on the other design elements included on this card.

The card base is a 4 1/4 by 5 1/2 inch top folding A2 card base cut from Dark Indigo cardstock. I added a scallop piece that was die cut using the Scallop Stackers: Medium die collection out of Prairie Grass cardstock using foam squares for dimension.

I used Enchanted Evening ink and a blending brush to add the ink around the perimeter of a 3 3/4 inch by 5 inch piece of Linen Cardstock. I really love ink blending on this cardstock because it brings out the lovely texture!

I rounded the corners and stamped the "grateful" sentiment in black using the You Made My Day stamp set at the bottom. I also die cut the Shape Shifters: Circle 3 die out of Linen Cardstock. I used a circle die cut to add the blended portion to the middle.

I added the circle portion to the center of the card and then got to work adding in all of the stamped and die cut pieces using foam squares. I also added some ink flecks around the perimeter using a marker and a color spritzing tool. A few sparkling clear sequins finish this off! Thanks for fluttering by!

Thursday, September 26, 2019

PTI Throwback Thursday {Once Upon a Time}

Hello and welcome to this week's Papertrey Ink Throwback Thursday! It's one of my favorite features and I always love when it's my turn to share with you! While the Book Cover Dies and coordinating Book Cover Details stamp set are definitely "throwback" worthy, they are new to me, so I was particularly excited to use them for this Bridal Shower card I was in need of!

I know I will be using these again and again; especially for all of the book lovers in my life as well as my Book Club! Believe me, it has been on my Wish List for YEARS, and I finally brought them home! To begin, I die cut the Book Cover portion using the Book Cover Card Die using Aqua Mist cardstock. I added some Aqua Mist ink around the edges using a blender brush. Once that was done, I added the die cut "pages" portion that I die cut from Rustic Cream cardstock. This particular cardstock gave the book pages the look I was going for. 

I quickly stamped the filigree detail on the book spine using my mini MISTI and black ink. The large rectangle on the front is also die cut using the Rustic Cream cardstock and the die is included in the Book Cover Card die collection {linked above}. I die cut the "Once" piece twice using Simply Chartreuse cardstock and glued together with liquid glue. 

I also die cut the "happily" and "for you" portions using the same cardstock and layered the same way. I also made a fake gift card for the pocket so you could see how I intended to use it. It will really have an Amazon gift card inside, but I may use this green piece to hide the orange and black of the card! LOL!

I wanted to add some florals, so I pulled out another "throwback" set; Bitty Bouquets. This is another one of my favorite sets and I have used it quite a bit. I used them last year on THESE cards, which turned out to be some of my favorites.
I die cut the shapes first using the Bitty Bouquets die collection. These are solid dies so you need to die cut and then stamp. I used my Mini MISTI to do all of the stamping since I was stamping multiples and I wanted to get them done quickly, accurately and nicely saturated. 

I did all of the extra stamping, like the "and they lived" and "every after" and " upon a time" using my mini MISTI as well so that I got everything lined up properly.


A few sparkling clear sequins finish up this fun and whimsical design! I think the Bride-to-be will think it's fun! Thanks for fluttering by!

Thursday, August 8, 2019

Papertrey Ink Throwback Thursday {Stitched with Love}

I'm trying to wrap my head around the fact that it is already Thursday, but since it is {LOL!}, that means it is my turn for this week's Papertrey Ink Throwback Thursday! My love for papercrafting and sewing go hand in hand so when I get the chance to combine the two...I am in heaven! I adore when the stamps and papers coordinate so perfectly with my fabric choices; like they did today!

It's been a while since I've sewn some handmade baby items, so it felt really good to switch gears and get some sewing done. A gal in my neighborhood just had a baby girl so I got to work whipping up a few of my favorite baby gifts. You can see some past projects that I have made HERE. As you can see, the Stitched with Love stamp set was the perfect choice to complement these fabrics and the "handmade" vibe I like to add to these projects. This stamp set is selling for $5 which is a steal of a deal for the amount of images that you get!

I paired the stamping with the always-adorable Nostalgic Notions Pattern Paper collection which is the perfect companion for these images. This paper is on sale for $2!!! I need to get more because it is so cute! I created the card so quickly by using one of the printed panels! While this isn't a "baby" card, it goes so perfectly with the gift ensemble,  don't think the mom will care!
I used the Scalloped Tags Die collection , which are back in stock, to layer up all of the stamped images. The sentiment is heat embossed in white onto Pure Poppy cardstock.

I was thrilled to find a flower shaped Aqua Mist button that fit perfectly on top of the stamped flower. I attached it with a glue dot for security! 

I used the Nesting Basics: Pierced Circles and the Nesting Basics: Circles die collection to die cut the stamped circle pieces.
I also made a quilt, which I wrapped before I photographed it! ugh! I am so upset! Maybe I'll ask the mom if I can take a photo later! LOL! It didn't match the ensemble so I kept it separate, but it turned out so cute! I had so much fun on this project and I hope to do more sewing on a regular basis! Thanks for fluttering by!


Thursday, June 27, 2019

Papertrey Ink Throwback Thursday {Wedding Wishes}

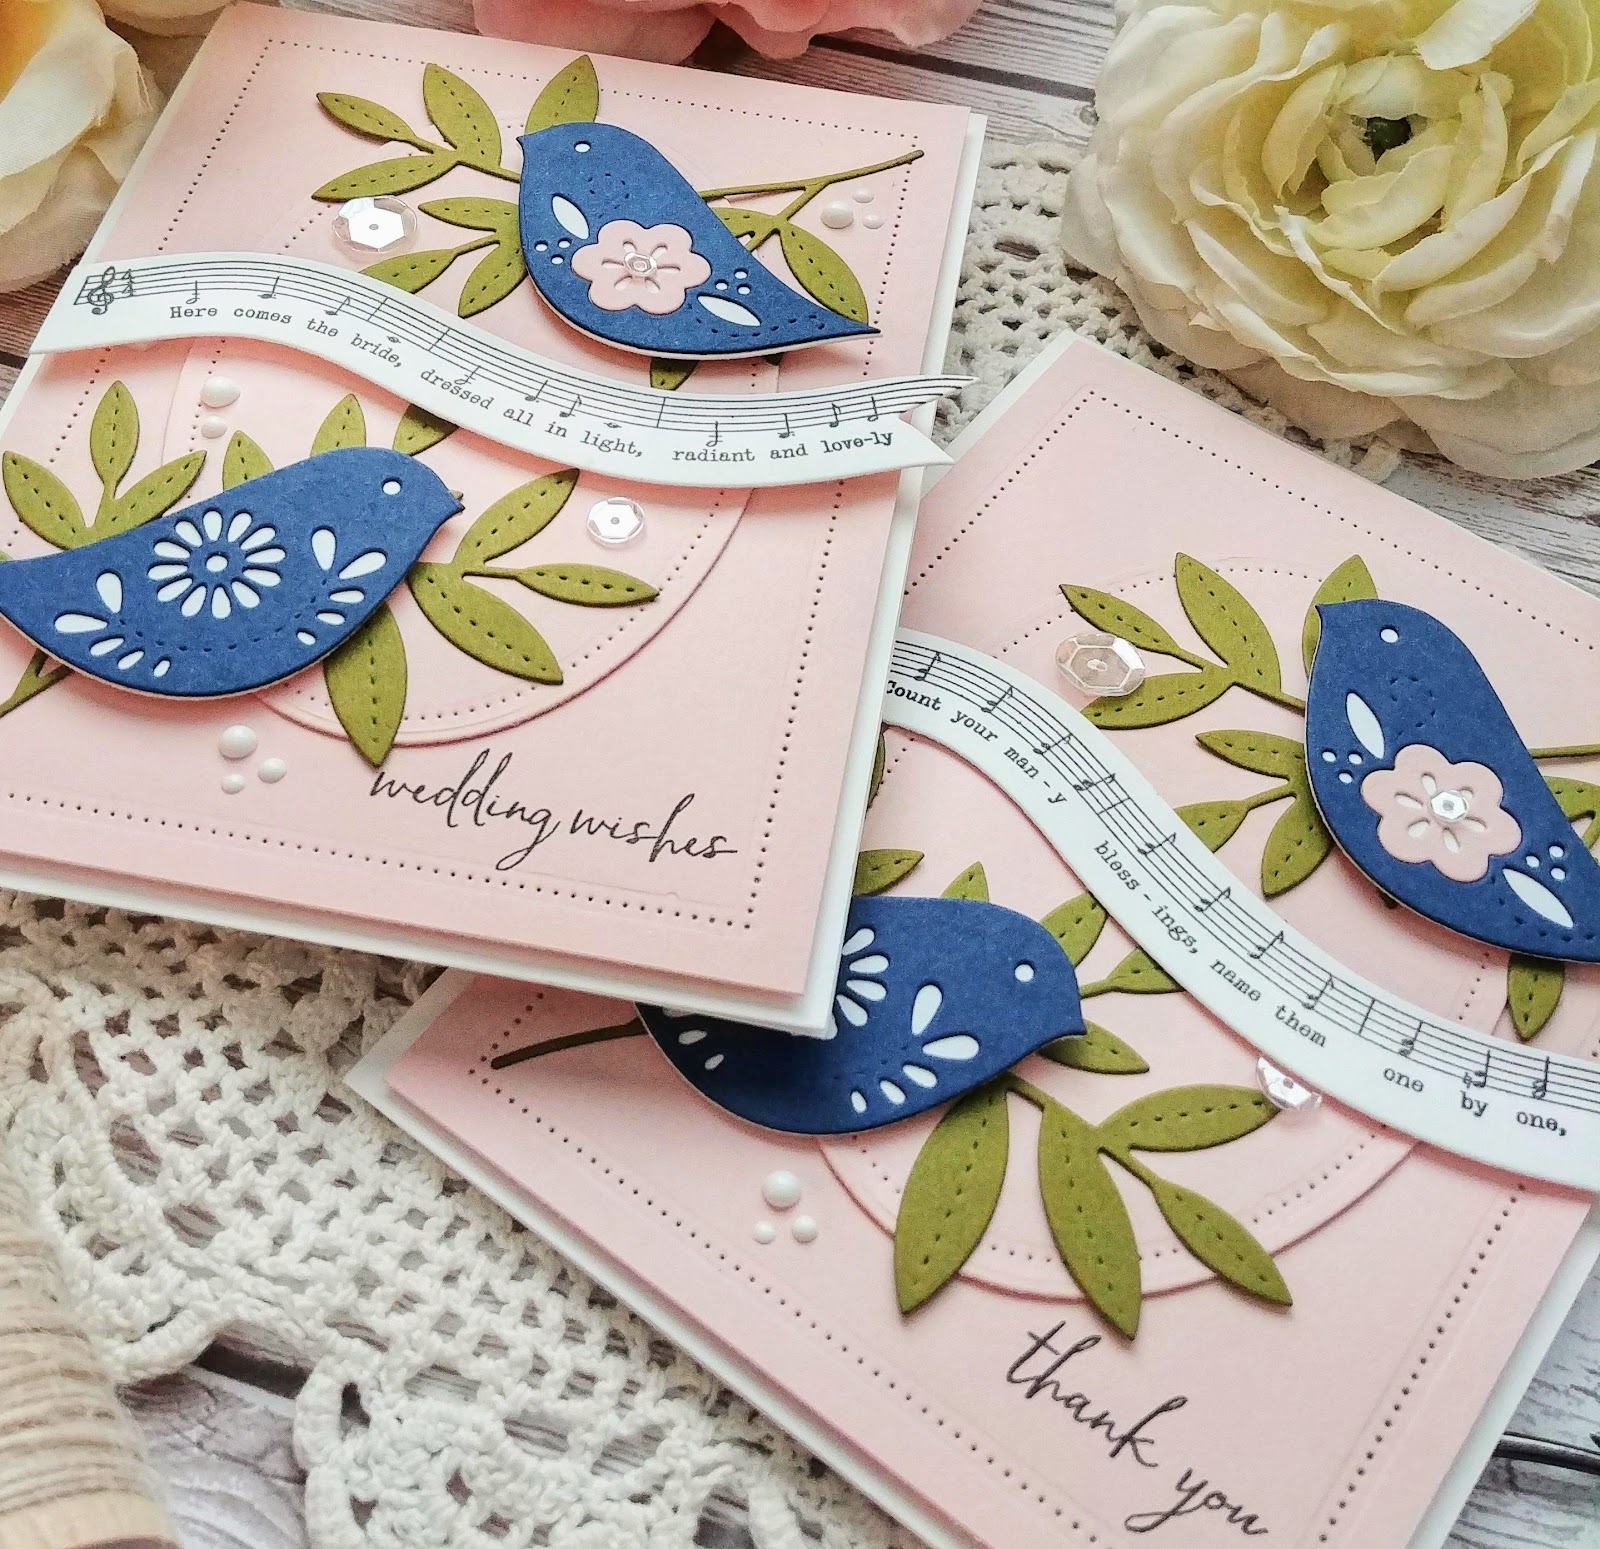
Hello and welcome to this week's Papertrey Ink Throwback Thursday post! I always love this post because it gives me the opportunity to pull out some of my favorite older sets! Today I will be sharing two {almost} identical cards using the amazing Songbirds Stamp Set and the coordinating Songbirds Die Collection, which are now back in stock! Yay! I made THIS project a few months ago for my Keeping Christmas series and the dies were sold out, so I am happy to say they are available now!

Wedding season is in full swing and I am in need of a card using this beautiful Enchanted Evening color paired with Sweet Blush. I also created an identical thank you card because it's just as easy to make one as it is to make two! ha ha!
To begin this design, I cut two panels of Sweet Blush cardstock which measure 4 by 5 1/4 inches. I used the Nesting Basics: Pierced Rectangle dies, which are also back in stock, to give the edge that pierced detail that I love so much! I also created an oval in the same way using the Nesting Basics: Pierced Ovals and the Nesting Basics: Oval die

I die cut the music shape using the Songbirds die collection out of white cardstock as well as the base for each of the two larger birds. The leaf clusters are die cut out of Ripe Avocado cardstock and the birds are die cut from Enchanted Evening cardstock {linked above}. 

Before I began assembling the card, I stamped the "thank you" and "wedding wishes" sentiments at the bottom of the Sweet Blush panels using black ink. Once that was done, and I had stamped the music image, I was able to get to work assembling the rest of the cards.

The thing that I love about the Songbirds stamp and die collection is that you can use the die cuts by themselves for a different look, or use the coordinating stamped images in the more traditional way. I chose to do more die cutting for these two designs. I used liquid glue to adhere the leaves and the blue birds to the white bases. Once that was done, I used foam squares to adhere everything else. The base layer is popped up as well to give it some added dimension.

Once all of the die cut pieces were added, I used some White Nuvo drops here and there to look like berries coming off of the leaf sprigs. The sparkling clear sequins were added using liquid glue as well.

I added Shimmer Spray once the photos were taken since it can be distracting in the photos, but it gives a beautiful shine in real life! I had so much fun making these two cards! This Songbirds stamp set would be perfect to create a set of all-occasion note cards to give as a gift! Thanks for fluttering by!

Thursday, May 16, 2019

Papertrey Ink Throwback Thursday {You are so SWEET!} and Inspired by...Pillows

I'm so happy to be here today sharing a card for both the Papertrey Ink Throwback Thursday AND the new Inspired By Challenge! The stamp set that I chose to "throwback" to is one of my all-time favorites; Strawberry Patch! This is one of those classic sets that I turn to again and again, especially this time of year! It has been the star of MANY teacher gifts, thank you cards, etc. 

I wouldn't have normally added the yellow plaid with this card if it wasn't for today's challenge, but I really love the summer-y softness that it adds to my card! I used the Bitty Big: Harvest Gold pattern paper on the large side to bring this element into the design.


One of the things that I love most about this particular set is that it comes with both solid images and line art images. For today's card, I used the line art images because I wanted to color them with Copic markers. I die cut all of the pieces that I needed using the coordinating Strawberry Patch Die collection. Once that was done, I used my mini MISTI to stamp them quickly. I used an assortment of Copic markers to color them.


I used the Mix and Mat: Pinked Edge die to create the backdrop for the stamped images. I love all of the detail that it adds to this design.  I liked the pierced detail so much that I decided to bring in additional pierced details by using Nesting Basics: Pierced Rectangles on both the white edge and the yellow piece.

I used my MISTI to stamp the sentiment underneath the strawberries. I like my sentiments to be crisp and the MISTI allows me to do that! I also added some white nuvo drops to the centers of the strawberry blossoms as well as the seeds. I really like the dimension that it adds to the berries. I hope you get a chance to join us this week at Inspired By! Thanks for fluttering by!


Thursday, April 11, 2019

Papertrey Ink Throwback Thursday {Some Bunny Loves You}

 Welcome to this week's Papertrey Ink Throwback Thursday! This is always a fun post to put together because I get to use some of my favorite older sets! When I buy products, I buy things with longevity in mind and multiple uses! These darling Carrot Treat Boxes stole my heart when they were first released and they still are so much fun to use! I also used the So Sweet stamp set that was designed to be used in conjunction with the boxes.

 Easter is on its way and baskets are ready to be filled! The Carrot Treat Box paired with the So Sweet stamp set creates the perfect presentation to make any basket shine. They never lose their style or charm and I reach for them year after year! I mentioned on the PTI blog that I have used these year round, and I will share all of the different ways I have transformed these boxes. Let me start off by sharing the very first ones I made when they were first released. I had so much fun that first Easter making them for family and friends. You can read that post HERE. I also shared some cutting tips when using this particular die that you may find helpful.
For today's boxes, I chose 3 colors of cardstock that would coordinate with the Pretty Pastels pattern paper pad. This is one of my favorites and I have used it EVERY year since it was released...that is  A LOT of years! LOL! I stocked up with the amazing sale so I will be able to use it for many more years to come! Ha ha! I have an Aqua Mist box, Winter Wisteria, and Berry Sorbet. These boxes almost look good enough to eat on their own! I used one of the included dies in the set to die cut the pattern paper pieces and adhered them to all four sides of the boxes.

 The Bunny is stamped in black and then I stamped the cheeks, nose and eyes with the coordinating images. It is so fast and easy to put this little guy together. I used the So Sweet die to die cut him and then adhered him to a tag that comes with the Carrot Treat Box die collection. 
After I had made all of those carrots that first year, I decided to try making some strawberry boxes. I loved how those turned out and you can see them HERE.  Then, Distress Oxide Inks hit the market and they were ALL THE RAGE! I loved the different results that you could get with those inks so I tried making some watermelon boxes. You can see those HERE. And my last alternate way to use the boxes can be found HERE.
To finish these boxes off, I used the other tag that is included for the sentiment at the top of the carrot. I just love the cute fonts that the sentiments are printed in. I also love the mix of sentiments to really make this set work for so many reasons. They are tied up with Spring Moss Swiss Dot ribbon and then the tag is attached using some Button Twine
I hope you enjoyed this trip down Carrot Box memory lane! LOL! I really have had so much fun with them over the years and today's project actually inspired me to try yet another modification, so watch out! Ha ha! Thanks for fluttering by!

Thursday, March 14, 2019

Papertrey Ink Throwback Thursday {Thanks, Coach} and a small giveaway!

Hey friends! It feels like it's been forever since I last checked in! I hope you're all having a fabulous week and enjoying some spring like weather {maybe}. We're having the usual March weather; warm-ish one day and cold the next! LOL! Today I'm sharing the Papertrey Ink Throwback Thursday post, which is always fun! It gives us a chance to breathe some new life into an older set and share some fresh inspiration!

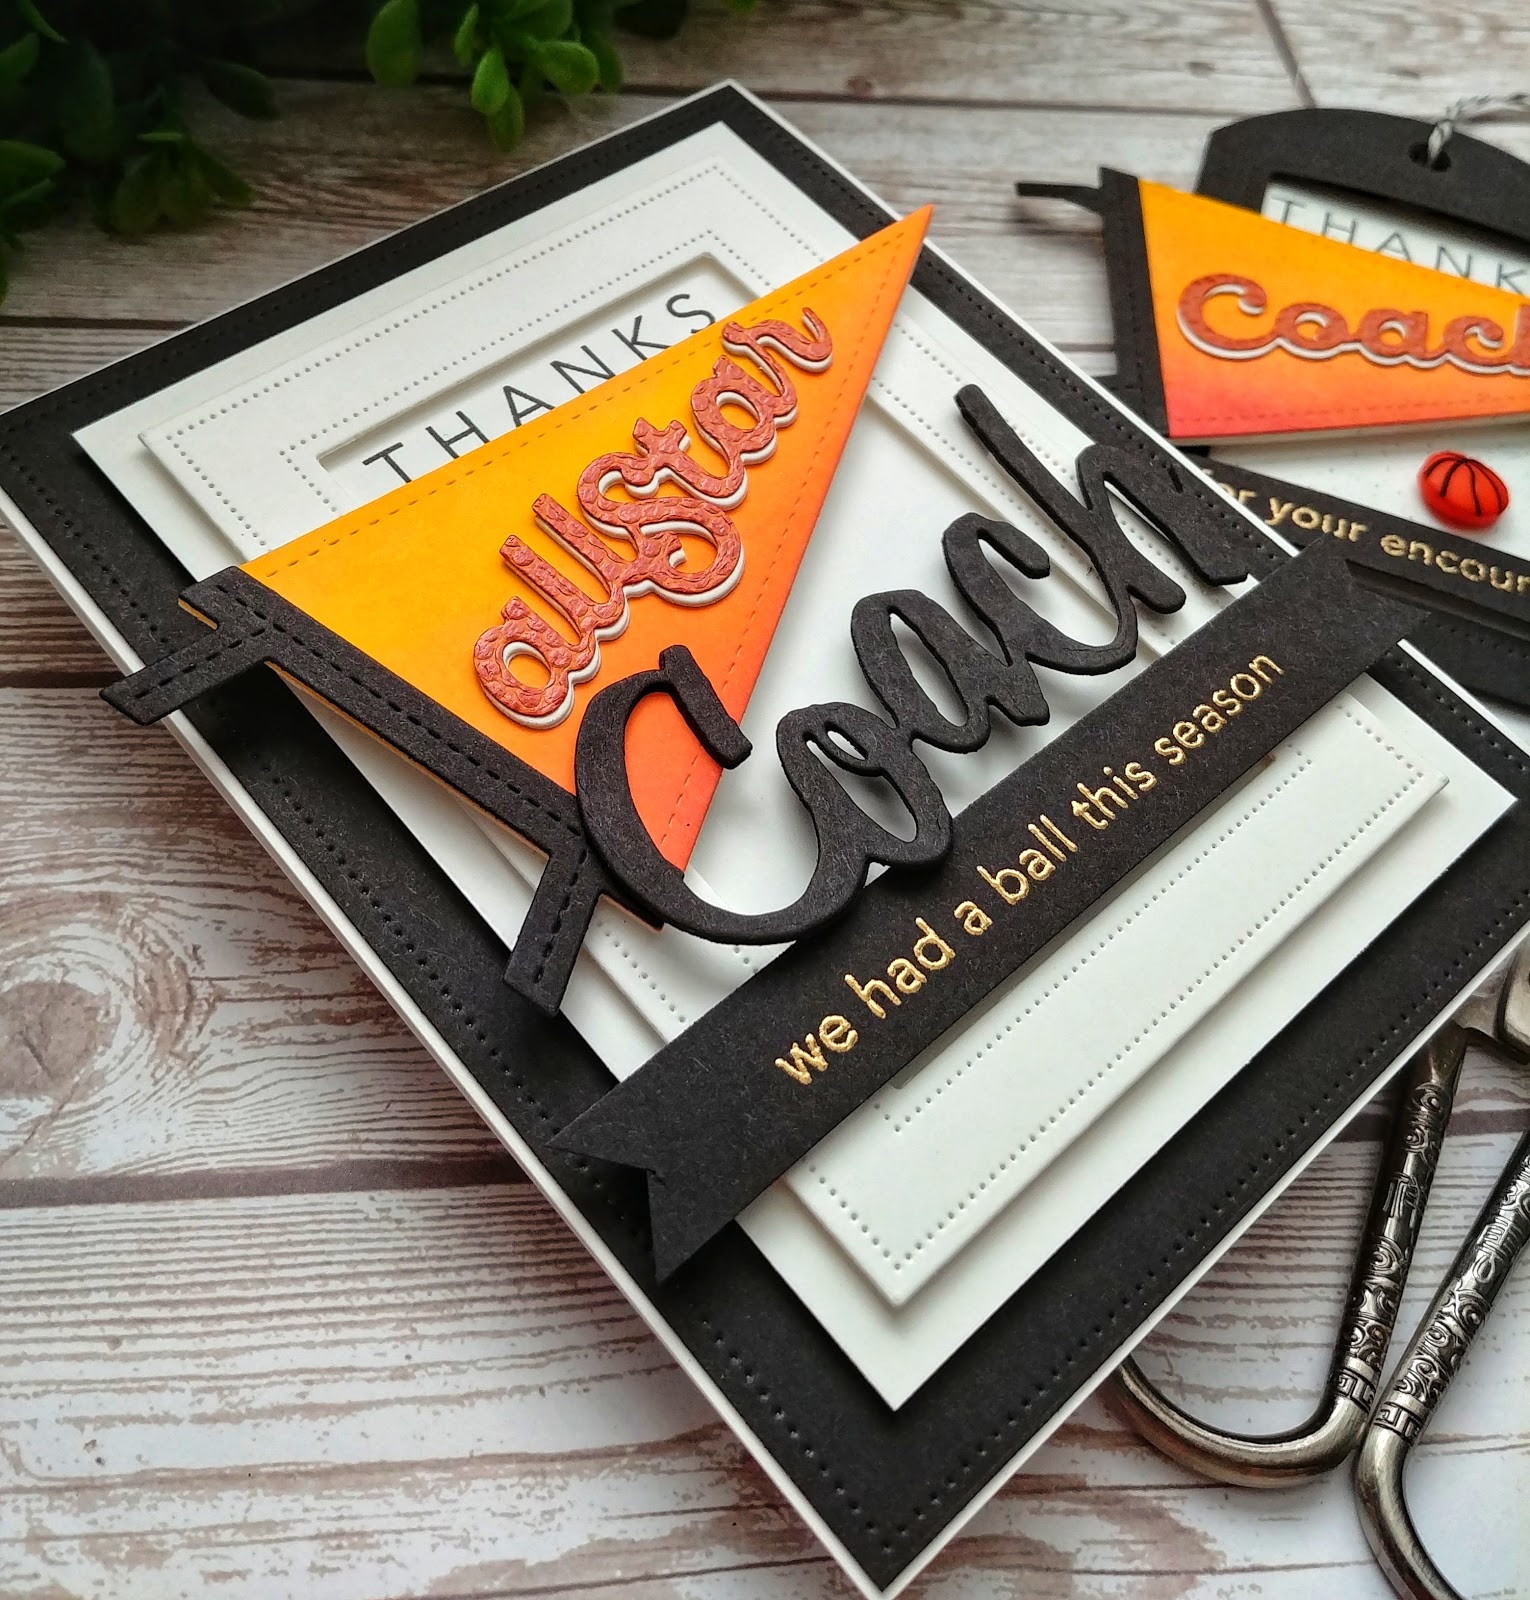
My 7 and 9 year old boys just finished their basketball season, so I always like to put together a thank you gift for their coaches. My 7 year old's coach was Dad and Grandpa; I gave Grandpa a gift and my husband felt left out! LOL! I just thought he wouldn't want all the treats I was giving! I got the big popcorn buckets from Dollar Tree and filled them with microwave popcorn packets and lots of theater sized candy as well as a few codes to RedBox. This card and tag ensemble was made for my 9 year old's coaches {husband and wife} so it worked out perfectly! I started off with the Thanks, Coach stamp set to heat emboss the "we had a ball this season" sentiment in gold onto a strip of black cardstock. I also used the "thanks" sentiment at the top that is also from this set. I love the clean lines and fonts of this set. It's a classic that will always be relevant for making coach themed cards and gifts.


I inadvertently ordered 2 of the Thanks, Coach die and I have one that I would like to give away.  Simply leave a comment at the bottom of this post and I will randomly pick a winner on Saturday! I will throw in some extra goodies as well! For my card, I die cut 3 of them and stacked them together using liquid glue for stability. 

The pennants were my favorite to make! I die cut them using the Pennant Flag Die and cut three for each project; the tag and card. I wanted them to be sturdy. The black portion is only die cut once and added using liquid glue. I used an assortment of Distress Oxide inks to get the blended look. The Utah Jazz was bought by Larry H. Miller from New Orleans clear back in the day, so the colors have always been Mardi Gras colors. They recently added in some new uniforms with these orange/red colors, which are definitely more "Utah" colors! LOL! Since our city teams are the "Jr. Jazz" I decided to give the project a Jazz flair! 
The tag was die cut from black paper using the Folded Pocket Tag Die. The white portion is actually an insert in the pocket with the red box codes written on it.

I die cut the word "coach" and  "allStar" using some basketball textured specialty paper for some added detail. My son said it is football textured paper, but I wasn't in the mood to hear it! LOL! I also die cut the same words out of white to give the shadow effect. I just simply glued them slightly offset from each other to give that extra detail. All of these elements are added onto a white frame that is die cut using the amazing Pierced Feature Frames. I also used the Nesting Basics: Pierced Rectangles die to give the black piece some extra detail as well.

I didn't want to neglect the inside since this set comes with a fabulous sentiment. It can be used on the front or inside; I chose the inside. I used the same inks as I did on the pennants to give it that gradient effect. I heat embossed "coach" using the same gold powder as the front.  I also added some grey ink specks to the front of the tag using my color spritzing tool. A small basketball button bought from the craft store finish off these two designs! Thanks for fluttering by and don't forget to comment for a chance to win!

Thursday, January 31, 2019

Throwback Thursday {Wishes Come True}

Hello and welcome to this week's Papertrey Ink Throwback Thursday! Today a few of us are revisiting the Wishes Come True stamp set and the coordinating Wishes Come True dies. Nothing says "birthday" more than cake and candles! Today I've created a paper cake and added the stamped candles for a festive, yet elegant birthday card! I've been sending out a TON of cards recently, so I'm pleased to get a birthday card back in the stash! I've grown weary of looking at some that I have had for a while now, so I took out a huge stack, wrote out cards to anyone who I could think could use a little happy mail, and mailed those babies out!  I plan on mailing them out a little bit more regularly to keep things fresh and rotated! 
For today's card, I knew that I wanted to create a stacked cake adorned with flowers and candles. To begin, I die cut the two "layers" using the Nesting Basics: Pierced Rectangles and the Nesting Basics: Rectangles Dies out of Lilac Grace cardstock. This particular shade of paper is at the bottom of my paper racks and it has been woefully neglected! You can look forward to more Lilac Grace in the future; it is absolutely beautiful! I added a strip of ScorTape to the bottom of the two rectangles, removed the backing and added some glitter for a fun border. Most professional cakes have some piped icing, a bow, or some type of visual interest, so that is why I added the glitter! I really like how it looks with the Lilac Grace.

Once that was done, I got to work on the flowers. I used Farmer's Market Florals to create all of the flowers for the cake. I die cut them using the Farmer's Market Florals dies and then got to work stamping them. I used my Mini MISTI so that I could get them done lickety split!  The ink colors are Lilac Grace, Winter Wisteria, Royal Velvet, Sweet Blush, Pale Peony, Hibiscus Burst, Harvest Gold, Simply Chartreuse, and Ripe Avocado. 


 The background was created by dry embossing the Bold Borders: Polka Dot using Winter Wisteria cardstock. This set the stage for me to add the rectangles to form the cake as well as add all of the flowers to decorate it.
The candles are stamped in the same colors as the flowers for cohesion. I added a small sparkling clear sequin to the "flame" of each candle for additional sparkle. 


I love, love, love all of the sentiments in the Wishes Come True stamp set! I stamped the sentiment in black onto a strip of white cardstock and attached it to the cake using foam squares. After I photographed it, I spritzed it with Shimmer Spray. I find that if I do it before, the sparkles show up in the photos in a distracting way, but in real life it looks AMAZING! Thanks for fluttering by!