Hello and welcome to day one of full reveals for the New Beginnings Collection from The Greetery! Today we're sharing all things spring and baby; what a delightful combination, don't you think? Just fitting for the New Beginnings title! You'll want to make sure to head to The Greetery Blog for the official "meet and greet" for all of the beautiful new products! Make sure to leave a comment here, and on every designers' blog, to be eligible to win one of (2) $50 gift certificates to the shop! My first card features the new Spring Sprays Stencil and Spring Sprays dies. This is such a fun and easy combination that allows you to create the two beautiful floral sprays that are on this card. To begin, I used the numbered stencils to create the sprays and then die cut the outlines using the Spring Sprays dies.
Once that was done, I die cut all of the stand-alone flowers and inked them up using the same ink colors that I used for the stenciling. (my next card uses JUST the stenciled sprays so you can see the difference) Once they were all inked up to my liking, I added them to the spray using both foam squares and liquid glue. I added some Copic marker detailing to all of the flowers for added detail and interest.
You'll notice that a few of the designers paired the Spring Sprays stencil/dies with the new Rejoice hot foil/stamp/die; I chose to use a different sentiment so you can see how easily it is to incorporate other sentiments. That being said, the Rejoice sentiment was designed specifically for these sprays.
The "Happy" portion of my sentiment was stamped in an ombre look using the previously released All Kinds of Happy stamp set and then I die cut it using the All Kinds of Happy Shadow Die. I ended up die cutting the shadow twice so that I could glue them together for a more sturdy piece. The "Spring Wishes" portion of the sentiment is stamped in black using the new Tear Strip Tags: Spring Stamp Set. I simply placed post-it notes over the top of the other sentiments while I inked it up and then removed them before stamping it down. I used my mini MISTI so that I could repeat the steps until it was saturated enough. 
My second card features the oh-so-sweet Bunny Kisses die (this is a larger version of the cute bunny that was released last year for the hourglass) paired with the new Ribbon Maker: Daisy Chain die and the new Tear Strip Tags: Spring Stamp Set. As I mentioned earlier, this particular card also uses the new Spring Sprays stencil/die, but doesn't included the additional die cut flowers. This is definitely a softer look and I felt it complemented the watercolor look I was going for with this shaped card.
To begin, I die cut the pieces for the bunny, eggs, and tulip and colored them using ink and blender brushes; I also added some details with Copic markers. I adhered some Nuvo Crystal Glaze over the top of the bunny's eye for some added realism.
I used watercolor paper to die cut the arch pieces, except for the smaller arch for the focal point. I used the A2 Arches dies to die cut the arched frame and then used the middle portion that was left from die cutting the frame to add some watercoloring. I just feel like spring/Easter just work so well for a soft watercolor look. As I mentioned earlier, this is a shaped card, so I took an A2 card base and placed the arch die slightly above the score line to create the base, and then glued the entire watercolor piece over the top.
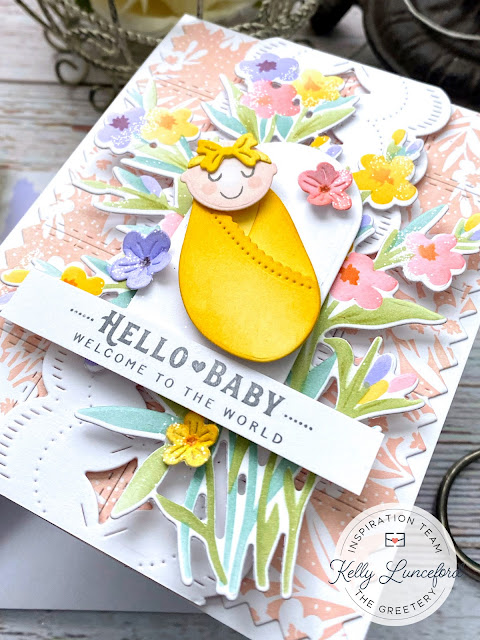
The sentiment was simply stamped and then cut using my paper trimmer and then I added the notched ends using scissors. You could definitely use the coordinating Tear Strip Tags die for another option. Eep! My last card features the sweetest new series called "Baby Face"; I chose to use the new Baby Face Swaddle dies, but each of the designers chose a different die to use, so by visiting all of our blogs, you should see each of the different "Baby Faces" represented and I'm sure Betsy is using all of them as well.
To begin, I stamped the Elegant Arches Stamp using white ink on a Kraft A2 panel. I never actually used the BotaniCuts Bluebells Dies when they were released and haven't since! Such a shame because they are absolutely wonderful! Anyway, I die cut them from Vintage Cream cardstock and then colored them using Bundled Sage, Peeled Paint, and Forest Moss Distress oxide ink for the greenery, and then added just a touch of Scattered Straw Distress Oxide ink at the base of each of the flowers. I glued them together and set them aside to dry. I die cut the Baby Face Swaddle pieces from the same Vintage Cream cardstock; the baby's head is colored using Tattered Rose Distress Oxide ink (the cheeks are stamped using the same ink). The swaddle and bow are both colored with Scattered Straw ink. I stamped the face using the new Baby Face Sentiments stamp set using black ink.
I glued the baby together using liquid glue and foam squares for a touch of dimension. I die cut focal arch from Vintage Cream cardstock and then stamped the different portions of the sentiments; there are so many different combinations for each of the different "baby face" dies.
I used three of the Spring Sprays flower dies to accent the left side of the card and grouped the bluebell stems on the right side. I stenciled and stamped a coordinating envelope using the Flappable stencils and the new Tear Strip Tags: Baby stamp set.
A touch of glitter finished off this baby card. You could omit the bow on the top of the head and use the "hair" die and this could work for a gender-neutral card to add to your stash. I couldn't resist adding the bow, so this one is for a sweet, baby girl! Make sure to head to the other designers' blogs to see how they've used these fun new products! Thanks for fluttering by!


