Showing posts with label fall cards. Show all posts

Tuesday, September 8, 2026

The Greetery {The Autumn Edit} Reveal Day 2


Hello and welcome back for day 2 of full reveals for The Autumn Edit Collection from The Greetery! I'm so glad you're liking this beautiful new collection as much as I am! I have quite a bit to share today, but as always, you'll want to make sure you head to The Greetery Blog for the official "meet and greet" for all of today's featured products! One more thing before I dive into the details of today's projects, make sure to leave a comment here, and on each of the designers' blogs for a chance to win one of two $50.00 gift cards to the shop!

Up first are two cards using the new Hand-picked Harvest suite of products. This first card is the most basic of the two; it combines the Hand-picked Harvest Stencil and coordinating Hand-picked Harvest Embossing Folder. The next card steps it up a bit by adding in the Hand-picked Harvest Die; I wanted you to be able to see the difference between the two styles.

To begin, I stenciled an A7 sized panel of white cardstock using the Hand-picked Harvest Stencil. I chose cool blue tones and greyish green for a different feel.

Once the panel was stenciled, I trimmed it down a bit on each side and then embossed it with the Hand-picked Harvest Embossing Folder. There is a small empty space included on the design for you to add a sentiment. I decided to go a bit larger and use one of the sentiments included in the Simple Autumn Sentiments Stamp Set. I heat embossed it in gold and then cut it using the Shortbread Shapes Rectangle Labels.

I added some gold drip-drops on either end of the label secured with liquid glue. The finishing touch is an Antique Gold bow cut using the Regency Bow No 1 Die secured with a small piece of foam tape. I gave it a spritz of shimmer spray, but made sure to cover up the sentiment because shimmer spray on dark cardstock is hard to photograph. I layered it onto a 5 by 7 panel of blue cardstock and then glued it to a card base using liquid glue.

The next card uses the stencil, but then I cut everything out with the Hand-picked Harvest Die. Once the pieces were cut, I used the Hand-picked Harvest embossing folder to emboss the individual pieces. 

Once all of the pieces were prepared, I got to work on the background. The benefit of cutting out the pieces is you can use whatever colored background you'd like. I chose to use Autumn Rose cardstock with Scarlet Jewel ink around the edges and then splattered the same ink and some white acrylic paint over the panel for added detail.

I used the large panel that the pieces were cut from to use as a placement guide to put everything back together. I popped the pieces up with foam squares for added dimension.

You could also use all of the individual pieces on their own for different arrangements or as accents on other projects. 

I created the sentiment just like I did on the first card and then added a bow using the Regency Bow No 2 die. This card also got a spritz of shimmer spray and some glitter to the individual pieces for sparkle and shine.

My next card features the lovely new Wildwood Bouquet Die and the new Wildwood Bouquet Embossing Folder. There is a coordinating stencil set, but I didn't end up using it on this project. I DO have a beautiful panel all stenciled that will have to be used soon, though; it's so beautiful!

This card was inspired by  THIS card I made back in the spring. I love the colors and the feel, so that is what guided my design choices for this card.

To begin, I die cut the main bouquet portion twice from white cardstock and glued it together with liquid glue. I added the ink using a blender brush and then spritzed it with fossilized amber distress oxide spray and let it dry.

I cut all of the flowers and buds from white cardstock as well and colored them, assembled them, and then added them to the bouquet with foam squares.

For the background, I cut a piece of blue cardstock and embossed it with the Wildwood Embossing Folder and then added white pigment ink over the top for a fun effect. I really like how it allows the details to pop. I foiled a panel of white cardstock using the Capsule Borders Hot Foil and then cut it using the Capsule Basics Die.

I used the same die to cut a smaller capsule mat and then embossed it with the same embossing folder as the background, added the Filigree Border and mounted it over the foiled panel. I layered it all up onto the background and then adhered the entire background to a 5 by 7 panel of woodgrain cardstock. The sentiment, which is from the new Simple Autumn Mini Sentiments, is heat embossed in gold onto Sweet Blush cardstock and adhered with foam squares.

And now...switching gears to something a little more spooky! Eep! How cute are the new additions to the Marketplace series? This new addition is called Eerie Avenue and is just as spooky sweet as can be! I used the Marketplace No 3 Die and the Arch Box Large Die to create the larger box and the Arch Box Small Die paired with the Marketplace Mini Die for the smaller box.

I chose to use the "Brooms & Blooms" shop name included in the Eerie Avenue Stamp Set so that is what prompted the accent choices. Since it's a flower shop, I pulled in the cute flowers and baskets from the previously released Marketplace Celebration Street Die, but I gave them a "spooky" vibe with the colors.

This box uses the same flowers and sentiment included in the new Simple Autumn Mini Sentiments embossed in silver.

I used the boarded up window pieces, cobwebs, & the Happy Halloween banner.

I really love cutting the windows out from the box as well so the recipient can add a battery-operated tea light if they like. I usually put one in the bottom (turned off) for the recipient anyway.

I mentioned in THIS post that I always like to make the large and small box so they can be packaged up together. I have a photo (not the best styling, just a quick picture) of two packaged in a flat-bottom cello bag. I can't wait to package these Halloween ones up with some fun ribbon!


My last project just might be my favorite; the Eerie Avenue Stamp Set includes the "Pumpkin Spice Market" shop name and I couldn't resist getting right to work. This box uses the same large arch box (linked on the previous project) and the Marketplace No 1 Die. I cut the box and the main building shape from Honey Nut cardstock and added some shading around the edges and some brown ink splatter for a "pumpkin spice" effect.

The building's  accents are all cut from Scarlet Jewel cardstock with the exception of the door. I like to use liquid glue to add all of the window frames so I have a little bit of wiggle room to get them places just right.

I also chose to use a banner cut from the Celebration Street Die (linked on previous project) with bows cut using the Marketplace Holiday Festoons Die. The wreath on the door is also from that same set.
The new Eerie Avenue Die comes with all kinds of pumpkin/jack-o-lantern options, but the trio of stacked pumpkins stole my heart for this project. I also added some of the same flowers from the window boxes. I was toying around with adding some pumpkins to the larger windows/boxes which would also be fun.

When it was all said and done, I want to GO to this shop, or rather own it and live at the top! ha ha! I had so much fun with all of today's projects!
Thanks for fluttering by! 
p.s. don't forget to leave a comment here, and on each of the designers' blogs for a chance to win one of two $100 gift cards to the shop.


Monday, September 7, 2026

The Greetery {The Autumn Edit Collection} Reveal Day 1

Hello and welcome, friends! It's such a wonderful day; it's day 1 of full reveals for the beautiful new collection from The Greetery called The Autumn Edit! I know you'll love it as much as I do! As always, you'll want to head to The Greetery Blog for the official "meet and greet" for each of the products being showcased today. Also, make sure to leave a comment here, and on each of the designers' blogs, for a chance to win one of two $100 gift cards to the shop!
My first card for today features the latest addition to the Shortbread Shapes family: Shortbread Shapes: Autumn Embossing Folder. This folder is designed to work with the previously released Shortbread Shapes: Rectangle Die. I've also used the beautiful new Simple Autumn Mini Sentiments and these work perfectly with the Shortbread Shapes: Rectangle Labels Die.

To begin, I cut a piece of China White cardstock using the Shortbread Shapes: Rectangle Die; I lined the outer die and the inner grid die together on my magnetic shim and then cut it out. I also cut out nine pieces using the smaller die included in the same set from Sweet Blush cardstock and then added some Autumn Rose ink around the edges for depth. Once that was done, I glued them to the grid with an adhesive tape runner. I embossed it using the new Shortbread Shapes: Rectangle Autumn embossing folder. I used the same configuration of dies to cut the Autumn Rose border, but used an exacto knife to trim it to be just the frame. I used the same embossing folder and then glued it over the top of the other piece with liquid glue.

I created a wreath by cutting the leaves twice from white cardstock using the previously released Magnolia Wreath Die. I added some yellow, purple, and green ink to give it a realistic autumn look and then spritzed it with fossilized amber distress oxide spray. I layered the two wreaths together and adhered them to the embossed background using foam squares.
The sentiment is heat embossed in gold onto the Ocean Tides label. I used Antique Gold cardstock for the embossed pumpkin in the middle and added it to the label with foam squares.

The finishing touch is a coordinating Antique Gold bow that was cut using the smallest size bow die included in the Regency Bow No. 2 Die. I chose not to make a shaped base for this card, but rather a regular folded base that fits just inside the perimeter of the background taking the curved edges into consideration. I know the width is 4 1/4, but I can't remember what the length is.

My next set of cards uses a few new favorites: Bitty Autumn Botanicals Stamp + Stencil, Simple Autumn Sentiments Stamp Set, Bitty Autumn Botanicals Die, and the new Bigger Autumn Botanicals: Corn Die.

To begin this card, I cut an A2 panel of Vintage Cream cardstock and stamped the details using the Bitty Autumn Botanicals Stamp. This is a red rubber cling mount stamp and allows you to quickly stamp all of the details for each of the tiny images. Once that was done, I used the coordinating stencil collection to add the different colors. I cut them out using the Bitty Autumn Botanicals Die and set them aside.

I cut another A2 panel of cream cardstock and stenciled some antique linen ink using one of the stencils included in the Diamond Foliage Stencil. I cut the overlay using the Diamond Foliage Die from Ocean Tides cardstock and glued it over the top of the stenciled panel with liquid glue. I cut two frames from the same Ocean Tides cardstock using the Frosted Frames Die and glued them over the top. Now, the reason why I cut two was because I had an accident with the first one I glued down, but in the end, I really like the depth it gives the background to have two stacked together (I did it again on purpose on the next card because I liked it so well). I added the focal panel, which follows the same steps as my first card, and then popped up the cute bitty botanical images using foam squares. The finishing touch is an Antique Gold bow cut from the Regency Bow No 1 Die.

I had so much fun with the background on the first card, I decided to make a second to showcase this fabulous new Bigger Autumn Botanicals: Corn Die. I cut the pieces for the corn from white cardstock and then colored them with dye inks and blender brushes. I gave everything a spritz of fossilized amber distress oxide spray and then assembled it with liquid glue and foam squares. I noticed that one of the squares on the new Shortbread Shapes: Rectangle Autumn embossing folder showed the corn tied up with a bow, so I modified the Regency Bow No. 2 (linked on card 1) to create something that fit the scale of the corn a bit better.

I hot foiled the label the corn is on using the Oblong Octagon Lables Hot Foil using champagne foil and then cut it out using the Oblong Octagon Labels Die. I heat embossed one of the new Simple Autumn Sentiments onto a piece of Ocean Tides cardstock and then cut it with the coordinating labels die (linked on card 1). The frame is cut from Saffron Spice cardstock and I just love this color combination!

Eep! These new Bigger Autumn Botanicals have STOLEN my heart! I'm obsessed; I had so much fun creating this pair! I probably should have mentioned earlier, but before I made any of my projects, I just had a fun crafty session creating all of these fun gourds, squash, pumpkins, mums, corn, etc. I love having all kinds of options when I'm creating so I love doing some prep work ahead of time because you never know what combination you're going to fall in love with!

All of the pieces are cut from white and then colored with dye inks, and this pale gourd is colored with oxide ink. Once they were colored, I spritzed them with fossilized amber distress oxide spray and let them dry. I also added some white acrylic paint, thinned with water, to the gourd and squash for that realistic look; I'm very pleased with the result!

The mums have a stem and foliage, but I just used them individually here as accents. Both background are created using the previously released Checks Out Stencil. I used Old Paper Distress Oxide ink for the stenciled portion and then used the Tile Style Stamp Set for the details. I used Old Paper Distress Oxide ink, Coastal Blue dye ink, Olive Twist dye ink, So Saffron Dye ink, and Simply Chartreuse dye ink. I used another foiled oblong label to use as a grounding anchor for the gourd and squash. I heat embossed the "garden fresh" sentiment using the Tomato Tomato Stamp Set

I couldn't resist using the "hello, pumpkin" sentiment with the Bigger Autumn Botanicals: Pumpkin 1 Die. I added a few mums here and there for this card as well.

I embossed a small panel using the Shortbread Shapes: Rectangle Autumn embossing folder to use behind the focal image for added texture and dimension.

I had so much fun creating these cards; this is such a phenomenal release! Join me again tomorrow for day 2 and don't forget to leave a comment here, and on each of the designers' blogs, for a chance to win one of two $100 gift cards to the shop! Thanks for fluttering by!


Kelly Lunceford (you are here)


Monday, October 14, 2024

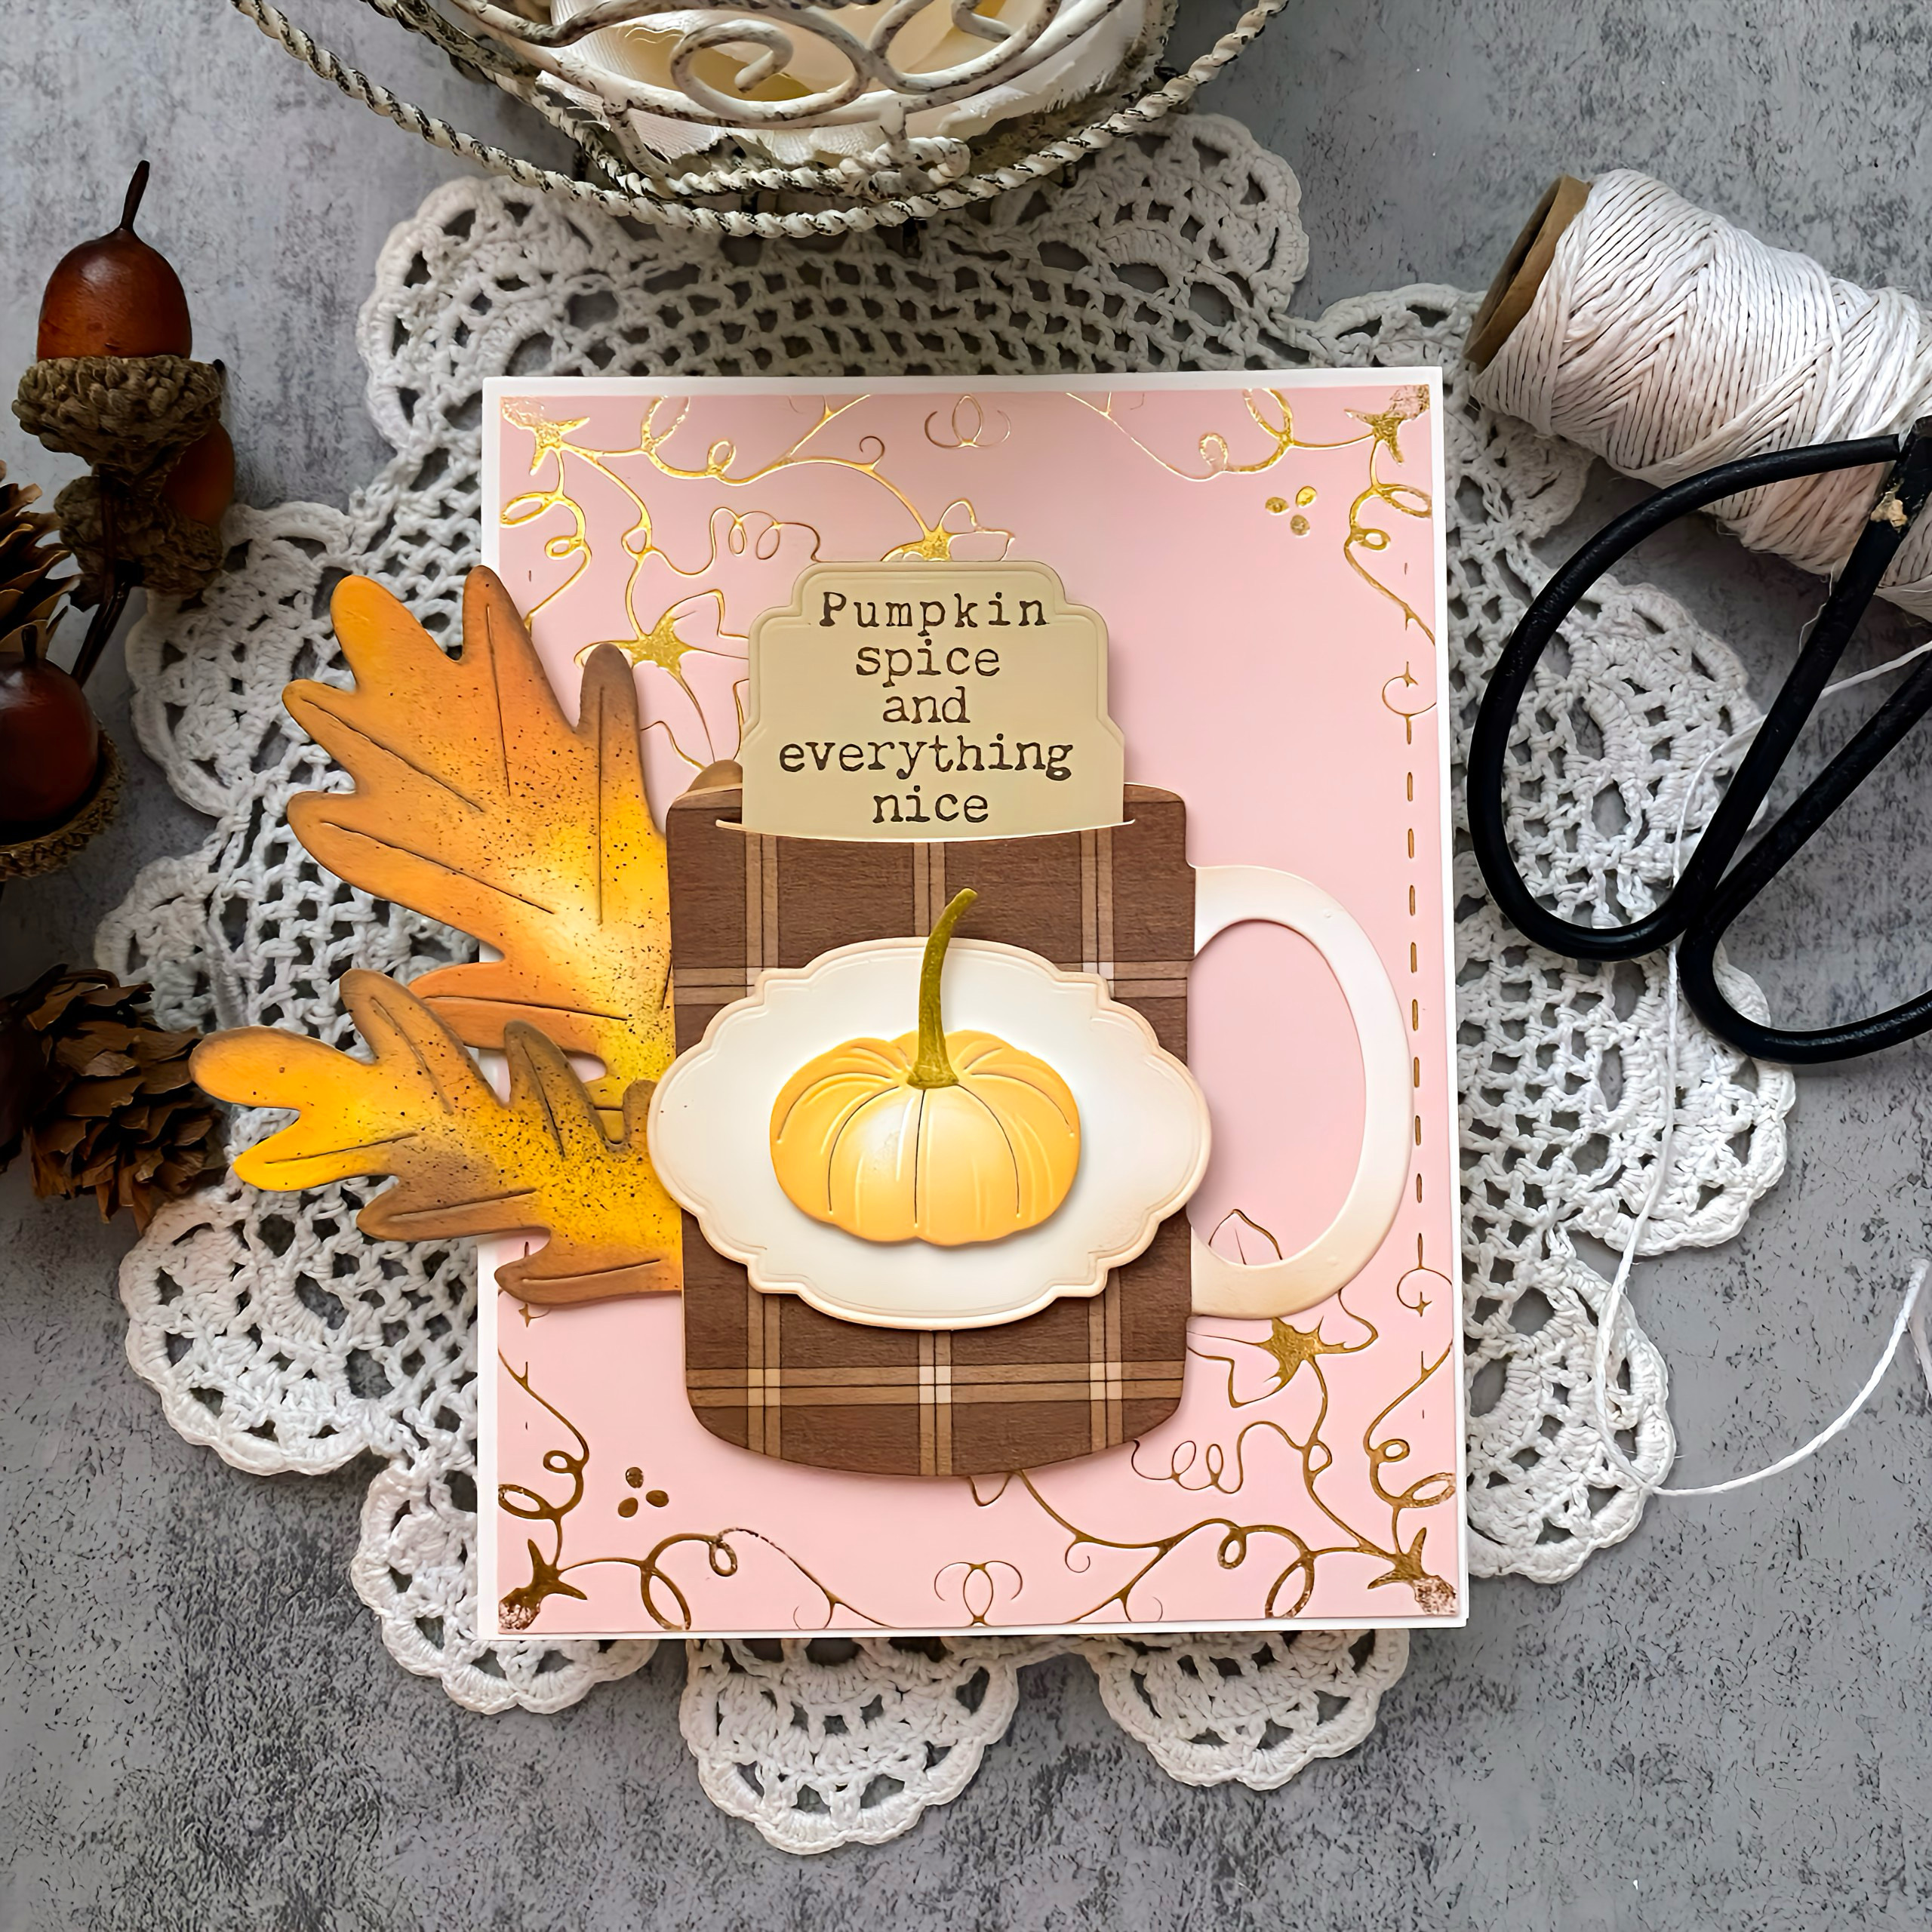
Project Inspiration {More Pumpkin Spice}

It's my turn for another Project Inspiration feature for the Papertrey Ink newsletter! I'm currently obsessed with all things autumn as the leaves are starting to change colors. We took a drive up the canyon to see the gorgeous display of leaves and I can't wait for them to change down in the lower elevations as well!

To begin, I used the gorgeous Fall Harvest Hot Foil Plate (yes, I can't seem to stop) on Sweet Blush cardstock with gold foil. I trimmed it down slightly and then glued it to a top-folding A2 Vintage Cream card base.

I die cut the mug twice; once from Vintage Cream cardstock and once from plaid pattern paper using The Mug Die. I trimmed the handle off the plaid mug and then glued them together using liquid glue. I used a blender brush to add some Classic Kraft ink around the edges. The sentiment was stamped on one of the tag included in the Just Tags Die. It is cut from Fine Linen cardstock and then stamped in Dark Chocolate ink. I slid it down inside the slit in the mug and secured it to the back using clear tape. I DID need to cut the curved edges off the side so it would fit, but that doesn't show.

The next step is to add the cute pumpkin and label. The pumpkin is from the Bountiful Cornucopia Die and the label is another one included in the Just Tags set....I find myself reaching for these cute little dies often, especially for sentiments.

Step 4: Add some foliage from the Into the Blooms: Acorn Die to the side of the mug. 

Step 5: Add the berries to either side of the mug.

Step 6: Add a few stamped images from the Measured in Abundance stamp set: the leaf next to the pumpkin and the Spanish Moss "nest" under the mug.

Finally, add some glitter and Shimmer Spray if you'd like!

I know this card is similar to the one I made HERE, but it's just such a fun theme! 

I know the crafting world has moved on to Christmas, but I'm still loving autumn, so hopefully you do, too! Thanks for fluttering by!