Monday, September 30, 2024

The Greetery {Fireside Holiday Collection} Day 1

Hello and welcome, friends! It's the most wonderful time of the year! I'm so excited to be hear today as we introduce the AMAZING and beautiful new Fireside Collection from The Greetery! I have been thoroughly enjoying myself as I have been creating holiday projects to share with you today! As always, you'll want to make sure to head to  The Greetery Blog for the official "meet and greet" for the new products! Also, make sure to leave a comment here, and on each of the designers' blogs, for a chance to win one of two $50 gift certificates to the shop!

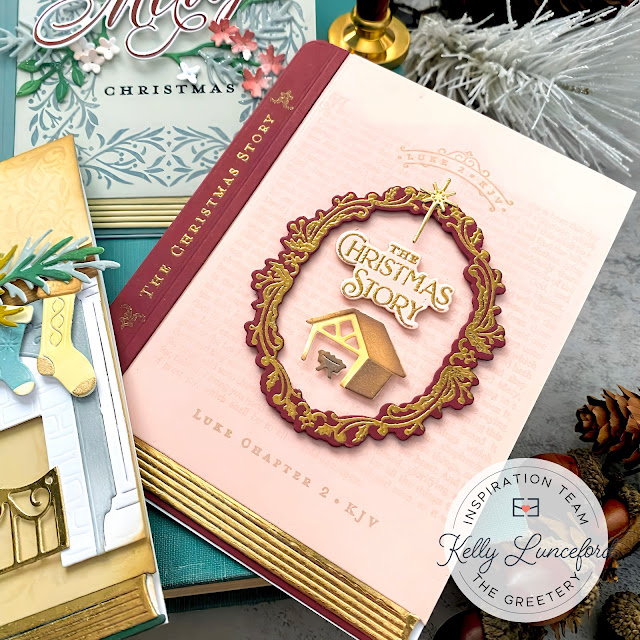
The first main product that is being showcased on these three cards is the new Have a Spine die collection that allows you to create book covers with ease! I couldn't stop with just one, so I made three book cards and each one also uses new products I'm excited to share with you!

My first card features the new Fireside Die Collection and the Hung with Care die collection in addition to the new Bookish Frames stamp set. I'm particularly fond of the new Bookish Frames stamp set because it includes sentiments from The Night Before Christmas! My sweet sister gifted my family a GORGEOUS pop-up book that we love looking at each year. When we pull it out again this year, I can't wait to use it as inspiration for even more book-themed Christmas cards!

I chose to use gold paper for the pages for a luxe look and a few other gold accents. There are a lot of fun additional accessories that you can add to the fireplace!

My second book card uses the new The Christmas Story stamp/die set paired with the older Christmas Time in the Country Die to create the cute stable/manger elements.

This card also features the smaller frame included in the Bookish Frames stamp/die set.

For my third book-themed card, I chose to use the beautiful new Scripted Holiday Sentiments stamp/die set.

I just adore these beautiful sentiments that allow you to create stylish Christmas cards! You can see just how beautiful the largest frame is that is included in the Bookish Frames stamp set.

I created a tone-on-tone look for the spine on this one; it says "from our home to yours"!

My next card features the beautiful new Winter Crest stamp/stencil combo, plus die! There is also a separate die for the frame, but I just used the stamp and not the die, but I'm sure some of the other designers used it on their projects.

My color combo was a happy accident; I ran upstairs to switch the laundry during my crafty session and I didn't get the ink off my fingers when I touched the CLEAN, WHITE laundry (eek!) so I quickly needed to wash my hands and the soap bottle in my adjoining bathroom was the perfect color inspiration! Needless to say, the laundry didn't get switched, but rather washed again to get the inky residue washed off! ha ha! Anyway, it was a happy accident which led to inspiration for this card! 

The base cardstock color is Lagoon from Fun Stampers Journey and I inked it up with SU! Not Quite Navy ink.

I die cut the entire focal piece from white cardstock, stamped the foliage and then stenciled the berries. I stamped the frame as well and then used the stencils to add shading to the inside of the frame.

The die set includes the banner and the NOEL and then stamped them with the Winter Crest stamp set.

I added some details to the foliage and berries using colored pencils.

Christmas cards just beckon for glitter, so I added some to the berries and leaves. 

If you know me, then you know I just adore using the Winter Medley die to create flower clusters to tuck here and there on my cards. I'm warning you now, my die got a major workout for this release! ha ha!


My final card for today features the cute new Warm and Cozy die and the Warm and Cozy stamp set.

For this card, I die cut the Bookish Frame using the die so it had more depth and dimension. I had so much fun creating this  peaceful scene.

This cute chair would be perfect next to the  Fireside fireplace die set and I'm sure a few designers probably did just that!

I wanted to create additional texture that you might find in a textile, so I used the Pierced Plaid Pierce Plate for the background. I couldn't resist adding the cute little cat to the rug!

There are some fun sentiments that accent this cute Warm and Cozy chair, but I used the new Scripted Holiday Sentiments for my peaceful card! 
Please join me again tomorrow for day 2 of full reveals! Thanks for fluttering by!
P.S. Don't forget to visit the other designers' blogs to see their beautiful inspiration!


Kelly (you are here)


Tuesday, September 24, 2024

Papertrey Ink September Release Day 1

Hello friends! It's day 1 of the Papertrey Ink September release countdown! I have a fun Christmas project to share with you today, but please note, I will not be back for the rest of the countdown, but I will be sharing projects made with this release a bit later! My cute felt gingerbread gal was made using the new In Stitches: Gingerbread die. The die collection includes everything you need to make this girl version, but there is also some accessories to make a cute Santa or just a regular gingerbread boy!

To begin, I die cut the basic gingerbread shape twice from Classic Kraft Felt and then used DMC floss to stitch the two pieces together. I left an opening to add the stuffing, but if you want to stitch any of the additional pieces TO the gingerbread person, you will need to do that before you stitch the two pieces together. All of the accessories on my cute gingerbread gal are just glued down using liquid glue.

The ric rac icing trim and her smile were cut using Vintage Cream Felt. Please note, this trim does have holes that you can actually stitch it down, but I found that the felt was too delicate and would tear if I tried to remove the holes, so I just left them intact and just glued them down.

Her cute apron and bow were cut using Pure Poppy Felt. The heart, cheek blush, and peppermint swirl piece are all die cut from Sweet Blush Felt and the eyes from True Black Felt. When I was getting near the top, I was running out of floss, so it was the perfect time to create a loop to make her into an ornament or to attach to a package. I would definitely decide ahead of time what materials and strategy you will use to create a hanger if you are going to! I love how she turned out and I can't decide if she will be added to a package for someone else or if I will keep her to add to my kitchen tree with all of the other felt ornaments my mom made me a few years ago. She was so much fun to make and I hope to get some time before the holidays come roaring in to make a few more! Thanks for fluttering by!


Monday, September 16, 2024

Pumpkin Spice and Everything Nice

Hello and welcome, friends! I have a fun autumn card to share with you today that's one of those "just for fun" projects using up some leftover pieces I've had from various projects.  I'm eagerly anticipating the arrival of autumn because I want to bake and deliver autumn treats and cards!

My card for today was 100 % inspired by a printable file I saw on Pinterest. It was one of those cute illustrations that I said to myself: I have a stamp or die to make that cute illustration into a card, and so I did! The best part about it is I had the pumpkin and foliage left over from recent projects. The greenery was leftover from THIS card and the pumpkin was leftover from THIS card. When I happened upon the Inspiration for my card, I knew that the leftover pieces would be PERFECT!!!

To begin, I die cut the cup from both Kraft and plaid pattern paper using the Brew To Go Die and glued them together for a sturdy piece. I die cut the two lid pieces from Smokey Shadow cardstock and adding some highlights using Fresh Snow ink. I glued the base and the lid together using liquid glue and set it aside. 

The sentiment is from the Thankful For Fall Sentiment stamp set and is cut using a retired die set. I chose it because it looked most like the inspiration photo. I added some ink around the edges to give it a cozy, warm look.

I also added the cup sleeve around the cup so I could add a gift card to the cup if I decide to and it looks cute, too! ha ha! The inspiration picture had a bow, and I almost didn't add it, but I decided to give it a try and I LOVE how cute and feminine the card looks now! I used the Wrap-it Ribbons die and die cut it from the same paper pad as the plaid I used for the cup.

The background was made using the Fall Harvest Hot Foil Plate with Copper foil on Honey Nut cardstock. From there, I had fun arranging the pumpkin and foliage. I spritzed the entire card with shimmer spray and added glitter. Thanks for fluttering by!


Tuesday, September 10, 2024

Wicked Witches Brew

I'm back again with this week's Papertrey Ink Flash Sale! I actually made this project a few week's ago, but some of the products weren't in-stock, so I'm happy to be sharing it today! The ensemble features a card and matching gift card holder just perfect for the upcoming Halloween season!


For the card, I used the Frightful Frames Die to cut the frame from white cardstock.. I cut it three times and then stacked them together using liquid glue. I used black soot disttress oxide inks leaving some portions white. I stamped the witches brew sentiment, which is from the Spooky Treat Labels stamp set onto a panel of black cardstock using silver metallic ink. I added the frame over the top using foam squares for maximum dimension.

I stamped it in white for the gift card holder, so you can see the difference in how it turned out. I used the coordinating Spooky Treat Labels Die to cut it out. I used the Brew To Go Die for the gift card holder. The sleeve hold the gift card; I would have included one, but I didn't have one on hand that matched! ha ha!


For the background on both the card and the gift card holder, I used the Cascading Dots Hot Foil Plate and silver foil on Simply Chartreuse cardstock to mimic the look of a bubbling brew! I added some ink around the edges for a spooky look.

I also added some white ink splatter and some photos corners cut from metallic silver cardstock.  The photo corner dies are from the retired Fairytale Christmas kit. I had fun working on this Halloween ensemble and I can't wait to start even more Halloween crafting. I inevitably wait until the last minute most years, but I'm crossing my fingers I will have time this month! Thanks for fluttering by!


Sunday, September 8, 2024

Project Inspiration {Hello Fall}

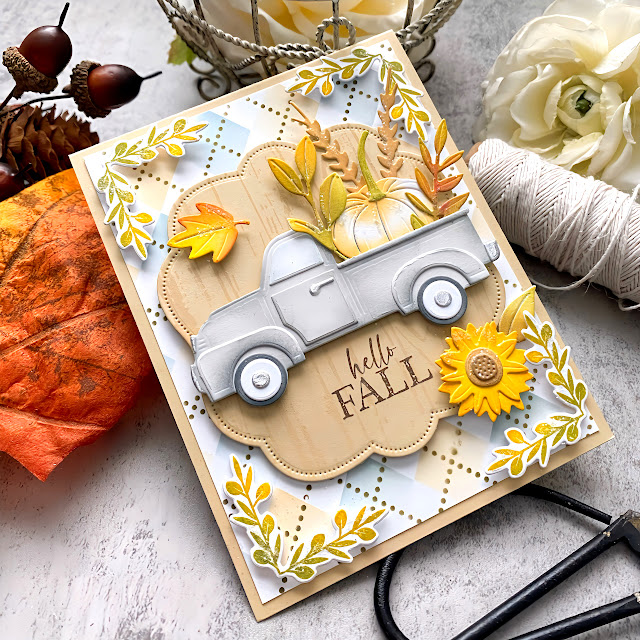
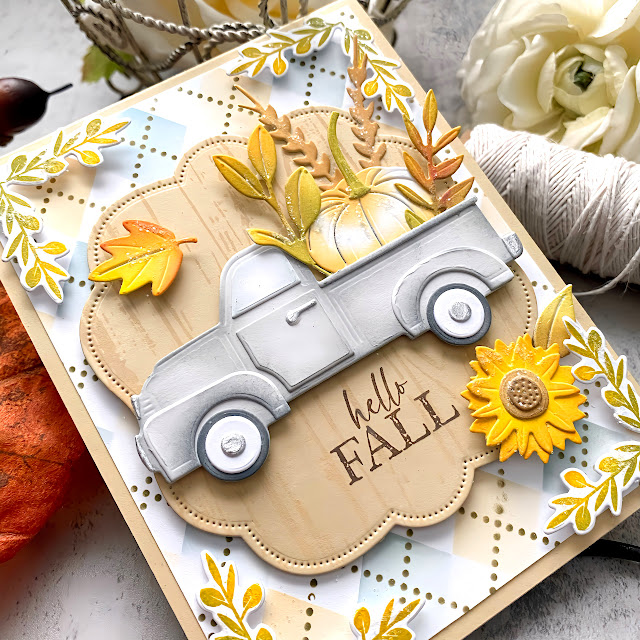
It's my turn for the Papertrey Ink Project Inspiration Feature! I will share step-by-step photos on how I created this muted autumn card using some of my favorites, both older and new!

To begin, I used the darling Argyle Stencil Collection on a 4 by 5 1/4 inch panel of white cardstock. I adhered it to a top-folding Fine Linen A2 cardbase using liquid glue.

I used the Weathered Wood Background on a piece of Fine Linen cardstock using antique linen distress oxide ink. I cut it using the Love to Layer: Lovely Brackets die and then stamped the sentiment that is included in the Just Sentiments: Happy Fall stamp set

I added the truck, that was cut using the Patriot die using foam squares. 

I tucked all kinds of autumn goodies that are die cut using the new Bountiful Cornucopia die.

The finishing touch is some details to the corners using the Corner Decor stamp set.

I really like how soft and subtle this card turned out! Fall usually takes a little while to get intense, so this is perfect for saying hello!

I gave it a spritz of shimmer spray and added some glitter here and there.

I didn't take a picture, but I've been using the sentiments from the Inside Greetings: Fall Mini stamp set.

Thanks for fluttering by!


Friday, September 6, 2024

The Greetery {Garden Inspired Strength For Today}

Hello and welcome, friends! I'm happy to be here today sharing two cards using the fabulous new Strength For Today Stamp/die set! It’s my favorite from the latest release and I’ve been itching to create some cards to add to my stash. I would love to just take a lazy day and make a whole set of cards using each one of these beautiful sentiments; doesn’t that sound lovely? Autumn is creeping in and I love cozy, crafty days!

To begin my cards, I die cut the foliage, which is from the Bird of Paradise Border Die, and colored it using oxide inks and finger sponge daubers. I also die cut both the moth and the dragonfly using the Jumbo Curiosity: Moth die and the Jumbo Curiosity: Dragonfly Die. There are stencils included so I used those to ink them up.

The background for both cards was done using the Wicker Weave Stencil; I didn’t want a full panel, so I just concentrated the stenciling in certain areas. Once that was done, I trimmed each panel down to an A2 size, added some salvaged patina distress ink with some Tropical Teal ink splatter. I layered the foliage using foam squares and then added the moth/dragonfly.
I die cut all of the sentiment pieces using the Strength for Today die; I wasn’t sure which sentiments I would use for sure, so I just cut them all out! Ha ha! I stamped them with the Strength for Today stamp set using black ink and then added them to the top of the panel using additional foam squares for dimension.

The final step was adding the panels to top-folding A2 card bases using liquid glue. I gave each one a spritz or two of shimmer spray and a trio of sparkling clear sequins. Both of these cards will be added to my stash; these are the types of cards I like having on hand because you never know when someone is going to need a little pick-me-up! Thanks for fluttering by!