Friday, March 29, 2024

Project Inspiration {Rejoice!}

I have a fun Easter project to share with you! This was shared in the Papertrey Ink newsletter this week and I wanted to share even more of the details for those who are interested. When I was decorating for Easter a few weeks ago, I found the Easter card that my sister gave me last year. I was so thrilled to get it because it was such great inspiration for me and I saved it because it's a cute decoration AND because I was itching to try making my own version using stamps/dies/hot foils.

To begin, I used the Ornate Swirls Hot Foil Plate on a 4 by 5 1/4 inch panel of Aqua Mist cardstock. I took the plunge and cut into my last FULL sheet of Aqua Mist cardstock and that was risky just in case the foiling didn't turn out! ha ha! It has a slight issue, but there's no way I was going to throw it away and try it again!

I also use the Weave-A-Basket die to cut out the pieces of the basket from white cardstock. I assembled the woven portion easily and then got to work on the eggs. There ARE eggs that are included in basket die collection, but the inspiration piece used much larger eggs so I chose to use the smallest solid egg die included in the Elegant Eggs Die collection. I simply used an assortment of hot foil plates using champagne foil on white cardstock. I cut them out with the egg die and then blended the color using blender brushes and ink.

I used a few different dies to create the flowers and greenery: Spring Silhouette for the leafy vines and the smallest flowers, Into the Blooms: Spring Nest for the pink and blue flowers to the right of the small white flowers, Into the Blooms: Wreath dies for the remainder of the flowers, and the Wrap-It Ribbons die for the bow.

I layered the basket onto the foiled panel and added the bow to the top using foam squares.

I tucked the eggs inside and then arranged the flowers and greenery until I was satisfied with the arrangement.

I layered it onto a top-folding A2 cardbase, added some glitter, and the sentiment. This particular sentiment has been a favorite this season and is from the Thoughts of Easter stamp set.

I heat embossed it in gold and then used the coordinating Thoughts of Easter Sentiments dies to cut it out.

Also, I forgot to mention that I used a mustard marker to color the centers of the very tiny flower centers.

I hope you all have a wonderful Easter! Thanks for fluttering by!


Thursday, March 28, 2024

The Greetery New Hot Foils {Love...On Your Special Day}

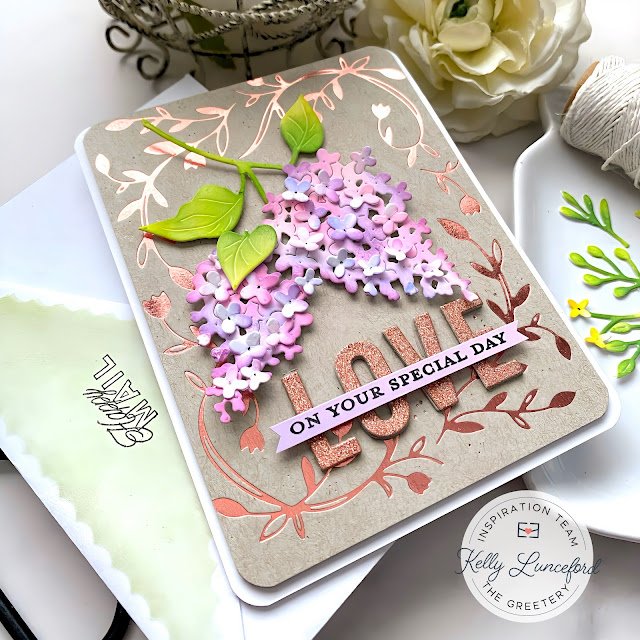
Hello and welcome! I'm happy to be here today sharing a card I created using the new Hot Foils from The Greetery! These were released a few days ago, but my computer was in the shop so I wasn't able to get my project blogged until now! I just HAD to get the Gray Kraft Paper that Betsy talked about in one of her Spring Fling posts, so I've used it today for this card.

For my project, I chose to use the new Spring Frame Hot Foil using Spellbinders Glimmer Hot Foil Roll-Rose Gold. Doesn't it look so pretty against the Gray Kraft paper? I love how it turned out! I used a very high heat and 25 seconds to get a nice, crisp impression. Betsy gave some useful tips over on The Greetery Blog that I will have to read more closely.

I also used the new Simply Bold Love Hot Foil using the same Rose Gold foil for the LOVE word, but I just didn't like it so I ended up putting Rose Gold glitter cardstock over the top! I think it was just too much foil in one place. I actually hated this card until I made that one edit. I think it's important to not get "married" to an idea when it's not working and just take a break and come back and see what new ideas flow. As soon as I added the matching glitter cardstock, I was happy! Just a tip if you ARE going to die cut the foiled letters, you CAN use the coordinating Simply Bold Love Die. simply die cut it from scrap paper and then lay the negative portion over the top of your foiling and then place the die in the right spot and run it through your machine.

As you can see, I just can't seem to stop with the BotaniCuts Lilacs Die....they were the perfect springtime addition to the frame.

The "on your special day" portion of the sentiment is from the Scripted Sentiments stamp set. I had originally stamped it on white cardstock and HATED it, but then I used Lilac Grace and I loved how it turned out! I rounded the corners of the foiled panel and the cardbase; I love how professional foiling looks and rounded corners also seem boutique-like, so I chose to do that for something different! Thanks for fluttering by!
P.S. Becky, I read your sweet comment on my last post and I wanted to let you know that I will be addressing your question in an upcoming post, so stay tuned!


Monday, March 25, 2024

Papertrey Ink March Release Day 4

This March Papertrey Ink countdown has just flown by and today is the 4th and final day! I had so much fun creating these final two projects to share with you today! Just a reminder, everything will be available for purchase tomorrow night at 10 pm ET. 

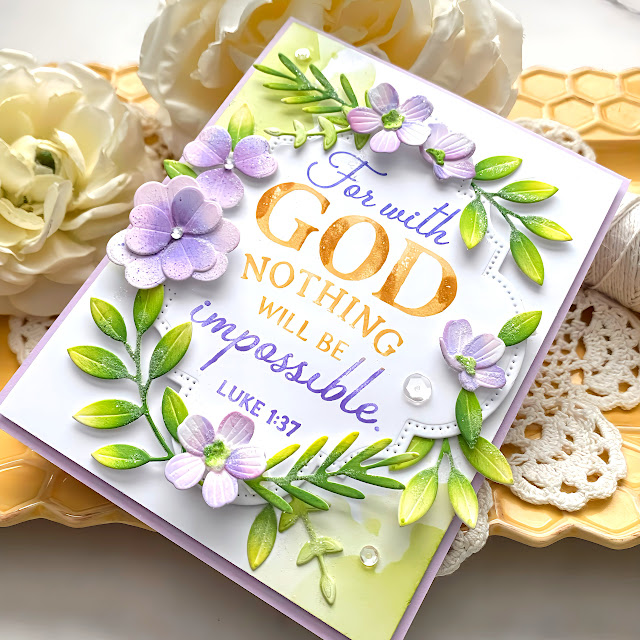
My first card for today features the latest addition in the Reflections series and I think this might be one of my favorites! I absolutely love this scripture found in Luke and I know it will come in handy for all kinds of different occasions.

I found a pretty scripture illustration on Pinterest that was the inspiration for today's card. I like to use my "card inspiration" folder when I'm not feeling very inspired or when I'm in a hurry! These past few days I have been in a hurry so it's always nice to having a "jumping off" point, if you know what I mean!

To begin, I got to work on the scripture sentiment; for this one, I used my old SU! Stampin' Write markers to selectively ink the verse using a few different colors until I was satisfied with the look.

Once that was done, I used the Reflections: March dies to cut it out. I set it aside and got to work on the background panel. I used the new Watercolor Wonderful Stencil Collection, but this time in two of the corners for a different look.

I trimmed the background panel to 4 by 5 1/4 inches and layered it onto a top-folding A2 Lilac Grace card base using foam squares for dimension. Then I die cut the flowers and leaves using the Into the Blooms: Clover dies (twice for everything) and then colored them using finger daubers and assorted Distress Oxide inks.

If you have eagle eyes, you'll also notice a few sprigs from the Spring Silhouette Die that I had leftover from a different project! ha ha! I arranged the flowers and leaves, with quite a bit of fussing, I might add, until I was satisfied with the arrangement. I added some glitter and sequins to finish it off! This card makes me so happy!
I had so much fun with the purple, yellow, and green color combo I decided to use it again for my final card for today and for the countdown! This card features the new Elegant Edges: Flourish dies and the new Elegant Script Hot Foil Plate.

To begin, I got my foil machine hot (medium heat, 15 seconds) and used champagne foil on a panel of Lilac Grace cardstock. This particular Hot Foil Plate is a horizontal placement, so I ended up just using a portion of it since I was making a vertical card.

Once again, I used the Watercolor Wonderful Stencil collection in the corner of the white panel; in hindsight I should have picked the other two corners because of the flower placement. I had originally planned to have the flourish at the bottom, but after fidgeting with it, I decided to place it at the top.

I used the smaller size included in the new Reflections: March die collection and stamped the sentiment from the Pro Stamper's Box: March using black ink. I mentioned on day one of the countdown that this is my favorite sentiment included in the box.

I used the Into the Blooms: Gardenia Die once again to accent the sentiment. 

Glitter and sequins finish off this card! Thanks for fluttering by!


Sunday, March 24, 2024

Papertrey Ink March Release Day 3

Welcome to day 3 of the Papertrey Ink March release countdown! I'm so happy to be hear today sharing a few cards; this first one features the absolutely gorgeous new Always in Bloom stamp set. This is my new favorite floral set...it rivals with Effortless Beauties now in my favorite floral category.

It's very easy to use which makes me so happy! I don't know if I'm getting too old or what, but I just really need easy lately! ha ha! It's easy to use with great results which makes it even more desirable.

This card also features the new Watercolor Wonderful Stencil Collection. This is going to be used A LOT! It allows you to create a realistic looking watercolor background!

I still need a few more Easter cards so I chose to use two of the sentiments from the Thoughts of Easter stamp set. Bobbi used these two together on one of her cards for the last release and I loved it so much I told her I was going to have to give it a try. I love how it turned out on this card.

We're also featuring a fun new set called Bookmarked!

I made a few for my son to give to his teachers! Thanks for fluttering by!


Saturday, March 23, 2024

Papertrey Ink March Release Day 2

Welcome to day 2 of the Papertrey Ink March release countdown! I have two projects to share with you today; up first is a floral card using the new Into the Blooms: Big Blossom! This is such a fun die set and I know I will be using it often! I paired with a few of the older Into the Blooms dies for some added flair!

To begin, I got to work die cutting ALL of the may pieces from different die sets that I knew I wanted to use. As I mentioned before, the big focal flower is from the new Into the Blooms: Big Blossom, but I also added some leaves from the Into the Blooms: Christmas Sprigs and the flowers from the Into the Blooms: Wreath die set. My next card also uses them because I love them so much!

I used an assortment of Distress Oxide inks to color all of the flowers and leaves. For the background, I just used blender brushes with the same colors as the flowers and leaves and just laid down some color here and there. I used watercolor paper and then just spritzed it with water to get the color moving. I used my heat tool to dry it quickly and then added some of the dark blue ink mixed with water to add the splatter.

I used the largest size in the  Love to Layer: Torn Edges Die to cut out the background panel. I added it to a top-folding A2 card base using foam squares. The "hello" word is from the Pro Stamper's Box: March die collection that was showcased yesterday.

I die cut it three times and glued them together for a sturdy piece and then added glue to the tall points on the h, and both Ls to adhere it to the card. 

My next card is bold and bright and features the new Mother's Day Sentiments. I've already  made two mother's day cards so I chose to use the more neutral "hello, beautiful" sentiment.

I used one of the frames from the Pro Stamper's Box: March and die cut it from Raspberry Fizz cardstock and stacked it three times.

The flowers are from the Into the Blooms: Wreath dies....my favorite!

Join me again for day 3 ! Thanks for fluttering by!


Friday, March 22, 2024

Papertrey Ink March Release Day 1


It's day one of the Papertrey Ink March release! I have a big post for you today using some beautiful new products! My first card for today features the new Pro Stamper's Box: March stamps, dies, and stencils. This is such a wonderful collection that has endless possibilities!
This card features my favorite sentiment included in the set paired with one of the stencil styles and the flowers and leaves that are included.


This card also features the stitched frame; there is also a rectangle frame that I will show on my next card.

I chose to use the stencil on each of the four corners. 

The collection also includes three word dies: hello, wish, and thinking of you. This card features "wish" and another one of the sentiments. 

I chose to use the other stencil design directly in the center and then added some ink blending over the top to soften the lines. I thought the flowers could pass as crocuses, so I clustered them together.

Rather than stamping the leaves, I simply colored them with a small blender brush using Green Parakeet and New Leaf ink.

I used the rectangle frame here and die cut the "wish" from both white and gold specialty cardstock and glued them together for a sturdy piece.

This is actually headed out today for one of the widow's in the neighborhood who is celebrating her birthday today. It's also my grandma's birthday today and I sure wish she was still here to wish a happy birthday! 

My third card using the Pro Stamper's Box: March features the large Thinking of You die. I really wanted to give it center stage. 

To begin, I die cut the sentiment three times from white cardstock and glued the together for a nice, sturdy piece. I let that dry and got to work creating the background. I used the Delicate Circles Hot Foil Plate and champagne foil on Spring Moss cardstock.

I used the Into the Blooms: Gardenia dies; I was only planning on adding the flowers until I realized that I could use the frame die as an added design elements.

This was an unexpected card for me, but I really like how it turned out!

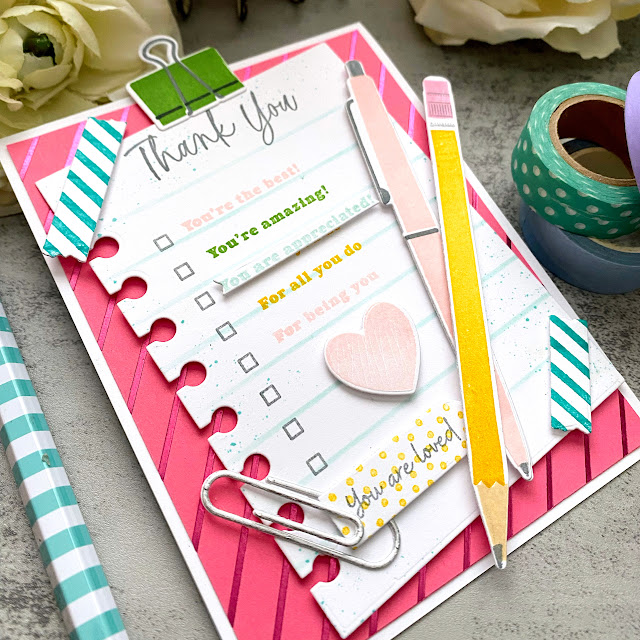
My final card for today uses the versatile Just Notes stamp/die set. I created this to use as a teacher appreciation card, but it really could go to anyone who you need to thank.

This stamp set comes with so many different bits and bobs to really have some fun!

would you believe that the paperclip is paper? It looks like real metal, huh? I can't wait to play around with this set some more! Join me again tomorrow for day 2! Thanks for fluttering by!