Thursday, May 26, 2022

The Greetery Garden Variety Release Day


Surprise! It's release day, but also the ANNIVERSARY sale at The Greetery!!! The winners will be announced today on The Greetery Blog at 7 am ET, and then all of the new products will be available for purchase beginning at 10 am ET!
You were all so supportive of my "dirty card" yesterday ( ha ha!) that I just HAD to share another, and this time, even the hand shovel is dirty! LOL! Someone commented yesterday that I'd kept my Garden Gear: Tools clean, so this one is dirty in your honor! I also wanted to combine both the gloves and the tools onto one project; they're just too cute not to!

To begin, I die cut the gloves from white cardstock and added the pattern using the Garden Gear: Gloves stencils. I chose a nice, bright, summery color scheme for both the gloves and the hand shovel. The elastic detail and side tabs are colored using Festive Berries Distress Oxide ink and attached using liquid glue. I loved how Betsy added details to the gloves using the Daisy Days stamp set, so I did that also.

The hand shovel was created by die cutting it twice from Soft Stone cardstock ( I wanted a nice and sturdy piece); the handle was die cut from white. I stenciled and stamped the pattern onto the shovel portion, and then colored the handle and attached it with liquid glue.

I had a dandelion left over from yesterday's post, so I added that, but I also had a ball creating more Wildflowers in happy colors to tuck inside the gloves.  

The background is stamped using the new Seed Catalog Background stamp using Tumbled Glass Distress Oxide ink. I added the "dirty" details using brown ink and then added the Mud Pie ArtGlitter. I simply used a 2 way glue pen and then sprinkled the glitter on the end of the shovel, roots of the dandelion, and the fingers of the gloves.
I had so much fun creating this card! I hope you love this release as much as I do! Thanks for fluttering by!


Wednesday, May 25, 2022

The Greetery Garden Variety Day 2

Welcome to day 2 of full reveals for the Garden Variety collection from The Greetery! Thank you for all of your sweet comments on yesterday's post! A few of you were interested in the details on the notecard box that I shared yesterday so I'll share the easy instructions and measurements at the bottom of this post. As usual, you'll want to visit The Greetery Blog for the official "meet and greet" detailing all of the products featured in today's post. The 3rd anniversary festivities will continue with a new prize being offered to three lucky winners. Leave a comment on my blog and the other designers' blogs to be eligible for a chance to win!

I'm absolutely smitten with the new Garden Gear: Gloves suite of products! I die cut the two gloves, the elastic detail at the wrist, as well as the little "tabs" on either side of the gloves. I used the Garden Gear: Gloves stencils to add the cute pattern. I'm thrilled with how realistic looking they turned out! This card also features the new "Plucked" dies; who knew weed dies could be so stinkin' cute?!


The background was created using the beautiful new Seed Catalog Background stamp. It's a little bit hard to see the gorgeous details on this card, but the last card I'm sharing today really showcases its beauty! I thought the Pretty Pot would be a fun addition; It was so fun "planting" the weeds (they're herbs for this card) and tossing out a few dandelions! ha ha! I gave the gloves the "worn-in" look by adding some brown ink around the edges; I also gave the end of the weeds, the edge of the pot, and the gloves some glitter dirt! You can find the fabulous glitter HERE. It looks SO realistic!

I used Distress Oxide inks for ALL of my stenciling, stamping, and blending. I had such a fun time coloring the pot, the weeds/herbs, and the gloves!

I curled the edges of the focal panel using my fingernail; it's a detail I haven't added in what feels like forever! ha ha! I felt it just worked with my "dirty" card!

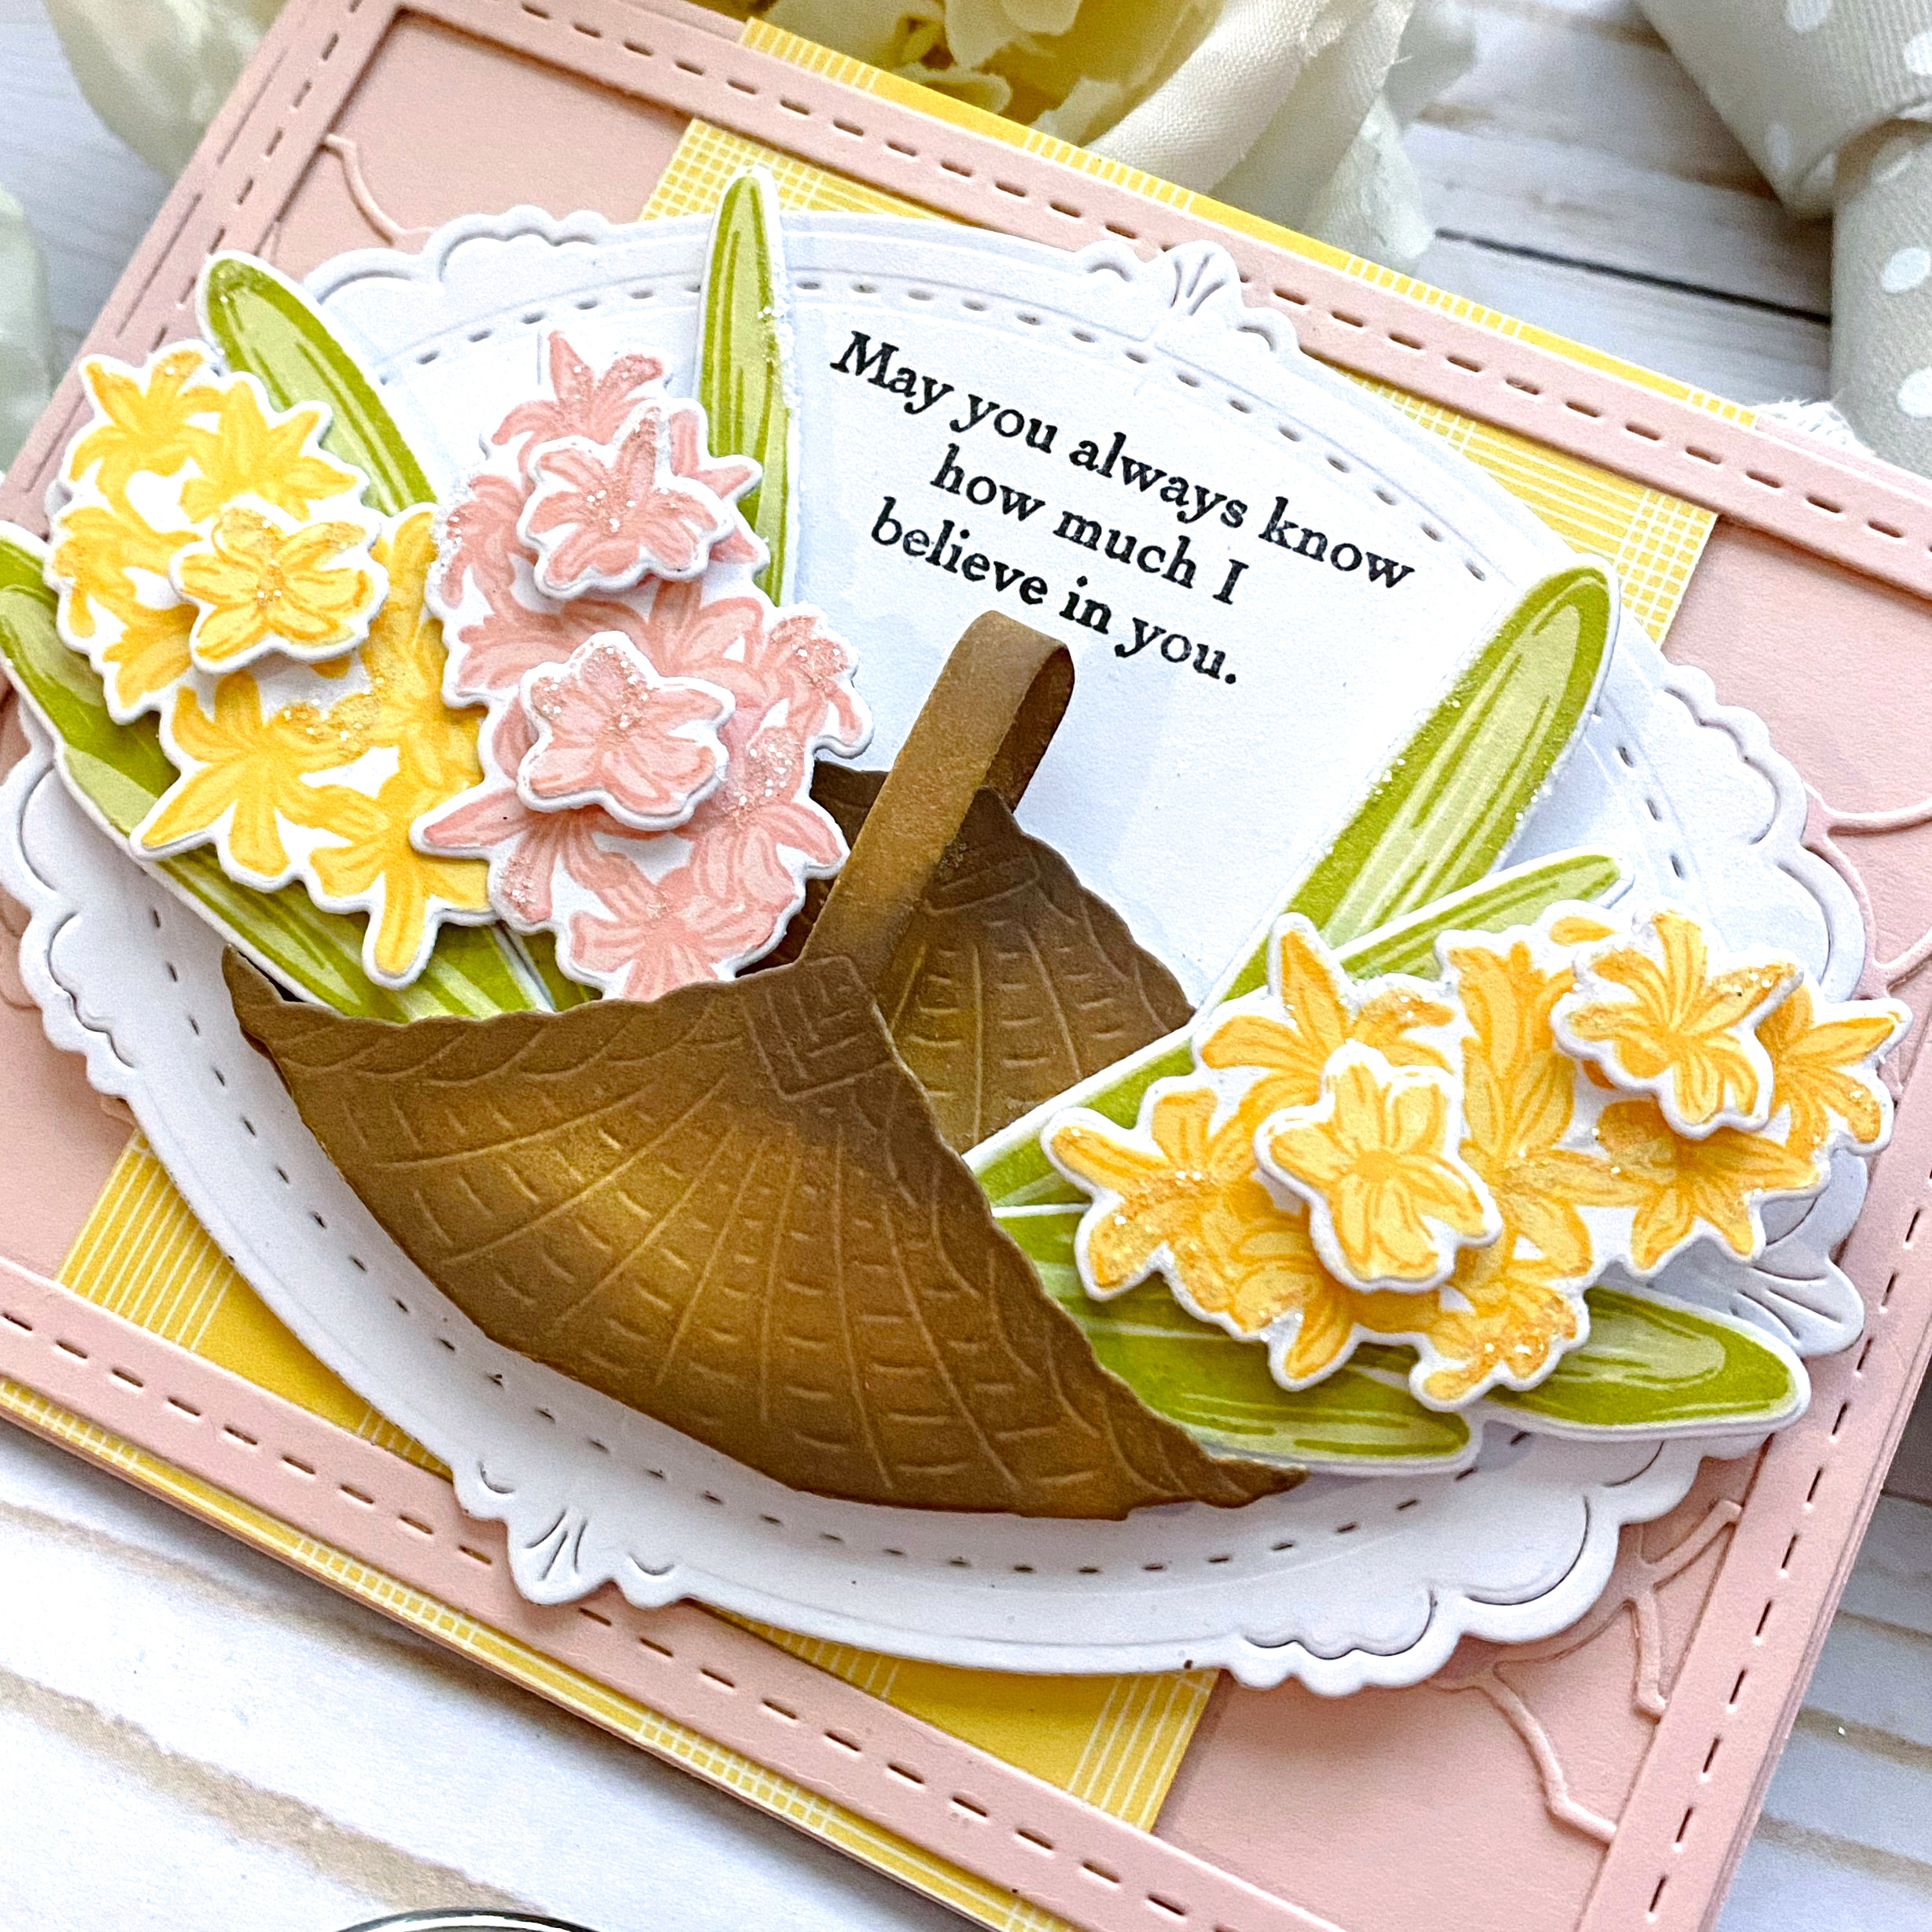
My next card features the new BotaniCuts Lavender paired with the fabulous new It's a Wrap: Posy Pocket Die. There is a mini version that I didn't get a chance to use, but it's just like this one only smaller. My bouquet also features some of the previously released Wildflower Mix flowers that I can't seem to get enough of!

It's been a while since I made a shiplap background, so I created one and added it over the top of another panel stamped with the Seed Catalog Background stamp. Once again, it's covered up, but I promise you'll get to see it on my next card! ha ha!

One of the things that is so fabulous about the It's a Wrap: Posy Pocket die is that it includes three pieces to construct the wrap; two pieces for the bow (I opted to tie it with a twine bow). Because the pieces are separate, it allows you to stamp or stencil a pattern onto the pieces and they will all be "shown" when it is assembled. You won't fold anything over that has previously been stamped/stenciled, if that makes sense!

Ta-da! As promised, here is a sample of the beautiful Seed Catalog Background stamp! At times I would fret that the card was too simple, but I truly love that Speckled Egg background! This card features the AMAZING Garden Gear: Tools Die and coordinating stamps/stencils! I mentioned on day 1 that this release is squeal-worthy, and these tools are one of the main reasons! They look SO realistic and I LOVE all of the options to make them so pretty!

I die cut both the trowel/shovel and hand rake using Soft Stone cardstock and then stenciled/stamped them using Distress Oxide ink. The handles and the little hanging pieces on the handles are die cut from white. I used additional ink to make them look realistic!

There are two different patterns to choose from for both the shovel and hand rake.  The shovel uses a combination of both stamps and stencils, while the rake uses stamps only!

I had a few wildflower clusters left over from my previous card so I tucked them behind the tools here and there for some added garden goodness!

In the end, this card turned out to be a little more simple than I usually make, but it also turned out to be one of my favorites! This would make such a fabulous addition to a garden themed notecard set (I mentioned yesterday that I'm obsessed). Everything will be available for purchase TOMORROW at 10 am ET. Thanks for fluttering by!

Kelly Lunceford (you are here)
Card box instructions: you will need two pieces of 8 1/2 x 11 cardstock. Cut 1 inch off the bottom of one of the sheets to create an 8 1/2 x 10 panel. Score all four sides at 2 inches. Snip a slit on each of the four corners so you can fold it up into a box. The lid is created by cutting the other piece of card stock measuring 7 1/8 x 8 5/8. Score each of those sides at one and a quarter. Cut a slit at each corner to fold up into a box. Hopefully that makes sense. It’s very easy and it holds quite a few cards.


Tuesday, May 24, 2022

The Greetery Garden Variety Day 1

Eep! Hello and a warm welcome to you all for day 1 of the THIRD anniversary festivities at The Greetery! I'm so excited for this fabulous new Garden Variety release and I hope you love it as much as I do! I mentioned to Betsy that the entire release is absolutely "squeal worthy"! I'm absolutely addicted to making notecard sets, so that is how I chose to highlight the beautiful new Daisy Days suite of products! Before I get too far ahead of myself, you'll want to head to The Greetery Blog for the official "meet and greet" for all of the new products! Also, there will be THREE prizes given away today to celebrate! Three lucky winners will receive a $50 gift certificate in a tumbler featuring The Greetery's logo, as well as a 25 % off code for the recipient to use at a later date! The winners will be drawn from the comments, so make sure to leave a comment here and on every designers' blog to increase your chances of winning!


As I mentioned earlier, my first project features the new Daisy Days Fill in the Blank papers; there is a set of 5 different colored background papers and then you use the Daisy Days stencils to fill in the colors how you would like. The box that is showcased here uses the Daisy Days dies and stencils to create the focal point. It is one of my favorite notecard boxes that I have been making for YEARS! 

You can see each color that is offered in the Daisy Days Fill in the Blank paper collection; black, blush, aqua, sand/kraft, and a terracotta color. All of these are absolutely gorgeous and can be used with so many different color combinations. I chose to use a traditional "daisy" look and kept each card the same; when you're stenciling 5 at a time, it certainly goes faster that way!

I used the Daisy Days die first and then simply lined up the stencils over the top. The Daisy Days die also includes three sizes of stand-alone daisies so you can use them as embellishments or accents on their own. I chose to simply layer them over the top of some of the stenciled daisies on the box.

Each notecard also features the beautiful new Scripty Hello die. I die cut the shadow from vellum and the scripty portion from white cardstock. I added a little bit of yellow ink at the top of each of the hello die cuts to create an ombre look. I attached them to the vellum shadow with liquid glue. I attached them to the notecards with strategically placed clear dimensional squares. Each stenciled panel was trimmed down slightly and then added to white A2 card bases.

I gussied up the outside of the box and the envelopes using the Handmade Labels stamp set and the Flappable Stencils. I made this for a dear friend's birthday and it was so fun to create! I also made a coordinating card that looks just like the top of the box, but with a birthday sentiment! I forgot to take a picture! ha ha!

My second card for today uses the new Print Shop: Garden Goodness stamp/stencil/die set. This card was created by using the Print Shop: Garden Goodness die to die cut all of the pieces, making certain to keep them inside the cut portion as best as I could. I put the stray pieces back if they fell out. Once that was done, I carefully stenciled the panel using the Garden Goodness stencils. I went back in with the Garden Goodness detail stamps to really make the images pop!

I had another panel that had all of the die cut portions punched out (that was leftover from a failed attempt at stenciling and THEN die cutting, but we won't talk about that). I simply placed it over the top of the black panel and carefully added the stenciled pieces into their corresponding holes. I used both liquid glue (for the small pieces) and foam squares for the larger pieces to give it some dimension.

I love inlaid die cutting because it's like putting a puzzle together. Once I had all of the pieces back in place, I removed the die cut panel carefully ( I actually had to cut it away in some places). Once I pulled it all off, this bright and beautiful panel was revealed! It reminds me of something from Fantasia or Sleeping Beauty!

I didn't give the All Kinds of Happy stamp set nearly as much love as it deserves when it was first released, so I chose to give it some attention for this whimsical design! I added some glitter to the leaves and flowers as well as a few Flower Bits here and there. I mentioned when I made THESE cards, that I didn't add glitter because I didn't want the glitter specks to compete with the white paint splatter. These cards are good reminder as to what I meant! LOL! I do love the sparkle and shine though!
Don't forget to head to the other designers' blogs to see how they've used these new products!
Thanks for fluttering by!
Kelly Lunceford (you are here)


Monday, May 23, 2022

Papertrey Ink May Release Countdown Day 4

It's the 4th and final day of the Papertrey Ink May release countdown! I have two more patriotic cards to share with you today; they both use the fabulous new USA dies and of course I HAD to use more of the fabulous sentiments from the Celebrate Freedom stamp set. I want to put a bug in someone's ear and ask to get some everyday sentiments with these same beautiful font combinations!

Both of today's cards also feature the fun new Wood Plank Background! I know I am going to have so much fun using this is so many different ways! Thank heavens it was showcased on the last day, otherwise I fear it would have somehow made its way to ALL of the cards for this release! ha ha! I wanted a rustic Americana look, so I added a lot of ink blending around the edges of EVERYTHING to give it that aged look.

I was especially pleased to see how nicely the pledge of allegiance sentiment looks on the Love to Layer: Torn edges die cut! Once again, the ease of the die cut sentiment made this design possible!

The USA die comes wired together, but I cut them apart so that I could layer the detailed portion over the top of the solid portion so I could do some inlaid die cutting. I die cut everything from white, colored the red stripes and glued them back in place. I sponged the blue ink at the top and then added the brown around the edges to give it some age.

My second card for today is almost exactly like the first, but this one is more bright and airy, which I love! By changing up the color of the Wood Plank background, it really changed the overall feel. This card features the new Feathered Friends 23 mini stamp set an die. 

I wanted to use a flower on this card, so I used one from the Into the Blooms stamp set and colored it with Distress Oxide ink.

I gave this one a bit of a shabby look as well, but didn't use such a heavy hand. 

I have a few people in the neighborhood that I will be delivering 4th of July goodies to, so these will be perfect to tuck with their packages! Thanks for fluttering by!


Sunday, May 22, 2022

Papertrey Ink May Release Countdown Day 3

Hello friends! It's been a whirlwind week and I honestly can't believe we've already made it to day 3 of the Papertrey Ink May release countdown! I always get excited when the Americana stamps/dies come around each year!  My first project uses the adorable new Patriot dies paired with the fabulous new Celebrate Freedom stamp set that is full of beautiful sentiments to accent all of your patriotic cards. I'm especially fond of the different font combinations on this set and even happier that they have coordinating dies! The design possibilities are always expanded when there are coordinating dies, don't you think? 

I die cut all of the pieces included in the Patriot Die collection out of white cardstock and then colored them with ink and blender brushes. I'm kicking myself that I've never done ink blending with metallic ink before; game changer for sure! I normally die cut pieces that I want to look metallic out of specialty cardstock! I love how the gold accents turned out using the gold metallic ink.

The 4th of July parade is always such a fun tradition and that is what inspired today's card. I hang patriotic bunting from my porch, so this die cut bunting was an additional joy! I was toying around with adding it to the previously released Picket Fence die; don't you think that would be cute? I'll have to give it a try!

Next up is the cutest little lion from the Build-a-Lion stamp/die set. It is just like the Build-a-Santa set that was released last year for Christmastime! I originally planned on making this a baby card, but loved this particular sentiment from the Just Sentiments: Lift stamp set that is also included in this month's release!

I'm still in charge of the children's group at church and I love congratulating the kids on their accomplishments! I can't wait to give this one to a deserving little girl!

There are two different mane options, so I chose to use this one; the other one looks very majestic, but equally cute! Don't forget to stop back tomorrow for the 4th and final day of the release! Thanks for fluttering by!


Saturday, May 21, 2022

Papertrey Ink May Release Countdown Day 2

Hello and welcome to day 2 of the Papertrey Ink May release countdown! This is one of my favorite days of the entire release and I think you're going to love all of the new products as well! All of my projects today are floral in nature using so many beautiful new products! Up first is a card using the new Country Hand Basket (a must-have) and the new Happy Hyacinths stamp/die set!

The sentiment is from the new Inside Greetings: Lift stamp set and I chose to use it above the basket of hyacinths. The basket die comes with 2 separate dies with tabs so you can construct the basket so you can actually tuck your flowers and foliage inside to give it a realistic look.

The Happy Hyacinths stamp set comes with a variety of leaves so you can create bouquets to your heart's content. There is a main floral cluster and then two different single blooms so you can make the clusters look more realistic and dimensional if you choose. You could also use them to scatter here and there, or frame an image.

I kept my hyacinths to two colors to keep it fresh and clean, but you could certainly stamp them up in all sorts of colors! I added a bit of glitter to each cluster for some sparkle and shine. The basket is die cut from white cardstock and then I colored it using assorted distress oxide inks.

My next project is probably one of my favorites from the release and it uses the new Vase Collection stamp set. It is a larger set than the Vase Collection usually is; it has bunch of fun accessories and the cute chicken wire holder. There are two different shapes of signs and three different sentiments to add to the signs.

The cute little ticket tucked at the top is stamped with one of the new images from the Vase Collection: Rustic Add-ons! It is just perfect to stamp on so many of the previously released containers in the Vase Collection series! I've used it in few different ways that I'll be sharing today.

You can see the cute jars up close in this picture as well as the "Freshly Picked for You" sign. I stamped it in Weathervane and black ink and then heat embossed the sentiment in white. I really love how the multi-step image comes together!

The ticket, larger blooms, and the little stick to hold the ticket are all from the previously released Jar Accessories stamp set and I've used them quite a bit on today's projects AND on one tomorrow! Ha ha!

I like this card because it could be used for so many different occasions!

My second card using the Vase Collection: Rustic Add-ons shows how fun the different images look stamped on this container. This particular pail is from the Vase Collection 6 stamp set and I stamped the "Est. 1947" image over the top. I also used the same image in the bottom left corner and the stems 25 cents each image in the top right corner.

I heat embossed the sentiment, which is from the new Just Sentiments: Lift stamp set, in white onto a strip of vellum.

I felt like the Sprigs and sprays stamp set was a good choice for this large pail.

I added in some of the larger foliage from the Antique Wishes stamp set to frame the pail and tuck inside for some added detail.


My final project for today was such a fun one to create! I really wanted to use the floral cluster image from the new Vase Collection: Rustic Add-ons stamp set to adorn this jar. It reminded me of an embossed image you might find on an old jelly jar or mason jar like this. I also fell in love with the idea of using all of these different Into the Bloom varieties to match the sentiment on the ticket at the top.

I always enjoy making shaped cards and this one was no exception. I simply placed the Jar die slightly below the score line of a top-folding A2 card base and die cut that. I also die cut another jar so I could layer it over the top using foam squares on the outer edges. 

This allowed me to actually tuck the flowers inside like I would on a real vase, if that makes sense.

Doesn't that ticket look so cute tucked inside the bouquet? I had so much fun putting this card together and I think it will be something fun for the recipient as well! Thanks for fluttering by!